Step-by-Step Guide to Enabling Nvidia GPU for ML/DL Models on a Windows Machine

Why You Care:
GPUs (Graphics Processing Units) are not strictly necessary for running basic machine learning (ML) models, but they are often preferred for training advanced models such as Catboost, Xgboost, Neural Networks, and Deep Learning models. Leveraging GPUs on your Pcs/work laptops bring a lot of advantages such as parallel processing, speed, can train on more iterations, can train with complex models, and competitive advantage as well. The below example is from official Catboost documentation about training time improvement with GPU.

You must be excited to use GPU on your laptop and speed up your training. Yes, that’s correct. However, you can’t directly leverage that GPU before enabling it. Don’t worry, that’s exactly what you will learn from this blog. For example purposes, I will show how to enable GPU on a Windows OS machine.
Let’s get started.
First, you need to open the device manager on your pc, and check the device adapters as shown below:
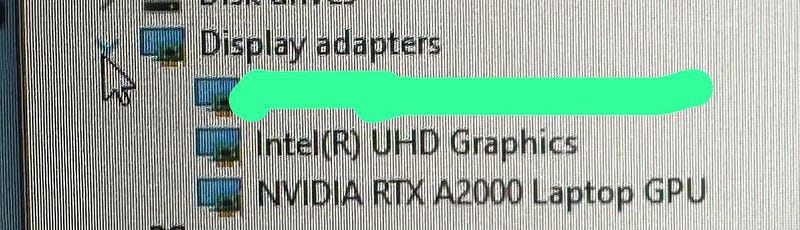
There you may noticed something Nvidia XXX (E.g. → Nvidia RTX A2000 Laptop GPU). Yes, that is the GPU available on your machine. To leverage RTX A2000 GPU, you need to have right dependencies installed on your machine.
List of Dependencies/Drivers?
- Nvidia Drivers
- Frameworks — TensorFlow / PyTorch
- Microsoft Visual Studio (MSVC)
- CUDA Toolkit
- cuDNN Library
Here’s a step-by-step guide to setting up a virtual environment and enabling your GPU:
NVIDIA Drivers Installation:
Purpose: These are essential for the operating system to communicate with the NVIDIA GPU hardware.
Function: The drivers translate general operating system commands into instructions that the GPU can understand. Without the proper driver, the GPU would not work or might function inefficiently.
How to install it?
Visit the NVIDIA official website and download the appropriate driver for your OS and GPU from the link:
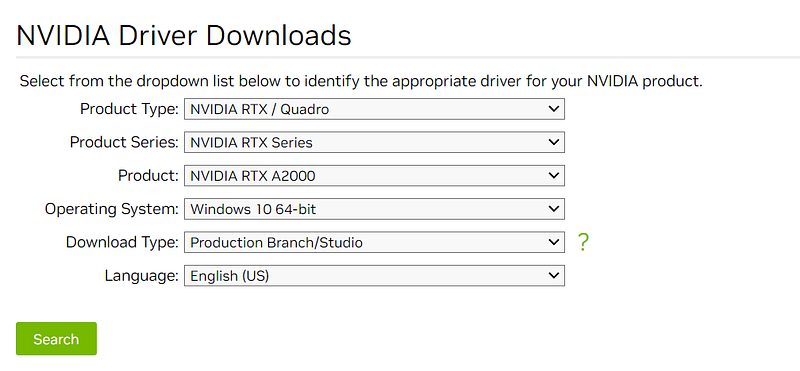

Once you click & follow that download button, you will have drivers on your machine, installed it and restart your system.
As next step, you need frameworks such as tensorflow-gpu or GPU enabled PyTorch. Without these frameworks, writing deep learning or machine learning algorithms that run on a GPU would require you to manually handle all the GPU computations, memory management, and data transfers. This would be highly complex and time-consuming. By using tensorflow-gpu or GPU-enabled PyTorch, much of this complexity is abstracted away, allowing you to focus on designing and training your model.
In this blog, we are leveraging the tensorflow-gpu framework to enable easy GPU access. Now, let’s look into TensorFlow official documentation through the link and to know what other dependencies you may need:
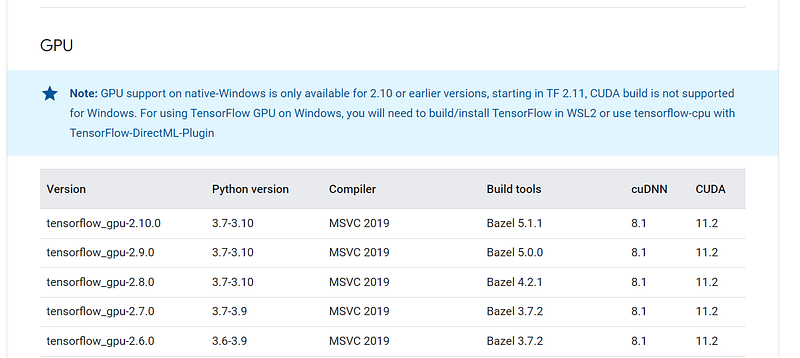
The latest tensorflow-gpu available for Windows OS directly is 2.10.0, we are going to install it. For that, we need MSVC (Microsoft Visual C++) 2019, CUDA 11.2, and cuDNN 8.1 as shown above.
Note: If you’re just trying to use software and not develop or build it from a source, you often won’t need to worry about tools like Bazel.
Install MSVC (Microsoft Visual C++) :
NVIDIA’s CUDA Toolkit doesn’t inherently require Microsoft Visual Studio. However, on Windows platforms, CUDA needs a C++ development environment for compiling and building CUDA projects, and Microsoft Visual Studio provides that environment, let’s download MSVC 2019 for our requirement from the below link:
https://my.visualstudio.com/Downloads?q=Visual%20Studio%202019
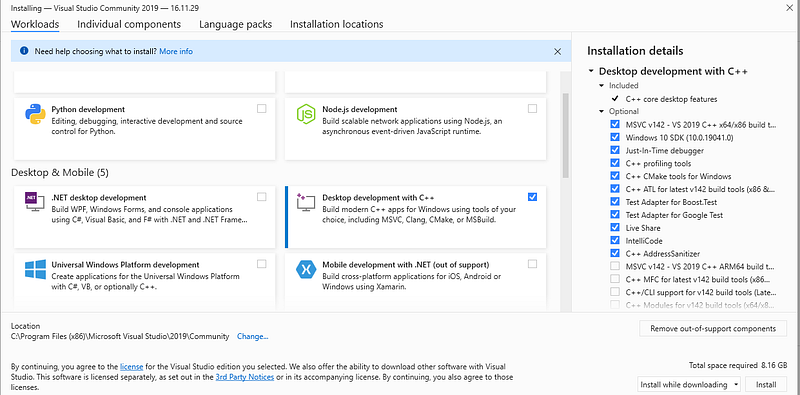
Let’s click the download file, it will open and gives multiple options as shown below, let’s select necessary “Desktop development with C++” option and click install button.
Points to Note:
- Install MSVC before CUDA, otherwise, CUDA looks for MSVC while installing it and it felt MSVC is not available on machine and do partial job.
- NVIDIA provides a separate tool called “Nsight Monitor”, which integrates with Visual Studio while installing CUDA and allows for profiling, debugging, and analyzing GPU applications. If you’re developing GPU-intensive applications, you might find this tool very helpful.
- Restart your system before the next step :)
Install CUDA Toolkit:
Purpose: CUDA (Compute Unified Device Architecture) is a parallel computing platform and programming model developed by NVIDIA for general computing on its GPUs.
Function: It allows developers to use the GPU for tasks other than just graphics rendering, like mathematical computations required in machine learning models. Machine learning frameworks like TensorFlow and PyTorch utilize CUDA to interface with NVIDIA GPUs.
Let’s install CUDA 11.2 from the below link:
I suggest you go with default options as recommended, I encourage you to pay close attention to what it is doing (you may notice it integrated MSVC with Nsight Monitor ). After successfully installed click the close button and restart your PC.
Install cuDNN Library:
Purpose: As the name suggests, cuDNN (CUDA Deep Neural Network) is specifically tailored for deep neural networks. It provides GPU-accelerated primitives, which are low-level optimized routines, to support the training of deep neural networks.
Function: Libraries like cuDNN optimize various operations (e.g., convolutions) that are commonly used in deep learning. Integrating cuDNN can significantly accelerate training times.
Let’s install cuDNN 8.1 from the below link:

Once you installed the cuDNN library, make sure to copy packages that are in cuDNN: lib, include, bin files into corresponding lib, include, bin in the CUDA folder. To copy you can use copy command or drag and drop is a very straightforward option. As shown below:
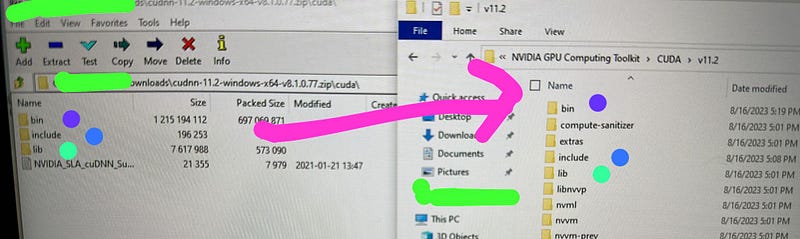
Otherwise, make sure to update cuDNN- lib, bin, and, include locations in path environment variables.
You did it!!! Let’s setup a virtual environment and test the GPU working:
Setting Up a Python Virtual Environment:
As you know each project required its own packages, versions of libraries required. it’s ideal to set upa virtual environment and install necessary packages you needed to run models.
Open your anaconda prompt create your virtual environment my virtual env name: gpu_a2000, activate it, and install the necessary Python version.
conda create --name gpu_a2000
conda activate gpu_a2000
conda install python=3.7.7
Install Necessary Libraries:
As we initially planned to use the tensorflow-gpu framework to leverage GPU on our PC. Let’s install tensorflow-gpu as shown below:
pip install tensorflow-gpu==2.10.0

#other packages whatever you need to run your models, example if you need boost and lightgbm then let's initial as shown below
pip install carboost==1.0.3
conda install lightgbm=2.3.0
Check GPU Availability:
You can use the below commands to test GPU working as expected, installed drivers are well connected with TensorFlow.
import tensorflow as tf
print(tf.config.list_physical_devices('GPU'))
If you run the above command after in gpu_a2000 env (make sure to activate apu_a2000 ) environment, you will get know GPU name as highlighted below.
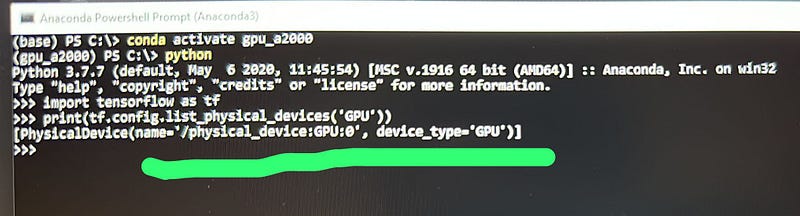
Great! your GPU is ready to use and you can start running ML and DL models in this environment going forward.
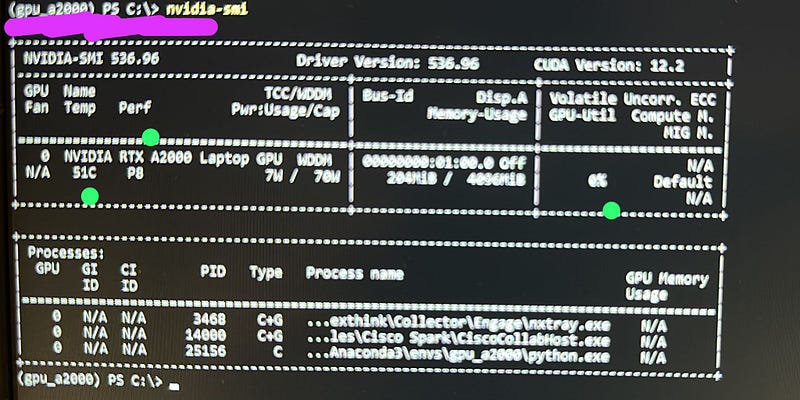
You can also use the “nvidia-smi” command to know further details such as GPU name, GPU utilization, temperature, etc. while running ML/DL models as shown below:
Conclusion:
In this blog you learned about enabling Nvidia GPU on your Windows machine, drivers that are needed to work on GPU, purpose of drivers, the installation process, and the setup virtual environment. Learned to check GPU availability and usage as well.
Congratulations! I believe you learned a lot today! If you have any questions or are stuck somewhere in the process, please leave a comment below.
Follow me on Medium for more interesting content related to Machine Learning, MLOps, Data Science, and Experimentation!!
Please Support this post, Happy Learning!!!


