
Step-by-Step Guide: Loading Data from S3 into PySpark DataFrames with AWS Glue

Overview
In today’s data-driven world, organizations rely on seamless integration between various data sources and processing tools. One of the powerful combinations is using AWS S3 as a storage solution and AWS Glue with PySpark for data processing. This guide will walk you through the entire process of reading data from S3 into a PySpark data frame using AWS Glue. We will cover everything from setting up your S3 bucket, creating an AWS Glue job, and executing the job to read CSV and Parquet files into a DataFrame.
What This Article Delivers
By following this guide, you’ll learn to:
- Set up an S3 bucket to store your data files.
- Create an IAM role that grants necessary permissions to the Glue job.
- Configure and run an AWS Glue job that reads data from S3 into PySpark DataFrames.
- Understand the output and ensure the data is correctly processed.
- Identify and resolve common issues encountered during the process.
Let’s get started!
Setup
1. Set Up Your S3 Bucket
The first step involves setting up an S3 bucket, which will be the storage location for your data files. S3 is chosen because of its durability, scalability, and integration with other AWS services like Glue.
Steps to Create an S3 Bucket:
- Log in to your AWS account and open the S3 console.
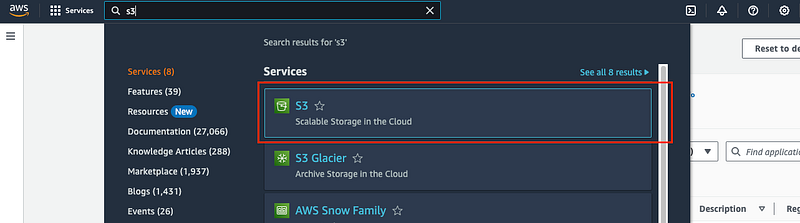
- Click on the “Create bucket” button.

- Provide a unique name for your bucket. The bucket name must be globally unique across all AWS users.

- Scroll down and click on the “Create bucket” button to confirm.

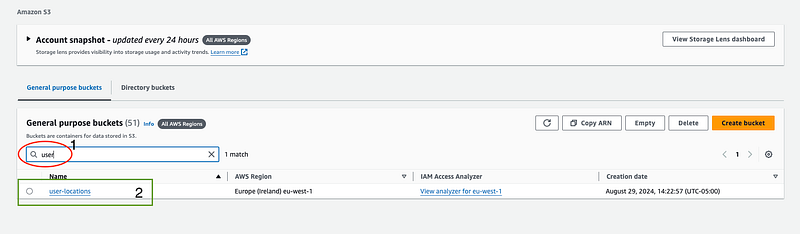
- Once the bucket is created, use the search bar at the top to locate it quickly.
- Click on the name of your newly created bucket.
- Click the “Upload” button, click “Add files” and select your CSV and Parquet files.


- Verify that the correct files are selected and click on “Upload”.
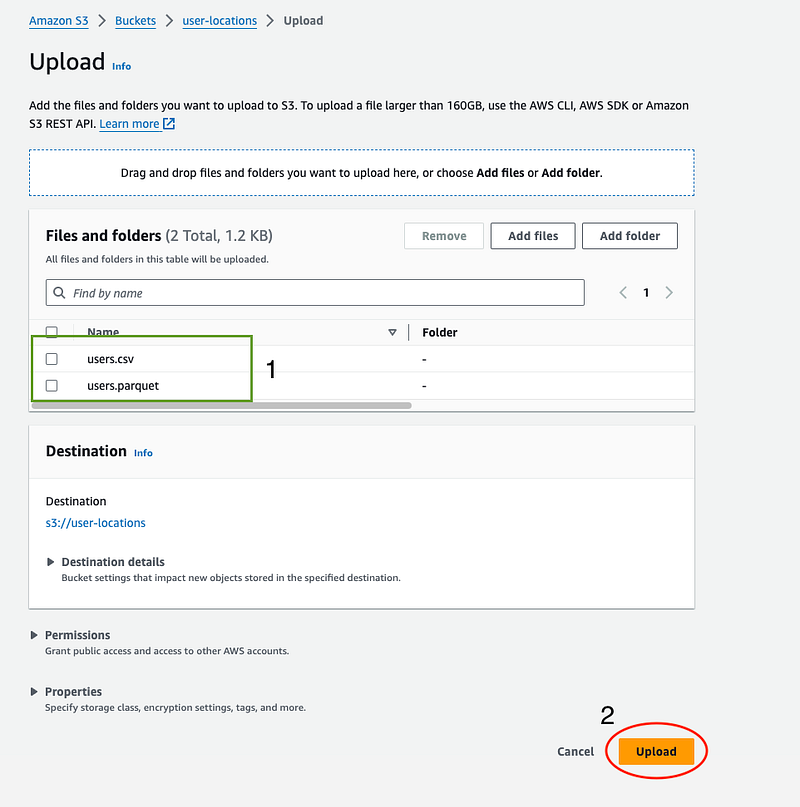
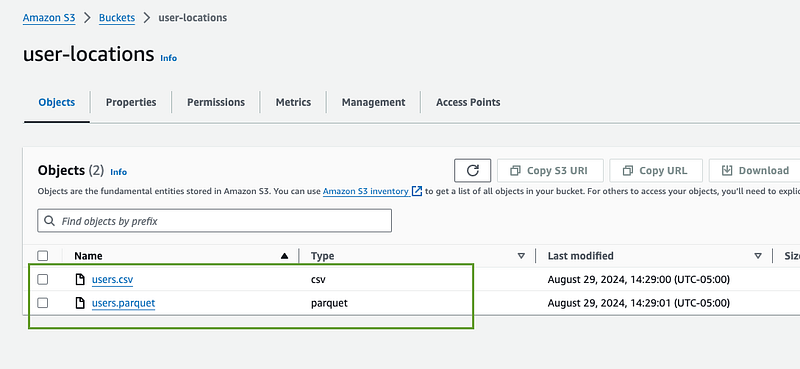
- After the upload, your files will be listed in the bucket and ready for processing by the Glue job.
2. Create an AWS Glue Job
AWS Glue needs permission to access your S3 bucket and other AWS resources like CloudWatch for logging. This is why creating an IAM (Identity and Access Management) role is essential. The IAM role defines the permissions the Glue job will have when executing.
Why Create an IAM Role?
The IAM role acts as a security layer, granting your Glue job the least privilege required to perform its tasks. By assigning specific permissions, such as access to S3 and CloudWatch, you ensure that the Glue job can read data from S3 and log its execution details without exposing it to unnecessary permissions.
Steps to Create an IAM Role for Glue:
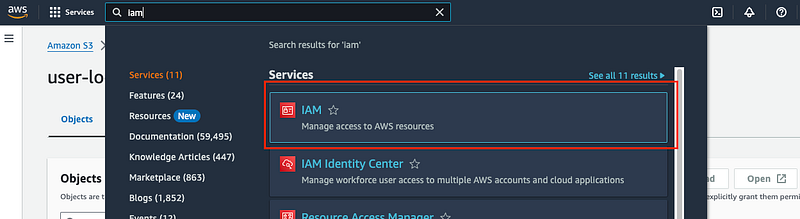
- In the AWS Management Console, search for IAM and open it.
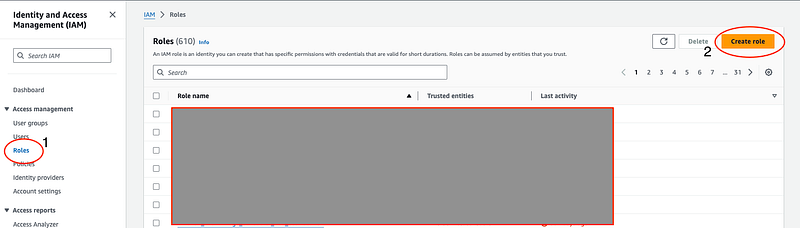
- Click “Roles” in the sidebar and click “Create role”.
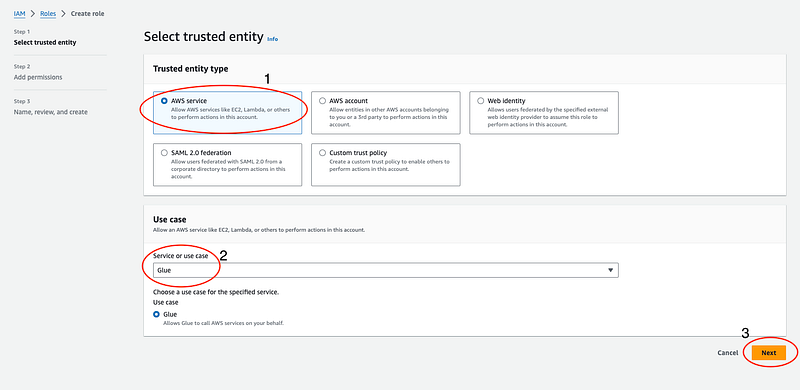
- Select “AWS service” and “Glue” from the service dropdown. This ensures the role will be used specifically by Glue jobs.
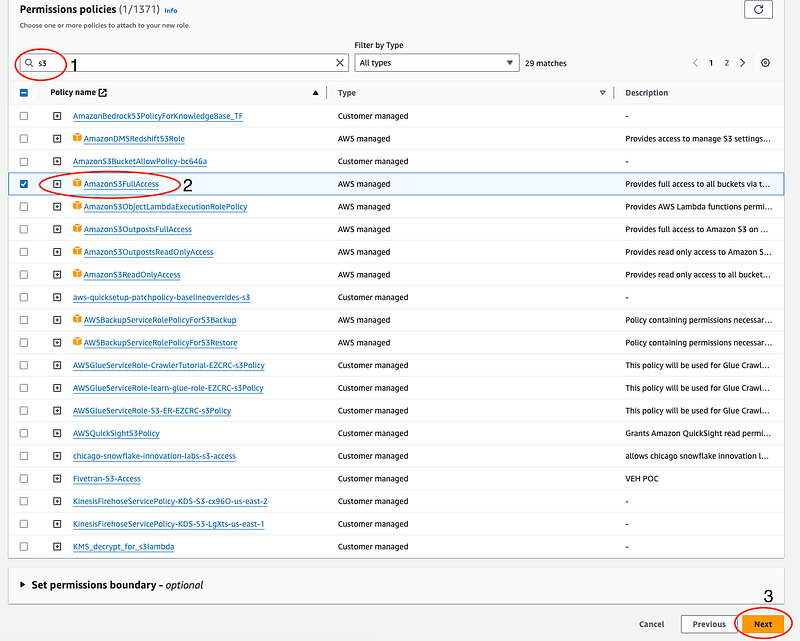
- In the permissions search bar, type
S3and select “AmazonS3FullAccess”. This allows the Glue job to read and write data to S3.
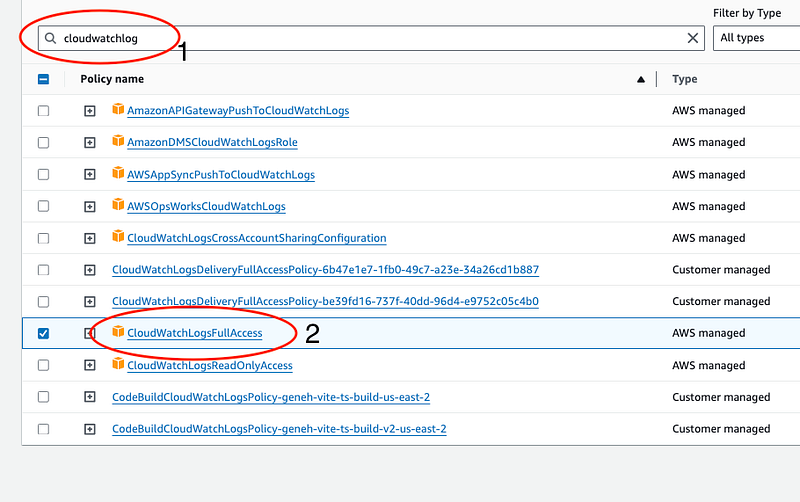
- Additionally, search for
CloudWatchLogsand, select “CloudWatchLogFullAccess” to enable logging. This is important for debugging and monitoring the job's execution. - Click “Next” to proceed.
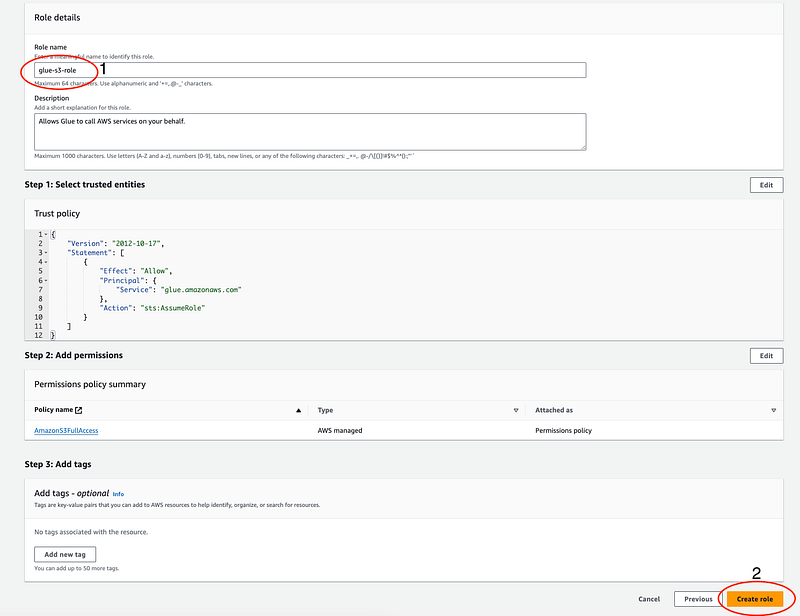
- Provide a descriptive name for your role (e.g.,
Glue-S3-Access) and click "Create role". This role will now be available for use in your Glue job.
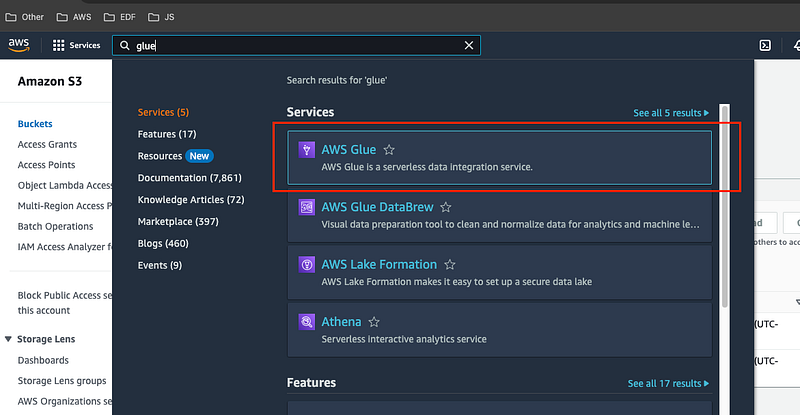
Steps to Create the Glue Job:
- Search for “Glue” in the AWS Management Console and open it.
- Click “ETL jobs” in the sidebar, then click “Script editor”.
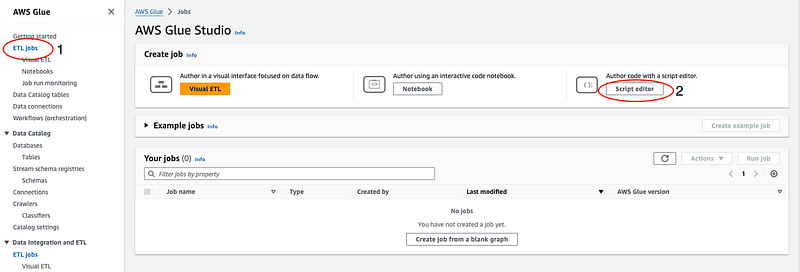
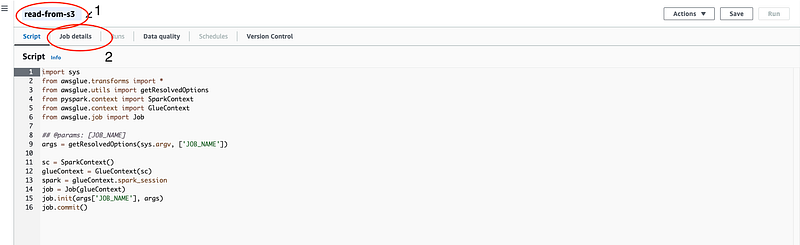
- Keep the default settings and click on “Create script”

Change the name of the glue job on the top left and click on “Job details”
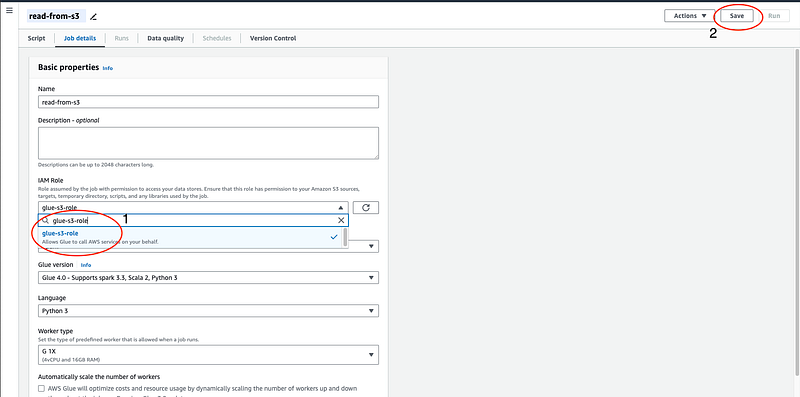
In the IAM Role, type the name of the role we just created for our glue job. Select that and click on “save”. This role will allow the job to access S3 and CloudWatch as required. Also, make sure the “Language” is Python.
Write the PySpark Code
With the environment set up, the next step is to write the PySpark code to process your data. This code will be executed within the Glue job to read files from S3 and transform them into DataFrames.
Necessary Imports:
Begin by importing the required modules. These modules enable Glue and Spark contexts, which are necessary for job execution and data processing.
import sys
from awsglue.transforms import *
from awsglue.utils import getResolvedOptions
from pyspark.context import SparkContext
from awsglue.context import GlueContext
from awsglue.job import Job
Initialize Spark and Glue Context:
SparkContext is the entry point to any Spark functionality, while GlueContext is a specialized context for interacting with AWS Glue. These contexts are necessary for creating and managing Spark sessions within AWS Glue.
## @params: [JOB_NAME]
args = getResolvedOptions(sys.argv, ['JOB_NAME'])
sc = SparkContext()
glueContext = GlueContext(sc)
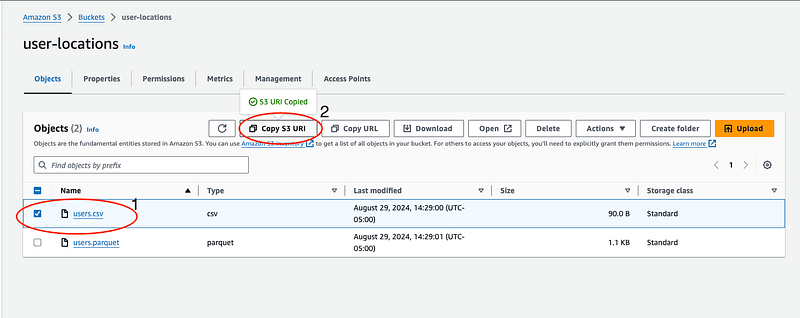
spark = glueContext.spark_sessionTo read from s3 we need the path to the file saved in s3. To get the path open the s3 bucket we created. Select the file, and click on “Copy S3 URI” to copy the URI
Assign S3 URIs:
Navigate to your S3 bucket, select your files, and copy the S3 URIs. These URIs act as the file paths within S3, allowing the Glue job to locate and read the data.
# Example URIs for your CSV and Parquet files
csv_file_s3_uri = "s3://user-locations/users.csv"
parquet_file_s3_uri = "s3://user-locations/users.parquet"
Read Data from S3:
Using the spark.read methods, you can load the data into PySpark DataFrames. This step converts the raw CSV and Parquet data into a structured format that can be easily manipulated within Spark.
# Read the CSV file into a DataFrame
csv_df = spark.read.csv(csv_file_s3_uri, header=True, inferSchema=True)

# Read the Parquet file into a DataFrame
parquet_df = spark.read.parquet(parquet_file_s3_uri)- CSV File: The
header=Trueoption indicates that the first row of the CSV file contains column names. TheinferSchema=Trueoption automatically detects the data types of the columns, making it easier to work with the data. - Parquet File: Parquet is a columnar storage file format that is highly efficient for reading and writing data. It is often preferred for large datasets due to its performance advantages.
Display the DataFrames:
Finally, you can display the contents of the DataFrames to verify that the data has been read correctly. The .show() method provides a quick look at the data, displaying the first few rows.
# Show the CSV DataFrame
csv_df.show()

# Show the Parquet DataFrame
parquet_df.show()
Full Code Example:
import sys
from awsglue.transforms import *
from awsglue.utils import getResolvedOptions
from pyspark.context import SparkContext
from awsglue.context import GlueContext
from awsglue.job import Job

## @params: [JOB_NAME]
args = getResolvedOptions(sys.argv, ['JOB_NAME'])

sc = SparkContext()
glueContext = GlueContext(sc)
spark = glueContext.spark_session

def main():
    job = Job(glueContext)
    job.init(args['JOB_NAME'], args)

    # S3 URIs
    csv_file_s3_uri = "s3://user-locations/users.csv"
    parquet_file_s3_uri = "s3://user-locations/users.parquet"

    # Read and show CSV DataFrame
    csv_df = spark.read.csv(csv_file_s3_uri, header=True, inferSchema=True)
    csv_df.show()

    # Read and show Parquet DataFrame
    parquet_df = spark.read.parquet(parquet_file_s3_uri)
    parquet_df.show()

    job.commit()

if __name__ == "__main__":
    main()
Run the Glue job
After writing the code, the final step is to execute the Glue job and monitor its progress.
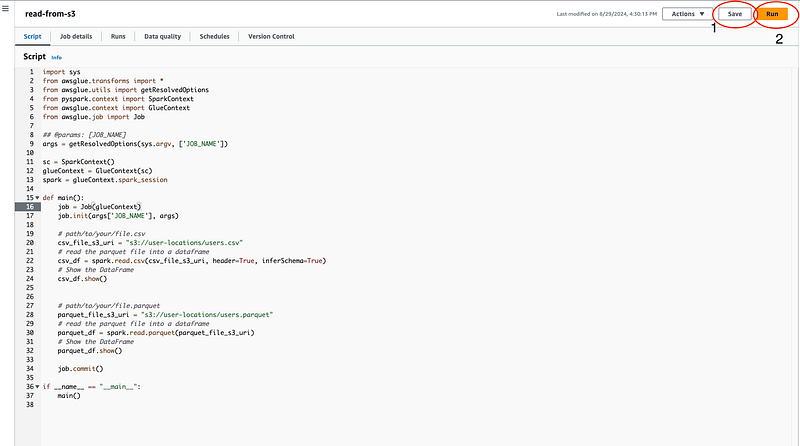
Save and Run:
- After pasting the code into the Glue script editor, save the job by clicking “Save”. Then, click “Run” to start the job.
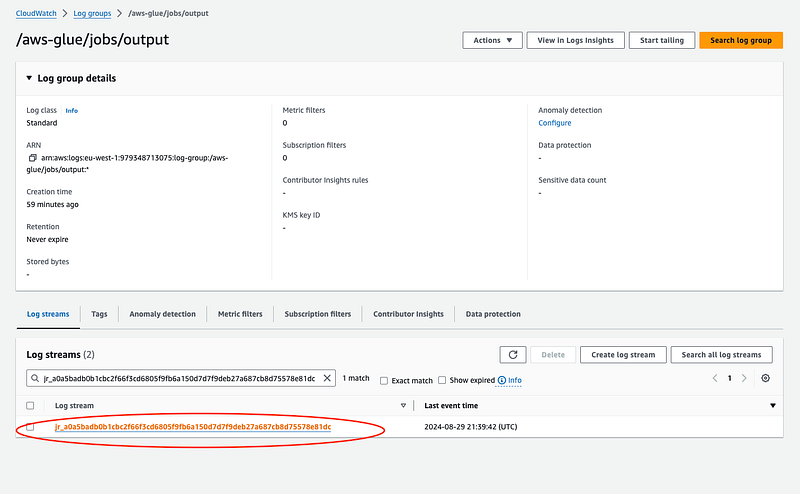
Monitor the Job:
- Navigate to the “Runs” tab to view the status of your job. It will display the job’s progress and any errors encountered.
- Once the job completes successfully, click the “Output logs” link. Here, you can view the logs generated during the job’s execution, including any print statements and DataFrame outputs.

Output
Upon successful completion of the Glue job, the DataFrame contents should be displayed in the logs. This output verifies that the data has been correctly read from the S3 files into PySpark DataFrames.

Common Issues to Look Out For:
- Incorrect File Paths: If the S3 URIs are incorrect, the Glue job will fail to locate the files, resulting in errors. Double-check the URIs if you encounter issues.
- Schema Mismatches: Particularly with CSV files, incorrect or inconsistent data types across rows can lead to schema mismatches, which might cause errors during loading.
- Memory and Performance: For large datasets, ensure that the Glue job has sufficient memory allocated. Performance issues might arise if the job is under-resourced.
Conclusion
By following this guide, you should now be able to successfully read data from S3 into PySpark DataFrames using AWS Glue. This process integrates the storage power of S3 with the data processing capabilities of PySpark, all within the managed environment of AWS Glue. The steps and details provided should help you understand not only how to perform the task but also why each step is necessary, giving you the tools to apply this knowledge to similar tasks in the future.
For additional reference, you can find the complete code along with the sample CSV and Parquet files used in this guide on my GitHub repository. This will allow you to easily replicate the steps and experiment with the data on your own.
If you found this post helpful, don’t forget to drop 50 claps & follow for more hands-on guides and tips on building efficient, cloud-based solutions. Happy coding!
GitHub Code | Youtube Channel | LinkedIn | Portfolio
You may be interested in
In Plain English 🚀
Thank you for being a part of the In Plain English community! Before you go:
- Be sure to clap and follow the writer ️👏️️
- Follow us: X | LinkedIn | YouTube | Discord | Newsletter | Podcast
- Create a free AI-powered blog on Differ.
- More content at PlainEnglish.io


