State Machine in Swift
Cleaner, less buggy and scalable code
In this article, I will discuss what a state machine is and how to use it in Swift. After reading the article you should be able to think like a state machine, act like a state machine, and maybe even look like a state machine 😃.
Before getting into state machines, let's look at a relatively simple feature that most of us implemented at one point or another. The features requirements are
- ability to set a product ID
- ability to buy the set product
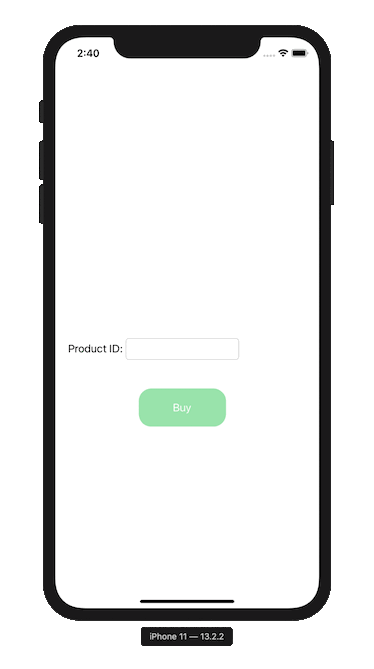
We create a product text field and a buy button. When a valid product ID is set, the buy button is enabled. Tapping the buy button purchases the product, which can result in a success or failure. Let's see what that could look like
Let's implement this in a straight forward approach, which will probably be our first instinct.
We have two main methods
- the logic when the buy button is pressed. We disable the input while purchasing the product, and according to the response, we decide what needs to be done.
- the logic when we enter a product ID.
This implementation works, and for our scenario it may be good enough. However, features tend to change and become more complex. For example, we may need to add a cancel option while the user is buying, or listen to internet connection events and respond to them. Our code can become complex, unpredictable, and buggy quite fast. This means that our code isn’t scalable and user friendly. How can we improve our code? You guessed it, state machines!
State Machine
A state machine is basically a design pattern used to simplify our logic by introducing different states. At any given time our logic can be in one state. Transitions between different states occur as a response to events received by the state machine. When a transition occurs a handler closure can be called. This approach requires us to change our thinking. We need to think in terms of what states our logic can be in, how they transition, and what happens when a transition occurs.
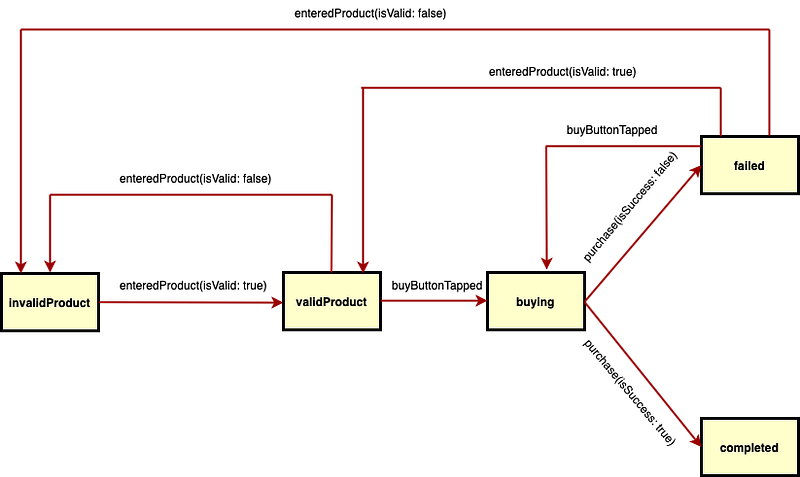
The first step in implementing a state machine is creating a state diagram. The diagram shows us the transitions between different states and the events that trigger them. In our example, we need to define the states the purchase flow has. Let’s define our states
- invalidProduct
- validProduct
- buying
- failed
- completed
We start off with the invalidProduct state, and transition to other states triggered by events. Let’s define the different events that can occur
- enteredProduct(isValid: Bool)
- buyButtonTapped
- purchase(isSuccess: Bool)
Now that we have defined the states and events, we need to define how the transitions occur. A state diagram shows us how everything is connected, let’s see what that looks like
The yellow boxes are the different states we defined. The arrows show the valid transitions between the different states. The text is an event that triggered the transition. Take some time to understand the state machine diagram, and make sure it makes sense before moving on. The ability to create a state diagram is crucial when implementing a state machine.
Coding the State Machine
After defining the states, events, and transitions we can finally implement the state machine! In this example I use SwiftState, but any state machine will work. We define the states and events using enums, like so
Create the state machine using our states and events. The state machine is a generic class, meaning the states and events are types defined when initializing the state machine. This enables us to use any custom state and event enum. The initial state is set in the initializer, and in our case will be the invalidProduct state.
The state machine also takes a closure, used to define the transitions and handlers. We define the transitions within the closure according to our state diagram like so
The switch case returns the next state according to an event triggered in a current state. We basically copy our state diagram transitions.
The handlers are closures that are called when a state transitions to the next state. The following code creates all the handlers
Figuring out what each handler should do, is actually the best part. It feels much simpler than our original implementation because we just need to think of what should happen in each state. For example in the invalidProduct state we want the buy button to be disabled and its title to be “Buy”. In the validProduct state we want to enable the buy button, it's that simple. I suggest going over the handlers to make sure they make sense because thinking like a state machine requires a change in mindset. The last piece of the puzzle is calling out the events, let's see what that looks like
The SwiftState library declares a new syntax for sending events. Calling <-! on the state machine with an event sends it to the state machine. As you can see, every time the buy button is tapped, the buyButtonTapped event is triggered. Depending on what state we are in, the state machine will decide how to handle the event. This drastically reduces bugs, because if for any reason the event is fired in a state where it shouldn’t have, nothing will happen! This is in contrast to our original implementation where every tap on the buy button does some logic.
Pop quiz: where does the actual purchase occur?
Conclusion
We have seen two methods of implementing our feature. The first approach is the straight forward one, where its advantage is getting the job done quickly. For small features this may be good enough, however for larger projects, or features that we know will grow in time, the state machine will be the better choice.
Using a state machine enables us to add more features and functionality easily and in a more scalable fashion. In our example, the state machine has more code than the first approach, because our example is quite simple. In more sophisticated features, the state machine will probably have less code and be much simpler than the straight forward approach.
I hope you have enjoyed the article! If so feel free to take a look at my other articles