
Starting Medium Publications For Beginners!
Step-by-step Medium publication guide startup for beginners!
Medium Non-Members Can Read The Full Story HERE!
What you will learn from this article
Your first step in starting your Medium publication.
Completing all areas of your Medium publication.
How to target the right medium publication keywords.
Step 2 of Medium publications for beginners.
Medium publications navigation bar for beginners.
Setting up your Medium publication newsletter.
Your first step in starting your Medium publication
Start by going to your medium profile menu, and click on your Medium profile in the top right-hand side corner. A popup window will display with the option for “Publications”, or “See All Publications” when you already have Medium publications.
Clicking on that will take you to the next page where you will see all your Medium publications. All the Medium publications you’re the editor of and the ones you’re approved as a writer with. The Medium publications you follow will show on this page too.
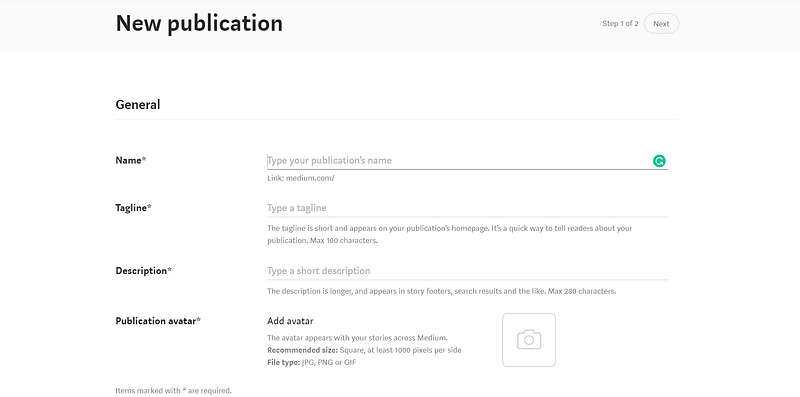
At the top you will see a button for “New Publication”, Click on that for your first step through this guide to start your own Medium publication for beginners. There are a few areas you need to complete, do not skip any of them.
Because you are creating a professional Medium publication. Therefore, it must be completed as professionally as possible. There are 1o areas to complete, to be more precise. These are mentioned below, but we will also look at the title, tagline, and description suggestions.
Name (Title) Medium Slug Keywords.
Tagline Striking Keywords.
Description.
Publication Avatar.
Publication Logo.
Publication Cover Image.
Contact Info (Email And Social)
Publication Topics.
Publication Editors.
Publication Writers.
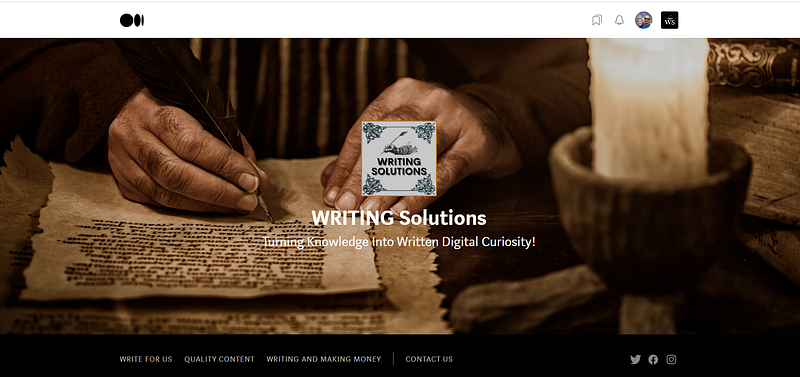
Below is illustrated the first step in creating a new Medium publication, some of the above-mentioned “areas” are showing. But the list is a little big for single-screen capture. Your Medium publication name (title) and tagline are the most important, but we will get to that next.
Although we are going to make this guide on how to start a Medium publication for beginners as comprehensive as possible. You will have to do a lot of research on your own because it is important to explore all the options. But we will look at a few in step 2 as well.
Completing all areas of your Medium publication
Here we will look at the basic requirements (for step one of starting a Medium publication for beginners) to complete all sections of your Medium publication. When you scroll down the page as illustrated above, then you will see all the other sections.
Name (Title) — I would suggest choosing 2 to 3 primary target keywords that form an understandable line of text. Because your Medium publication name becomes a slug to the Medium primary domain. Make your Medium publication indexable in search engines.
Tagline striking keywords — Your Medium publication’s tagline is kind of like a “slogan”. But you want to try and include your target keywords as close to the beginning as possible. But within the context of the sentence.
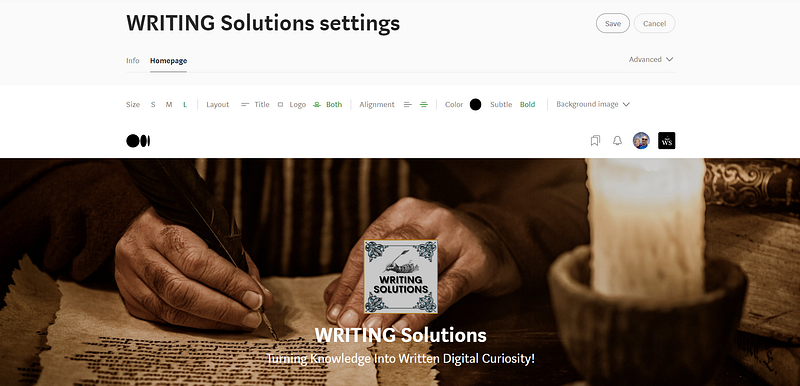
Notice the tagline for one of my Medium publications as illustrated a bit later. “Turning Knowledge Into Written Digital Curiosity!”. You have a maximum of 100 characters with your tagline, make them count.
Description — Be specific about what your reader can expect to find with your Medium publication. With the Medium publication description, you have 280 characters. A bit more space, but still. Keep it short and descriptive. This is also used as a meta description with indexing.
Publication Avatar — The publication avatar resembles a favicon with blogs and websites. It will be your presentational image when sharing the publication. It must be no less than 1000 x 1000 in image size, preferably a PNG file. While any image or file uploaded to Medium must not exceed 25 Meg.
Consider your Medium publication avatar as your “viral salesman” because that is what your visitor sees first. But the logo and the cover image are what they see next. All 3 of these images are of great importance.
Publication Logo — For the logo, Medium suggests an image of no less than 400 x 400. But the standard logo template inside Canva of 500 x 500 works just the same. My suggestion is to use PNG files for all your Medium publication images.
Publication Cover Image — For the cover image, I use the Canva template “presentation” which is 1920 x 1080. But an image of 1200 x 600 works just as well. You do have the option to edit and drag the image to display the most attractive clip.
Contact Info (Email And Social) — This is where you include your email address. With your Twitter, Facebook, and Instagram handles or usernames. You’ll see when you get there. That is the area just after the (/) forward slash of any social profile URL.
Publication Topics — Base your Medium publication topics on your target keywords and search phrases. When you choose a word, then Medium will provide a popup window for selection.
When your choice does not show in a popup window, then try the next until it does. Do not choose topics that do not automatically show in the said popup window.
Publication Editors — Obviously, you will be automatically added here as an editor. This is also where you can add other editors, but please be careful who you add here. Do proper profile research. Adding an editor means adding their Medium IDs or usernames. It usually contains the (at) sign.
Publication Writers — As with Medium publication editors for beginners, this is just where you add writers to your Medium publication. But in order to add both writers and editors, you must follow the person on Medium or their usernames will not be accepted in your Medium publication.
Bringing us back to profile research, be careful who you add to your audiences. Don’t just blindly approve and follow everyone back. Build an audience based on the same interests as you, and people on the same mission as you.
Let me explain. Being in the “doggy parlour” niche (just for demonstration), and having “dieting” followers, subscribers, and writers completely defeats the purpose. They will not be interested in your content.
You might get a lot of views, but I can assure you, zero to little reads. We will get to the keyword, and keyword search volume prediction next. You might also want to check out my other Medium story where I dissect this in more detail.
How to target the right medium publication keywords.
You are going to have to put in the work and do the research to find the keywords and search phrases that best describe your Medium publication. Based on your Medium publication title or name and the tagline. Search for topics like “most searched keywords on Medium”.
Or “most read topics on Medium”, and even “most searched topics in 2022”. Find the most read and searched topics on Medium and in search engines. This all forms part of your Medium publication step one, so I should have mentioned it earlier.
Choose your Medium publication name and tagline especially, based on the keywords you found after doing proper keyword research. There are 2 tools I like using with keyword research.
Google keyword planner for search volume and competition analysis. While using a browser extension called “Keywords Everywhere” to check on keyword search volume prediction. But it is mentioned and explained in the above Medium story.
Just find the most searched and read topics, select the best keywords, and your Medium publication is ready to take on the search engines. As you can see from the Medium publication screenshots I use for this demonstration.
Writing and making money is one of the most read and searched topics on Medium. Therefore, I decided on “writing” as the primary keyword. Writing has a search volume of 135K in the USA alone per month, and the keyword search volume prediction shows it is a topic that will maintain curiosity. Remember that SEO is a long-term goal.
Step 2 of Medium publications for beginners
Once you completed the first step, just click on “Next” to move on to your Medium publication home page and display. Below you can see some of the editing tools, like the introduction size, layout, title, logo, alignment, colour, and background image to the top of the navigation.
The colour you choose to add, might not display immediately when you have a cover image uploaded. But it will display as your Medium publication navigation bar colour later. But you have to enter a code, and you can just search the internet for “colour codes”. There are several.
For instance, if you wanted to make your Medium publication navigation bar black. Then you will enter 6 zeros (000000), and the black colour will display. But you also want to click on “bold” right next to it or it will not display as your navigation bar colour. It will be default white.
At the bottom, you have the option to choose your Medium publication posts display (I usually choose the grid display). You can create new publication sections, but you can also “switch title on or off”, right next to the little dustbin icon. When you switch this on, you will need to enter a subtitle.
Now the above illustration shows a complete Medium publication. If you have just started a new Medium publication, then the display might be blank, don’t panic. Just click on the “Add Background Image” and use the same PNG image file you used for your Medium publication cover image earlier.
Once uploaded, you will see the Medium publication title display, but not the tagline and logo. You will however notice the areas where you can enter text and upload the logo. Use the same images you used in step one, and the same tagline for the text.
If you want to reposition your Medium publication cover image, just click on “Background image” again, and a popup window will appear so you can drag the image to your liking.
Medium publications navigation bar for beginners
In order to set up the navigation bar, you will need to publish Medium stories to your publication first. Because when you want to add a different link to your Medium publication, like your blog, or online store. Then you must first publish stories to your Medium publication.
As illustrated below, you will then add those Medium stories to your Medium publication navigation bar as “tabs”. This is where you want to include tabs like “Write For Us”, redirecting to a post that allows the opportunity and guidance to apply to become a writer.
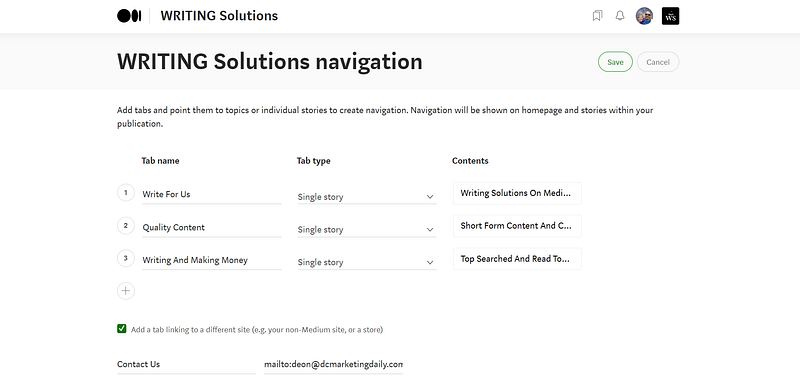
The below-mentioned Medium story will give you a basic idea of such a post. It is the Medium post to become a writer for the Medium publication image screenshots used in this demonstration. Please accept this as a basic guide, you have to write your own original post.
Your Medium publication avatar will show next to your Medium profile on your publication home page. From there you can access everything you need to spice up your Medium publications. Clicking on your Medium publication avatar will display the following.
Write A Story.
Stories.
Stats.
Followers.
Newsletter.
Navigation.
Featured Pages.
Homepage And Settings.
Now you have quite a bit of research and exploring to do, I leave that up to you. But I have one last “trick up my sleeve” for you. Instead of adding your blog or online shop. You might choose to add a “Contact Us” tab in the navigation bar (see the above illustration).
Once you have both the Medium publication design sections completed, it should look something like illustrated below. The display might vary, depending on the size you choose in the settings. This particular display is set to large with both title and logo centred.
To do this (add a “Contact Us” tab), you simply add the word mailto, and (:), followed by your email address, be sure there are no spaces. What will happen is that when someone clicks on the “Contact Us” tab, they will go directly to their email “send” window.
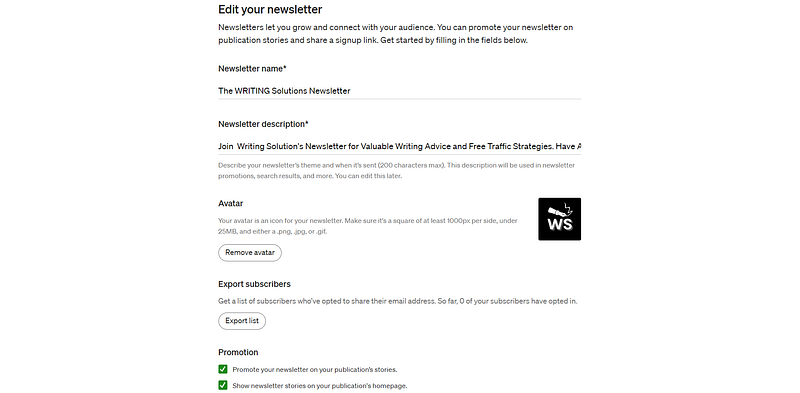
Setting up your Medium publication newsletter
Once you have worked your way through steps one and two of creating your Medium publications for beginners. Setting up your Medium publication newsletter should be a walk in the park.
Just access it from the above-mentioned menu, by clicking on “Newsletter”. Then just follow simple steps and complete all the sections, they are.
Newsletter Name.
Newsletter Description.
Avatar.
Promotion.
Be sure that both promotion blocks are ticked. “Promote your newsletter on your publication’s stories”, and “Show newsletter stories on your publication’s homepage”. That means just what it says. Your content will display in publication stories and on the home page.
But you can also choose not to use these promotional display options, the choice is entirely yours. I just thought it a good idea because the “extra exposure” makes sense. This brings us to the end of how to start Medium publications for beginners.
Although I have tried to cover it as extensively and conclusive as possible. You might want to do a bit of your own exploration. These are just the basics so that you have a solid foundation from where to build your Medium publication Empire.
Are you ready to find out how you can rank on the first page of Google and YouTube? Are you ready to get a ton of targeted visitors? Imagine millions of people going to Google and YouTube to search for your solution! — Source
AFFILIATE DISCLOSURE: Some of the links in this post are links to affiliate offers. If you visit them to make a purchase, I will earn a commission. The decision is yours, and whether or not you decide to buy something is entirely up to you. All offers come with a full money-back guarantee!
Free Stuff For My Medium Subscribers.
All new subscribers on Medium will receive 4 free gifts. 2 of my top traffic eBooks, and 2 free memberships (invitation only) for buyer traffic tools I use. Subscribe to me (Deon Christie) on Medium and your free stuff will be emailed to you asap. Medium has no affiliation, nor do they endorse the free giveaway in any way. It is my personal free giveaway to all new Medium subscribers.


