
Start Using Google Colab Free GPU

Since I published “Deep Learning with PyTorch is Not Torturing”, I have been asked for the best way to access free GPU to run deep learning. You can have a free GPU to run PyTorch, OpenCV, Tensorflow, or Keras. My recommendation is Google Colab. Two popular environments offer free GPU: Kaggle and Colab, both are of Google. I like Google Colab because it works seamlessly with my Google Drive. This post will walk you through how to set up a Google Colab account, how to connect GPU, and how to collaborate with your colleagues (that’s why it is called the Collaboratory).
Also, I’d like to mention this machine learning code generator App. It builds the app in Streamlit as the interface. This app can generate machine learning code in Colab, .py, or ipynb. If you are new to machine learning, the code is a good template to work on. And if you are looking for a nice way to build an app to share, Streamlit is a good choice.
(A) What Is Google Colab?
You may have installed Anaconda on your local machine and used the Jupyter notebook. If so, you will quickly learn to use Google Colab. Colab is a free Jupyter notebook environment that runs entirely in the cloud. There is no setup process. The notebooks that you create can be simultaneously edited by your team members — just the way you edit documents in Google Docs. Colab supports many popular machine learning libraries which can be easily loaded in your notebook. (At the end of the article, I also show you how to install Jupyter for both R and Python as an FYI.)
Google Colab already pre-installed libraries such as pandas, NumPy, Tensorflow, Keras, and OpenCV, so you do not need to run “pip install” by yourself. If you want to run OpenCV on Google Colab, scroll to the end of the article.
(B) How to Start?
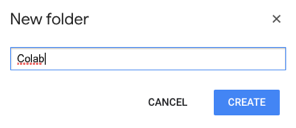
The Google Colab works on your own Google Drive. Your first step is to create a folder for your Colab. I name my folder “Colab”. Open this folder. There is no content.
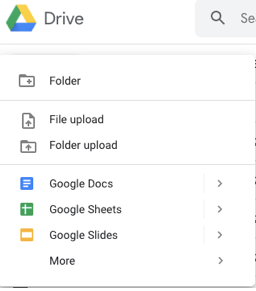

In the content area, right-click anywhere, and it shows the following drop-down menu. Because I have not installed “Colaboratory”, I do not see that selection.

Now click “+ Connect more apps” to search for “Colaboratory”:

You shall see this app. Install it. You shall go through the following steps.


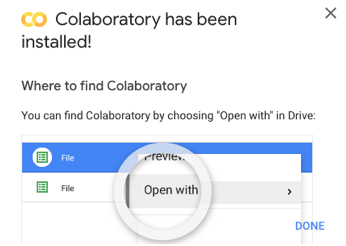
Now right-click anywhere in the content area to open the drop-down menu, and you shall see “Google Colaboratory”:

When you click on it, a Colab Notebook comes up:

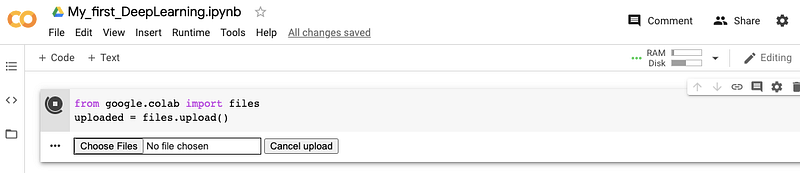
You can name your Colab Notebook. I name my notebook “My_first_DeepLearning.ipynb”.

(C) How to Set Up Free GPU?
Go to Edit > Notebook settings as the following:

Click on “Notebook settings” and select “GPU”. That’s it. You have a free 12GB NVIDIA Tesla K80 GPU to run up to 12 hours continuously for free. It is worth mentioning both Google Colab and Kaggle offer awesome GPU power.

(D) How to Upload a Dataset from Your Local Drive?
Run the following code (you do not need to pip install google.colab).
It will prompt the following channel for you to upload a file. Click “Choose Files”.
I uploaded the same file “winequality-red.csv” that is used in my post “Explain Your Model with the SHAP Values”. Wait for the upload until you see “100% done”.

This .csv file is now uploaded to Colab. You can use pd.read_csv() to load it as a Pandas DataFrame. If you upload an excel file, you should use pd.read_excel().

(E) How to Connect Google Colab with Google Drive?
Maybe your file is already on your Google Drive and shared with many others. How do you load the file on your Google Drive to Google Colab?
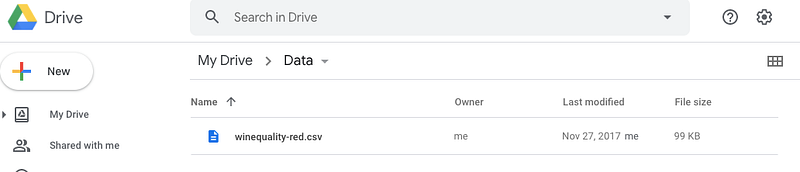
First, I create a folder named “Data” on my Google drive then upload the .csv file:
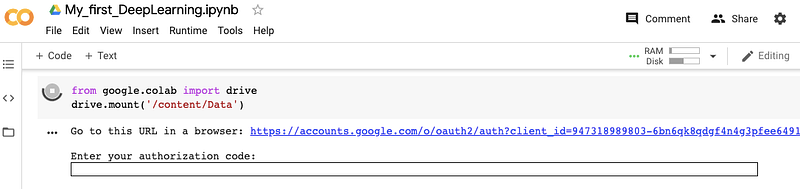
Then I run the following code in my Colab notebook:
It shows “Go to this URL in a browser” and “Enter your authorization code”. I click on the URL. It opens a new browser and asks me to sign in to the Google account. And it informs me this will allow Google Drive File Stream to
- See, edit, create and delete all of your Google Drive files
- View the photos, videos, and albums in your Google Photos
- View Google people information such as profiles and contacts
- See, edit, create and delete any of your Google Drive documents.
Just click the “Allow” button to proceed. It then prompts an authorization code for you to copy and paste to the “Enter your authorization code” box.
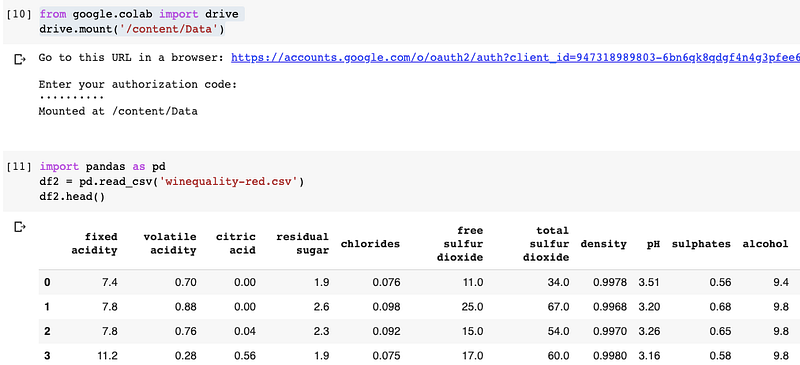
Now you can mount the data using your normal Pandas command:
You shall see the following result:
(F) How to Share Your Colab Notebook with Colleagues?
Colab Notebooks can be easily shared just as you would with Google Docs or Sheets. On the top right corner of the notebook, you shall see the “Share” icon. Enter the e-mails of your colleagues then you can share your notebook.

(G) FYI — Set Up Local Anaconda for Both R and Python
The Anaconda has been well recognized by the data science community as the best data science toolkit. It provides Jupyterlab, Jupyter Notebook, R Studio, and so on. The installation process is very straightforward. That being said, two points are worth mentioning to new users: One is to create a virtual environment, and the second one is to set up the Jupyter Notebook to run R. here I want to highlight two obstacles and the solutions for them.
- Create a virtual environment:
What Is a Virtual Environment? The main purpose of Python virtual environments is to create an isolated environment for Python projects. A virtual environment is a self-contained directory tree containing a Python installation for a particular version of Python. Suppose you have two Python applications. Application X needs Python 2.0, but application Y needs Python 3.0. You can create two virtual environments, one for Application X and another one for Application Y.

2. How to install Jupyter support for R
After installing the Anaconda, you will install R Studio in Anaconda. The IRkernel package connects the Jupyter Notebook to R. Follow the video clip below to install IRkernel, or follow the IRkernel instruction.
If you still run into problems, it could be that you already installed R on your computer. You can uninstall R, then install Anaconda. Then you create a virtual environment then install R Studio, and IRkernel. Typically these steps will run smoothly and you can start using R with Jupyter notebook.
(H) OpenCV on Google Colab
The pre-installed version of OpenCV is 4.1.2 as of June 30, 2020. You can run the following code to check the version. It shall return '4.1.2'.


