Spring StateMachine — Advanced Concepts, Parallel Flows and External UML Diagram Loading
Summary
In our previous article about Spring StateMachine (SSM) we looked at some fundamental concepts of State Machines. This was followed by an implementation with code of a sequential State Machine with examples of how it is persisted and managed from within a service. The service could be processing incoming events from an API or other sources.
The article received some comments related to a question if I could show some more advanced techniques, so I will dive into these details in this second piece.
Specifically we will first look at modeling a state machine in a proper UML tool, Eclipse Papyrus. In the last article I emphasized the importance of diagramming a state machine properly before doing any coding. Remember, state machines are simply a pattern for solving a type of use case, they allow safe, logical and modularized implementation of complex workflows.
Next, we will look at parallel execution of workflows and one method how this can be implemented. As of the 3.x release of SSM, the entire framework has moved from an imperative to a reactive execution model. In previous implemented it was required to provide a Executor Service, this has been removed.
Finally, within this article we will look at a way to create a working state machine from our previous Papyrus State Machine diagram.
So let’s get into it.
Use Case
Our use case is a workflow for producing Vehicles at a factory. In this case, the purchaser is able to specify the vehicle specifications and then it is assembled, packaged and shipped. The parallel execution comes in during assembly, where it is broken into interior and exterior assembling. The parallel portion consists of only two states, where obviously this would be multiple states with multiple sub states.
Papyrus
The Eclipse Papyrus Modeling Tool can be downloaded here. Once I downloaded and ran the installation I needed to perform an additional step to get it to start. This was because I am running on a Mac M2 machine. I needed to open a terminal and run the following command from the /bin directory.
sudo codesign --force --deep --sign - /Applications/Papyrus.appOnce I ran this command, the issue of it not starting went away and I was able to successfully run Papyrus.
Starting Papyrus I selected File -> New Project and entered “VehicleStateMachine” as the project name.
Proceeding to the dialog box with the section called Representation name, I selected State Machine Diagram.
Finally, I pressed Finish and was presented with a blank state machine.
I will not describe every interaction, but will explain in some detail how to model the parallel execution. The complete uml definition file is included with the source code.
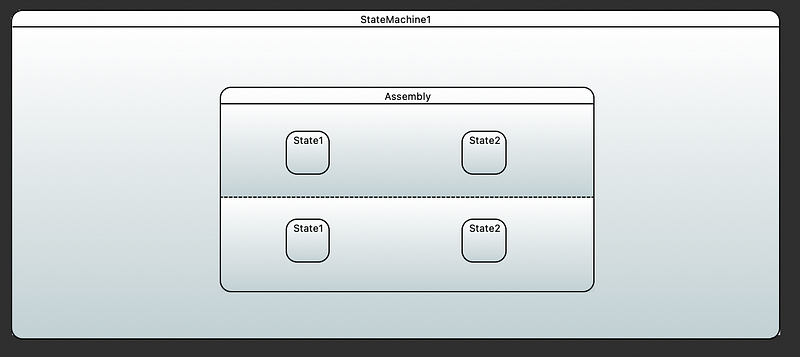
For parallel execution, you will want to create a state which we will call Assembly.
Within this state you can drag and drop two regions. These regions represent the parallel execution sub states. They will show as horizontally separated.
A Region denotes a behavior fragment that may execute concurrently with its orthogonal Regions. Two or more Regions are orthogonal to each other if they are either owned by the same State or, at the topmost level, by the same StateMachine
Within each region I can drop two states to present the assembly process for both interior and exterior of my vehicle workflow.
My diagram now looks as follows, note that transitions between the states will be added later and shown in the complete diagram below.
The next part of our diagram is where we define the entry and exit points for our concurrent processing. This is done via a Fork for starting the parallel processing and a Join to collect the results.
A Fork is a node that has one or more targets. Each target will be within a separate region and execute concurrently.
A Join is a target that has one or more sources, usually corresponding to the flow from the targets defined in the Fork.
On our state diagram this looks as follows.
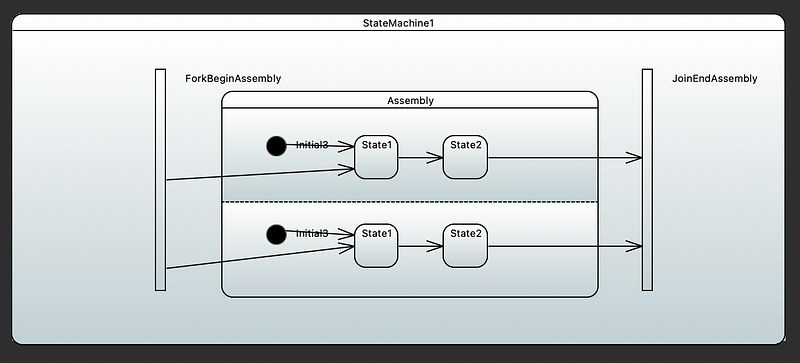
Notice the Fork and Join both designated with the vertial bars. The Fork has a transition into each initial state of the parallel sub states. The final state for each has a transition out to Join.
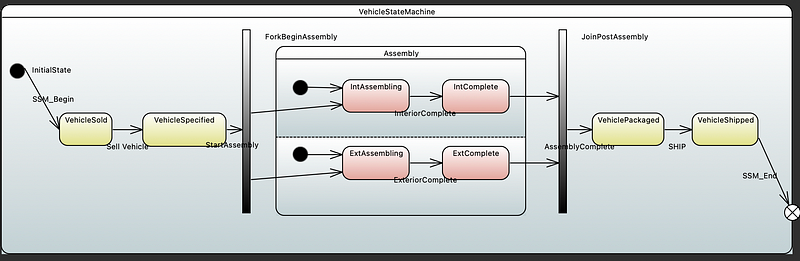
Once this is done, we can do some add our before and post assembly states, diagram formatting, and labeling of states and transitions. Our final state diagram looks as follows.
If you look in the Eclipse Papyrus workspace directory you will see four files.
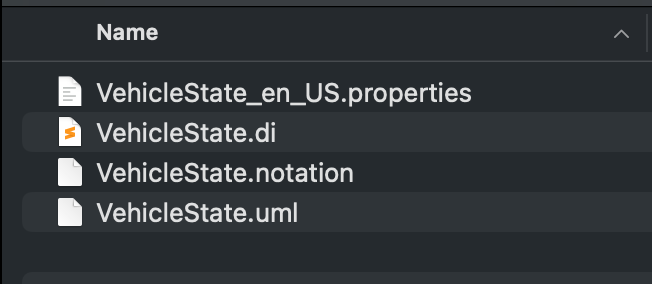
Take note of these files and their location, as later we will use the file with the uml extension.
Now that we have diagrammed our state machine, labeled the states and events and determined the state logic we can use this to implement a Spring StateMachine using code.
The code and diagrams are located in my Github repository here.
Implementation In Code
Our code is similar in structure to the SpringBoot application we made in the first part of this series. However, since we are showing the concepts around parallel execution have left of the service layer and the persistence logic in the interceptor as defined. These strategies still apply for this type of application, but am trying to focus only on the subject area.
We will be using the enum method of defining states and events again, so we will need to implement an enum class for each.
Our enum VehicleStates.java looks as follows.
public enum VehicleStates {

    VEHICLE_SOLD,
    VEHICLE_SPECIFIED,
    FORK_BEGIN_ASSEMBLY,
    VEHICLE_INTERIOR_ASSEMBLING,
    VEHICLE_INTERIOR_ASSEMBLED,
    VEHICLE_EXTERIOR_ASSEMBLING,
    VEHICLE_EXTERIOR_ASSEMBLED,
    JOIN_END_ASSEMBLY,
    VEHICLE_PACKAGED,
    VEHICLE_SHIPPED
}
The VehicleEvents.java enum is as follows.
public enum VehicleEvents {
    SPECIFY,
    START_ASSEMBLY,
    INTERIOR_COMPLETE,
    EXTERIOR_COMPLETE,
    ASSEMBLY_COMPLETE,
    SHIP
}
Reviewing this, we can see exactly where each matches to their respective reference state or transition on our complete diagram above.
Next we will implement a listener that extends StateMachineListenerAdapter to log state changes.
public class VehicleStateListener extends StateMachineListenerAdapter<VehicleStates, VehicleEvents> {
    @Override
    public void stateChanged(State<VehicleStates, VehicleEvents> from, State<VehicleStates, VehicleEvents> to) {
        System.out.println("state changed from " + offNullableState(from) + " to " + offNullableState(to));
    }

    private Object offNullableState(State<VehicleStates, VehicleEvents> s) {
        return Optional.ofNullable(s).map(State::getId).orElse(null);
    }
}
Finally, we will implement the state machine itself. This contains the three overridden methods as before. One for defining the states, one for implementation of the transitions. A third for the state machine configuration itself.
package com.brianeno.statemachine.config;

import com.brianeno.statemachine.domain.VehicleEvents;
import com.brianeno.statemachine.domain.VehicleStates;
import com.brianeno.statemachine.service.VehicleStateListener;
import lombok.AllArgsConstructor;
import org.springframework.context.annotation.Configuration;
import org.springframework.statemachine.config.EnableStateMachineFactory;
import org.springframework.statemachine.config.EnumStateMachineConfigurerAdapter;
import org.springframework.statemachine.config.builders.StateMachineConfigurationConfigurer;
import org.springframework.statemachine.config.builders.StateMachineStateConfigurer;
import org.springframework.statemachine.config.builders.StateMachineTransitionConfigurer;

@Configuration
@EnableStateMachineFactory
@AllArgsConstructor
public class VehicleStateMachineConfig extends EnumStateMachineConfigurerAdapter<VehicleStates, VehicleEvents> {

    public static final String VEHICLE_ID_HEADER = "vehicle_id";
    public static final String MACHINE_ID = "forkjoinMachineId";

    @Override
    public void configure(StateMachineStateConfigurer<VehicleStates, VehicleEvents> states) throws Exception {
        states.withStates()
            .region("R_MAIN")
            .initial(VehicleStates.VEHICLE_SOLD, ctx -> {
                System.out.println("Action sold");
            })
            .state(VehicleStates.VEHICLE_SPECIFIED, ctx -> {
                System.out.println("Action specified");
            })
            .state(VehicleStates.VEHICLE_PACKAGED, ctx -> {
                System.out.println("Action package");
            })
            .state(VehicleStates.VEHICLE_SHIPPED, ctx -> {
                System.out.println("Action shipped");
            })
            .fork(VehicleStates.FORK_BEGIN_ASSEMBLY)
            .join(VehicleStates.JOIN_END_ASSEMBLY)
            .end(VehicleStates.VEHICLE_SHIPPED)
            .and()
            .withStates()
            .parent(VehicleStates.FORK_BEGIN_ASSEMBLY)
            .region("R_EXTERIOR")
            .initial(VehicleStates.VEHICLE_EXTERIOR_ASSEMBLING)
            .end(VehicleStates.VEHICLE_EXTERIOR_ASSEMBLED)
            .and()
            .withStates()
            .parent(VehicleStates.FORK_BEGIN_ASSEMBLY)
            .region("R_INTERIOR")
            .initial(VehicleStates.VEHICLE_INTERIOR_ASSEMBLING)
            .end(VehicleStates.VEHICLE_INTERIOR_ASSEMBLED);
    }

    @Override
    public void configure(StateMachineTransitionConfigurer<VehicleStates, VehicleEvents> transitions) throws Exception {
        transitions
            .withExternal()
            .source(VehicleStates.VEHICLE_SOLD)
            .target(VehicleStates.VEHICLE_SPECIFIED)
            .event(VehicleEvents.SPECIFY)
            .and()
            .withExternal()
            .source(VehicleStates.VEHICLE_SPECIFIED)
            .target(VehicleStates.FORK_BEGIN_ASSEMBLY)
            .event(VehicleEvents.START_ASSEMBLY)
            .and()
            .withFork()
            .source(VehicleStates.FORK_BEGIN_ASSEMBLY)
            .target(VehicleStates.VEHICLE_INTERIOR_ASSEMBLING)
            .target(VehicleStates.VEHICLE_EXTERIOR_ASSEMBLING)
            .and()
            .withJoin()
            .source(VehicleStates.VEHICLE_INTERIOR_ASSEMBLED)
            .source(VehicleStates.VEHICLE_EXTERIOR_ASSEMBLED)
            .target(VehicleStates.JOIN_END_ASSEMBLY)
            .and()
            .withExternal()
            .source(VehicleStates.VEHICLE_INTERIOR_ASSEMBLING)
            .target(VehicleStates.VEHICLE_INTERIOR_ASSEMBLED)
            .event(VehicleEvents.INTERIOR_COMPLETE)
            .and()
            .withExternal()
            .source(VehicleStates.VEHICLE_EXTERIOR_ASSEMBLING)
            .target(VehicleStates.VEHICLE_EXTERIOR_ASSEMBLED)
            .event(VehicleEvents.EXTERIOR_COMPLETE)
            .and()
            .withExternal()
            .source(VehicleStates.JOIN_END_ASSEMBLY)
            .target(VehicleStates.VEHICLE_PACKAGED)
            .event(VehicleEvents.ASSEMBLY_COMPLETE)
            .and()
            .withExternal()
            .source(VehicleStates.VEHICLE_PACKAGED)
            .target(VehicleStates.VEHICLE_SHIPPED)
            .event(VehicleEvents.SHIP);
    }

    @Override
    public void configure(StateMachineConfigurationConfigurer<VehicleStates, VehicleEvents> config) throws Exception {
        config.withConfiguration()
            .machineId(MACHINE_ID)
            .autoStartup(true)
            .listener(new VehicleStateListener());
    }
}
A few notes. We defined in the state configuration anonymous Action functions for logging.
Next take note of the fork() and join() additions in the state configuration.
In our transition configuration we use the withFork and withJoin methods. The fork has two targets and the join has two sources. This is where the beginning and ending of the parallel execution occurs.
The fork and join are also a target and a source respectively for other state transitions.
This is the code implementation for our state diagram we made in Papyrus, which allowed us to follow the labeling and workflow defined and translate into code. As mentioned I find this incredibly useful.
For testing let’s implement the run method in our application class.
@SpringBootApplication
@RequiredArgsConstructor
public class SpringStateMachineApplication implements CommandLineRunner {


    private final StateMachineFactory<VehicleStates, VehicleEvents> stateMachineFactory;

    public static void main(String[] args) {
        SpringApplication.run(SpringStateMachineApplication.class, args);
    }

    @Override
    public void run(String... args) {

        StateMachine<VehicleStates, VehicleEvents> stateMachine = stateMachineFactory.getStateMachine(VehicleStateMachineConfig.MACHINE_ID);

        // since version 3.x need to send events reactively
        stateMachine.sendEvent(Mono.just(MessageBuilder.withPayload(VehicleEvents.SPECIFY)
            .setHeader(VehicleStateMachineConfig.VEHICLE_ID_HEADER, 1)
            .build())).subscribe();

        stateMachine.sendEvent(Mono.just(MessageBuilder.withPayload(VehicleEvents.START_ASSEMBLY)
            .setHeader(VehicleStateMachineConfig.VEHICLE_ID_HEADER, 1)
            .build())).subscribe();

        stateMachine.sendEvent(Mono.just(MessageBuilder.withPayload(VehicleEvents.INTERIOR_COMPLETE)
            .setHeader(VehicleStateMachineConfig.VEHICLE_ID_HEADER, 1)
            .build())).subscribe();

        stateMachine.sendEvent(Mono.just(MessageBuilder.withPayload(VehicleEvents.EXTERIOR_COMPLETE)
            .setHeader(VehicleStateMachineConfig.VEHICLE_ID_HEADER, 1)
            .build())).subscribe();

        stateMachine.sendEvent(Mono.just(MessageBuilder.withPayload(VehicleEvents.ASSEMBLY_COMPLETE)
            .setHeader(VehicleStateMachineConfig.VEHICLE_ID_HEADER, 1)
            .build())).subscribe();

        stateMachine.sendEvent(Mono.just(MessageBuilder.withPayload(VehicleEvents.SHIP)
            .setHeader(VehicleStateMachineConfig.VEHICLE_ID_HEADER, 1)
            .build())).subscribe();
    }
}
When we run our application we see the following logging.
....
....
10:10:05.859 [restartedMain] INFO  c.b.s.SpringStateMachineApplication - Started SpringStateMachineApplication in 0.812 seconds (process running for 1.078)
Action sold
state changed from null to VEHICLE_SOLD
state changed from VEHICLE_SOLD to VEHICLE_SPECIFIED
Action specified
state changed from null to VEHICLE_EXTERIOR_ASSEMBLING
state changed from null to VEHICLE_INTERIOR_ASSEMBLING
state changed from VEHICLE_INTERIOR_ASSEMBLING to VEHICLE_INTERIOR_ASSEMBLING
state changed from VEHICLE_INTERIOR_ASSEMBLING to VEHICLE_INTERIOR_ASSEMBLED
Action package
state changed from FORK_BEGIN_ASSEMBLY to VEHICLE_PACKAGED
state changed from VEHICLE_EXTERIOR_ASSEMBLING to VEHICLE_EXTERIOR_ASSEMBLED
state changed from VEHICLE_PACKAGED to VEHICLE_SHIPPED
Action shipped
10:10:05.964 [RMI TCP Connection(2)-172.16.0.44] INFO  o.a.c.c.C.[Tomcat].[localhost].[/] - Initializing Spring DispatcherServlet 'dispatcherServlet'
....
....
After the line “Action specified” we see where the parallel execution begins.
With this we have defined a parallel executing workflow.
Loading From UML Diagram
Earlier I mentioned the three files that were created as part of the Eclipse Papyrus state diagram. One of those had a .uml extension.
Spring StateMachine allows loading a state machine directly from this uml without any addition code.
This is done through the spring-statemachine-uml library. We will create a separate project, the code can be found here.
The code can be found here.
In the pom.xml we will add the following dependency.
        <dependency>
            <groupId>org.springframework.statemachine</groupId>
            <artifactId>spring-statemachine-uml</artifactId>
        </dependency>
this will bring in the required functionality to load an external state diagram.
Our configuration class now looks as follows.
@Configuration
@EnableStateMachineFactory
@AllArgsConstructor
public class VehicleUmlStateMachineConfig extends StateMachineConfigurerAdapter<String, String> {

    public static final String MACHINE_ID = "umlMachineId";

    @Override
    public void configure(StateMachineConfigurationConfigurer<String, String> config) throws Exception {
        config.withConfiguration()
            .machineId(MACHINE_ID)
            .autoStartup(true)
            .listener(new VehicleUmlStateListener());
    }

    @Override
    public void configure(StateMachineModelConfigurer<String, String> model) throws Exception {
        model
            .withModel()
            .factory(modelFactory());
    }

    @Bean
    public StateMachineModelFactory<String, String> modelFactory() {
        return new UmlStateMachineModelFactory("classpath:VehicleState.uml");
    }
}
Our application class looks as follows.
@SpringBootApplication
@EnableStateMachine
@RequiredArgsConstructor
public class SpringUmlStateMachineApplication implements CommandLineRunner {
private final StateMachineFactory<String, String> stateMachineFactory;
public static void main(String[] args) {
SpringApplication.run(SpringUmlStateMachineApplication.class, args);
}
@Override
public void run(String... args) {
StateMachine<String, String> stateMachine = stateMachineFactory.getStateMachine(VehicleUmlStateMachineConfig.MACHINE_ID);
stateMachine.sendEvent(Mono.just(MessageBuilder.withPayload("Begin_SSM")
.build())).subscribe();
stateMachine.sendEvent(Mono.just(MessageBuilder.withPayload("Sell Vehicle")
.build())).subscribe();
stateMachine.sendEvent(Mono.just(MessageBuilder.withPayload("StartAssembly")
.build())).subscribe();
stateMachine.sendEvent(Mono.just(MessageBuilder.withPayload("AssemblyComplete")
.build())).subscribe();
stateMachine.sendEvent(Mono.just(MessageBuilder.withPayload("SHIP")
.build())).subscribe();
}
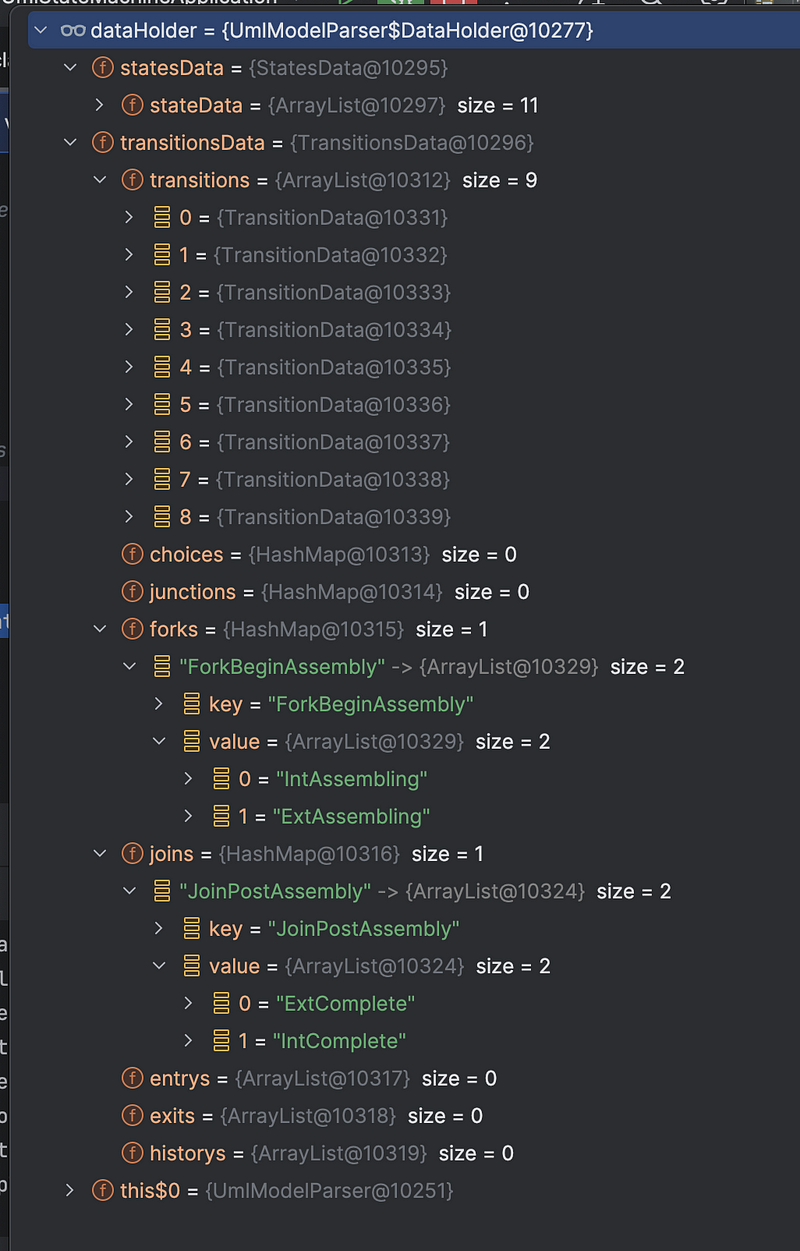
}Once the UML state diagram is loaded within the debugger we can see the states, transitions, fork and joins were successfully loaded.
This is how a Eclipse Papyrus UML diagram is loaded into your state machine. This could potentially be used where external groups such as business analysts or workflow specialists could create workflows within Papyrus and could be used seamlessly within a SpringBoot Spring StateMachine application.
It is worth adding that within the code if guards or actions are defined these can be referenced within Papyrus state diagram by creating behaviors, language “bean” and the name of the action bean within the code.
With that we are done with our walk through of some additional topics related to SSM.
Summary
In this article we did a deeper dive into Spring StateMachine by looking at creating state diagrams within Eclipse Papyrus. We also created a code based implementation of parallel state execution using Fork / Join functions. Finally, we looked at how to load a state diagram dynamically into our code using UmlStateMachineModelFactory.
As usual all source can be found in my Github repository.
The code for VehicleStateMachine Fork/Join sample can be found here.
The code for VehicleUmlStateMachine can be found here.
Enjoy the journey.
🔔 If you enjoyed this, subscribe to my future articles or view already published here. 🚀
📝 Have questions or suggestions? Leave a comment or message me through Medium.
Thank you for your support! 🌟


