
Spring Boot, Kafka, Non-Blocking Retries — A Hands-on Tutorial
Non-blocking failed message handling in Kafka with RetryableTopic in a Spring Boot application

Sometimes, when we process messages from Kafka topics, errors can happen. For example, consumer services or other infrastructure can be down. We want to ensure we don’t lose any data and try to handle the failed messages.
The default Kafka failure handling behavior retries to process the messages infinitely. This is not beneficial because some fatal errors cannot be fixed, and we should not reprocess them.
Instead of relying on the default implementation, we can use the RetryableTopic annotation to configure a more robust strategy to handle failed messages. For example, we can send the failed message to the Dead Letter Queue, limit the number of retries, define timeout, exclude fatal exception reprocessing, etc.
In this tutorial, I’ll show you how to implement the RetryableTopic in a Spring Boot application in a few easy steps.
Let’s get started!
RetryableTopic Introduction And Benefits
First, let’s understand the difference between blocking and non-blocking message retries. Let’s say that you’ve configured a @Bean in your Kafka configuration to try to reprocess the failed messages N number of times. For example, consider the following code extract:
The consumer tries to reprocess the failed messages continuously in real -time. The main topic will be blocked. Here we have a FixedBackOff strategy with 3 attempts with a recovery interval of 5 seconds.
If all retry attempts have failed, the message is sent to the Dead Letter Queue (DLT). Until then, all other incoming messages will be blocked until the previous ones are processed.
This can be dangerous, especially if the retry interval is too long.
Here is how we can improve the situation by using RetryableTopic:
- The main topic is not blocked, and other messages can be processed.
- The failed messages are sent to retry topics with a back-off timestamp.
- If the failed message cannot be processed, it is sent to the next retry topic.
- If the processing fails for all retry topics, the message is forwarded to the DLT.
- Messages from the DLT can be retried by being sent back to the first retry topic.
Prepare the Project
We’ll produce messages using an HTTP Get request and consume the messages using Kafka. The Kafka listener will use the RetryableTopic annotation.
I’ve created a skeleton Spring Boot project via https://start.spring.io/ for this demo.
Add the dependencies
I’m using Maven as a build tool. We need the following dependencies in the pom.xml:
- The
spring-boot-starter-webdependency enables the creation of a web application. - The
spring-kafkadependency is used for Kafka operations. - The
lombokdependency eliminates the usage of boilerplate code.
Prepare the infrastructure
To run Kafka locally, let’s create a docker-compose.yml file:
- We have two services —
zookeeper, needed bykafka.
Configure the Kafka properties
Let’s configure the application.yml:
- The name of the topic we’ll listen to is called
my-topic. - The name of the Kafka consumer group is
my-group. - We’ve configured the
KafkaProducerandKafkaConsumerproperties for serialization and deserialization. - We use the
29092port for the Kafka bootstrap server we defined in thedocker-compose.ymlfile.
Add a Kafka Listener
Let’s create the Kafka listener:
- We use the
@ Componentannotation to register the Bean in the Spring Boot app. - We have a method
handleMessage()where we define our Kafka listener and use the@RetryableTopic. - When all retry attempts are exhausted, the message is forwarded to the
handleDlt()method, indicated by the@DltHandlerannotation. The default name of the DLT topic will bemy-topic-dlt. - Note that the
throw new RuntimeException("Test exception")part is required for testing purposes.
Here are some of the @RetryableTopic's essential properties:
- The
attemptsproperty defines how many retries we want to have. In this case, we’ll have 4 retries plus 1 for the original topic. - The app will auto-create the topics with suffixes named after the index value. For example,
my-topic-retry-1. The naming strategy is defined by thetopicSuffixingStrategyproperty. - The
backoffproperty instructs the app to retry the failed messages in 1 second. We have a multiplier of2.0. This means that the second attempt will happen after 2 seconds, the third after 4 seconds, and so on. - The
excludeproperty lets us configure which exceptions we don’t want to retry. For example, it’s a good practice to ignore fatal exceptions, such asDeserializationException. For a complete list of unrecoverable failures, check the documentation.
The RetryableTopic provides other powerful options. If you want to check them out, visit the documentation.
Add a Rest Controller
For simplicity, let’s add a RestController to produce messages to the topic:
- The
produceMessage()method will send messages to our Kafka topic. - The
kafkaTemplateis autowired by default. Of course, we could configure our own Bean if we need a custom implementation.
Create the Main app
The main app looks like this:
Test the application
Now, it’s time for testing!
- Start the local infrastructure by running:
docker-compose up2. Run the main class - KafkaErrorHandlingApplication.java.
3. Send a test message via the controller. For example:
GET http://localhost:8090/produce/helloYou should see in the app’s console that the listener receives the messages. Since we throw a RuntimeException, the message will be forwarded to the retry topics and finally to the DLT.
The log looks like this:
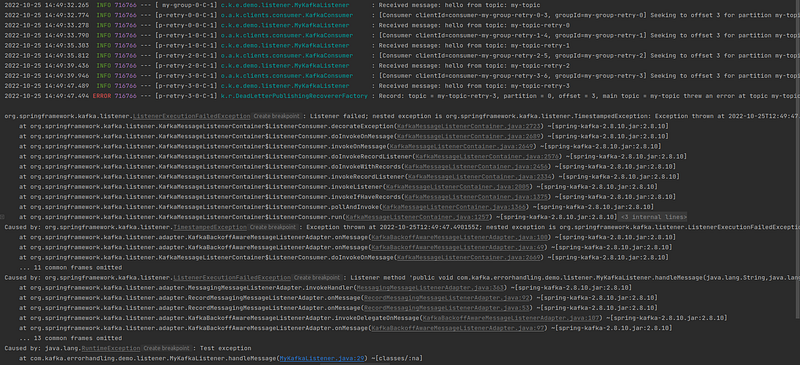
Perfect! Check the timestamp on the screenshot to see that the retry attempts happen as configured by the BackOff policy.
Also, the DLT works as expected:

Conclusion
In this tutorial, you learned how to use the RetryableTopic annotation to implement non-blocking failed message handling. We saw some example configuration properties.
This annotation provides us with a robust solution for error handling. However, keep in mind that currently, it comes with a few limitations as per the official docs:
By using this strategy you lose Kafka’s ordering guarantees for that topic.
At this time this functionality doesn’t support class level
@KafkaListenerannotations.
You can find the link to the complete source code of this demo under the References section below.
I hope that you’ve learned something new from this post. If you liked this tutorial, you might also like my other Kafka-related articles:
Thanks for reading, and happy coding!


