
Build a Real-time Chat Application Using Socket.io and NextJS
How sockets work, what you can do with them, and how to implement the functionality with NextJS
There is always something more that you can add to your application. Maybe you’ve created a beautiful dashboard but you don’t want your user to refresh the site every time there is something new.
Maybe you want to send a notification when a new message is present. Maybe you always wanted to create a multiplayer real-time game like agar.io.
Possibilities are endless. But for different types of endeavors, you need a different set of tools. In this article I’ll walk you through the necessary steps which you have to take in order to build a real-time chat application like that:
If you’re more comfortable with working with the code, here is the Github project.
What are sockets?
There’s not really much value for knowing all of the theory underneath a socket unless you’re a Linux programmer, so let’s not dive into a rabbit hole. I’m here to give you everything you need so you can start creating cool applications. Sooooo.. what is a socket?
A socket is an endpoint of communication between 2 devices. That is a definition. In my opinion, the easiest way to understand what a socket really gives us is to put it in comparison to a non-socket communication.
Client-Server (one-way) communication
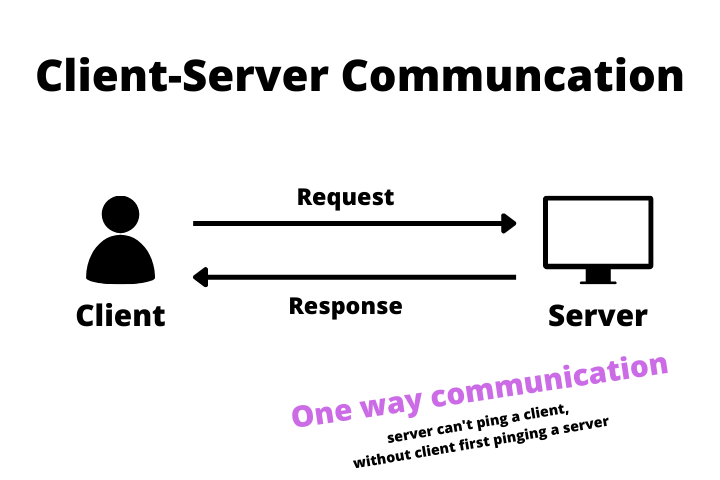
In the modern web majority of communication on the internet is of a client-server type - most APIs, and websites work in that fashion. What client-server communication really means is that a client has to ask a server in order to receive an answer. There is no way for a server to initialize that communication therefore server can’t really notify a user about any events.
Socket (dual-way) Communication
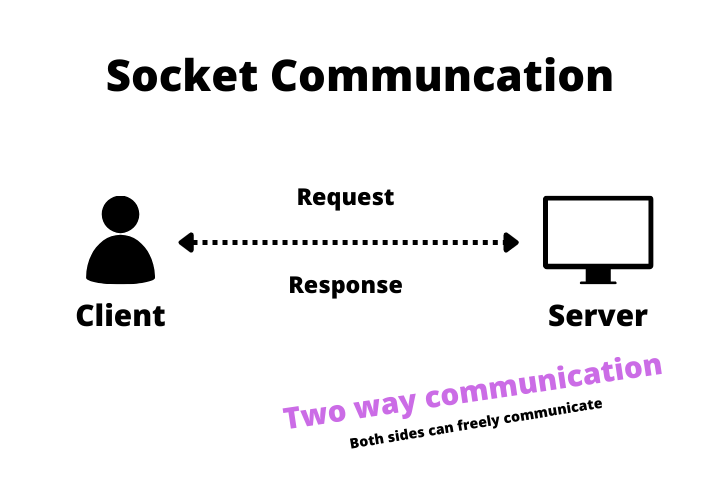
In socket communication, once it’s established both sides are free to send each other a message. There is no need to initialize communication after it was established. Now the server can notify a user about e.g. new message, and the user can react to it. Communication in that scenario is based on events.
Socket.io architecture
In order to establish dual-side communication, we need a server and a client. Since we’re using NextJS our server-side will be placed in the NextJS API folder, while the client-side will be coded into each page that will need it. So in total, we will have one server (it’s possible to have more than one server if the traffic is heavy) and one connection per client. Let’s start with the server-side.
Socket Server Code
Create a socket.tsx file in the API folder. Since the NextJS API folder acts as a server we’ll need to set one up here. We check if the socket connection is already set up by examining the res socket property. Basically, we want to create one server instance for the whole app. As you can see first we check if the server.io property is present, if so that means that we already have a server. If not we create a new one, and afterward, we assign emit handlers which I will show you in the next step.
It’s worth noting that although we can create events with almost any name there are a few special ones. The “connection” being one of them. Other ones are e.g.: “connect-error”, “disconnect”, etc. You can check the full list in the docs.
Setting different event handlers on connection is the right place to do it, because we have to make sure that the socket exists, and the callback function gets called only after the socket was created.
Although you could create all of the event handlers in the onConnection function we’ll do it with clean architecture in mind. Since we only have one event that won’t change a lot, but if you’d have a lot of them this would allow you to structure it nicely and group them for example by different functionality. The message handler looks like that:
As you can see the convention is to first define handlers on the top, and second assign them to correct events. This code means that if the client will send the createdMessage event it will get handled by a similarly named functio️n.
That’s all when it comes to the server side. Let’s now focus on the client.
Client App Code
All of the client code is placed in just one file: index.tsx. We create a global socket variable so it won’t get re-written every time, then we create a message type and set a few of useState values. So far so good. In useEffect, we run a socketInitializer function. Since we’re using a NextJS API as a server, we have to fetch(/api/socket) endpoint that will trigger the logic we’ve created in the previous step. It’s necessary because in order to connect to a server from a client we first need to make sure that the server exists.
Afterward, we assign an instance of io, assign it to a socket and create an event listener.
Emitting events
Since we’re already created a socket server, client, as well as event handlers, let’s emit an event when the user wants to send a message. If you want to notify a second side of the communication pipe you need to call emit method, where the first parameter is the name of the event, and all following ones are the arguments for a callback function. You can have as many of those as you want, just remember to specify them in the function declaration.
In this particular scenario, we also add the message to our message array which we’re displaying in chat. The reason for that is that there’s really not much sense in first sending it to the server and then sending it back to the client when we can just save it right away. That brings us to the next topic:
Different types of emit
Since there are a lot of different possibilities to use socket.io there are also a lot of different ways to send an event. You can emit it to all of the clients except the one that sends it (like in the example above), you can broadcast it to include the one that sends it, or you can send it just to one room (yes you can have rooms there). You should definitely know what you can use, and socket.io has a superb cheat sheet in their documentation.
Frontend
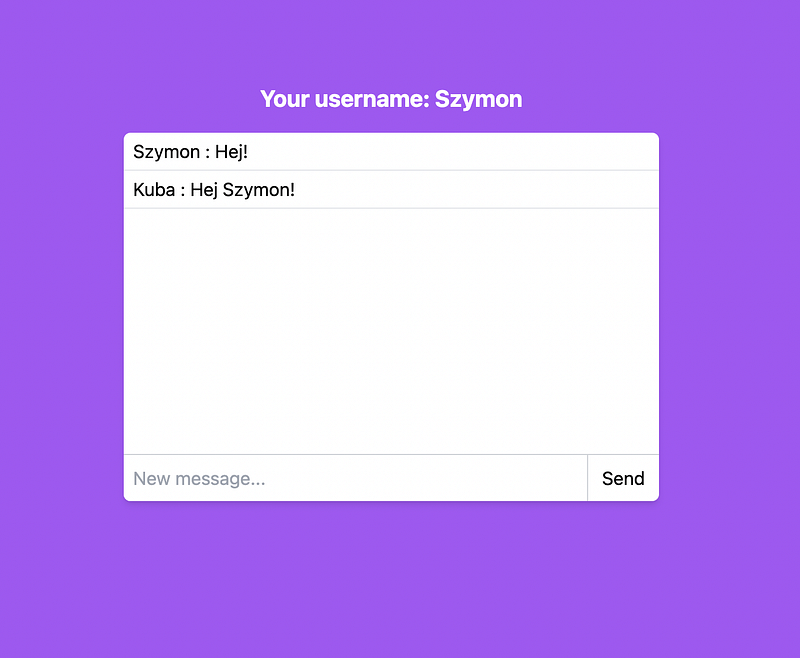
The last part of this tutorial is defining a front end, and it’s super easy. We just iterate over the messages array, display all of the messages, and send a message if the user presses the send button or presses enter key, which btw you achieve by doing that:
Overall the frontend code looks like that:
Summary
As you can see socket.io isn’t that scary, and it’s super powerful. It allows you to build interactive real-time dashboards, multiplayer games, and a lot more. In two words, it allows you to build websites that are more dynamic.
If you want to dive further you can either subscribe to my newsletter, for the next parts of the series or dive straight into the documentation.
Feel free to catch me up on Twitter.
And here is a Github repo.
Have a nice day.


