
Skeletonization in Python using OpenCV
Let me start off with a (not so) funny joke.
Why are skeletons so calm?
Because nothing gets under their skin.
What the heck is Skeletonization?
Before talking about skeletonization, let’s understand what Binary Image and BLOBs are.
Binary Image as the name suggests is an image where the value of every pixel in the image is either 0 (Pure Black) or 255 (Pure White).

BLOB (Binary Large Object) refers to a group of connected pixels in a binary image.
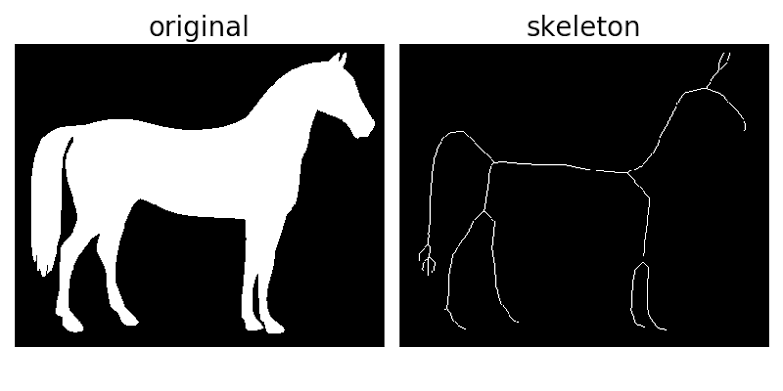
Skeletonization is a process of reducing foreground regions in a binary image to a skeletal remnant that largely preserves the extent and connectivity of the original region while throwing away most of the original foreground pixels.
In simpler words, Skeletonization makes a BLOB very thin (typically 1 pixel).
Why Skeletonize?
Skeletonization is widely used in object representation, retrieval, manipulation, matching, registration, tracking, recognition, compression, etc
It can facilitate quick and accurate image processing on the light skeleton instead of an otherwise large and memory-intensive operation on the original image.
Let’s start.
Let’s start off by importing the necessary libraries:
import cv2
import numpy as np
We need a guinea pig a.k.a test image to work on. I will be using the below image.

Why an Elephant you ask? Well, I like Elephants and they are kinda cool I guess.
Download the above image or any other image of your choice and name it as testimg.
Let’s load the image in grayscale and binarize it using thresholding.
Wait a second, what’s thresholding?
Thresholding is the process of converting a grayscale image into a binary image. Based on a certain threshold value, the pixels with value greater than the threshold will be converted to 255 (White) and lesser than the threshold will be converted to 0 (Black).
#Load the image in grayscale
img = cv2.imread('A://testimg.jpg',0)
#Threshold the image with threshold value 127
ret,img = cv2.threshold(img,127,255,0)
Time to address the Elephant in the room now.
How the hell do you skeletonize?
I found an excellent blog that demonstrates an excellent method implemented in C++. I will be using the same method here.
How to skeletonize?
A skeleton can be computed using only the two basic morphological operations: dilate and erode.
Let’s talk about dilation and erosion first.
Dilation: In extremely simple terms, this operation causes white regions within an image to “grow” or “dilate”.

Erosion: In extremely simple terms, this operation causes white regions within an image to “shrink” or “erode”.

Both erosion and dilation make use of something called a kernel.
The Kernel is a matrix usually shaped as a plus or a cross that is convoluted with the image matrix to get the result.
Opening is simply Erosion followed by Dilation.
Opening is extremely useful in removing noise as illustrated below.

So the process is basically repeatedly eroding the image and refining the skeleton.
STEPS:
- Starting off with an empty skeleton.
- Computing the opening of the original image. Let’s call this open.
- Substracting open from the original image. Let’s call this temp.
- Eroding the original image and refining the skeleton by computing the union of the current skeleton and temp.
- Repeat Steps 2–4 till the original image is completely eroded.
That’s all guys!
Complete Code:
Here’s our beloved elephant in all it’s skeletonized glory.


