
Simple React Application with FastAPI + Typescript + Postgres
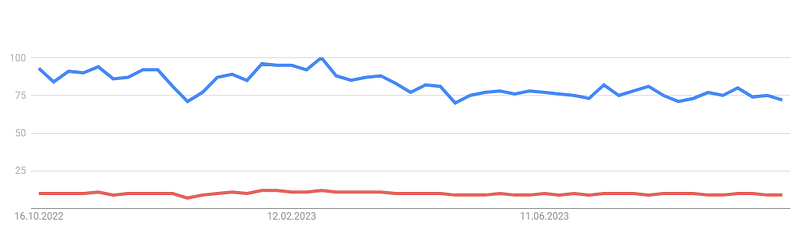
Yes! I now love and also hate this Typescript language. While I learned to program my Frontend with Javascript in React, I tried the Typescript language as I wrote my last app in Angular. I looked up the Google Trend barometer and was slightly surprised that TypeScript is just a fraction of the amount of searches Javascript creates (seen in Figure 1).
However, I liked the language and the additional settings and features the language adds to the Javascript framework. So, I made a small React application based on Typescript and a FastAPI with Python connected to a Postgres database. With this post, I want to give you a step-by-step tutorial on how to set up a quick and dirty development environment.
Step 1: Install the libraries
I programmed the backend and frontend in:
- Python
- Typescript
The frameworks used are:
- FastAPI
- React
- Postgres (SQLAlchemy)
For initialization, I recommend following the language’s websites and creating a virtual environment for the Python backend so you do NOT mess up the global Python initializations. I recommend Anaconda or virtualenv. Now, create a folder with your project name. We name it my-app.
Step 2: Create the React App
Now open your terminal, go into that project folder, and create the frontend folder in your project via the command:
npx create-react-app frontend --template typescript
This will create a folder with Typescript in the project. When you look at the structure, it should look like that:
my-app ├── frontend │ ├── README.md │ ├── node_modules │ ├── package.json │ ├── package-lock.json │ ├── .gitignore │ ├── public │ ├── tsconfig.json │ └── src
The only difference to a Javascript app now is the additional tsconfig.js in the folder structure. This will set up the options for the linting and typescript rules.
Step 3: Create the backend
After adding all necessary frontend folders, let us create the backend folder. Therefore, we must create a backend folder in the project parent folder my-app. We also added a main.py in the folder, so it is not empty. After that, it should be like that:
my-app ├── frontend ├── backend │ ├── main.py
So now your backbone of the app stands, and it is ready to fill it with life and start it up.
Step 4: Start Backend and Frontend
We use the FastAPI as the server between the two languages to connect the Frontend and Backend. It is an easy and flexible library with many options and different ways to embed. Copy and paste the following code to start a server with port 8000.
from fastapi import FastAPI

def start_application():
    app = FastAPI()
    return app

app = start_application()

@app.get("/")
def home():
    return {"msg":"Hello FastAPI🚀"}
If we want to start the API, we just need to run the command in the terminal at the level of the backend folder:
uvicorn main:app --reload
When you open it on http://127.0.0.1:8000/docs#/default you will see a nice API setup for watching your routes.
To start the Frontend, you need to go to your frontend folder in the terminal and execute the command:
npm run start
Then the beautiful React Hello WebPage will open in http://localhost:3000/ .
So far, nothing interesting happened. How are the two pages connected? They aren’t so far! To do that, we add a Server.ts file in the frontend src folder with the code:
export class Server {

    baseUrl = "http://127.0.0.1:8000"

    async getHello(): Promise<any[]> {
      try {
        const response = await fetch(`${this.baseUrl}/hello`);
        if (!response.ok) {
          throw new Error(`Request failed with status: ${response.status}`);
        }
        const data = await response.json();
        return data;
      } catch (error) {
        console.error("Error fetching places:", error);
        throw error;
      }
    }


  }
This Server fetches data from the FastAPI Server, which runs on port 8000 on our machine. Quick and Dirty! There is also a function getHello() implemented, which fetches a specific not yet implemented route in the Backend. But first, let’s see how to access the Server in a frontend component. Because of simplicity, let us take the App.tsx file:
import React from "react";
import "./App.css";
import {Server} from "../Server";

export interface Message {
  message: String;
}

function App() {

  const [hellomessage, setHello] = React.useState<String>();

  useEffect(() => {
        new Server().getHello()
            .then((message: Message) => setHello(message.msg)
            });
  }, []);
  return (
   <div className="App">
    {hellomessage ? hellomessage : "Hello there"}
   </div>
  );
}

export default App;
Now let us create the route in the backend which sends the data. Therefore we need to add to the main.py file following function/route:
@app.get("/hello")
def home():
    return {"msg":"Hello from the backend!"}
Now, when running the react app, we should see the msg. But we get an error! When you get an error, it might be due to CORS. When this happens, add a CORS policy to your main.py with:
from fastapi import FastAPI
from fastapi.middleware.cors import CORSMiddleware

def start_application():
    app = FastAPI()
    return app


app = start_application()
origins = [
    "http://localhost:3000",
    "http://localhost",
    "http://localhost:8000",
]

app.add_middleware(
    CORSMiddleware,
    allow_origins=origins,
    allow_credentials=True,
    allow_methods=["*"],
    allow_headers=["*"],
)

@app.get("/")
def home():
    return {"msg":"Hello FastAPI🚀"}

@app.get("/hello")
def home():
    return {"msg":"Hello from the backend!"}
Now everything should work properly and the Frontend and Backend are connected!
Step 5: Add the Postgres Database (or any other)
From here on, it is about some additional settings in the Backend to add a database connection in which your data is stored. You can start if you do not have any and want to execute the Backend functions with GenAI or other cool features! Happy Coding!
How do we add a connection to a Postgres server? The most important thing for this is the server address itself. The database URL has all the essential information included:
postgres[ql]://[username[:password]@][host[:port],]/database[?parameter_list]
The username, password, host, the host’s port and the database name with several parameters are the main parts of the SQL schema. To add that URL in our Backend, we create a .env file in the Backend folder:
DATABASE_URL=postgresql://postgres:tester@localhost:5432/hello
POSTGRES_USER=postgres
POSTGRES_PASSWORD=tester
POSTGRES_SERVER=localhost
POSTGRES_PORT=5432
POSTGRES_DB=hello
In this file, I inserted the URL and separated it into its components.
Now, a config.py file (also in the Backend folder) will fetch the needed data and output the information for us via a class called Settings:
import os
from dotenv import load_dotenv

from pathlib import Path
env_path = Path('.') / '.env'
load_dotenv(dotenv_path=env_path)

class Settings:
    PROJECT_NAME:str = "My App"
    PROJECT_VERSION: str = "1.0.0"

    POSTGRES_USER : str = os.getenv("POSTGRES_USER")
    POSTGRES_PASSWORD = os.getenv("POSTGRES_PASSWORD")
    POSTGRES_SERVER : str = os.getenv("POSTGRES_SERVER","localhost")
    POSTGRES_PORT : str = os.getenv("POSTGRES_PORT",5432) # default postgres port is 5432
    POSTGRES_DB : str = os.getenv("POSTGRES_DB","tdd")
    DATABASE_URL = f"postgresql://{POSTGRES_USER}:{POSTGRES_PASSWORD}@{POSTGRES_SERVER}:{POSTGRES_PORT}/{POSTGRES_DB}"

settings = Settings()
I used the Postgres parameters to create the DATABASE_URL, but you can skip these lines and add the DATABASE_URL from the .env file. As the needed information is loaded and ready to use, we create the engine to the database via SQLAlchemy to make our life easier:
from sqlalchemy import create_engine
from sqlalchemy.orm import sessionmaker
from config import settings

SQLALCHEMY_DATABASE_URL = settings.DATABASE_URL
print("Database URL is ",SQLALCHEMY_DATABASE_URL)
engine = create_engine(SQLALCHEMY_DATABASE_URL)

SessionLocal = sessionmaker(autocommit=False,autoflush=False,bind=engine)
Perfect so far! But we have two questions: how does the data look in the database, and where is the FastAPI Database connector??
The Data in the Database has several rows with three columns:
- id
- msg (Message)
- smiley
To embed the connector into the FastAPI, just change your main.py to the following:
from fastapi import FastAPI, Depends
from config import settings
from session import SessionLocal
from models import Hello
from base_class_api import HelloAPI
from typing import List
from sqlalchemy.orm import Session
from sqlalchemy import select
from fastapi.middleware.cors import CORSMiddleware

def start_application():
    app = FastAPI(title=settings.PROJECT_NAME,version=settings.PROJECT_VERSION)
    return app


app = start_application()
origins = [
    "http://localhost:3000",
    "http://localhost",
    "http://localhost:8000",
]

app.add_middleware(
    CORSMiddleware,
    allow_origins=origins,
    allow_credentials=True,
    allow_methods=["*"],
    allow_headers=["*"],
)

def get_db():
    db = SessionLocal()
    try:
        yield db
    finally:
        db.close()

@app.get("/")
def home():
    return {"msg":"Hello FastAPI🚀"}

@app.get("/hello")
def home():
    return {"msg":"Hello from the backend!"}

@app.get("/hellodb", response_model=List[HelloAPI])
def places(db: Session = Depends(get_db)):
    statement = select(Hello.id, Hello.msg, Hello.smiley)
    hellos= db.execute(statement).all()
    return hellos
Now you’re wondering, what are those HelloAPI and Hello things imported? We created them to make the error debugging easier and ensure the Frontend receives the correct format. They look as follows:
- models.py (in the Backend folder):
from base_class_sql import Base
from sqlalchemy import Column, Integer, String, Boolean, Float

class Hello(Base):
    __tablename__ = 'Hello_msg'

    id= Column(Integer, primary_key=True)
    msg= Column(String(collation='pg_catalog."default"'))
    smiley= Column(String(collation='pg_catalog."default"'))
- base_class_api.py (in the Backend folder):
from pydantic import BaseModel
from typing import Optional

class HelloAPI(BaseModel):
    id: int
    msg: Optional[str]
smiley: Optional[str]- base_class_sql.py (in the Backend folder):
from typing import Any
from sqlalchemy.ext.declarative import declared_attr
from sqlalchemy.orm import as_declarative

@as_declarative()
class Base:
    id: Any
    __name__: str

    @declared_attr
    def __tablename__(cls) -> str:
        return cls.__name__.lower()
Step 6: Test the Database connection in the Frontend
In our Backend Server and Database, everything is set up. The Frontend needs to call the Server route to the hello messages in the Database to collect them. Therefore, just add the following route to your Sever.tsx:
export class Server {

    baseUrl = "http://127.0.0.1:8000"

    async getHello(): Promise<any[]> {
      ...
    }
    async getHelloDB(): Promise<any[]> {
      try {
        const response = await fetch(`${this.baseUrl}/hellodb`);
        if (!response.ok) {
          throw new Error(`Request failed with status: ${response.status}`);
        }
        const data = await response.json();
        return data;
      } catch (error) {
        console.error("Error fetching places:", error);
        throw error;
      }
    }
  }
The App.tsx can now fetches the data via the route and shows the results:
import React from "react";
import "./App.css";
import {Server} from "../Server";

export interface Message {
  id: number;
  msg: String;
  smiley: String;
}

function App() {

  const [hellomessage, setHello] = React.useState<Message[]>();

  useEffect(() => {
        new Server().getHelloDB()
            .then((message: Message[]) => setHello(message)
            });
  }, []);
  return (
   <div className="App">
    {hellomessage ? hellomessage.map(item => (
      <div>
      <span>item.id</span>
      <span>item.msg</span>
      <span>item.smiley</span>
      </div>
      )
    ) : "Hello there"}
   </div>
  );
}

export default App;
Oh nice! We can now see the messages stored in the Database!
Step 7: Develop your app or deploy it!
Your development environment for a quick and dirty React Typescript App with FastAPI and Postgres is now set up, and you can code and develop your app. After the development, I recommend deploying your app to Docker and Kubernetes. You can also set up a development environment built from the ground with Docker and Kubernetes, so your app can easily change and deploy with just a few commands/clicks.


