
Shared Folders on a Local Network
A RaspberryPi 4 adventure

I suppose given all the available Cloud Storage from OneDrive, Google Drive, Box, Dropbox, and potentially many others, that you might ask why would anyone want to build a File Server on a local network. In this article, I will tell you why I did it and explain why it was quite the adventure.
The use case
I doubt that anyone explicitly starts out to build a File Server for the hell of it. There are far more enjoyable and cheaper things to be doing. Everything, therefore, starts with a use case. Start by describing the business or technical need and then progress towards identification of potential options.
My project
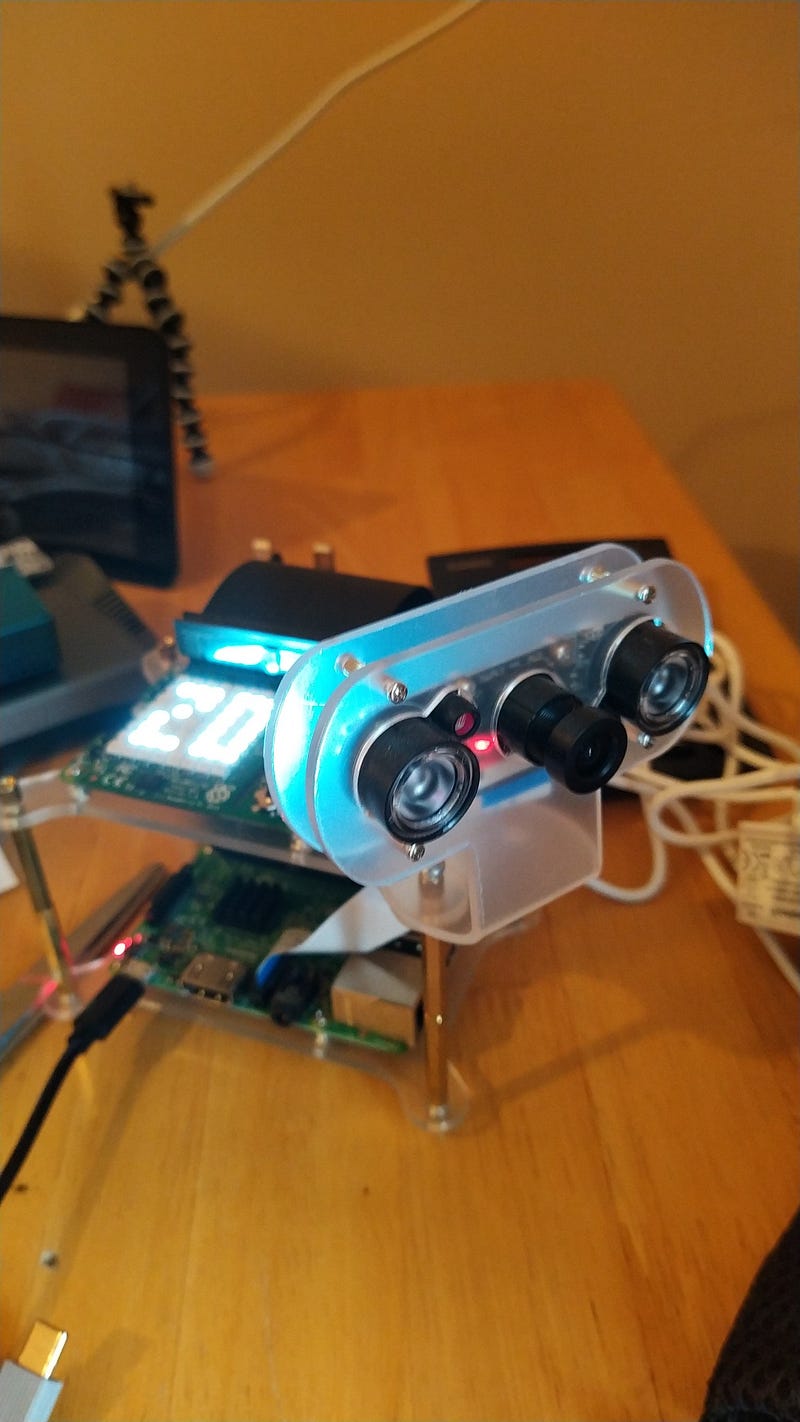
My project is based on a lot of small devices which measure the environment. The photo, below, will offer you some insight into these devices.
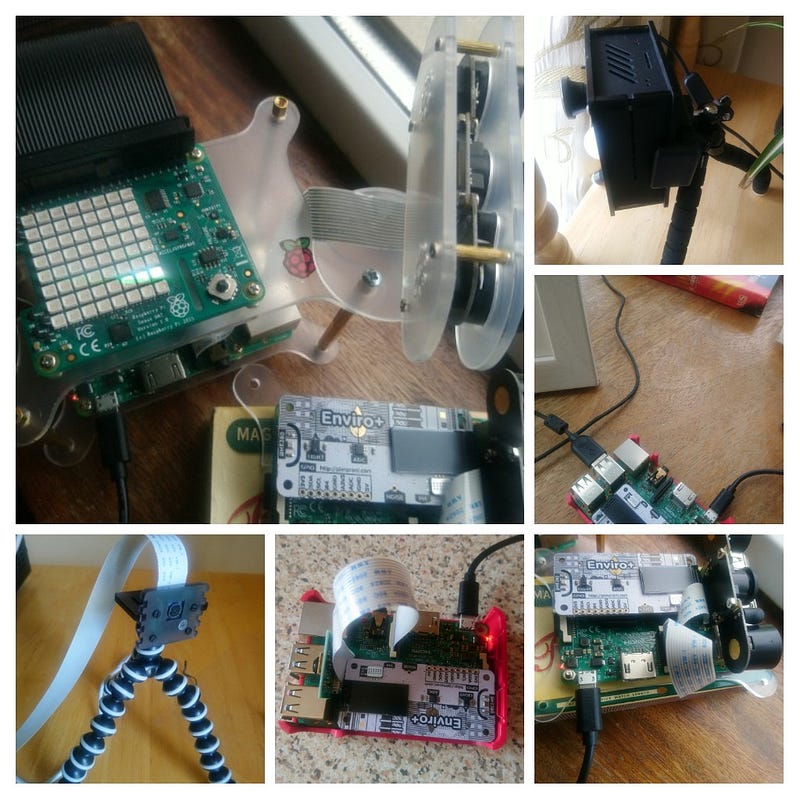
One of the critical things my project does is surveillance for a remote area. The service is based on motion detection rather than a Closed Circuit TV set-up. There is, therefore, no constant digital recording from the cameras, and that means no Digital Media recorder for playback, recording, and archive.
The cameras are a collection of Raspberry Pi camera modules. Some have infrared filters, others use Fish Eye lenses. Indeed, some cameras are standard off the shelf USB devices. It is really a bit of a mix and match. The important thing is they are all triggered based on detection. When motion is detected the specific activated Camera makes a short video recording encompassing the triggering event. The clip could be a few seconds or several hours, depending on the activity involved. In any given day, there could be hundreds of short video clips streaming off five different Cameras in real-time. You can examine the contents of Monitor5 from the little screenshot below.
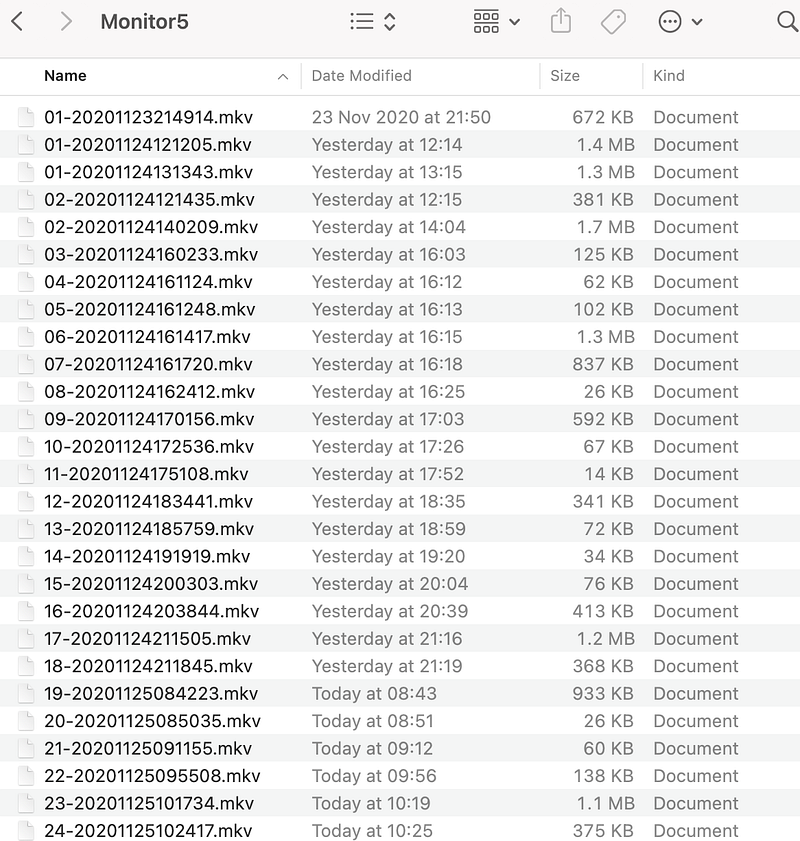
I needed a place to store a lot of small video clips, setting them up for further processing downstream. With five Cameras, I had a least five folders containing clips from specific points of view or vantage points. Since the files vary in size from 26kb to potentially gigabytes, I felt I needed a large storage facility. Transferring a large video file over the public internet does present some challenges.
Potential solutions
Undoubtedly there are many acceptable solutions to storing those video files. My first thought was to plug a USB external drive into the WiFi router on my desk. Seemingly the quickest and easiest solution. You can see that option in the photograph below. You will notice I have a 1TB Seagate Portable drive plugged into the Huawei F2000 modem.
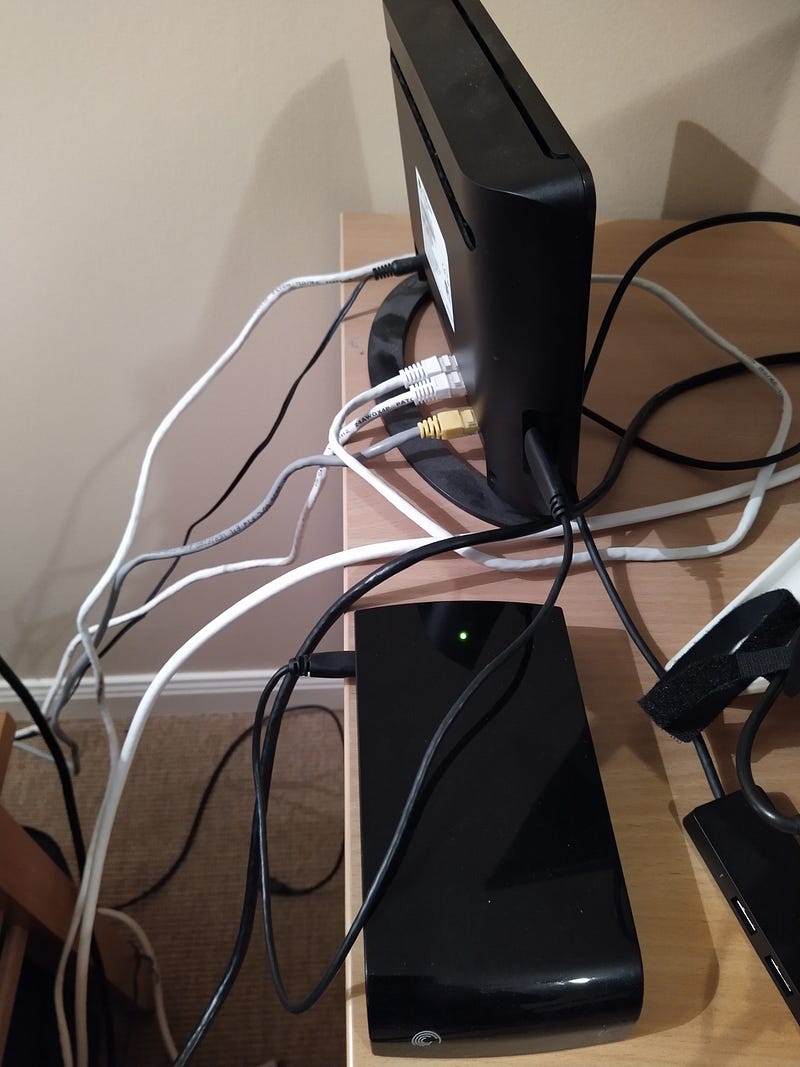
Probably was not a bad option, but there were some disadvantages. First off, I did not really like the whole idea. What if someone plugged out the Portable drive? What then? A single point of failure for the entire system. Worse what if someone hacked in and deposited something on the system for making trouble later. No, I was not a fan of the idea. Hatred aside, using the NAS seemed to be only half the trip. What would be the use of 100’s of video clips if we did not process them into a single movie and watch it? Dropping the files to the NAS left me needing to recover them all, process them, wipe the cache and NAS folders. I just hated the idea. Processing video from a USB drive on a modem is just not a good idea in practice. Each device would have to mount the NAS share, store user ID and Password, and it was slow. So I hated the option and pretty much said NO to using the Seagate drive.
Next, I had watched some videos and read some articles about OpenMediaVault. The quick and seemingly easy way to set-up a media server. Since I already had a RaspberryPi 4 computer running, I could have easily downloaded the OpenMediaVault OS image and just booted up my server. Seemed easy but then I did not want to dedicate an entire machine, at $49, to a media vault. Thinking that one through I figured my own dedicated media vault would really be the same as the portable USB drive just slightly more network traffic. This time I was stuck because I really did want to play with OpenMediaVault, but you do have to stick to the use case otherwise you will get lost in what I see as eye candy distractions. Very tempting solution but it was a NO due to the same basic problems.
S3 buckets and cloud object storage are always fun, but the project has a budget, and again colossal video files will take time to upload, then download for processing. FTP and SFTP always provided the answer in days gone by but using those mechanisms require additional orchestration and planning.
CIFS/Samba shares (SMB) caught my eye, and I read a few articles on that topic. Rather than have a dedicated file server or NAS device, I could just use a shared folder on the Application Server. An attractive option. On my application Server, I already had a web application running, an MQ broker service, a Redis Database, and a MongoDB instance. So making a shared folder on this server allowed me to schedule my video processing job and not have to move the video data. It sounded ideal, really. I liked the whole idea, and I decided, with a rush of blood to the head, that was what I would do. End of discussion, we are doing it.
Now you have the background on my project, the business need, and the solutions I looked at. Did I miss something fundamental? Probably! Did I understand my answer well enough? Probably not! It turned into an adventure and I will explain why next.
The Adventure
As with any adventure, there are multiple stages. There are precisely two main stages in setting up an SMB share. Broadly those stages map to the file server and the guest who must connect. In my project, I have one single-host server and at least five guests representing remote cameras.
Stage 1 — Server Side
Initially, I expected the server-side to be the most complicated, but that turned out to be really easy. Well, it was straightforward because I found a great article and just followed that religiously. I added the document below as an embed and encourage you to use this one if you are working on configuring a share.
After completing the steps in the article and the mandatory reboot, my shared folder was up and running. A quick test on a Windows computer provided me with the evidence. I remember sitting back and thinking that was supposed to be challenging, but that was easy, so way to go me! Champion! After much celebration I turned to configure the five camera computers or Stage 2 as I called it above.
Stage 2 — Guest or Client side
You might need a little further explanation of the Stage 2 computers. Let us start with one of my many photos to set the scene.
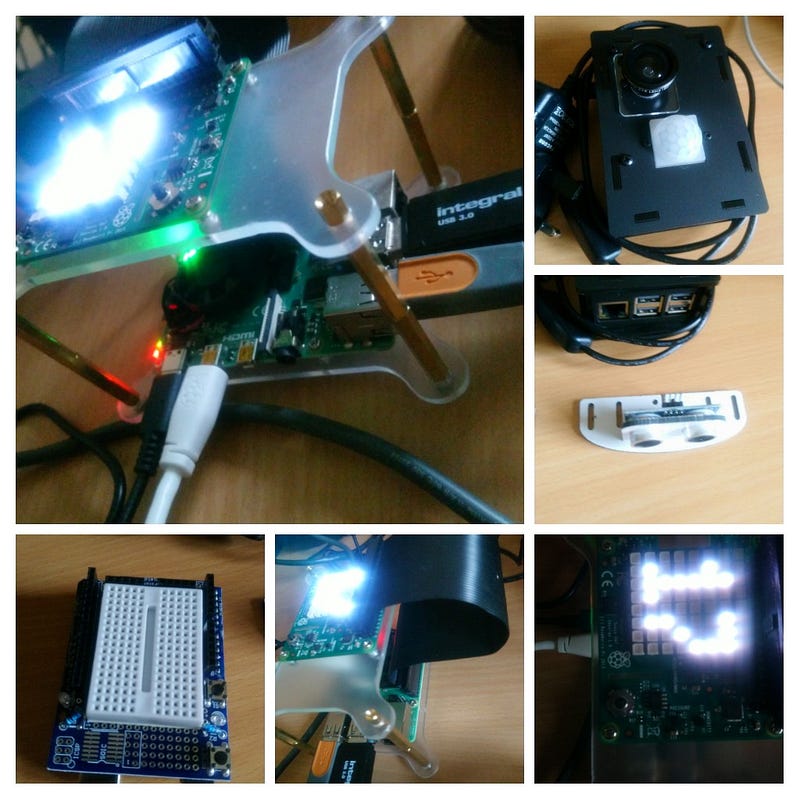
The devices are based on a Raspberry Pi 3 or Asus Thinker single board computer system. They use a MicroSD card or tiny onboard storage to keep a copy of the OS and working files. They all run a derivative of the Linux operating system. Essentially these are small low powered 32bit ARM processors with 2–4gig of RAM and mostly 16gig of SD Storage. Each computer needs to have read and write access to the share so that all video clips can be stored on the central application server. Doesn’t that sound really easy? But the reality is that it isn’t quite as easy as it seems! Why? you probably should ask?
Motion detection
Naturally, I didn’t design the motion detection algorithms myself. Hey! why reinvent the wheel? Instead, I just installed and configured the Motion Linux library. The motion library comes with a service definition, and you can control that service using a few special Linux incantations aka Magic Spells!
sudo systemctl start motion - starts the service as configured
sudo systemctl status motion - tells you the current status
sudo systemctl stop motion - stops the service
sudo systemctl enable motion
the most magic of all - enables the service to start on boot.
Assuming you did a normal install or at least
sudo cp "the service.service" /etc/systemd/systemYou can read much more from the Motion project on their site.
The troublesome aspect of configuring and auto-starting the Motion service is that Motion writes to a log file and requires a place to store the video clips. It is the motion service that created the .mkv files we examined and discussed earlier in this article. There now, another mystery has been unveiled to you, the reader. Naturally, I wanted my log and video clips to be stored directly on the web application file share rather than on those fragile small local SD cards.
Environmental sensors and internal device sensors
I did write some programs myself though! For instance, I did write the program that reads my sensors and sends the readings to the RabbitMq broker. You can find my code in the Github repository I created for the project.
When I say, I wrote you have to remember that Software Engineering is more like Art! I collected snippets from different places, including the hardware suppliers. Naturally, I created a demonised service and well yeah I went ahead and enabled that as well. Much “sudo’ing” going on I am afraid.
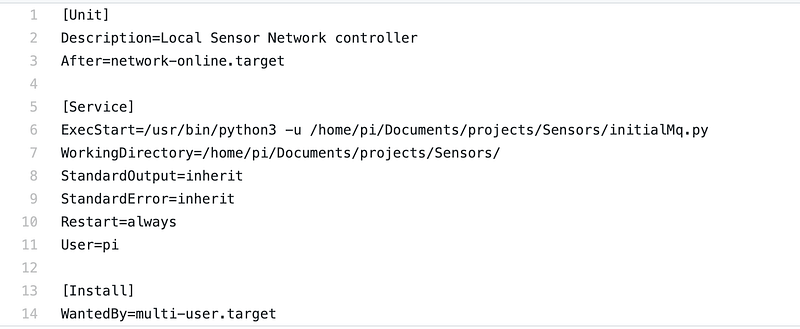
Hopefully, you are getting a picture of each device. On each device, at least two services are running those are a) Motion and b) my Sensor service. Believe me, when I tell you, many many more services are running on boot. The order of the services on boot-up is probably not that clear to me, but the start-up order and dependencies are quite important as I found out.
So I went ahead and configured Motion to write log entries and store video clips on the file server I previously configured in Stage 1. The motion service is controlled by a configuration file. Mine was visible as follows.
sudo nano /etc/motion/motion.confMounting the share was a little bit troublesome, but at the time, I didn’t really understand what I was doing. Hindsight is undoubtedly powerful, but I am writing this to pass the learning forward. Typically mounting the share is the straightforward piece and the Samba Server article I used demonstrated the technique with Windows and OSX. There was no difficulty at all.
My settings, on the Samba Server, are exactly the same as the article used. The magic incantation I was using was as shown below based on CIFS and the RaspberryPi ( piOS )
sudo mount -t cifs //192.168.1.1/pimylifeupshare /mnt/shared -o user=xx,pass=xxxxx, xxx those are secret guysThis worked for a manual mount, but I simply could not figure out how to get the share to mount on boot and significantly to be ready before the other system services started. Timing and sequence is everything in this adventure. Irrespective, and in practice, the whole system was working. With the manually mounted share, on each device, I could start Motion manually, and everything worked fine. You could say — so what it worked, it wasn’t perfect, but it worked! Yes, it did work, but it wasn’t near perfect because it wasn’t even right, it was terrible. Daily power cuts caused the system to crash, and then when everything just re-booted the share would no longer be mounted, and hence the cameras would be offline. See what I mean? It wasn’t right at all.
Stage 3 — Learning and fixing
Ok, I know that I said there were only two stages. Stage 1 created the Samba Server, and Stage 2 was mapping each device to the server via CIFS. I did all my experiments as I described, but I struggled severely with re-booting sensor rigs, power cuts and start-up operations. I could not accept this pain, and therefore I went about fixing the issues. So what did I do?
Step 1
mkdir /home/pi/secSecure
This is a local directory which I want to map to my share
Last time I used /mnt/shared but this isn't right.
Step 2
sudo nano /etc/fstabadd the following line
//192.168.1.1/pimylifeupshare /home/pi/secSecure cifs uid=xx,username=xx,password=xxx,file_mode=0777,dir_mode=0777,iocharset=utf8,_netdev 0 0xx,xxx are a secret guys!Step 3
sudo crontab -eadd these lines@reboot sleep 30; mount -a
@reboot sleep 60; /etc/init.d/motion stop
@reboot sleep 90; /etc/init.d/motion startstop and restart motion because most likely it has already started before crontab is executed.Step 4
sudo nano /etc/motion/motion.confupdate the file location of the log and video library to
/home/pi/secSecureuse Cntrl W to find the entries. I had /mnt/shared so I searched for /mnt/Step 5
sudo reboot nowStep 6
Have patience, my apprentice. Remember than crontab will wait 30seconds on the reboot before it issues mount -a. Then 60 seconds to stop and restart motion. If all goes well, then the Camera LED should come on and glow red. Did it work? Well, let’s just say it did, but there was a bit of trial and error. There were initially some permission issues with writing to the share. I added “file_mode=0777,dir_mode=0777” in fstab, did a reboot, and that seemed to work. Again I am not sure why that was necessary, but peace has broken out. At this stage, if I was running a marathon, I for sure had hit the wall. It is hard to convey in this text medium exactly how frustrated I was with the whole thing.
“Motion cannot start — permission error.”
It works! I know it works because I configured four more devices and did, like, 100 restarts. Always the same now, I get a warm glowing RED LED.
Concluding
It should have been so simple but setting up streaming Motion detection based on a remote Samba share creates dependencies that might not always start correctly or on time. Authorities and permissions are also terribly important to get right. Often times, with demonised services, stuff just fails silently and is continually retried until some give up event.
I wrote this article for you so that you would have my solution and know that it is essential to never give up or settle for 2nd best. If it’s worth doing, then do it right!
If you are interested in the entire project, then you are a lucky Human Being. I made you a video series of the full build. Yes, from scratch. Go listen to it. There are 16 videos, and that too was a learning adventure so be kind.


