
Set up your Windows PC or Laptop for Spark and Scala development
And write your first piece of Scala code.
If you want to start getting into the whole big data field a good entry point for you is to set up a free tier AWS account with Amazon. This gives you — for an entire year — free access to most of the AWS big data eco-system provided you don’t go over certain data and processing limits. It’s great for learning AWS and doing proofs-of-concept and so on.
My other recommendation if you’re just starting your big data journey — and what this article is about — is to install a Spark and Scala development environment on your local PC or laptop.
Why Spark and Scala?
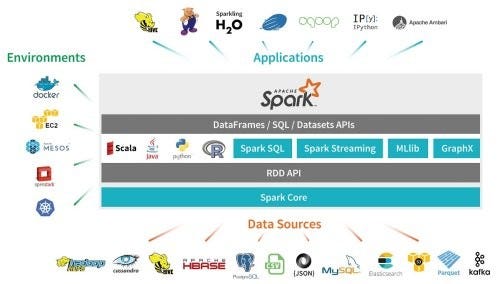
Spark is a general-purpose data processing engine that is suitable for processing very large data sets. It has support for the popular languages Java, Python, R, and Scala and is used in a wide range of circumstances including querying large data sets, machine learning and real-time data streaming applications. Oh, and it’s fast — very fast.
Its supporters claim a speed increase of 100x over Hadoop and map-reduce when running in-memory tasks and up to 10x increase when running disk-based tasks. In terms of the programming languages to use with Spark, the main advantage of Scala is that since Spark itself is written in Scala there tend to be fewer compatibility issues when new versions of either Spark or Scala are released.
Let’s get on to the installation process itself. There are quite a number of steps, just take your time and be methodical.
Install the JAVA development kit
SCALA compiles down to JAVA byte code and is able to take advantage of existing JAVA libraries therefore we need to install a JAVA development kit. You can get this from www.oracle.com. Choose the latest version of the JDK appropriate to your operating system, download it and follow the installation instructions.
Install Spark
You can get a pre-built version of Spark from spark.apache.org. Make sure you get one pre-built for Hadoop. It will download in a .tgz format which is a UNIX-type compressed format which windows will unlikely recognise off the bat. If so, there is a utility called WinRAR which you can download from www.rarlab.com which will read this kind of file. Once you’ve downloaded and unzipped the .tgz file, copy the unzipped contents to somewhere like c:\spark on your PC.
Install winutils.exe
We need to trick windows into thinking that HADOOP is installed on it and to do this there is a program called winutils.exe that you need to download and install onto your PC. Search for it on Google and make sure it’s virus-free before installing it. Create a directory c:\winutils\bin on your PC and copy the winutils.exe program to that location. You don’t run it explicitly — it will run when needed.
Change the log4j.properties.template file
We do this in order to reduce the number of warning messages shown. Go to the conf sub-directory under your Spark home directory. You should see a file called log4j.properties.template file. Open this file with a text editor and change the line
og4j.rootCategory=INFO, consoleto
og4j.rootCategory=ERROR, consoleSave the file.
Set up some environment variables
The following environment variables now need to be set up
Variable        Value
------------    -------
SPARK_HOME      Wherever you installed SPARK to e.g c:\spark
JAVA_HOME       Wherever you installed the JAVA JDK e.g c:\program Files\java\jdk1.8
HADOOP_HOME     Wherever you put bin directory that winutils.exe lives in e.g c:\winutils
Lastly, you need to amend your PATH environment variable and add the following to it.
%SPARK_HOME%\bin;%JAVA_HOME%\bin
Install an IDE
For larger programming projects it’s likely that you’ll need to install an Integrated Development Environment (IDE). There is a number to choose from but one I’ve used before is based on Eclipse. You can get it from www.scala-ide.org. Again, download the zip, uncompress it and copy its contents to, for example, c:\eclipse.
To check that the Spark installation is OK, go to wherever you installed Spark, open up a command window and type in spark-shell. After a minute or so you should see a welcome message, the Spark version you’re running and, eventually, a scala> prompt something similar to this:
Setting default log level to "WARN".
To adjust logging level use sc.setLogLevel(newLevel). For SparkR, use setLogLevel(newLevel).
23/02/27 10:53:28 WARN NativeCodeLoader: Unable to load native-hadoop library for your platform... using builtin-java classes where applicable
Spark context Web UI available at http://DESKTOP-87FEVI1.mshome.net:4040
Spark context available as 'sc' (master = local[*], app id = local-1677495210404).
Spark session available as 'spark'.
Welcome to
      ____              __
     / __/__  ___ _____/ /__
    _\ \/ _ \/ _ `/ __/  '_/
   /___/ .__/\_,_/_/ /_/\_\   version 3.3.2
      /_/

Using Scala version 2.12.15 (Java HotSpot(TM) 64-Bit Server VM, Java 1.8.0_261)
Type in expressions to have them evaluated.
Type :help for more information.

scala>
If you don’t see this then something has gone wrong and you should re-visit all the steps described above and make sure all is OK with them. Similarly for the IDE, just go to where the eclipse.exe lives and double-click on it. If it's the first time running it, you should see an eclipse launcher window prompting you to select a development workspace, otherwise, the normal eclipse IDE window will appear.
Now, for our very first SPARK/SCALA program we will do a simple wordcount program on a text file. Handily, the spark home directory has an existing file we can use called README.md. Use this or some other suitable text file on your system. Now, make sure you are in the home directory of your spark installation and type spark-shell. The spark-shell command should be in the bin sub-directory.
Once you have the scala> prompt, type in the following lines of code:
scala> val rdd = sc.textFile("c:/spark-3.3.2-bin-hadoop3/README.md")
rdd: org.apache.spark.rdd.RDD[String] = C:/spark-3.3.2-bin-hadoop3/README.md MapPartitionsRDD[1] at textFile at <console>:23

scala> rdd.count()
res0: Long = 124
There you go, you just ran your first Spark/Scala code!
To exit from spark, at the scala> prompt just type in :quit .
Ok, that’s all I have for now. If you found this content useful please consider following me for more content like this.