
Setting up SonarQube on Your Local Machine for Java Projects
A step by step guide with an example Maven project

Code Quality is one of the most important aspects of software engineering. SonaQube is the code assurance tool that ensures the code quality of the project by collecting your source code and analyzing it. You can configure your CI/CD pipeline to deploy or not based on the results from this tool. For example, if the unit test coverage is less than 85% you can fail the build pipeline.
In this post, we will see how we can run the static analysis for your project on your local machine. This will be useful to make sure your code quality is good before you check in your changes or make a PR, etc.
- Prerequisites
- Example Project
- Installing SonarQube
- Running Analysis
- Summary
- Conclusion
Prerequisites
Here are the prerequisites for this article. If you don’t have these on your system go ahead and install them if you want to practice on your machine.
Java Runtime and SDK: We need java runtime and SDK for the Java applications to run. This is the core component for running Java applications.
Eclipse IDE: We need an IDE to develop this application. There are other IDEs such as NetBeans, IntelliJ IDE, etc. Eclipse is an open-source IDE and has very good community support.
Spring Boot: Spring is a framework that makes our life easy to develop these java based applications. Spring Boot makes it easy to create stand-alone, production-grade Spring-based Applications that you can “just run”.
H2 Database: H2 Database is a very fast, open-source, JDBC API, and in-memory database. We use this as a database for our project.
JUnit 5: JUnit 5 is the testing framework for Java applications.
Maven: We need Maven to install dependencies, package, and build the project.
JMeter: It’s open-source software that is designed for load testing functional behavior and measures the performance of the application.
Project Lombok: This is a java library that automatically plugs into your editor and builds tools, spicing up your java. You would never write another getter or equals method again, with one annotation your class has a fully-featured builder, Automate your logging variables, and much more.
Postman: Manual testing your APIs
Example Project
Here is the Github link for the example project you can just clone and run on your machine.
// clone the project
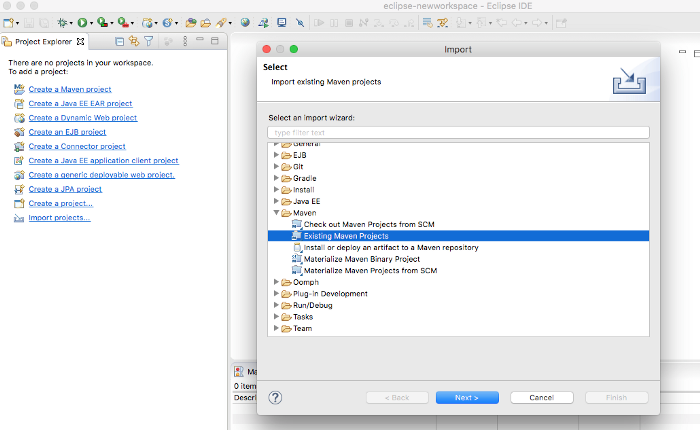
git clone https://github.com/bbachi/java-webservice-example.gitOnce you clone the project and import the project as an existing maven projects
Run the project as a java application as spring boot has an embedded tomcat container.

You can access the API on this URL http://localhost:8080/api/todo/tasks

Installing SonarQube
You can install SonarQube in multiple ways and you can visit the below page to install based on your operating system.
https://docs.sonarqube.org/latest/setup/get-started-2-minutes/I used Docker to install SonarQube on my local machine. Make sure you install the latest Docker Desktop from this page.
https://hub.docker.com/editions/community/docker-ce-desktop-macYou need to run the following command to start the SonarQube on port 9000.
docker run -d
     --name sonarqube
     -e SONAR_ES_BOOTSTRAP_CHECKS_DISABLE=true
     -p 9000:9000 sonarqube:latest
You can list the docker container or you can see it in the Docker dashboard as below.
docker ps

Once started and you can hit the URL http://localhost:9000/

Running Analysis
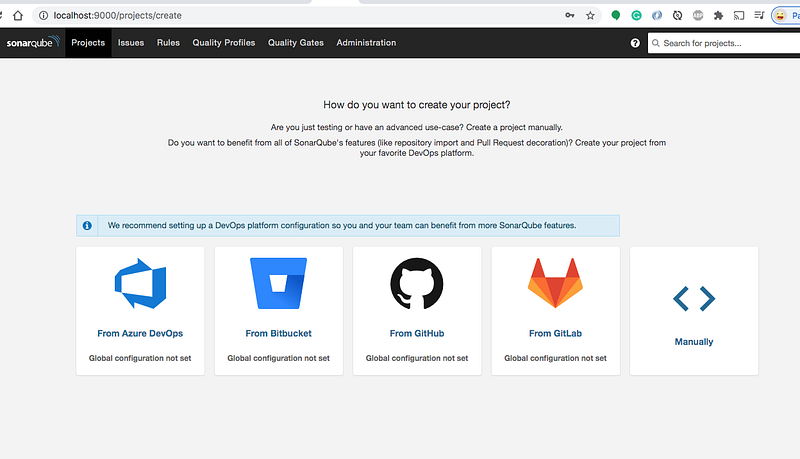
First, we need to create a project in the SonarQube. Click on the Manually tab from the below screen.
Let’s give the project display name and the key as below and click on the setup button.

On the next screen, you need to let SonarQube know where you want it to analyze the repository. Let’s select Locally.

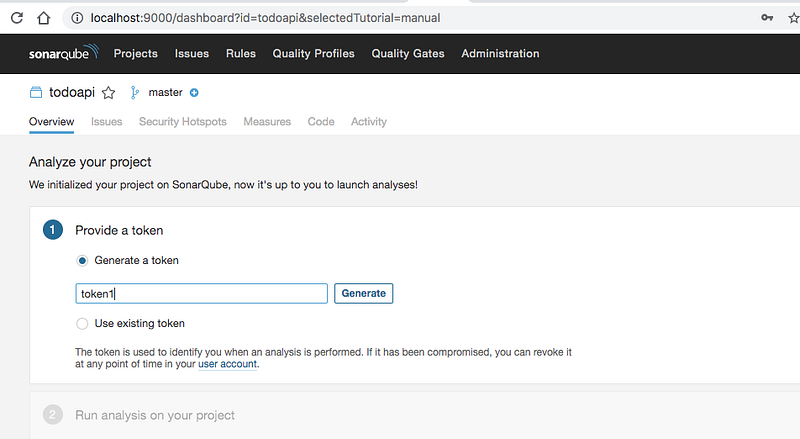
You need to generate the token on the next screen.

Once you go to the next screen you need to select the build. Since we are running analysis on the Java API with Maven configuration, let’ select Maven as below.
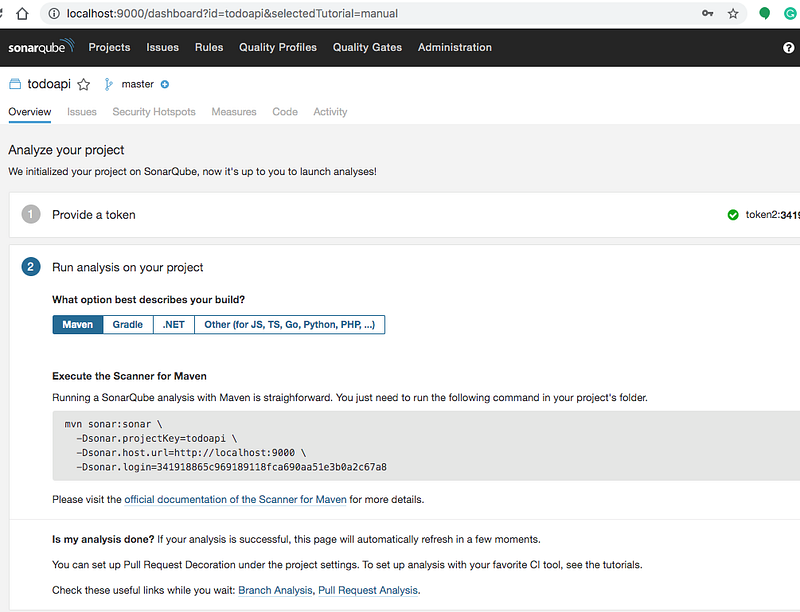
Let’s copy the command and run it at the root of the above-cloned project as below.

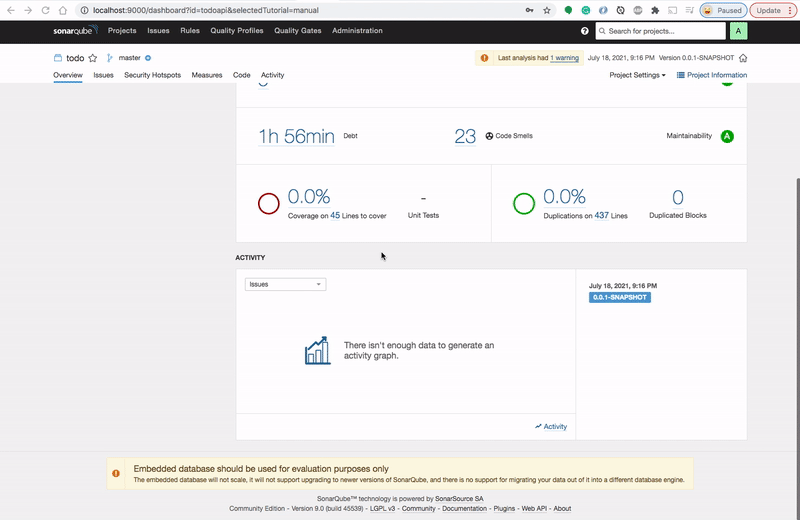
When the build is successful, you can see the SonarQube screen automatically refreshed with the analysis.
Summary
- Code Quality is one of the most important aspects of software engineering.
- SonaQube is the code assurance tool that ensures the code quality of the project by collecting your source code and analyzing it.
- You can install SonarQube in multiple ways: zip file or Docker
Conclusion
It’s always handy to run the SonarQube on your local machine for the analysis of your code.