
Setting up a YugabyteDB cluster using Docker
Your guide to setup a local YugabyteDB cluster on Docker containers for seamless scalability and performance

YugabyteDB is a popular distributed SQL database that offers high scalability, fault tolerance, and data durability. It allows users to deploy their databases across multiple data centers and cloud providers, ensuring high availability and performance. In this article, we’ll provide a step-by-step guide to setting up a YugabyteDB cluster with a replication factor of 3 using Docker containers. We’ll cover the necessary steps for configuring and deploying the cluster, and we’ll highlight best practices for ensuring fault tolerance and data durability. By the end of this article, you’ll have a fault-tolerant YugabyteDB cluster up and running on Docker, ready to handle your most demanding workloads.
1. Installing YugabyteDB
Pull the YugabyteDB Docker image.
$ docker pull yugabytedb/yugabyte
Pull Download the YugabyteDB workload generator.
$ docker pull yugabytedb/yb-sample-apps
2. Docker network
Let’s create a Docker network named “universe”:
$ docker network create universe
3. Creating a single-node cluster
We are going to use “yugabyted” which is a new database server that acts as a parent server across the yb-tserver and yb-master servers [ref.]:
docker run -d --rm --name yugabyte --net=universe --hostname=yugabyte -p7000:7000 -p5433:5433 \
 yugabytedb/yugabyte:latest bin/yugabyted start \
 --base_dir=/tmp/ybd \
 --listen=yugabyte \
 --master_flags "ysql_num_shards_per_tserver=4" \
 --tserver_flags "ysql_num_shards_per_tserver=4,follower_unavailable_considered_failed_sec=30" \
 --daemon=false
4. Creating a multi-node cluster
Add two more nodes to the cluster using the join option:
for N in 1 2
do docker run -d --rm --name yugabyte$N --net=universe --hostname=yugabyte$N -p700$N:7000 \
  yugabytedb/yugabyte:latest bin/yugabyted start \
  --base_dir=/tmp/ybd \
  --listen=yugabyte$N \
  --join=yugabyte \
  --master_flags "ysql_num_shards_per_tserver=4" \
  --tserver_flags "ysql_num_shards_per_tserver=4,follower_unavailable_considered_failed_sec=30" \
  --daemon=false
done
5. Checking cluster status
5.1 Docker
Run:
$ docker ps -a
Result:
docker ps -a
CONTAINER ID   IMAGE                        COMMAND                  CREATED          STATUS          PORTS                                                                                                                                                                               NAMES
2048dbb1f977   yugabytedb/yugabyte:latest   "bin/yugabyted start…"   15 seconds ago   Up 11 seconds   5433/tcp, 6379/tcp, 7100/tcp, 7200/tcp, 9000/tcp, 9042/tcp, 9100/tcp, 10100/tcp, 11000/tcp, 12000/tcp, 0.0.0.0:7002->7000/tcp, :::7002->7000/tcp                                    yugabyte2
a4172c593742   yugabytedb/yugabyte:latest   "bin/yugabyted start…"   19 seconds ago   Up 14 seconds   5433/tcp, 6379/tcp, 7100/tcp, 7200/tcp, 9000/tcp, 9042/tcp, 9100/tcp, 10100/tcp, 11000/tcp, 12000/tcp, 0.0.0.0:7001->7000/tcp, :::7001->7000/tcp                                    yugabyte1
40750cea24e1   yugabytedb/yugabyte:latest   "bin/yugabyted start…"   36 seconds ago   Up 31 seconds   0.0.0.0:5433->5433/tcp, :::5433->5433/tcp, 6379/tcp, 7100/tcp, 7200/tcp, 9000/tcp, 9042/tcp, 9100/tcp, 10100/tcp, 11000/tcp, 0.0.0.0:7000->7000/tcp, :::7000->7000/tcp, 12000/tcp   yugabyte
5.2 Admin UI
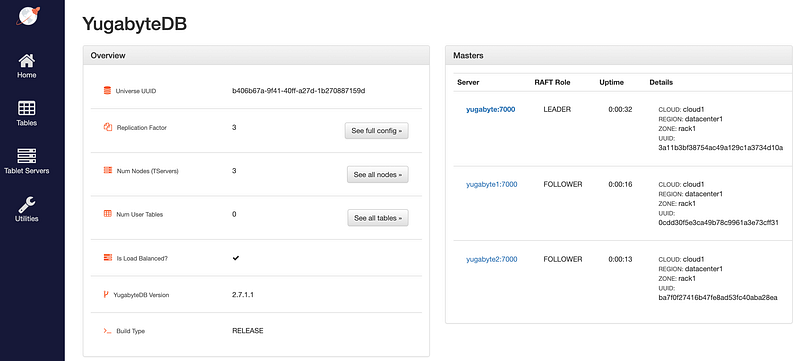
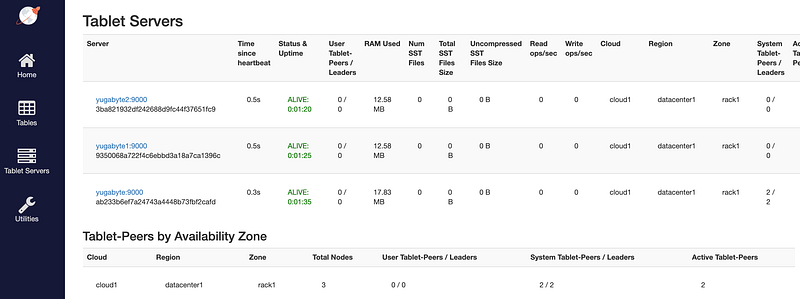
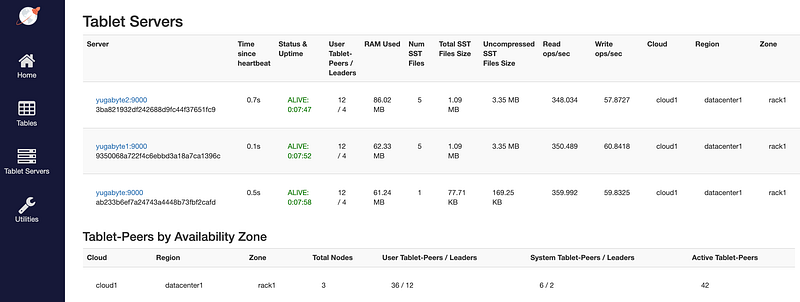
The yb-master Admin UI is available at http://localhost:7000 and the yb-tserver Admin UI is available at http://localhost:9000.
6. Emulating workloads against YugabyteDB
Run the command below and a new container yugabyte-client will be create:
docker run -d --rm --name yugabyte-client --net=universe yugabytedb/yb-sample-apps:latest \
  --workload SqlInserts --nodes yugabyte:5433 --num_threads_write 1 --num_threads_read 4
We can run and see the new container’s logs:
$ docker logs yugabyte-client
Result:
docker logs yugabyte-client
1 [main] INFO com.yugabyte.sample.Main  - Starting sample app...
81 [main] INFO com.yugabyte.sample.common.CmdLineOpts  - Using a randomly generated UUID : b3ebd393-e49c-4dc6-9cb4-11223f6c5b59
96 [main] INFO com.yugabyte.sample.common.CmdLineOpts  - App: SqlInserts
96 [main] INFO com.yugabyte.sample.common.CmdLineOpts  - Run time (seconds): -1
96 [main] INFO com.yugabyte.sample.common.CmdLineOpts  - Adding node: yugabyte:5433
97 [main] INFO com.yugabyte.sample.common.CmdLineOpts  - Num reader threads: 4, num writer threads: 1
97 [main] INFO com.yugabyte.sample.common.CmdLineOpts  - Num unique keys to insert: 2000000
97 [main] INFO com.yugabyte.sample.common.CmdLineOpts  - Num keys to update: 0
97 [main] INFO com.yugabyte.sample.common.CmdLineOpts  - Num keys to read: 1500000
97 [main] INFO com.yugabyte.sample.common.CmdLineOpts  - Value size: 0
97 [main] INFO com.yugabyte.sample.common.CmdLineOpts  - Restrict values to ASCII strings: false
97 [main] INFO com.yugabyte.sample.common.CmdLineOpts  - Perform sanity check at end of app run: false
97 [main] INFO com.yugabyte.sample.common.CmdLineOpts  - Table TTL (secs): -1
97 [main] INFO com.yugabyte.sample.common.CmdLineOpts  - Local reads: false
97 [main] INFO com.yugabyte.sample.common.CmdLineOpts  - Read only load: false
5210 [main] INFO com.yugabyte.sample.apps.SqlInserts  - Created table: postgresqlkeyvalue
10273 [Thread-1] INFO com.yugabyte.sample.common.metrics.MetricsTracker  - Read: 886.36 ops/sec (4.28 ms/op), 4474 total ops  |  Write: 189.83 ops/sec (5.24 ms/op), 951 total ops  |  Uptime: 5062 ms |
15277 [Thread-1] INFO com.yugabyte.sample.common.metrics.MetricsTracker  - Read: 1167.40 ops/sec (3.41 ms/op), 10327 total ops  |  Write: 204.97 ops/sec (4.86 ms/op), 1977 total ops  |  Uptime: 10066 ms |
20242 [Thread-1] INFO com.yugabyte.sample.common.metrics.MetricsTracker  - Read: 1212.68 ops/sec (3.29 ms/op), 16392 total ops  |  Write: 210.54 ops/sec (4.74 ms/op), 3030 total ops  |  Uptime: 15031 ms |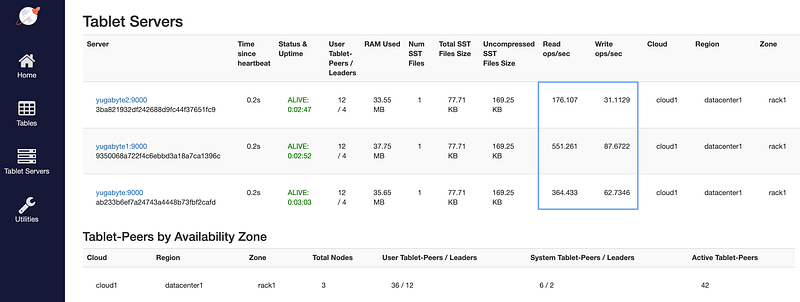
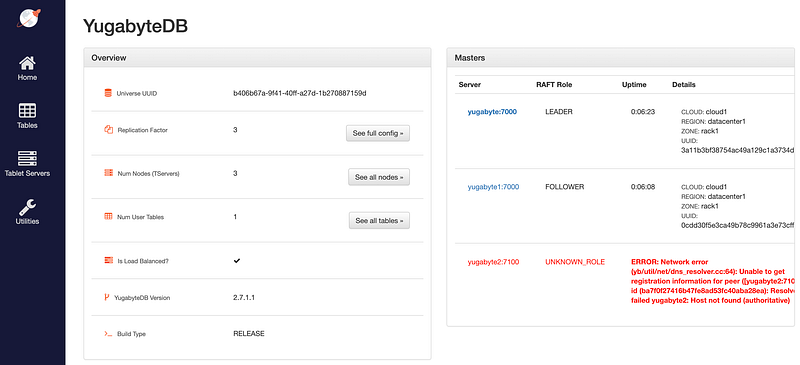
7. Fault tolerance with node disconnection
Let’s disconnect one container from network and observe continuous write/ready availability:
$ docker network disconnect universe yugabyte2
After some seconds..

8. Node cluster rejoins
Reconnecting the container to the network:
$ docker network connect universe yugabyte2
After some seconds..

9. Cleaning up
To clean up everything:
$ docker rm -f yugabyte yugabyte1 yugabyte2 yugabyte-client
$ docker network rm universe
$ docker rmi yugabytedb/yugabyte yugabytedb/yb-sample-apps
10. Conclusion
In this article, we’ve explored the process of setting up a YugabyteDB cluster with a replication factor of 3 using Docker containers. We’ve covered the essential steps for configuring and deploying the cluster, including best practices for ensuring fault tolerance and data durability. With YugabyteDB, you can build a highly scalable and resilient distributed database that can handle the most demanding workloads. By deploying your database on Docker, you can easily manage your infrastructure and seamlessly scale up or down as needed. We hope this article has been helpful in getting you started with YugabyteDB and Docker, and we wish you the best of luck in building your next-generation applications.
11. Reference
➕ Setting up MySQL Group Replication with MySQL Docker images
Thanks for reading
- 👏 Please clap for the story (50 claps) to help the article to be spread
- ➕More stories about Programming, Career, AI and more.
- 🔔 Follow me: Medium | LinkedIn | Twitter
- 📝 Join the Medium Membership Program for only 5$ a month, and support me and other writers to keep on the tremendous work.


