
Setting a Permanent Static IP Address in Ubuntu-Based Systems
How to Set a Static IP Address for your Ubuntu VM or Server

I have been able to set up lots of personal home labs/VMs for myself when trying out things on Ansible, Kubernetes, etc. One thing I keep battling with is constantly having to edit my /etc/hosts file because my IP address constantly changes whenever I reboot or change my network. If you are like me or you simply want to have a permanent IP Address for your server, nodes, or VM, here are the steps to set up a static IP address in Ubuntu-based systems. Please click here for CentOs based systems.
With this I can memorize the IP’s of all my nodes and SSH into them as much as I can, anytime, and any day. I have a set-up of both Centos and Ubuntu on my laptop. That is why I am doing this additional guide.
Objectives: 1. Configure a static IP address in an Ubuntu-based system. 2. Make the IP address configuration permanent. 3. Understand the network configuration files and their role.
Prerequisites: 1. An Ubuntu-based system (e.g., Ubuntu 20.04 or later). 2. Administrative (sudo) privileges. 3. Basic knowledge of your network configuration, including the desired IP address, subnet mask, and gateway IP.
Step-by-Step Guide:
- Identify Your Network Interface Name:
To configure a static IP address, you need to identify the name of your network interface. You can do this by using the
ip acommand or theifconfigcommand if it’s installed. Open a terminal and run:
ip aThis command will display a list of network interfaces. Identify the one you want to set a static IP address for eth0 or ens33. My network interface is enp0s3that is what I will be using.
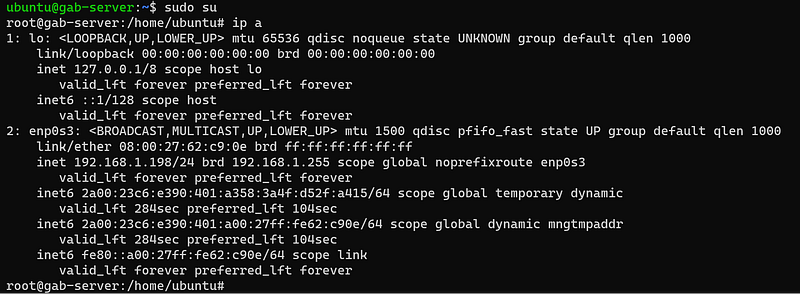
As shown above, my network IP is 192.168.1.198. However, I will be changing this IP to a static IP address of 192.168.1.201. This adjustment is part of a broader plan where I already have another Ubuntu Server acting as a master-nodefor my Ansible cluster with the IP of 192.168.1.200. I want all my Ansible hosts to be within the same network range, specifically in the 192.168.1.200 and 192.168.1.255 range while keeping the subnet mask consistent.
2. Edit the Network Configuration File:
Once you’ve identified your network interface, you need to create or edit a network configuration file. Ubuntu uses the /etc/netplan/ directory for network configuration. Use a text editor like nanoor vimto create or edit the configuration file for your specific interface. Replace interface_name with your actual network interface name: I have nano installed on my ubuntu system, so that is what I will be using.
sudo nano /etc/netplan/01-netcfg.yaml
3. Make Configuration Changes: Inside the configuration file, make the following changes to set up a static IP address:
- Set the interface to be “static” by defining it as `dhcp4: no`. - Define your static IP address by adding `addresses: [your_static_ip]` (replace `your_static_ip` with your chosen IP address). - Specify your subnet mask by adding `netmask: your_subnet_mask` (replace `your_subnet_mask` with your subnet mask). - Set your default gateway (if required) by adding `gateway4: your_gateway_ip` (replace `your_gateway_ip` with your gateway IP address).
Here’s an example of what the file might look like after making these changes:
network:
  version: 2
  ethernets:
    interface_name:
      dhcp4: no
      addresses: [192.168.1.201/24]
      gateway4: 192.168.1.1
4. Apply the Configuration:
Save the file and exit the text editor. In nano, you can do this by pressing Ctrl+O, then ENTER, and Ctrl+Xto exit.
Confirm the change;
cat /etc/netplan/01-netcfg.yaml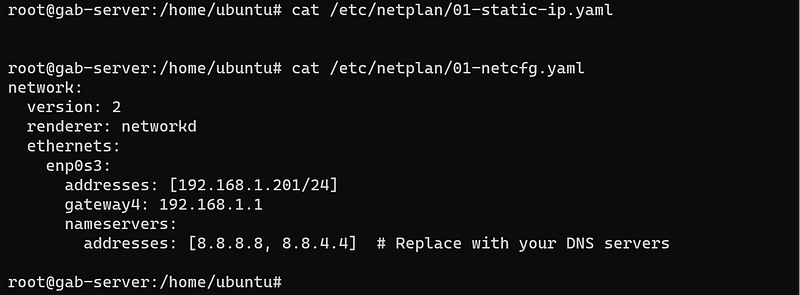
Apply the configuration using the following command:
sudo netplan apply
Restart the network depending on your network requirements
sudo systemctl restart systemd-networkd
or
sudo systemctl restart NetworkManager
Sometimes, you may have to reboot the system to see the change.
5. Verify the Configuration: Your Ubuntu-based system should now have a permanent static IP address configuration. Verify that the changes have taken effect by running:
ip aEnsure that the inetentry for your interface now displays the configured static IP address.

As shown, my IP has changed to the desired IP of192.168.1.201 , you should also have the same IP based on your IP earlier choice during the config.
Conclusion: By following these steps, you can set up a permanent static IP address on your Ubuntu-based system. Remember to adapt these instructions to the specific Ubuntu version you are using, as the process might differ for newer releases. If necessary, consult the documentation or resources relevant to your Ubuntu version for any variations in the process.
I am currently on Ubuntu 23.04 ; if you are not sure of what version you are using. Please run this command.
cat /etc/*releaseRelated Topics:
Click the topic to read more on …
Set up a static IP Address on CentOs based systems
#IPaddress #DevOps #Ansible #Kubernetes #Network #StaticIP #StaticIPaddresses #GabrielOkom #Ubuntu #Linux