
Selenium with Python Installation for Windows 10/11
Step 1. Make Sure You Have Python
(If you already have python installed, skip to step 2)
Step 1.1: Open a terminal and type “python”.
To do so, open the Windows search bar, type cmd and click on the icon.

If you prefer some other terminal that’s fine too.
If you don’t have python installed Windows will open the Windows Store and it will look something like this.

Step 1.2: Click the button labelled Install on my devices or Install and it will install Python for you as a Windows app. You can see in my screencap it says “This product is installed”. Yours should say that too once you’ve installed it.
Step 1.3: Open a new terminal and test your python got installed correctly like below.
$ python --version
Python 3.9.7
If it did not install correctly it will probably either launch the Microsoft Store or say “Command python not found” or something like that.
If for some reason you just cannot install python through the Windows Store, check out the Python Website here [3] and download and run the Windows installer for Python.
Once you can print the version number successfully you are clear to go to the next step.
Step 2. Make Sure You Have Pip
(If you already have pip installed, skip to step 3)

Step 2.1: You can check if you have pip installed by opening a terminal and entering “pip”. If pip is not found, you will have to install it.
Step 2.2: Download PIP get-pip.py
Before installing PIP, download the get-pip.py file. [2]
1. Launch a command prompt if it isn’t already open. You can use any terminal you like however.
2. Then, run the following command to download the get-pip.py file: [2]
curl https://bootstrap.pypa.io/get-pip.py -o get-pip.py
Step 3: Installing PIP on Windows
Step 3.1: To install PIP type in the following:
python get-pip.py[2]
Here is my full output:
$ python get-pip.py
Collecting pip
  Downloading pip-21.2.4-py3-none-any.whl (1.6 MB)
Collecting wheel
  Downloading wheel-0.37.0-py2.py3-none-any.whl (35 kB)
Installing collected packages: wheel, pip
  WARNING: The script wheel.exe is installed in 'C:\Users\ashle\AppData\Local\Packages\PythonSoftwareFoundation.Python.3.9_qbz5n2kfra8p0\LocalCache\local-packages\Python39\Scripts' which is not on PATH.
  Consider adding this directory to PATH or, if you prefer to suppress this warning, use --no-warn-script-location.
  WARNING: The scripts pip.exe, pip3.9.exe and pip3.exe are installed in 'C:\Users\ashle\AppData\Local\Packages\PythonSoftwareFoundation.Python.3.9_qbz5n2kfra8p0\LocalCache\local-packages\Python39\Scripts' which is not on PATH.
  Consider adding this directory to PATH or, if you prefer to suppress this warning, use --no-warn-script-location.
Successfully installed pip-21.2.4 wheel-0.37.0
WARNING: You are using pip version 21.2.3; however, version 21.2.4 is available.
You should consider upgrading via the 'C:\Users\ashle\AppData\Local\Microsoft\WindowsApps\PythonSoftwareFoundation.Python.3.9_qbz5n2kfra8p0\python.exe -m pip install --upgrade pip' command.
You’ll notice there are several warnings in here. Make a habit of always checking your install output for errors and warnings, it may save you a lot of pain later.
I am going to go ahead and heed these warnings.
It says that:
C:\Users\ashle\AppData\Local\Packages\PythonSoftwareFoundation.Python.3.9_qbz5n2kfra8p0\LocalCache\local-packages\Python39\ScriptsIs not on the path, so let’s add that to the path.
Step 3.2: Start typing the word “Environment Variable” into your Windows search bar

and select the option called “Edit the System Environment Variables”
Step 3.3: Click the button labelled “Environment Variables”

Step 3.4:
- Go to the bottom section labelled “System Variables”
- Find and select the element called “Path”
- Click the “Edit…” button
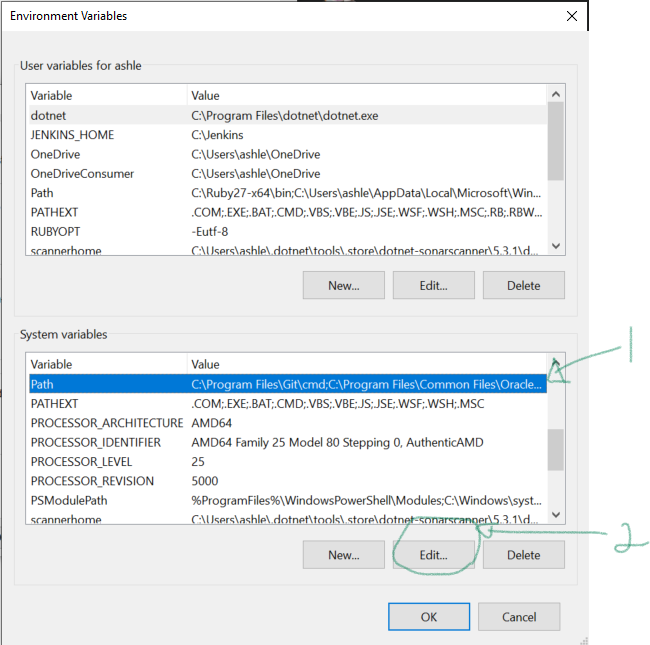
Step 3.5:
Click the “New” button to add a new element to the path

Step 3.6:
- Paste your path from the warning message into the new empty element that was just created.
Here’s the one from my error message:
C:\Users\ashle\AppData\Local\Packages\PythonSoftwareFoundation.Python.3.9_qbz5n2kfra8p0\LocalCache\local-packages\Python39\Scripts- Click the OK button

Step 3.7:
- Hit OK or exit out of the environment variables dialog and the System Properties Dialog


- Restart your terminal
If you can do:
$ pip --versionpip 21.2.4 from C:\Users\ashle\AppData\Local\Packages\PythonSoftwareFoundation.Python.3.9_qbz5n2kfra8p0\LocalCache\local-packages\Python39\site-packages\pip (python 3.9)And it prints out your version number then you are good to go to the next step.
Step 4: Install Selenium
Check to see if you already have selenium installed:
pip list | grep seleniumselenium 3.141.0In your terminal do as below:
$ pip install selenium
Collecting selenium
  Downloading selenium-3.141.0-py2.py3-none-any.whl (904 kB)
Collecting urllib3
  Downloading urllib3-1.26.7-py2.py3-none-any.whl (138 kB)
Installing collected packages: urllib3, selenium
Successfully installed selenium-3.141.0 urllib3-1.26.7
Step 5: Create User Data Cache
Step 5.1:
Create an empty folder called UserData. You can put it anywhere you like. You are going to encode the path to this folder in your script.
Step 5.2:
In your Chrome browser go to Hamburger Menu -> Help -> About Google Chrome

Here’s what version of Chrome I have at the time of this writing.
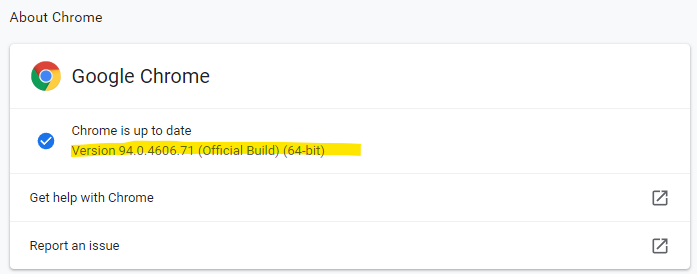
Yours might be different, but that’s not going to stop you.
Step 5.3:
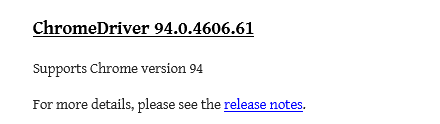
Now to go the ChromeDriver download page [4].
It looks like this.

Step 5.4:
Download the Chrome driver closest to your version of Chrome. If it is not an exact match that is fine, the minor version numbers are just for minor patches and bug fixes, its just important that the major version numbers match.
The one closest for me was the third one down the list that looks like this:
Edit: now I use this one:
Click the link. (It’s black text, I know, links are usually blue, but it’s underlined to let you know it’s a link.
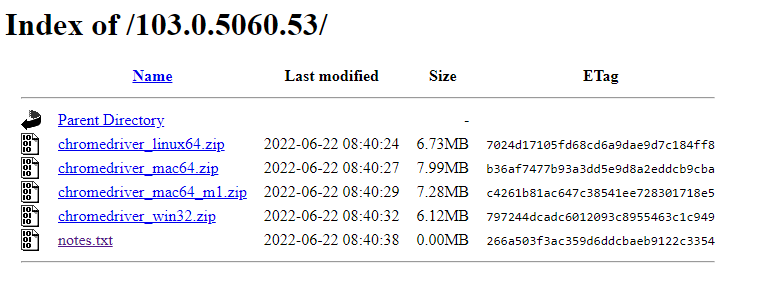
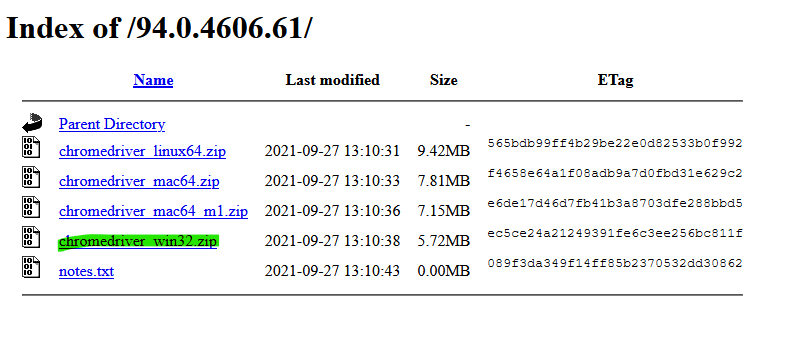
Step 5.5:
It takes you to some download page. Select chromedriver_win32.zip and download the file.
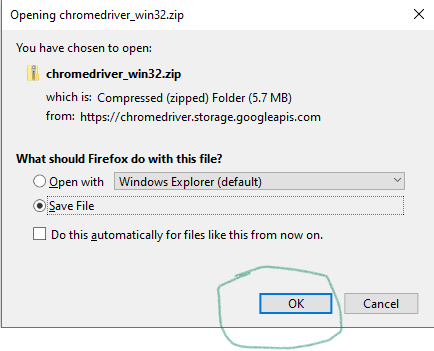
Click Ok to save the zip file.
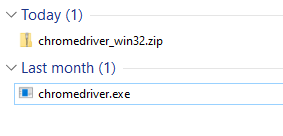
Step 6.6:
Unzip the file into your Downloads folder

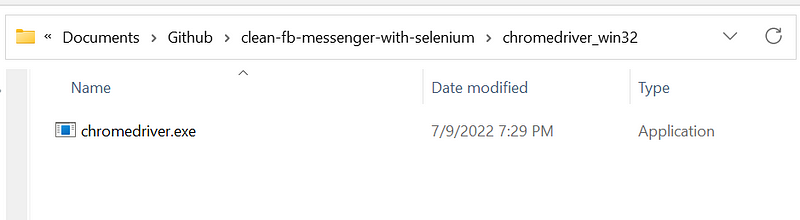
Step 6.7:
Make a folder for it in your project
Step 7: Let’s Write Some Code
Facebook and Tiktok are Javascript based pages, and urllib doesn’t know how to parse these.
$ pip list | grep seleniumselenium 4.3.0pip list | grep randomrandom-user-agent 1.0.1install code:
pip install selenium
pip install random_user_agent
If you haven’t joined Medium but would love to, click here. By signing up for Medium through my referral link, I will receive a small commission.
References
[1] Selenium Installation. https://selenium-python.readthedocs.io/installation.html
[2] Install Pip on Windows. https://phoenixnap.com/kb/install-pip-windows
[3] Install Python for Windows. https://www.python.org/downloads/
[4] Chrome Driver Download Page. https://chromedriver.chromium.org/downloads
[5] The Art of Not Getting Blocked. How to Use Selenium on Tik Tok and Facebook. https://readmedium.com/the-art-of-not-getting-blocked-how-i-used-selenium-python-to-scrape-facebook-and-tiktok-fd6b31dbe85f
[6] Selenium code to open facebook messenger and send a message. https://stackoverflow.com/questions/31168221/selenium-code-to-open-facebook-messenger-and-send-a-message
[7] Create Delete All Messages Button. https://gist.github.com/mdunham/aea1668dbd1c70b51ea44f99e5bca9b6
[8] Python Error. logging not defined. https://pythonexamples.org/python-nameerror-name-logging-is-not-defined/#:~:text=To%20solve%20the%20Python%20%E2%80%9CNameError,actually%20using%20the%20logging%20module.&text=The%20solution%20is%20same%20for,at%20the%20start%20of%20program.


