avatarLynda Coker

Free AI web copilot to create summaries, insights and extended knowledge, download it at here

2097

Abstract

ers</li><li>Design Wall or Portable Design Board (You will need to position your project at eye level and be able to back at least three feet away from it in order to judge composition and blending.) <a href="https://wisecrafthandmade.com/2014/09/make-portable-design-wall/">How to make your own design wall/board</a></li><li>Foundation fabric cut 3" larger on all sides than the size piece you want to create<b>. </b><i>(I created a 14 x 17-inch piece in vertical format– that meant my foundation fabric needed to measure 20 x 23 inches).</i> (I always mat and frame my fabric art so the 3 extra inches gives me room to do that. It will also give you room to add fabric borders if you choose.)</li><li>Chalk pencil: I use the pencil to make a rough drawing to help with placement and composition. Just a few lines are needed.</li></ul><p id="626a">Fuse fabrics according to the manufacturer's recommendations. Then cut the desired shapes and heat fuse them to the background fabric using the tacking iron. When the piece is complete, cover it with a pressing cloth and press with a regular iron on cotton setting. This will ensure that all areas have been bonded evenly.</p><h1 id="dc79">Tips for making fabric choice</h1><ol><li>Choose at least three values (light, medium, dark) of each of the primary colors in the guide image — Yellow/Gold, Blue/Gray, Green/Brown, Red/Orange.</li><li>Look at what you already have in your stash. Consider both sides of your fabric as an option.</li><li>Look for specific color ranges within a particular fabric. For example, you may have a fabric that is large sunflowers on a tan/brown background. You may think, “I can’t use that.” But, think again. Within the flower petals, is there a perfect shade of yellow, orange, or gold that you can cut and use? Remember, you will be working with small cuts of fabric. Does the tan/brown floral background have just the right shade to use for shadowing areas, etc?</li><li>Learn to look for small patches of color within your present fabric stash, looking at both sides of your existing fabric.</li><li>If you can’

Options

t find something that you need, buy a small amount for a specific project.</li><li>You can also start to improvise. Example: Let’s say I need some green foliage that has strong yellow or white highlights. And wouldn’t you know, I don’t have any foliage fabric that fits what I need. What to do? Perhaps I can put a foundation of solid green leaves, and then using yellow and white fabric that I do have, I’ll fussy cut a few leaves and then use a few snippets to highlight the existing green leaves. When finished, you would never know unless you examined the foliage area up close.</li><li>Art is the expression of what you see, not always an exact duplicate of it. Improvising has produced some of my most loved elements within some of my work. So don’t be afraid to improvise and invent.</li></ol><div id="1cdb" class="link-block"> <a href="https://readmedium.com/use-fabric-like-paint-to-create-art-hydrangea-love-b50e34ba1ffb"> <div> <div> <h2>Use Fabric Like Paint to Create Art — Hydrangea Love</h2> <div><h3>#1 Basic Technique — If you can use scissors and an iron, you’ve got this</h3></div> <div><p>medium.com</p></div> </div> <div> <div style="background-image: url(https://miro.readmedium.com/v2/resize:fit:320/1*NDAX48l3hRY808JzZMy7pw.jpeg)"></div> </div> </div> </a> </div><div id="8925" class="link-block"> <a href="https://readmedium.com/weeds-concrete-and-art-what-do-they-have-in-common-9b9cce62d4bc"> <div> <div> <h2>Weeds, Concrete, and Art — More in Common Than You Think</h2> <div><h3>A simple approach to mixed media</h3></div> <div><p>medium.com</p></div> </div> <div> <div style="background-image: url(https://miro.readmedium.com/v2/resize:fit:320/1*SJRYMVwZqB8hyguWi5NaWg.jpeg)"></div> </div> </div> </a> </div></article></body>

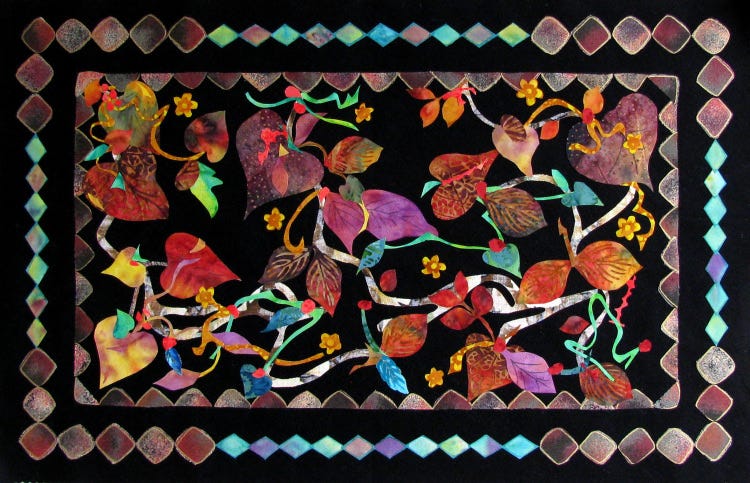
Scraps to Art — The Beauty of Autumn

#2 — Choosing fabrics — How to turn fabric scraps into mosaic art

Fabric Art and Photo by Lynda Coker

It’s so much fun to make something out of nothing. And that’s exactly what happens when I choose to use those small scraps of fabric that would normally end up in the trash.

This is article #2 in a serious of stories I’ll be writing on how I create my fabric art pieces. The basics are the same for each project. However, I’ll be covering different elements in more detail in each story.

The focus of this article is on how to choose fabrics.

Recommended tools and supplies

  • Heat resistant working surface. (I use a cushioned quilter’s grid)
  • Tacking/Mini Iron — Regular Iron
  • Fusible product of your choice — I use Wonder Under Medium weight and purchase it by the yard. You can use whatever fusible web you desire. There are several good choices, so do a little research and make your selection. Some choices may be Misty Fuse, Heat n Bond, Steam a Seam 2.
  • Large and small scissors
  • Applique/Teflon sheet (You can also use the release paper backing your fusible web product. Save some larger pieces after removing it from your fused fabric)
  • Tweezers
  • Design Wall or Portable Design Board (You will need to position your project at eye level and be able to back at least three feet away from it in order to judge composition and blending.) How to make your own design wall/board
  • Foundation fabric cut 3" larger on all sides than the size piece you want to create. (I created a 14 x 17-inch piece in vertical format– that meant my foundation fabric needed to measure 20 x 23 inches). (I always mat and frame my fabric art so the 3 extra inches gives me room to do that. It will also give you room to add fabric borders if you choose.)
  • Chalk pencil: I use the pencil to make a rough drawing to help with placement and composition. Just a few lines are needed.

Fuse fabrics according to the manufacturer's recommendations. Then cut the desired shapes and heat fuse them to the background fabric using the tacking iron. When the piece is complete, cover it with a pressing cloth and press with a regular iron on cotton setting. This will ensure that all areas have been bonded evenly.

Tips for making fabric choice

  1. Choose at least three values (light, medium, dark) of each of the primary colors in the guide image — Yellow/Gold, Blue/Gray, Green/Brown, Red/Orange.
  2. Look at what you already have in your stash. Consider both sides of your fabric as an option.
  3. Look for specific color ranges within a particular fabric. For example, you may have a fabric that is large sunflowers on a tan/brown background. You may think, “I can’t use that.” But, think again. Within the flower petals, is there a perfect shade of yellow, orange, or gold that you can cut and use? Remember, you will be working with small cuts of fabric. Does the tan/brown floral background have just the right shade to use for shadowing areas, etc?
  4. Learn to look for small patches of color within your present fabric stash, looking at both sides of your existing fabric.
  5. If you can’t find something that you need, buy a small amount for a specific project.
  6. You can also start to improvise. Example: Let’s say I need some green foliage that has strong yellow or white highlights. And wouldn’t you know, I don’t have any foliage fabric that fits what I need. What to do? Perhaps I can put a foundation of solid green leaves, and then using yellow and white fabric that I do have, I’ll fussy cut a few leaves and then use a few snippets to highlight the existing green leaves. When finished, you would never know unless you examined the foliage area up close.
  7. Art is the expression of what you see, not always an exact duplicate of it. Improvising has produced some of my most loved elements within some of my work. So don’t be afraid to improvise and invent.
Art
Makers
Fabric
Creativity
Design
Recommended from ReadMedium