
Say Goodbye to Downtime: Achieving Seamless Updates with Blue-Green Deployments in ECS on AWS: Part — 1
Streamlining Python app deployments using Blue-Green with ECS and Codebuild on AWS. Picture this: you are ready to publish a new version of your app but uncertainty creeps in. Will downtime disrupt your users? Will the new release function flawlessly? How easily can I roll back if needed? Will there be any performance impact? And wouldn’t it be ideal to test the waters with a gradual rollout?
There are so many questions that come to a developer's mind while releasing a new version of any app. But fear not, for there’s a potent antidote: Blue-Green deployments on AWS, the magic potion for stress-free rollouts, offering zero downtime, seamless rollbacks, and the power to control traffic between versions.
Blue-Green deployments on AWS offer a smooth, stress-free way to update your app without a single hiccup. You can even control the percentage of the traffic going to the new version. And when everything is working as expected, you can decommission the older version. All this with Zero downtime.
In this blog, we’ll break down the magic behind Blue-Green and show you how to leverage CodeBuild, ECR, ECS, and Application Load Balancers to deploy like a pro.
The technology stack is not limited to these tools, we are also going to use Python, boto3, Flask, DynamoDB, Terraform, CodeBuild, ECR, ECS, and Application Load Balancers — and trust me, it’s not as scary as it sounds!
However, due to the long content of this blog, I have created this in 2 parts. Here is the part-2 of this blog — https://readmedium.com/say-goodbye-to-downtime-achieving-seamless-updates-with-blue-green-deployments-in-ecs-on-aws-30e6af5c0b2c
Ready to banish deployment anxiety and embrace a world of effortless updates? Join me as we embark on this transformative journey!
What we’ll build
We are going to create a simple Blog app in Python using Flask API and DynamoDB database. On a high level, we are going to do the following —
1. Build and deploy “Blue” Version of the Blog App
- Create a Python blog app with Flask, boto3, and DynamoDB.
- Design a Dockerfile for packaging the app into a container image.
- Create a
buildspec.yamlfor CodeBuild Project. - Push the code to a GitHub repository.
- Set up a
CodeBuildproject,DynamoDBtables, andECRrepository in Terraform. - Run
terraform applyto create the base infrastructure. - Trigger the
CodeBuildproject in AWS Console which is gonna build the image from the docker file and push the built image to the ECR repository. - Create another Terraform workspace for creating
ECS task,ECS servicewith the desired number of tasks, andApplication load Balancerto direct traffic to this “Blue” ECS service. - Run
terraform applyto create the AWS services described in the previous step. - Now, the blog app should be accessible via the
Application Load BalancerURL which directs traffic to the “Blue”ECSService.
2. Deploy “Green” Version with Zero Downtime:
- Make changes to the app and commit them to the Github repository.
- CodeBuild automatically rebuilds (or trigger the build manually in the AWS Console) the image and pushes it to
ECRwith a new version (“Green”). - Create a new ECS service with the desired number of tasks using the “Green” image.
- Register the “Green” service in the same
ALB target groupas the “Blue” service. - Gradually shift traffic from the “Blue” to the “Green” service using the ALB configuration.
- Monitor the “Green” service for any issues.
3. Switch to “Green” and Clean Up:
- If the “Green” version performs well, remove the “Blue” service from the target group.
- Consider scaling down or terminating the “Blue” service to save resources.
What we’ll need
To embark on our Blue-Green adventure, we’ll need a trusty toolkit:
1. Python and Flask: Our trusty programming duo — Python for robust backend operations and Flask for building the web app itself.
2. boto3: Library in Python to interact with AWS Services — DynamoDB in our case.
3. DynamoDB: The NoSQL database, perfect for storing our blog post data with lightning speed and scalability.
4. Terraform: The infrastructure architect, meticulously crafting and deploying our AWS resources with code-as-configuration magic.
5. Docker: The container wizard, packaging our app into a portable, self-contained unit, ready to run anywhere.
6. CodeBuild: The build tool from AWS, automatically takes our code, crafts the Docker image, and pushes it to the ECR repo.
7. ECR: The secure image repository, housing our Docker masterpiece for easy retrieval and deployment.
8. ECS: The container orchestrator, managing and running our app containers on Fargate, a serverless compute.
9. Application Load Balancer (ALB): The traffic director, seamlessly routes user requests to the appropriate version of our app, guaranteeing uninterrupted service.
10. Github: The collaboration hub, keeping our code version-controlled and readily available for CodeBuild to work its magic.
With these tools in hand, we’re ready to embark on our Blue-Green deployment journey, conquering deployment anxiety and delivering delightful updates to our users without a single hiccup!
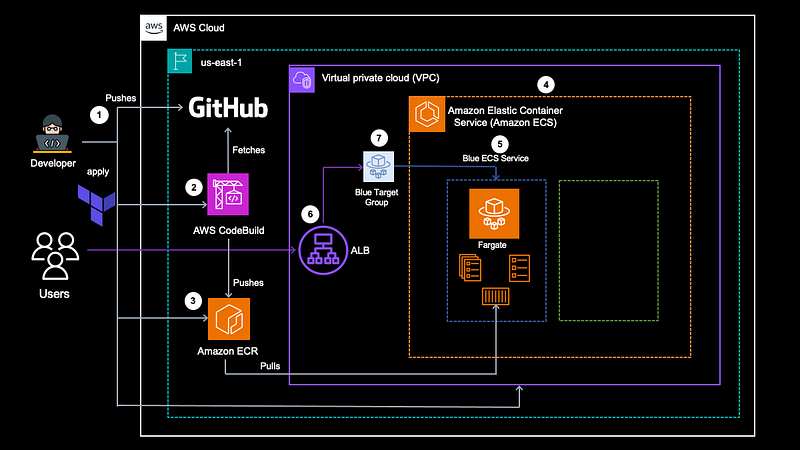
Architecture
Here is how the architecture is going to look after deployment for Part — 1 of this blog —
Source Code
You can download the source code from the below repositories -
Prerequisites
Before creating and working with the project, let’s set up some dev tools first -
- Make sure you have an IDE to develop your project. I am using
Visual Studio Codefor the same. You can install it from the following link based on the operating system— https://code.visualstudio.com/download - Install the CLI tools — Anaconda for creating a Python virtual environment, AWS-CLI, and Terraform-CLI.
- Create a virtual environment in your IDE terminal and install the libraries required for this project -
conda create -n ecsproject_py310 python=3.10
conda activate ecsproject_py310
pip install flask boto3
4. Create an Access Key ID and Secret Access Key in AWS Console and download it. Then export those credentials in your terminal as follows —
export AWS_ACCESS_KEY_ID=<Copy this from the credentials file downloaded>
export AWS_SECRET_ACCESS_KEY=<Copy this from the credentials file downloaded>
5. Create a production-like directory structure for the project files for easier maintenance and reusability purposes. Here is the directory structure you can follow -
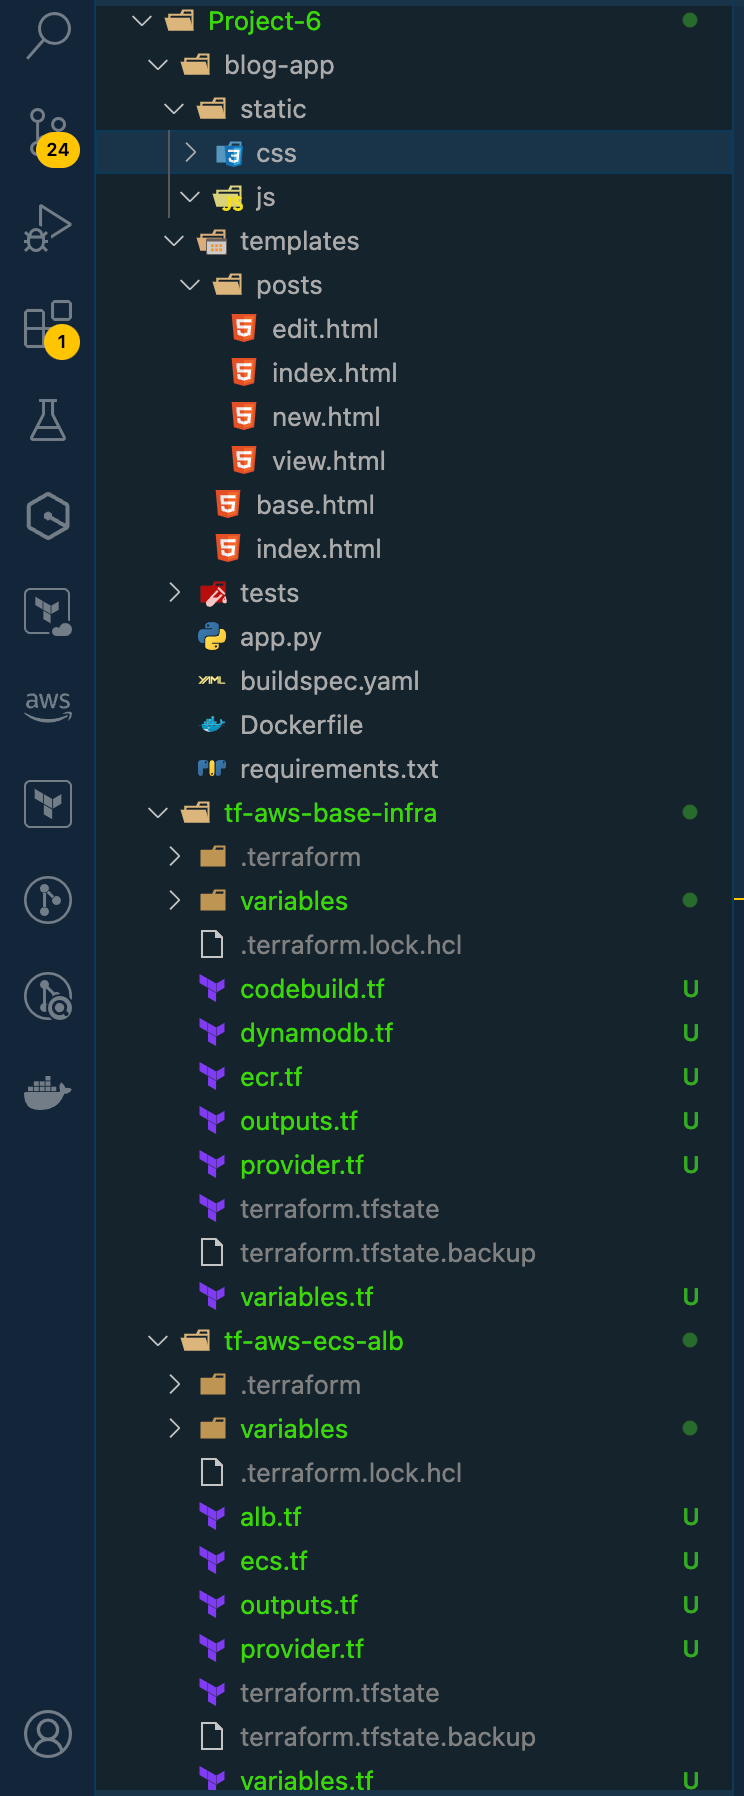
Some of the important files and folders are as follows —
- Blog App — This will consist of the front-end web application files including the main
app.pyand HTML. - tf-aws-base-infra — Terraform configuration files for the base infrastructure — DynamoDB, CodeBuild, ECR Repo.
- tf-aws-ecs-alb — Terraform configuration files for creating ECS cluster, task, services, and Application Load Balancer.
Stage 1: Building and deploying the “Blue” Version of the Blog App
Task 1: Creating and building a Python Flask App
As we have configured the development environment, Let's start creating our simple blog app in Python and Flask.
As part of this task, we are going to work with below files —
app.py: The main Python file where we’ll create our Flask application, define routes, and handle logic.
templates/: Folder containing HTML templates used to render the user interface.
static/: Folder for static assets like CSS, JavaScript, and images.
tests/: Folder for unit tests to ensure code quality.
requirements.txt: List of Python libraries required for the application, used for dependency management. We can create this file using below command in the terminal —
pip freeze > requirements.txt
Dockerfile: Instructions for building the Docker image that will package your application and its dependencies.
buildspec.yaml: This file will be used by
CodeBuildProject. We write instructions like pre-build, install and post-build which is going to push the image to theECRrepository.
Let’s dive deeper into the functionality of our blog app. First, start by creating different routes. We have to implement routes for:
- Listing all posts (
/) - Viewing a specific post (
/posts/<post_id>) - Creating a new post (
/posts/new) - Editing an existing post (
/posts/<post_id>/edit) - Deleting an existing post (
/posts/<post_id>/delete)
Similarly, let’s create templates (using Jinja2 for Flask) to render HTML content for these routes.
After this, let’s start writing methods/functions to perform these actions in the dynamoDb table. Here is the data model of the DynamoDb table -
Table: BlogPosts
Primary partition key: post_id (string)
Secondry Range key: author(string)
Attributes: title (string), content (string), timestamp (string)
We’ll be using boto3 a library to interact with the dynamoDb table Here is the complete code for the functions and routes. You can download the HTML templates and the full code from the link here.
from datetime import datetime
import uuid
from flask import Flask, render_template, request, redirect, url_for
import boto3  # Import Boto3 for DynamoDB
from boto3.dynamodb.conditions import Key

app = Flask(__name__)

# Configure DynamoDB
# No need to provide acess key and secret access key
# instead we'll be attaching an IAM role with appropriate DynamoDB access permissions to our ECS task.

dynamodb = boto3.resource('dynamodb', region_name='us-east-1')

# Define routes
# Route for the home page
@app.route('/')
def index():
    # Retrieve posts from DynamoDB
    posts = get_posts_from_dynamodb()
    print(posts)
    return render_template('index.html', posts=posts)

# Route for getting the post details based on the post_id
@app.route('/posts/<post_id>')
def view_post(post_id):
    # Retrieve post details from DynamoDB
    post = get_post_by_id(post_id)
    print(post)
    return render_template('posts/view.html', post=post)

# Route for creating new post
@app.route('/posts/new', methods=['GET', 'POST'])
def new_post():
    if request.method == 'GET':
        return render_template('posts/new.html')
    else:
        title = request.form['title']
        author = request.form['author']
        content = request.form['content']
        create_post(title, author, content)
        return redirect(url_for('index'))

# Route for updating exiting post
@app.route('/posts/<post_id>/edit', methods=['GET', 'POST'])
def edit_post(post_id):
    post = get_post_by_id(post_id)  # Use your existing function
    if request.method == 'GET':
        return render_template('posts/edit.html', post=post)
    else:
        title = request.form['title']
        content = request.form['content']
        author = request.form['author']
        print("Updating for author: " + author)
        update_post(post_id, title, author, content)
        return redirect(url_for('view_post', post_id=post_id))

# Route for deleting exiting post
@app.route('/posts/<post_id>/delete', methods=['GET', 'POST'])
def delete_post(post_id):
    author = request.args.get('author')
    print("Author: " + author)
    delete_post(post_id, author)
    print("Post delete successfully.")
    return redirect(url_for('index'))

# Functions for interacting with DynamoDB
def get_posts_from_dynamodb():
    table = dynamodb.Table('BlogPosts')

    response = table.scan()  # Retrieve all items from the table
    posts = response['Items']

    while 'LastEvaluatedKey' in response:  # Handle pagination
        response = table.scan(ExclusiveStartKey=response['LastEvaluatedKey'])
        posts.extend(response['Items'])

    return posts

# Function for getting post details by post_id
def get_post_by_id(post_id):
    print("post id: ", post_id)
    table = dynamodb.Table('BlogPosts')

    try:
        response = table.query(KeyConditionExpression=Key('post_id').eq(post_id))
        #response = table.get_item(Key={'post_id': post_id})  # Get the specific item
        post = response['Items'][0]
        return post
    except KeyError:
        return None

# Function for creating new post
def create_post(title, author, content):
    table = dynamodb.Table('BlogPosts')

    new_post = {
        'post_id': generate_unique_id(),
        'title': title,
        'author': author,
        'content': content,
        'timestamp': datetime.utcnow().isoformat(),  # Using UTC timestamp
    }

    table.put_item(Item=new_post)

# Function for updating exiting post
def update_post(post_id, title, author, content):
    table = dynamodb.Table('BlogPosts')

    updated_post = {
        'Key': {'post_id': post_id, 'author': author},
        'UpdateExpression': 'SET title = :title, content = :content',
        'ExpressionAttributeValues': {
            ':title': title,
            ':content': content,
        },
    }
    print(updated_post)
    response = table.update_item(**updated_post)
    print(response)
    print("Table udpated successfully")

# Function for Deleitng exiting post by post_id and author - Key attributes
def delete_post(post_id, author):
    table = dynamodb.Table('BlogPosts')

    table.delete_item(Key={'post_id': post_id, 'author':author})

def generate_unique_id():
    unique_id = str(uuid.uuid4())  # Generating a universally unique identifier
    return unique_id

if __name__ == '__main__':
    app.run(host='0.0.0.0', debug=True)
Task 2: Creating Dockerfile and buildspec.yaml file for CodeBuild
In this task, we are going to create a Dockerfile for packaging our web app and buildspec.yaml file which will be required by the AWS CodeBuild project to build the project and push the image into the ECR repository.
Below is the very simple Dockerfile for our web app. We are performing the following 3 tasks in the Docker file -
- Taking the base Python slim image
python:3.10-slim. - Installing the required libraries from
requirement.txtPlease runpip freeze > requirements.txtin your virtual environment to create this file. - Exposing port 5000 and running the Flask app. The app should be bound to 0.0.0.0 using
app.run(host='0.0.0.0'), making it accessible from outside the container.
Dockerfile →
# Base image with Python and Flask
FROM python:3.10-slim

# Set working directory
WORKDIR /app

# Copy application code
COPY . /app

# Install dependencies
RUN pip install -r requirements.txt

# Expose the port Flask listens on
EXPOSE 5000

# Run the Flask app
#CMD ["python", "app.py"]
CMD flask run -h 0.0.0.0 -p 5000
Next, we need to create buildspec.yaml file for theCodebuild project.
This is also a very simple yaml file where we’ll be doing the following -
- Install libraries from the
requirements.txt(This step is only required if you have not installed the libraries in theDockerfile. - Build the docker image using
Dockerfileand tag the docker image with the tag: blue. - Login to Docker and push the image to the
ECRrepository. - Details for ECR can be stored as environment variables within CodeBuild for security for example: {ECR_Repository} → See Codebuild terraform configuration in the next Task.
buildspec.yaml →
version: 0.2

phases:
  install:
    commands:
      - pip install -r requirements.txt

  build:
    commands:
      - docker build -t ${ECR_REPOSITORY}:blue .

  post_build:
    commands:
    - aws ecr get-login-password --region ${AWS_REGION} | docker login --username AWS --password-stdin ${ECR_REPOSITORY}
    - docker push ${ECR_REPOSITORY}:latest
Remember to Save this file as buildspec.yaml at the root of your project directory, and CodeBuild will follow its instructions during the build process.
Since CodeBuild doesn’t directly support using a subdirectory as the source, we have to create a new repository in GitHub for the web app project. I have checked in the front-end code here.
Task 3: Creating base infrastructure for the web app
After creating the front end for our app, it’s time to create the base infrastructure in AWS. We are going to need a dynamoDB table, an ECR repository and CodeBuild project.
We are going to build via Terraform. Here are the configurations for the AWS services —
DynamoDB —
resource "aws_dynamodb_table" "blog_posts" {
  name           = var.blog_table
  billing_mode   = var.billing_mode
  read_capacity  = var.table_rcu
  write_capacity = var.table_wcu
  hash_key       = "post_id"
  range_key      = "author"

  attribute {
    name = "post_id"
    type = "S"
  }
  attribute {
    name = "title"
    type = "S"
  }
  attribute {
    name = "content"
    type = "S"
  }
  attribute {
    name = "author"
    type = "S"
  }
  attribute {
    name = "timestamp"
    type = "S"
  }

  local_secondary_index {
    name               = "TitleIndex"
    range_key          = "title"
    projection_type    = "KEYS_ONLY"
  }
  local_secondary_index {
    name               = "ContentIndex"
    range_key          = "content"
    projection_type    = "KEYS_ONLY"
  }
  local_secondary_index {
    name               = "TimestampIndex"
    range_key          = "timestamp"
    projection_type    = "KEYS_ONLY"
  }
}
ECR —
resource "aws_ecr_repository" "blog_app_ecr_repo" {
  name = var.ecr_repo_name
}
CodeBuild —
resource "aws_iam_role" "codebuild_role" {
name = "codebuild-role"
assume_role_policy = <<EOF
{
"Version": "2012-10-17",
"Statement": [
{
"Effect": "Allow",
"Principal": {
"Service": "codebuild.amazonaws.com"
},
"Action": "sts:AssumeRole"
}
]
}
EOF
}
# Policies for ECR full access
resource "aws_iam_role_policy_attachment" "codebuild_ecr_policy" {
role = aws_iam_role.codebuild_role.name
policy_arn = "arn:aws:iam::aws:policy/AmazonEC2ContainerRegistryFullAccess"
}
# Additional policies for CloudWatch Logs, etc.
resource "aws_iam_role_policy_attachment" "codebuild_logs_policy" {
role = aws_iam_role.codebuild_role.name
policy_arn = "arn:aws:iam::aws:policy/CloudWatchLogsFullAccess"
}
resource "aws_codebuild_project" "codebuild_project" {
name = var.codebuild_project_name
description = "Builds Blog Flask application Docker image"
service_role = aws_iam_role.codebuild_role.arn
artifacts {
type = "NO_ARTIFACTS"
}
cache {
type = "LOCAL"
modes = ["LOCAL_DOCKER_LAYER_CACHE"]
}
environment {
compute_type = "BUILD_GENERAL1_SMALL"
image = "aws/codebuild/standard:5.0" # Choose a suitable image
type = "LINUX_CONTAINER"
image_pull_credentials_type = "CODEBUILD" # Use CodeBuild's credentials for pulling images
# Environment variables (replace with your values)
environment_variable {
name = "ECR_REPOSITORY"
value = aws_ecr_repository.blog_app_ecr_repo.repository_url
}
environment_variable {
name = "AWS_REGION"
value = var.aws_region
}
}
source {
type = "GITHUB"
location = var.github_repo
git_clone_depth = 1
}
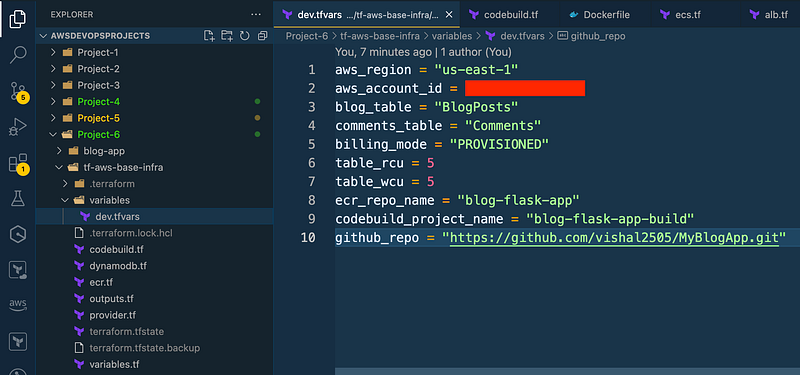
}Let’s create this infrastructure using terraform apply command. Remember as you have declared variables in variables.tfso you need to provide values for those while running the apply command. Generally, we need to create a separate dev/test/prod.tfvars file to provide the values.
(ecsproject_py310) tf-aws-base-infra  $  pwd
/Users/vishalmishra/Study/medium/AWSDevOpsProjects/Project-6/tf-aws-base-infra

(ecsproject_py310) tf-aws-base-infra $ terraform apply -var-file=variables/dev.tfvars -auto-approve 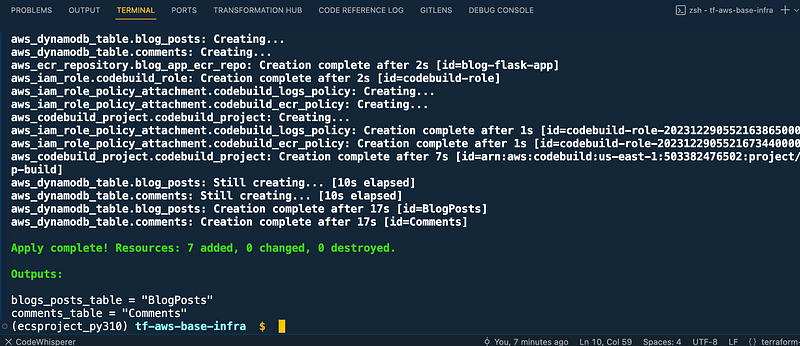
By the end of this task, you will have a dynamodb table, ecr repository and codebuild project created in your AWS Console.
Task 4: Triggering Codebuild Project
In this task, we are going to build the CodeBuild project manually instead of the Automatic trigger. So head over to the CodeBuild project in the AWS Console https://us-east-1.console.aws.amazon.com/codesuite/codebuild/start?region=us-east-1
Go to the left-hand menu under Build click on Build projects you will see your project pointing to the Github repository as stated in the terraform configuration for the CodeBuild project.

After selecting the project, you can start the build by clicking on Start build -

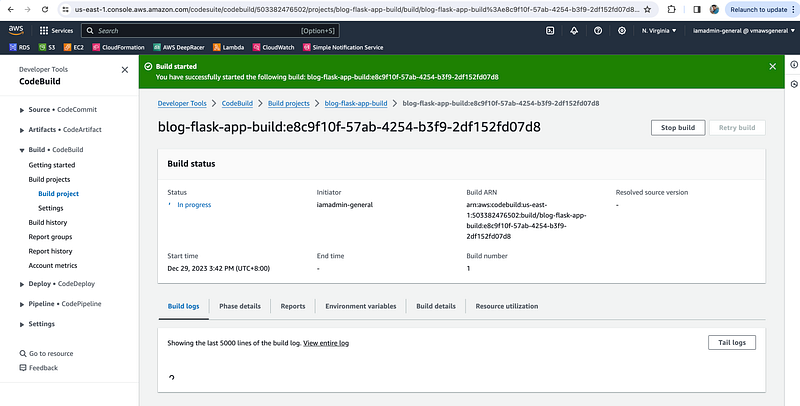
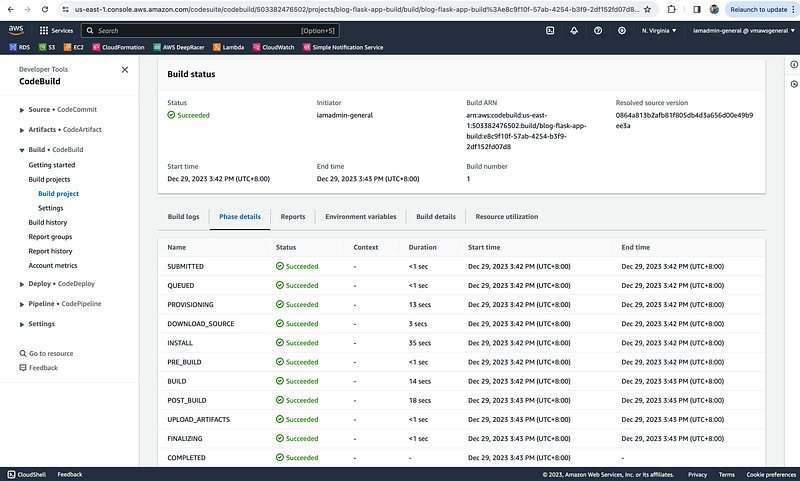
You can monitor the different phases involved in the build process under Phase details. Give it some time and you will the build getting successful.
After this, you will see an image tagged as “Blue” in the ECR repository -
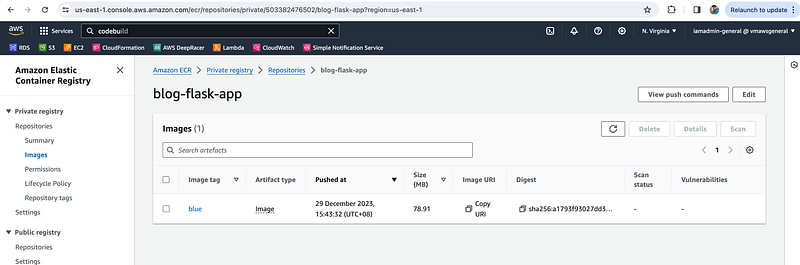
We’ll deploy this image in the ECS cluster in the next task. However, if you want to test the image locally, you can do it by pulling the image from ECR and running the docker container locally as below -
aws ecr get-login-password --region "us-east-1" | docker login --username AWS --password-stdin <AWS_ACCOUNT_ID>.dkr.ecr.us-east-1.amazonaws.com

docker pull <AWS_ACCOUNT_ID>.dkr.ecr.us-east-1.amazonaws.com/blog-flask-app:blue

docker run -p 5000:5000 <AWS_ACCOUNT_ID>.dkr.ecr.us-east-1.amazonaws.com/blog-flask-app:blue
Although, when you run this locally, you will get an error as below because you have not provided the AWS credentials to access DynamoDB table while running the container.
192.168.65.1 - - [31/Dec/2023 02:59:49] "GET /favicon.ico HTTP/1.1" 404 -
[2023-12-31 02:59:52,051] ERROR in app: Exception on / [GET]
Traceback (most recent call last):
  File "/usr/local/lib/python3.10/site-packages/flask/app.py", line 1455, in wsgi_app
  ...
  File "/usr/local/lib/python3.10/site-packages/botocore/auth.py", line 418, in add_auth
    raise NoCredentialsError()
botocore.exceptions.NoCredentialsError: Unable to locate credentials
192.168.65.1 - - [31/Dec/2023 02:59:52] "GET / HTTP/1.1" 500 -
In the AWS environment, the error won’t be there because the ECS task will be using an IAM role to access the DynamoDB table.
Besides, in the next task, we’ll work on creating the infra (ECS) to run the image.
Task 5: Creating further infrastructure — ECS and Application Load Balancer
AWS provides native container orchestration service i.e. ECS to run the containers. In this task, we will be using ECS Fargate, as this is a serverless computing service that allows you to run containers without provisioning servers.
Just to give a brief introduction about ECS, it has 3 components — Cluster, tasks, and services.
A Cluster is a logical grouping of tasks or services. But the cluster consists of additional resources as well for example — VPC and subnet where your tasks and services run.
Tasks are JSON files that describe how a container should be run. For example — Image, Ports mapping CPU, memory, etc.
A Service simply runs a specified number of tasks and restarts/kills them as needed. Also, the service works seamlessly with Elastic Load Balancing (ELB) to provide external access and sophisticated load-balancing capabilities.
Let’s create an ECS cluster and Application Load balancer via Terraform. I have created a different folder for this to keep the state separate from the base infrastructure to make it maintainable and reusable.
ECS -
data "aws_ecr_repository" "blog_app_ecr_repo" {
  name = var.ecr_repo_name
}

resource "aws_cloudwatch_log_group" "ecs_log_group" {
  name = "/ecs/blog-app-task"
  retention_in_days = 3
}

# Providing a reference to our default VPC
resource "aws_default_vpc" "default_vpc" {
}

# Providing a reference to our default subnets
resource "aws_default_subnet" "default_subnet_a" {
  availability_zone = "us-east-1a"
}

resource "aws_default_subnet" "default_subnet_b" {
  availability_zone = "us-east-1b"
}

resource "aws_default_subnet" "default_subnet_c" {
  availability_zone = "us-east-1c"
}

# ECS task Execution Role
resource "aws_iam_role" "ecsTaskExecutionRole" {
  name = "ecsTaskExecutionRole"

  assume_role_policy = <<EOF
{
  "Version": "2012-10-17",
  "Statement": [
    {
      "Effect": "Allow",
      "Principal": {
        "Service": "ecs-tasks.amazonaws.com"
      },
      "Action": "sts:AssumeRole"
    }
  ]
}
EOF
}

# Policies for ECS Task Execution Role
resource "aws_iam_role_policy_attachment" "ecsTaskExecutionRole_policy" {
  role       = aws_iam_role.ecsTaskExecutionRole.name
  policy_arn = "arn:aws:iam::aws:policy/service-role/AmazonECSTaskExecutionRolePolicy"
}

resource "aws_iam_role_policy_attachment" "ecsTaskExecutionRole_policy_2" {
  role       = aws_iam_role.ecsTaskExecutionRole.name
  policy_arn = "arn:aws:iam::aws:policy/AmazonDynamoDBFullAccess"
}

resource "aws_kms_key" "ecs_cluster_key" {
  description             = "ECS CLuster KMS Key"
  deletion_window_in_days = 7
}

resource "aws_cloudwatch_log_group" "ecs_cluster_group" {
  name = "blog_ecs_log_group"
}

resource "aws_ecs_cluster" "blog_ecs_cluster" {
  name = "blog_app_ecs_cluster"

  configuration {
    execute_command_configuration {
      kms_key_id = aws_kms_key.ecs_cluster_key.arn
      logging    = "OVERRIDE"

      log_configuration {
        cloud_watch_encryption_enabled = true
        cloud_watch_log_group_name     = aws_cloudwatch_log_group.ecs_cluster_group.name
      }
    }
  }
}

resource "aws_ecs_task_definition" "blog_task_def_blue" {
  family                   = "blog-app-blue"
  requires_compatibilities = ["FARGATE"]
  network_mode             = "awsvpc"
  execution_role_arn       = aws_iam_role.ecsTaskExecutionRole.arn
  task_role_arn            = aws_iam_role.ecsTaskExecutionRole.arn
  memory                   = 512
  cpu                      = 256
  container_definitions    = <<EOF
[
  {
    "name": "blog-app-blue",
    "image": "${data.aws_ecr_repository.blog_app_ecr_repo.repository_url}:blue",
    "memory": 512,
    "cpu": 256,
    "essential": true,
    "portMappings": [
      {
        "containerPort": 5000,
        "hostPort": 5000
      }
    ],
    "logConfiguration": {
                "logDriver": "awslogs",
                "options": {
                    "awslogs-create-group": "true",
                    "awslogs-group": "${aws_cloudwatch_log_group.ecs_log_group.name}",
                    "awslogs-region": "us-east-1",
                    "awslogs-stream-prefix": "awslogs-blogapp"
                }
            }
  }
]
EOF
}

resource "aws_ecs_service" "blog_service_blue" {
  name            = "blog-app-blue"
  cluster         = aws_ecs_cluster.blog_ecs_cluster.id
  task_definition = aws_ecs_task_definition.blog_task_def_blue.arn
  desired_count   = 1
  launch_type     = "FARGATE"

  network_configuration {
    subnets          = [aws_default_subnet.default_subnet_a.id, aws_default_subnet.default_subnet_b.id, aws_default_subnet.default_subnet_c.id]
    assign_public_ip = true                                               # Providing our containers with public IPs
    security_groups  = [aws_security_group.ecs_service_sg.id]             # Setting the security group
  }

  load_balancer {
    target_group_arn = aws_lb_target_group.blog_app_lb_tg.arn             # Referencing our target group
    container_name   = aws_ecs_task_definition.blog_task_def_blue.family
    container_port   = 5000                                               # Specifying the container port
  }

}

resource "aws_security_group" "ecs_service_sg" {
  ingress {
    from_port = 0
    to_port   = 0
    protocol  = "-1"
    # Only allowing traffic in from the load balancer security group
    security_groups = [aws_security_group.blog_app_lb_sg.id]
  }

  egress {
    from_port   = 0 # Allowing any incoming port
    to_port     = 0 # Allowing any outgoing port
    protocol    = "-1" # Allowing any outgoing protocol
    cidr_blocks = ["0.0.0.0/0"] # Allowing traffic out to all IP addresses
  }
}
Here’s a summary of the key actions performed by the above Terraform code for the AWS ECS service:
1. Data Sources:
- Fetches information about an existing
ECR repositoryto obtain the image URL i.e. the image created byCodeBuildservice.
2. Logging:
- Creates two CloudWatch log groups: one for container logs and one for ECS cluster logs.
3. Networking:
- References the default
VPCandsubnetsto place theECSresources. In an ideal production environment, you should use your customizedVPC.
4. IAM Role:
- Creates an
IAM rolewith necessary permissions for ECS task execution. - Attaches a policy granting access to
ECS,DynamoDB, and other services.
5. Encryption:
- Creates a
KMS keyforECScluster configuration encryption.
6. Security Group:
- Creates a security group for the
ECS service. - Allows inbound traffic only from the load balancer security group.
- Allows all outbound traffic.
7. ECS Cluster:
- Creates an ECS cluster named “blog_app_ecs_cluster”.
- Configures logging for the cluster using the
KMS keyandCloudWatchlog group.
8. Task Definition:
Defines a task definition named “blog-app-blue” with:
- Container named “blog-app-blue” uses the image from the ECR repository.
- Memory and CPU allocations.
- Port mapping for container port 5000.
- Logging configuration using
awslogsdriver and the created log group.
9. ECS Service:
- Creates an ECS service named “blog-app-blue” within the cluster:
- Uses the defined task definition.
- Maintains 1 running task.
- Uses Fargate launch type for serverless container execution.
Specifies network configuration:
- Uses the default subnets.
- Assigns public IPs to containers.
- Uses a security group to control traffic. ECS will receive traffic only from the Application Load Balancer.
- Integrates with a load balancer using a target group.
ALB -
resource "aws_alb" "blog_app_lb" {
  name               = "blog-app-lb"
  load_balancer_type = "application"
  subnets = [
    aws_default_subnet.default_subnet_a.id,
    aws_default_subnet.default_subnet_b.id,
    aws_default_subnet.default_subnet_c.id
  ]
  # Referencing the security group
  security_groups = [aws_security_group.blog_app_lb_sg.id]
}

# Creating a security group for the load balancer:
resource "aws_security_group" "blog_app_lb_sg" {
  ingress {
    from_port   = 80 # Allowing traffic in from port 80
    to_port     = 80
    protocol    = "tcp"
    cidr_blocks = ["0.0.0.0/0"] # Allowing traffic in from all sources
  }

  egress {
    from_port   = 0 # Allowing any incoming port
    to_port     = 0 # Allowing any outgoing port
    protocol    = "-1" # Allowing any outgoing protocol
    cidr_blocks = ["0.0.0.0/0"] # Allowing traffic out to all IP addresses
  }
}

resource "aws_lb_target_group" "blog_app_lb_tg" {
  name        = "blog-app-lb-tg"
  port        = 80
  protocol    = "HTTP"
  target_type = "ip"
  vpc_id      = aws_default_vpc.default_vpc.id # Referencing the default VPC
  health_check {
    matcher = "200,301,302"
    path = "/"
  }
}

resource "aws_lb_listener" "blog_app_lb_listener" {
  load_balancer_arn = aws_alb.blog_app_lb.arn # Referencing our load balancer
  port              = "80"
  protocol          = "HTTP"
  default_action {
    type             = "forward"
    target_group_arn = aws_lb_target_group.blog_app_lb_tg.arn # Referencing our tagrte group
  }
}
Here’s a summary of the key actions performed by the above Terraform code for the Application Load Balancer (ALB):
- Load Balancer:
- Creates a
Application Load Balancernamed “blog-app-lb”. - Place it in the
default subnets. - Attaches a
security groupfor traffic control.
2. Security Group:
- Creates a
security groupfor theALB. - Allows inbound
HTTPtraffic onport 80from all sources. - Allows all outbound traffic.
3. Target Group:
- Creates a
target groupnamed “blog-app-lb-tg” to register targets for the ALB. - Listens on
port 80forHTTPtraffic. - Uses
IP-based target registrationforECSservice(Fargate). - Resides in the
default VPC. - Configures health checks using a path-based rule (expecting 200, 301, or 302 responses).
4. Listener:
- Creates a listener on the
ALB. - Listens on
port 80forHTTPtraffic. - Forwards traffic to the specified target group.
Let’s run terraform apply create the ECS and ALB components. In the dev.tfvars file, we just need to pass the ECS repository name. Also, make sure you are in the correct directory before running apply. This is gonna take 3–5 minutes as ALB creation and target registration takes some time.
(ecsproject_py310) tf-aws-ecs-alb  $  pwd
/Users/vishalmishra/Study/medium/AWSDevOpsProjects/Project-6/tf-aws-ecs-alb

(ecsproject_py310) tf-aws-ecs-alb $ terraform apply -var-file=variables/dev.tfvars -auto-approve 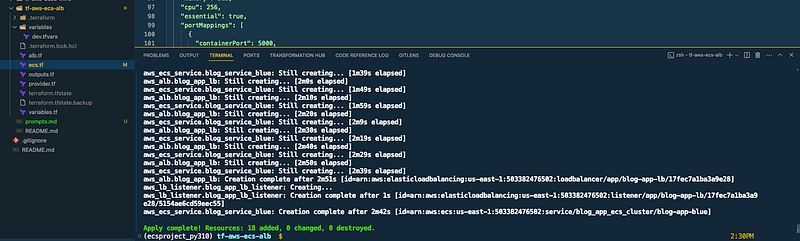
By the end of this task, we have successfully deployed the “Blue” version of our blog app in theECS container which will be served by an Application Load Balancer. In the next task, we are going to validate the deployment and test the Load Balancer DNS URL.
Task 6: Testing the app using Load Balancer URL
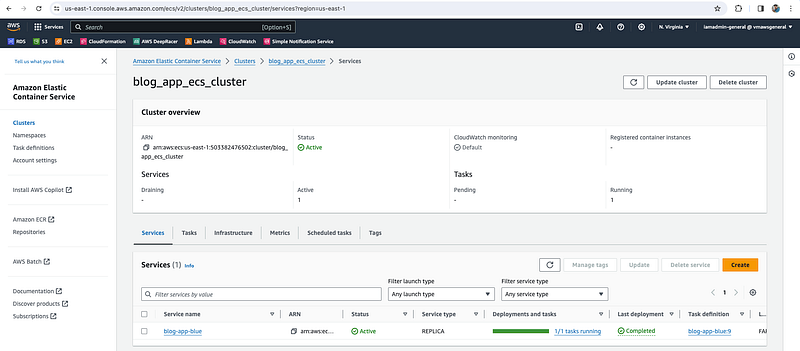
Let’s validate our deployment and test the URL. First, head over to the ECS cluster and check the service status. Deployments and tasks status should be — 1/1 tasks running. This means our ECS service is running fine with 1 replica as configured in the Terraform templates.
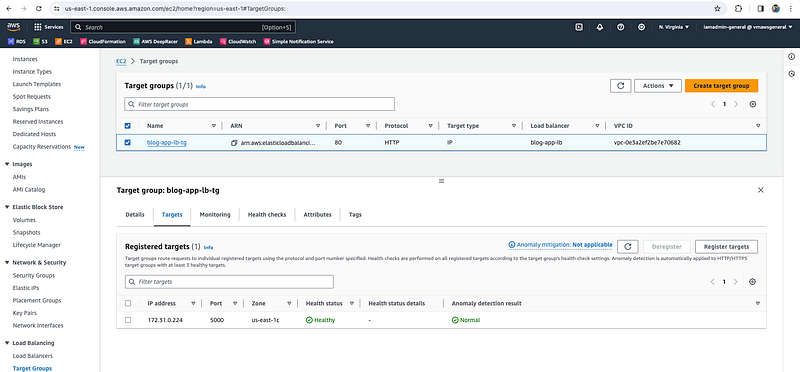
Secondly, let’s move to the ALB Target Group
https://us-east-1.console.aws.amazon.com/ec2/home?region=us-east-1#TargetGroups:
and check under → Registered targets. If all the configurations are fine, then you will see that your ECS container should be registered under this, and the health status should be Healthy.
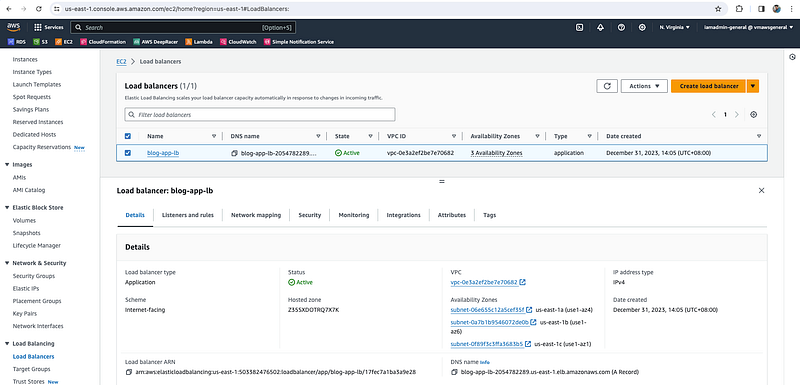
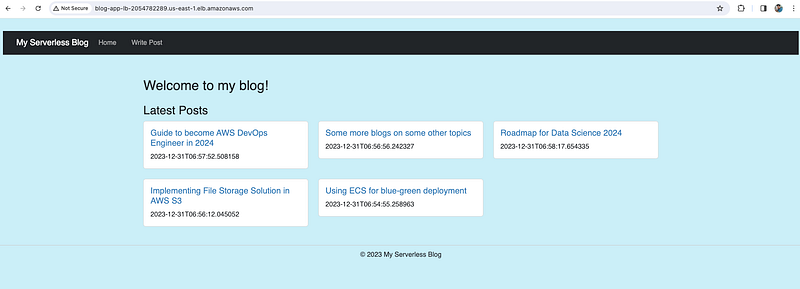
Finally, let’s get the Load Balancer DNS URL and test our blog app —
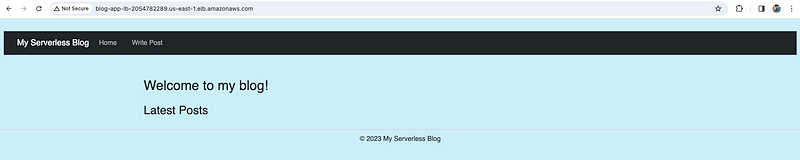
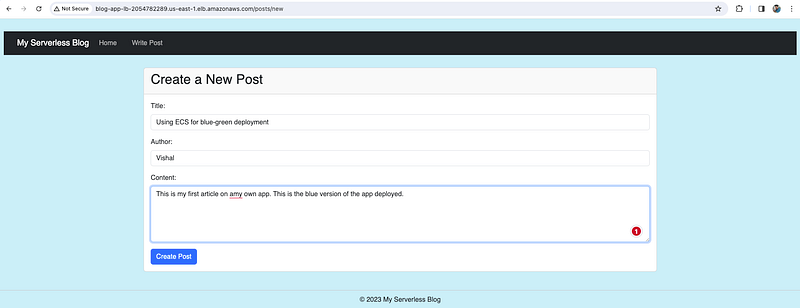
Now create some posts, while clicking on the Write Post link on the above page.
So now, our app is running fine in the live test environment. Next is to update the app with zero downtime. Since this blog is getting very long, hence we are going to continue with this in Part — 2, where we are going to deploy the “Green” version of the app. And, we’ll keep both versions running for a while by splitting the traffic (say 80%–20%) and then will delete the older “Blue” version of the app.
Errors and Issues Encountered -
I have encountered multiple issues while implementing this. Here I am mentioning some of the issues that you might encounter and how can you resolve those without wasting too much time.
- Container Status is Unhealthy.
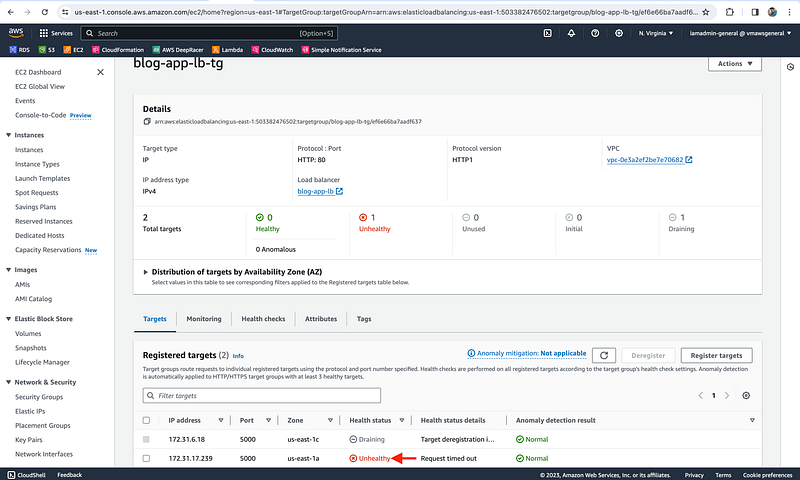
Note that the status of the container is unhealthy. This is because the ECS service does not allow traffic in by default. We can resolve this by creating a security group for the ECS service that allows traffic only from the application load balancer security group.
To conclude part 1 of this hands-on guide,
We’ve successfully built the foundation for our Blue-Green deployments, setting up the infrastructure and deploying the initial “Blue” version. But the true magic happens with the “Green” update.
In Part 2, we’ll delve deeper into how to build, deploy, and seamlessly transition to the new version, all without interrupting user access. Buckle up for the final act of our Blue-Green deployment journey!


