
RxJS Best Practices
A series of practices I use every day in my code

RxJS is the most popular framework for functional reactive programming (FRP) in JavaScript. This means a lot of people are using RxJS daily in their projects. Most developers are aware of the common clean-code practices, but what about RxJS best practices? Are you aware of the dos and don’ts when it comes to FRP? Are you applying them in your code?
This tutorial will focus on several best practices that I use daily when writing code, with practical examples. We’ll be covering the following points:
We’ll be covering these techniques:
1. Avoid logic inside the subscribe function
2. Use subjects to force completion
3. Avoid duplicated logic
4. Avoid nesting — use chaining instead
5. Share to avoid stream duplication
6. Don’t expose subjects
7. Use marble diagrams for testing
Without further ado, let’s get started.
Hello everyone, welcome to Dottech. In this video we’re going to talk about RxJS, which is the most popular framework for functional reactive programming in JavaScript. More specifically, we’re going to talk about RxJS best practices. We’ll discuss the dos and don’ts when it comes to functional reactive programming. So, without further ado, let’s get started
1. Avoid Logic Inside the Subscribe Function
This statement may seem pretty obvious to some of you, but it’s a common pitfall for RxJS beginners. Until you learn how to think functionally + reactively, you may be tempted to do something like this:
Our pokemon$ Observable emits Pokemon objects, and, in a very nonreactive way, we’re subscribing to it in order to access these objects and perform some actions, like returning early if the Pokemon type is Water, making a call to a getStats() function, logging the stats this function returns, and, finally, saving the data to the Pokedex. All our logic is inside the subscribe function.
However, doesn’t this code look exactly like something we’d see in the traditional imperative programming paradigm? Since RxJS is a functional reactive programming library, we have to say goodbye to our traditional way of thinking and start thinking functional reactively (Streams! Pure functions!).
So how do we make our code functional reactive? By using the pipeable operators that RxJS provides us with:
Et voilá, our code has gone from imperative to functional reactive with a few simple changes. It even looks cleaner, doesn’t it?
Note: I’m fully aware of the fact that a part of the logic (the saveToPokedex() function) still remains in the subscribe. I find keeping the last part of the logic inside the subscribe makes it easier for me to read the code. You are all free to choose whether or not to keep the subscribe completely empty.
The operators we’ve used are pretty straightforward: filter and map work exactly the same as the array operators they share a name with, and tap is used to perform side effects (defined below).
“An operation, function or expression is said to have a side effect if it modifies some state variable value outside its local environment.” — via Wikipedia
2. Using Subjects to Force Completion
Memory leaks are a real danger when it comes to using Observables. Why? Because, once we subscribe to an Observable, it’ll keep emitting values indefinitely until one of the following two conditions are met:
- We manually unsubscribe from the Observable
- It completes
Seems simple enough, right? Let’s take a look at how to unsubscribe from an Observable:
As you can see in the above example, we have to store the subscription of our pokemon$ Observable in a variable and then manually call unsubscribe on that stored subscription. Doesn’t seem too difficult so far.
But what happens if we have more Observables we need to subscribe to?
As you can see, as we add more Observables to our code, we need to keep track of more and more subscriptions, and our code starts looking a bit crowded. Isn’t there a better way for us to tell our Observables to stop emitting values? Luckily for us, there is, and it’s very, very simple:
We can use a Subject, together with the takeUntil() operator, to force our Observables to complete. How? Here’s an example:
Let’s understand what’s going on above. We’ve created a stop$ Subject, and we’ve piped our three Observables with the takeUntil operator. This operator is used to tell an Observable to stop emitting values, as soon as a different notifier Observable emits. Which means that our three Observables will stop emitting values when the stop$ Subject emits.
So how do we make our stop$ Subject emit? By calling the next() function on it, which is exactly what we’re doing inside our stopObservables() function. Therefore, whenever we call our stopObservables() function, our stop$ Subject will emit, and all our Observables will automatically complete. Sounds cool, doesn’t it?
No more having to store any subscriptions and call unsubscribe? All hail the takeUntil operator!
3. Avoid Duplicated Logic
We all know duplicated code is a bad sign and something that should be avoided. (If you didn’t know that, I’d recommend you go and read this and then come back.) You may be wondering which scenarios could lead to having duplicate RxJS logic. Let’s take a look at the following example:
As you can see, we have a number$ Observable, to which we subscribe twice: once to calculate the total value with reduce() and once to get rid of all the odd numbers with filter().
However, our number$ Observable, despite its name, doesn’t only contain numbers. As you can see, it also contains some dangerous falsy values, which can cause our code to fail. This is why we need to filter out these falsy values, which is what we’re doing with filter(Boolean).
Note: When using filter(Boolean) we lose type inference. We can avoid this by explicitly typing filter, like so: filter<number>(Boolean).
Seems quite straightforward, but …
Notice how we’ve duplicated the filter(Boolean) logic in both Observables? This should be avoided as long as our code allows it. How? By attaching this logic to the source Observable, like this:
Less code + no duplication = cleaner code. Awesome!
4. Avoid Nesting — Use Chaining Instead
Nested subscriptions should be avoided at all costs. They make our code complex, dirty, difficult to test, and can cause some pretty nasty bugs.
“What’s a nested subscription?” you may ask. It’s when we subscribe to an Observable in the subscribe block of another Observable. Let’s take a look at the following code:
Doesn’t look very neat, does it? The above code is confusing, complex, and, should we need to call more functions that return Observables, we’re going to have to keep adding more and more subscriptions. This is starting to sound suspiciously like subscription hell. So what can we do to avoid nested subscriptions?
The answer is to use higher-order mapping operators. Some of these operators are switchMap, mergeMap, etc.
To fix our example, we’re going to make use of the switchMap operator. Why? Because switchMap unsubscribes from the previous Observable and switches (easy to remember, right?) to the inner Observable, which, in our case, is the perfect solution. However, please note that depending on which behavior you need, you may need to use a different higher-order mapping operator.
Just look at how lovely our code looks now.
5. Sharing to Avoid Stream Duplication
Ever had your Angular code make duplicate HTTP requests and wonder why? Read on and you’ll discover the reason behind this widespread bug.
Most Observables are cold. This means their producer is created and activated when we subscribe to them. This might sound a bit confusing, but it’s simple enough to understand. With cold Observables, every time we subscribe to them, a new producer is created. So if we subscribe to a cold Observable five times, five producers will be created.
So what is a producer exactly? It’s basically the source of our Observable’s values (for example, a DOM event, an HTTP request, an array, etc.) What does this imply for us reactive programmers? Well, if we, for example, subscribe twice to an observable that makes an HTTP request, two HTTP requests will be made.
Sounds like trouble.
The following example (borrowing Angular’s HttpClient) would trigger two different HTTP requests, because pokemon$ is a cold Observable, and we’re subscribing to it twice:
As you can imagine, this behavior can only lead to nasty bugs, so how can we avoid it? Isn’t there a way to subscribe multiple times to an Observable without triggering duplicated logic as its source is created over and over again? Of course there is. Allow me to introduce the share() operator.
This operator is used to allow multiple subscriptions to an Observable, without recreating its source. In other words, it turns an Observable from cold to hot. Let’s see how it’s used:
Yes, that’s really all we need to do, and our problem is magically solved. By adding the share() operator, our previously cold pokemon$ Observable now behaves as if it were hot, and only one HTTP request will be made, even though we subscribe to it twice.
A word of caution: Since hot Observables don’t replicate the source, if we subscribe late to a stream, we won’t be able to access previously emitted values. The shareReplade>y() operator can be a solution for this.
6. Don’t Expose Subjects
It’s a common practice to use services to contain Observables we reuse in our application. It’s also common to have Subjects inside such services. A common mistake many developers make is exposing these Subjects directly to the outside world by doing something like this:
Don’t do this. By exposing a Subject, we’re allowing anyone to push data into it — not to mention we’re completely breaking the encapsulation of our DataService class. Instead of exposing our Subject, we should expose our Subject’s data.
“Isn’t it the same thing?” you may be wondering. The answer is no. If we expose a Subject, we’re making all of its methods available, including the next() function, which is used to make the Subject emit a new value. On the other hand, if we just expose its data, we won’t make our Subject’s methods available, just the values that it emits.
So how can we expose our Subject’s data but not its methods? By calling the asObservable() method — which basically transforms a Subject into an Observable. Since Observables don’t have the next() function, our Subject’s data will be safe from tampering:
We have four different things going on in the above code:
- Both our
pokemonLevelandstop$Subjects are now private, and therefore not accessible from outside ourDataServiceclass. - We now have a
pokemonLevel$Observable that has been created by calling theasObservable()method on ourpokemonLevelSubject. This way, we can access thepokemonLeveldata from outside the class, while keeping the Subject safe from manipulation. - You may have noticed that for the
stop$Subject, we didn’t create an Observable. This is because we don’t need to accessstop$’s data from outside the class. - We now have two public methods named
increaseLevel()andstop(). The latter is simple enough to understand. It allows us to make the privatestop$Subject emit from outside the class — thus completing all Observables that have pipedtakeUntil(stop$). increaseLevel()acts as a filter and only allows us to pass certain values to thepokemonLevel()Subject.
This way, no arbitrary data will be able to find its way to into our Subjects, which are nicely protected inside the class.
Note: Please bear in mind that Observables have complete() and error() methods, which can still be used to mess with the Subject.
Remember everyone, encapsulation is the key.
Use Marble Diagrams for Testing
As we all (should) know, writing tests is as important as writing code itself. However, if the thought of writing RxJS tests sounds a bit daunting to you … fear not. From RxJS 6+, the RxJS marble-testing utils will make life very, very easy for us. Are you familiar with marble diagrams? If not, here’s an example:
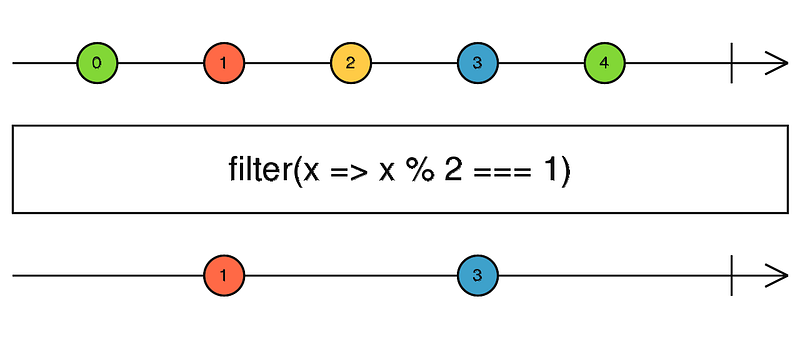
Even if you’re a newbie to RxJS, you should more or less understand these diagrams. They’re all over the place, they’re quite intuitive, and they make it quite easy to understand how some of the more complicated RxJS operators work. The RxJS testing utils allow us to use these marble diagrams to write simple, intuitive, and visual tests. All you have to do is import TestScheduler from the rxjs/testing module and start writing tests!
Let’s take a look at how it’s done by testing our number$ Observable:
Since deep diving into marble testing isn’t the goal of this tutorial, I’ll only briefly cover the key concepts that appear in the above code so we have a basic understanding of what’s going on:
TestScheduler: Used to virtualize time. It receives a callback, which can be called with helper objects (in our case, thecold()andexpectObservable()helpers).Run(): Automatically callsflush()when the callback returns.-: Each-represents 1 milliseconds of virtual time.Cold(): Creates a cold Observable whose subscription starts when the test begins. In our case, we’re creating a cold Observable that’ll emit a value every 1ms and complete.|: Represents the completion of an Observable.- Therefore, our
expectedMarbleDiagramexpects a to be emitted at 20 ms. - The
expectedValuesvariable contains the expected values of every item that’s emitted by our Observable. In our case, a is the only value that’ll be emitted, and it equals 10. ExpectObservable(): Schedules an assertion that’ll be executed when thetestSchedulerflushes. In our case, our assertion expects thenumber$Observable to be like theexpectedMarbleDiagram, with the values contained in theexpectedValuesvariable.
You can find more information about helpers in the official RxJS docs.
Advantages of using RxJS marble-testing utils:
- You avoid a lot of boilerplate code. (Jasmine Marbles users will be able to appreciate this.)
- It’s very easy and intuitive to use.
- It’s fun! Even if you aren’t a big fan of writing tests, I can guarantee you’ll enjoy marble testing.
Since I enjoy making all my code examples Pokemon-themed, I’ll throw in another spec, this time featuring a pokemon$ Observable test:
Conclusion
That’s all folks! Today we discussed a few of the RxJS best practices I always take careful care to apply in my code. I hope you found them useful, if you didn’t already know about them.
Do you know any more RxJS best practices? If you do, let me know in the comments below. This way we can all contribute to writing better and cleaner reactive code.


