
Rust Basics for Data Engineer/Scientist: Part 2
Build a Linear Regression from Scratch by exploring Rust concepts
If you like to experience Medium yourself, consider supporting me and thousands of other writers by signing up for a membership. It only costs $5 per month, it supports us, writers, greatly, and you get to access all the amazing stories on Medium.

This Article is the continuation of the Rust Basics for Data Engineer/Scientist: Part 1. I highly recommend you read Part 1 if you don’t have any knowledge of Rust.
As a Data Engineer or Data Scientist, if you are reading this article, it is because you want to learn more about Rust than just the introduction I gave you in Part 1, That is fair and I will give you what you come for.
In this article, we will approach Rust concepts by doing things that you are usually familiar with in Python: building a Linear Regression from Scratch.
Thanks to Part 1: you are already familiar with Rust concepts like Cargo, Variables, Functions, and Modules. In this Part 2, we will explore Control Flows, Ownerships, References, and Borrowing with examples and link up all our built knowledge together to create a hand-made Linear Regression in Rust that will give the same result as in Python.
Control Flow
Control Flow must be what you are the most familiar with, coming from Python. A few differences are seen in Rust and I will point them out on the 2 Control Flows that cover nearly all your needs: If-Else and For.
If-Else
Let’s do a simple If-Else code and comment on it after:
One very important thing to notice is that If Control Flow is considered as an expression in Rust and not a statement like in Python. For this code, in Python, the msg variable will be affected inside each statement (if, else if, else), whereas, in Rust, the msg is the result of the If expression, as you notice the msg variable is constructed by the If expression.
Curly braces are mandatory, however, you don’t need parentheses around the condition, because everything between the If and the opening curly brace is the condition. The condition must mandatorily evaluate to a boolean, there is no type coercion.
Moreover, you need to put a semi-colon at the end of the If expression.
For loop
The main things you will want to do with For loop are iterating over iterable values such as a list, or a range of values.
The two examples are below:
The two For loops are doing the same: looping through a list or a range and printing the iterated value.
On the first loop, we are iterating through a list, Rust does not consider by default the list to be iterable so there is a method iter() on the list that permits that.
On the second loop, we are iterating on a range from 0 to 3. Like Python’s range function, it is from one number to the last number excluded (here 4 excluded). The two dots means from the left number to the right number.
For loop Control Flow is just like in Python, considered as a statement and not an expression. Therefore you can do the same things that you want inside the loop as in Python, it is not expected to return something.
Let’s now dive into another concept: ownership.
Ownership
Ownership is what Rust safety guarantees are built on and makes Rust so different from other programming languages.
The concept of ownership relies on 3 principles:
- Each value has an owner. No value is not owned by a variable. When you declare
let x=3you are assigning 3 to the ownerx. - There is only one owner of a value. Contrary to Python, no variables may share ownership of a value. Other variables may only borrow the value.
- If the owner goes out of scope, the value previously associated with it gets dropped. It is what we have seen in Part 1: variable only exists inside curly braces.
Therefore, passing ownership of a value to a function usually means a function is going to consume the passed-in value. However for basic types like integers or float, Rust internally builds a copy of your variables when passed to a function, but for more complex types or objects it might be that the copy method is not implemented.
The code above won’t compile because the variable x does not exist anymore after the call of the function eat_variable: the function consumed the passed-in value, therefore, dropping the ownership of x.
However, for most cases, where we want the variable to live through a function or braces, you should use references, which is why it’s time to talk about references and borrowing.
References
In Rust, references allow you to refer to a value stored in memory without owning it. They’re represented with the & (ampersand) symbol and are used to pass values to functions or to create safe and efficient shared ownership with other parts of your code. This way, you can avoid copying values and instead manipulate the original data.
The following code creates a reference to a string and passes it to a function that takes a reference as an argument:
In this example, s is a String value, and &s is a reference to the value of s. The calculate_length function takes a reference to a String as an argument and returns the length of the string. This way, you can access the string value s inside the function without owning it or copying it, making the code more efficient and preventing potential errors.
Borrowing
Borrowing refers to the act of creating references to values stored in memory, similar to how references work. The key difference between references and borrowing is that borrowing is used to enforce the ownership and mutability rules in Rust. With borrowing, you can ensure that values are only used in the way you intend them to be used, and you can prevent data races and other concurrency issues.
The code below is a good example:
In this code, the value of x is first assigned to 5. Then, within a new scope, a mutable reference y to x is created using the &mut syntax. The * symbol is used to dereference y (the code won’t compile without it), allowing the value associated to x be modified through the reference. Finally, after the scope ends, the value x is printed and shows that it has been incremented.
By using borrowing, the code can ensure that the mutable reference y to x is only available within the scope it's created in, and the value x can only be modified through the reference y. This helps ensure that the code is correct and free from undefined behavior.
Linear Regression from Scratch
For education purposes and make sure that our code is doing the right computations, we will first start by building the Linear Regression in Python and then convert each function to Rust.
For reproducibility, it is also easier to get worldwide toy datasets through famous Python packages.
First, we will import the package and load the “California housing dataset”.
import pandas as pd
from sklearn.datasets import fetch_california_housing
import numpy as np
ld = fetch_california_housing()
Then we prepare X and y where X is the input matrix and y is the target column. We will also keep by convenience 4 variables of interest to explain the prices: Median Income, House Age, Average number of Rooms, and the Average number of Bedrooms. We will also save the data as CSV to retrieve it in Rust :)
ld = fetch_california_housing()
features=ld['feature_names']
X=ld['data'][:,[0, 2, 3, 5]]
y = ld['target']
df=pd.DataFrame(X, columns=['MedInc', 'HouseAge', 'AveRooms', 'AveBedrms'])
df['target'] = ld['target']
df.to_csv('house_price_data.csv', index=False)
The Linear Regression method we will implement is the Gradient Descent method to find the parameters. It is a more efficient approach compared to the Ordinary Least Squares method as it does not require matrix inversion, which can be problematic when dealing with sparse data and many features. Additionally, Gradient Descent is also the most generic method for Machine Learning algorithms since it only requires a differentiable Loss Function to be applied to any algorithm.
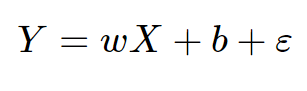
The linear function hypothesis is that there exists a linear relationship between our target y and variable X:
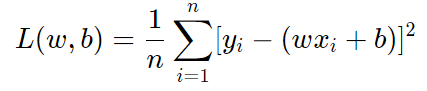
such that the squared residuals are minimized (which is minimizing the Loss Function):
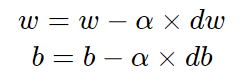
The Gradient Descent technique tells us that if the Loss Function is differentiable, we could get to the optimal parameters w and b by taking small alpha steps (which is called the learning rate) toward the direction that decreases the Loss Function:
The derivatives dw and db are easy to compute and they are equal to:
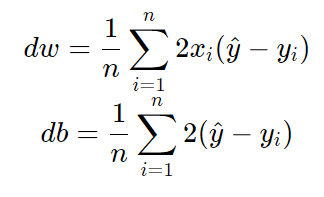
where y_hat is the predicted value of y at each iteration with the current w and b.
Python Implementation
You can jump directly to the Rust implementation if you do not care of the Python one.
Now, let’s implement that in Python, here is the code:
def fit_reg(X, y, n_iters=1000, lr = 0.01):
    n_samples, n_features = X.shape
    weights = np.zeros(n_features)
    bias = 0
    for _ in range(n_iters):
        y_pred = np.dot(X, weights) + bias
        dw = (1/n_samples) * np.dot(X.T, (y_pred-y))
        db = (1/n_samples) * np.sum(y_pred-y)

        weights = weights - lr * dw
        bias = bias - lr * db
    return weights, bias
We also need a function that computes the predicted values:
def predict_reg(X, weights, bias):
    y_pred = np.dot(X, weights) + bias
    return y_pred
and a function that computes the Mean Squared Error of the predictions:
def compute_mse(y_test, predictions):
    return np.mean((y_test-predictions)**2)
As a matter of simplicity, we are just predicting training data, so we are assessing our goodness of fit instead of our predictive power on unseen data. For education purposes, we will also propose the univariate Linear Regression of each of the 4 variables to predict housing prices (to show you how to apply For loop in Rust :D).
for i in range(X.shape[1]):
    weights, bias = fit_reg(X[:,i:i+1], y)
    print(f"{features[i]}: weight:{weights}, bias:{bias}")
    preds = predict_reg(X[:,i:i+1], weights, bias).reshape(X.shape[0],1)
    mse = compute_mse(y.reshape(len(y),1), preds)
    print(f'MSE {features[i]}: {mse}')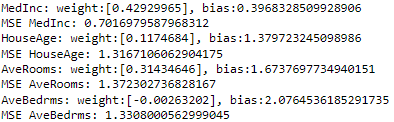
Ok fine, we have the weights, the biases, and the MSE of each of the 4 models! So our goal now is to reproduce the same results we got from Python but in Rust! Let’s do it!
Rust Implementation
First, you will need a CSV reader to get the Data into memory. There is no pandas package in Rust, the package which has the most proximity to it, is polars. It offers a DataFrame implementation coded in Rust (polars is also available for Python).
So let’s define in your main.rs a function read_csvthat just read and stores the Data into a DataFrame:
fn read_csv() -> Result<DataFrame> {
    let file = File::open("house_price_data.csv").expect("could not open file");

    return CsvReader::new(file)
            .infer_schema(None)
            .has_header(true)
            .finish()
}
As you notice, there is this strange expect method after the opening of the CSV: what it does is that if the opening is on Error it will print the message inside the expect. Also, we use the polars CsvReader library to read the CSV and store it as a DataFrame.
Let’s continue with the 3 functions below (fit_reg, predict_reg, and compute_mse). You should insert them in a lib.rs file that you will lay next to main.rs in the src folder. As you notice, I will make the functions public since they are in the lib.rs file and we will import them into the main.rs.
First the fit_reg function to fit the Linear Regression and obtain the optimal parameters:
pub fn fit_reg(x: &Array2<f64>, y: &Array2<f64>, n_iters: i64, lr: f64) -> (Array2<f64>, f64) {
    let n_samples = x.shape()[0];
    let n_features = x.shape()[1];
    let mut weights = Array2::zeros((n_features, 1));
    let mut bias = 0.0;

    for _ in 0..n_iters {
        let y_pred = x.dot(&weights) + bias;
        let dw = (1.0 / n_samples as f64) * x.t().dot(&(y_pred.clone() - y));
        let db = (1.0 / n_samples as f64) * (y_pred - y).sum();

        weights = weights - dw * lr;
        bias = bias - db * lr;
    }
    (weights, bias)
}
You notice that for the input and outputs of the functions, we are expecting Array2<f64> types. Those types are coming from the equivalent of numpy in Rust, which is called ndarray. The number at the end of Array means that it is 2-dimensional and the number f64 corresponds to the type of the elements inside the array. It allows optimized vectorial computation for our needs. You noticed that we defined weights and bias as mutable variables because they are iteratively recomputed and that we used references every time where we just want to borrow the value.
The next function is the predict_reg function to predict the target values with weights and bias from our learning, also the easiest function.
pub fn predict_reg(x: Array2<f64>, weights: Array2<f64>, bias: f64) -> Array2<f64> {
    x.dot(&weights) + bias
}
Third the compute_mse function to compute the Mean Squared Error of our Linear Regression model:
pub fn compute_mse(y_test: Array2<f64>, predictions: Array2<f64>) ->f64{
    let differences = y_test - predictions;
    let squared_differences = differences.mapv(|v| v.powf(2.0));
    let mse = squared_differences.mean();
    mse.unwrap()
    }
Notice that here we had to unwrap the result of the mean calculation on the squared differences. It will happen sometimes that on some functions, the returned object is an Option<..> or a Result<…>. Those are specials type that assesses that the computation was successful (more information here), but if you are interested only in the values, you have to unwrap it.
And finally, let’s call all the steps of the Linear Regression in the main function:
use polars::prelude::*;
use std::fs::File;
use linear_reg;

const N_ITERS: i64 =1000;
const LR: f64 = 0.01;
fn main() {
    let df = read_csv().unwrap();
    let columns=["MedInc", "HouseAge", "AveRooms", "AveBedrms"];
    for col in columns.iter(){
        let x = df.select([col]).unwrap().to_ndarray::<Float64Type>().unwrap();
        let y = df.select(["target"]).unwrap().to_ndarray::<Float64Type>().unwrap();
        let (w,b) = linear_reg::fit_reg(&x, &y, N_ITERS, LR);
        println!("{} weight {}, bias {}", col, w, b);
        let preds = linear_reg::predict_reg(x, w, b);
        let mse = linear_reg::compute_mse(y, preds);
        println!("MSE {}: {}", col, mse)
    }
}
Notice that we defined the number of iterations and the learning rate as constants variables as suggested by Part 1, since those parameters are never muted and are global, we increase the runtime by defining them as constants. Moreover, since the project that we created is called linear_reg (by running cargo new linear_reg at the creation of the project), Rust knows where to import the functions fit_reg, predict_reg, and compute_mse.
After typing cargo run, the prints of our code:
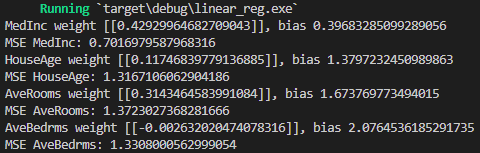
They are the same as in Python! Congratulations.
Notice that you’ll also need some external packages in your Cargo.toml such as polars and ndarray.
Because I am very kind, I provide you below the entire code that you need in each file.
In conclusion, Rust provides a comprehensive set of control flows (If-Else, For loop) that can be used to manipulate and handle data in various ways. Ownership, References, and Borrowing are the backbones of Rust’s safety guarantees: they help in the creation of efficient and safe code and ensure that values are only used in the way intended.
Through these concepts, Data Engineers and Scientists can create robust and efficient machine learning models such as the hand-made Linear Regression in Rust demonstrated in this article.
With no extra costs, you can subscribe to Medium and get access to unlimited stories, via my referral link to support my work.
Or you can get all my posts in your inbox for free. Do that here!