
Running your application as Docker Container
In this article, we will cover basic steps involved in running a web application as a docker container. If you are new to the world of containers and docker, do read my other posts on containers and docker for more insights.
By the end of this article, we will containerize and run sample rest web application provided by Spring in below github repository.
https://github.com/spring-guides/gs-rest-service.git
You can generate the web archive file(war) for the application either using mvn install or with gradle. We need the war file to bring up the application.
How would we run this web application in a system?
Before talking about containerizing the application, how would we normally run this sample application in a system?
In order to run the application on a system, we will have to follow the below steps
1. Install Java run-time and setup JAVA_HOME and PATH environment variables. 2. Install and setup application server, say tomcat, which would host the application. 3. Configure system and server profile based on application needs. 4. Deploy the application web archive file to the server. 5. Start/Run the application server daemon which is hosting your application.
When you are containerizing your application with docker, you will have to follow the exact same steps to setup docker container image. This container image can then be used to bring up as many containers as you need, anywhere, anytime with same configuration.
Let us containerize the web application!
What is a Container?
To over simplify, Containers are super isolated processes that run on a host system. These processes have their own file system, network, user groups, processes, host names and everything needed to function as independent systems. They are light weight and only take up resources that are needed for your application to run and nothing else.
What do we need to create a container?
A container is derived by running a container image inside the docker host.
Now, what is a container image?
Container images are blue prints from which docker creates containers. You stack up layer after layer of your application dependencies and application software to create your application container image.
What are the ingredients to build a container image?
In order to build a container image you need a docker file and build context.
Docker file (dockerfile):
Docker file is a text document that lists a series of commands, which can be executed in succession to create a docker image.
What do these commands do?
I. Define the base image from which the container needs to be built. II. Alter the container file system and configuration as per application needs. III. Specify what the container will execute when it is up and running.
Let us look at each of the above functions of commands in detail and figure out commands needed to setup our application docker file
I. Defining Base Image
Base images specify the base file system on top of which your container image will be built. Choice of base image depends on the use case. In our case, we will use official alpine linux container image as the base image as it has tiny footprint of ~5MB, which in turn will reduce the size of our final application image.
Docker Command to set base image:
FROM image_name
In our example case, command will be: FROM alpine:latest
Defining the base image should be the first command in your docker file. you can define base image as ‘scratch’, if you don’t want to use any base image.
II. Commands that alter container file system and configuration
Once you have the base image, you need to alter the container file system by either adding/deleting/updating content in such a way desired for your application to work. In case of our application, we need to alter the container file system as mentioned in steps 1 through 4 under section ‘How would we run this sample application in a system?’, to set up our application container.
Below is the list of basic docker file commands available to alter container file system.
i. RUN <shell script> / <executable>
RUN command helps us to directly execute shell script or executables on the container file system. So using run, you can add a user, clone a git repository, install a utility and do a variety of other things inside the container.
Using RUN command with shell script is the preferred option. you can use logical and operator ‘&&’ to combine and run a list of shell scripts in a single run command.
In our example case, we will leverage RUN command to install java and to download and setup tomcat application server which will host our application. Below is the docker file code snippet for the same.
#Install Java 8 using alpine linux apk pacakge manager
RUN apk — update — no-cache add openjdk8
#Download and setup tomcat to /opt directory. Using CURL to download tomcat gzip file and TAR to extract contents.
RUN mkdir temp && \ cd temp && \ apk add curl && \ curl -O https://www-eu.apache.org/dist/tomcat/tomcat-8/v8.5.43/bin/apache-tomcat-8.5.43.tar.gz && \ tar -xf apache-tomcat-8.5.43.tar.gz -C /opt/ && \ rm -rf temp
Backslash \ is used as escape character to continue the command in new line.
ii. ENV <env_variable_name> <env_variable_value>
Defines environment variables that will be available throughout the container life cycle from its definition. you can also define multiple environment variable in a single ENV command as below
ENV
For our case, we will use this command to setup JAVA_HOME and PATH environment variables.
#Setup JAVA_HOME and PATH environment variables
ENV JAVA_HOME /usr/lib/jvm/java-1.8-openjdk ENV PATH $PATH:$JAVA_HOME/bin
iii. COPY <from_dir> <to_dir>
This command is used to copy a file or a directory from the build context to container file system.
from_dir - in build context to_dir - in container file system
We will use this command to copy our application war file from build context to tomcat webapps folder in container file system in order to deploy it.
COPY gs-rest-service-0.1.0.war /opt/apache-tomcat-8.5.43/webapps/gs-rest-service-0.1.0.war
iv. EXPOSE <port>
This command is used to specify container ports which need to be exposed to the container host.
By default tomcat runs on 8080 port, so we will expose port 8080 from our container.
EXPOSE 8080
v. ARG <variable_name> = <optional_default_value>
Defines build argument variable which can be passed via docker build command when building an image from dockerfile. you can also provide a default value which will be used if there aren’t any build arguments passed.
III. Setting what the container executes once it’s up:
Once we have setup containers file system and configurations, we are left with defining what the container executes once it is up. In order to cater this docker has two commands — CMD and ENTRYPOINT.
i. CMD <executable> / <shell script>
This command has two use cases. you use this when you have to execute something by default when the container is up. You can also use CMD to pass default parameters to entry point command.
The default command can be overridden by the command provided by user at run time.
ii. ENTRYPOINT <executable> / <shell script>
This command gets executed no matter what and could take default arguments from CMD. You cannot override commands run by entrypoint.
CMD and ENTRYPOINT can take shell script and executable style inputs. Executable is preferred and is in JSON format. Shell script is not preferred in CMD and ENTRYPOINT commands because when you use shell script to define what your container runs, shell takes PID 1 and your container will have lower priority PID, thus causing system event related issues.
In our case, we will use CMD command to pass default argument “run” to entry point instruction which is running script ‘catalina.sh’.
“run” when passed as argument to catalina.sh, enables starting and running tomcat on the foreground. We can override this by passing “start” / “stop” commands via build argument to CMD.
#Set default argument for entry point CMD [“run”]
#Defining what our container runs ENTRYPOINT [“/opt/apache-tomcat-8.5.43/bin/catalina.sh”]
Our completed dockerfile after above steps looks like below
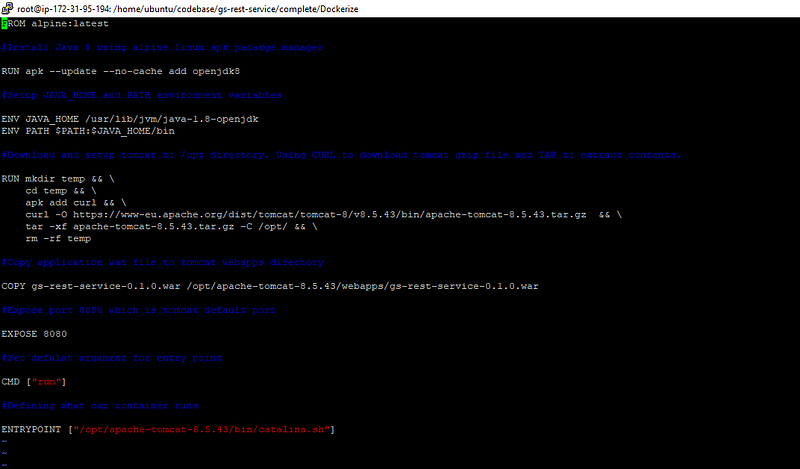
you can access the docker file from github.
Docker build context:
Build context will be a directory path or git repository URL which contains static files that can be utilized to build docker image.
In our case, the build context will be current working directory which will contain the war file that needs to be deployed to the server and docker file that defines the docker image.

Now we have everything needed to build an image. Let us run docker build command to build our image from the above build context (.) which has our docker file and war file and tag it as restwebapp:1.0 (-t flag)


Now we have our application container image, now let us run the image to spun up our application container. we will expose all the container ports (-P flag)and run the container in detached mode (-d flag).


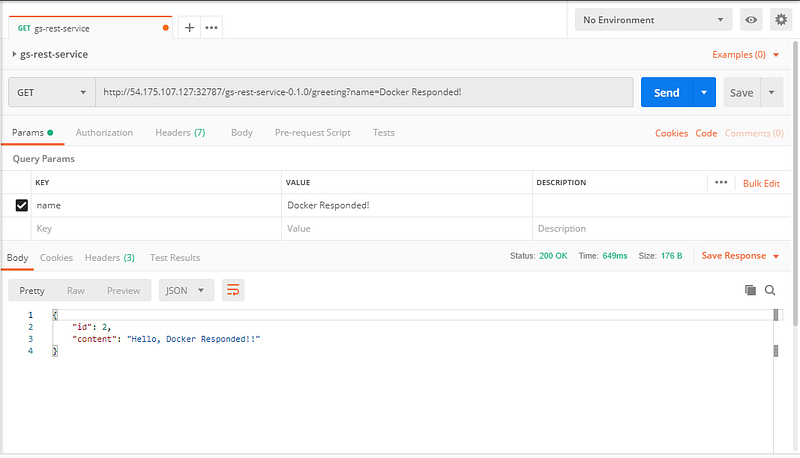
Now we have our application containerized and running on port 32787 (32787 on host mapped to 8080 on container). Now all that is left for us to do is test our application.
Using postman to test the get method, we get the below expected greeting JSON response :)
Well, we have achieved our end goal. That is all for now. Thank you for reading!
Do connect with me to discuss more on all things devops!

Follow us on Twitter 🐦 and Facebook 👥 and join our Facebook Group 💬.
To join our community Slack 🗣️ and read our weekly Faun topics 🗞️, click here⬇
