

Modular iOS
Reusing code and resources with Swift static libraries and resource bundles
Have you ever copied and pasted the same code into more than one of your app projects? What happens when you find a bug in that code? You will have to fix that same code in every single project where you have used it. Is there a way to manage duplicated code amongst various of your iOS app projects?
Yes there is! Apple provides us a mechanism to share code through Swift static libraries. But what about resources such xibs, nibs and images? Apple provides us with another mechanism of sharing resources called resource bundles.
In this post I will show you how you can build your own Swift static library and resource bundle.
In an earlier post I showed how to reuse code and resources using Swift dynamic framework. Static libraries and resource bundles is an alternative mechanism to dynamic frameworks. We will further explore the differences between them.
In this post we will learn:
- what static libraries are
- how static libraries compare to dynamic frameworks
- why use static libraries
- how to reuse code and resources using static libraries and resource bundles
- consuming static libraries and resource bundles in an app
Feel free to skip any sections if you are already familiar with the concepts.
What is a static library?
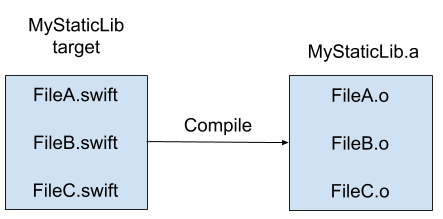
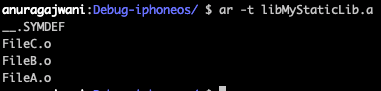
A static library is a collection of compiled source code files. Let’s say we have FileA.swift, FileB.swift and FileC.swift. With a static library we can compile these files and wrap them inside a single file containing all of these. The file has has an extension of .a; short for archive. Sort of like getting some pages and making a book out of it.
Static library vs Dynamic frameworks
iOS allows us two methods of grouping code together for distribution:
- dynamic frameworks
- static libraries
The difference between the two that we will cover in this post is:
- dynamic frameworks can hold resources (i.e images), static libraries can’t
- dynamic frameworks are loosely linked to the app, static libraries are hard linked to the app
To explain linking further let’s look at examples for each type of code grouping mechanisms.
Dynamic framework linking
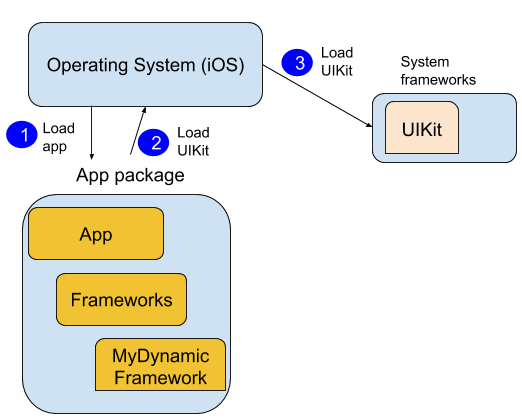
When our app consumes code dynamically the code is not loaded with the app when the app is launched. The system loads our app which in turns tells the system that it requires to consume some code to run. The system then loads the necessary chunks of code that our app relies on. All of this happens at runtime.
An example of this is UIKit. iOS apps make use of UIKit. However UIKit is not included with each app. Rather the app has reference to it and the functionality it requires to function but not the actual code. UIKit is included in the operating system. The system loads UIKit if it was not already loaded.
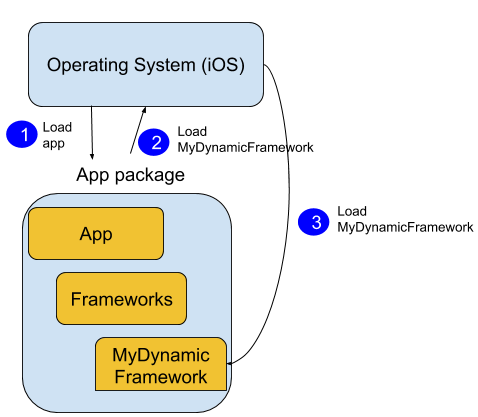
What about dynamic frameworks that are not included within the operating system? What about frameworks that we build and distribute with our apps?
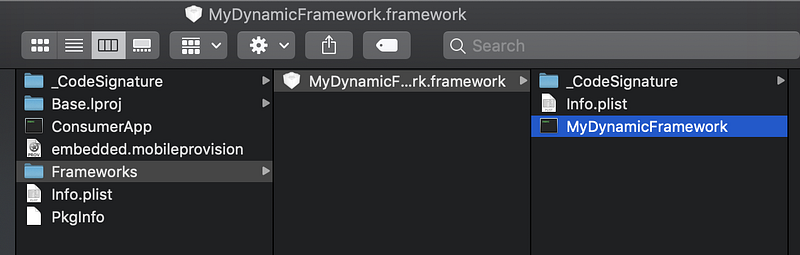
ConsumerApp can’t work without MyDynamicFramework or it will crash. Thus the system must load it. It must be thus included with the app package.
Xcode creates a directory within the app package called Frameworks. This directory is where to host dynamic frameworks required by the app.
What if the framework is not included within our app’s package Framework directory or within the system? App crash at runtime💥.
Static library linking
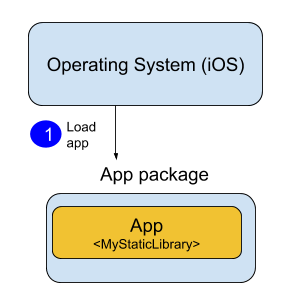
When our app consumes code statically the code that it consumes gets copied into the app executable binary.

When the system loads the app, the static library functionality is loaded with it as single executable.
Why use static libraries?
Some reasons to use static libraries similar as for dynamic frameworks:
- code reusability
- hiding code that is not related to the app (using private and internal access)
For both static libraries and dynamic frameworks if we distribute only the compiled form then we can also:
- avoid sharing our secret code and only distribute the functionality
- reduce app compilation time
But why use static libraries over dynamic frameworks? Apps with static libraries load faster than those with dynamic frameworks. Let’s dive a little deeper to understand why.
Dynamic frameworks have the advantage of being loaded into memory lazily at runtime and the possibility of being shared with multiple processes. That works great if the dynamic framework is used by multiple apps in iOS.
iOS system dynamic frameworks are used by multiple apps and these are likely to be loaded before your app launches thus saving app launch time. However in case of embedded dynamic frameworks in apps (these are the ones included inside your app and not by operating system) the launch times can be much slower. How much slower?
To test it out I wrapped three Swift files in two different targets:
- Dynamic framework
- Static library
I created an empty app. I configured the app to print loading times to console. Then I linked the app to a dynamic framework. I ran the app on a simulator from cold(was not cached in memory). The results:
Total pre-main time: 1.0 seconds (100.0%)
        dylib loading time: 193.54 milliseconds (18.3%)
        rebase/binding time: 760.93 milliseconds (71.9%)
        ObjC setup time:  60.19 milliseconds (5.6%)
        initializer time:  42.81 milliseconds (4.0%)
        slowest intializers :
            libSystem.B.dylib :  18.22 milliseconds (1.7%)
I repeated the process with one difference. I linked the app to a static framework. The static framework contains the same code as the dynamic framework as in the previous run. The results:
Total pre-main time: 290.34 milliseconds (100.0%)
        dylib loading time:  44.15 milliseconds (15.2%)
        rebase/binding time:  54.60 milliseconds (18.8%).
        ObjC setup time:  60.76 milliseconds (20.9%)
        initializer time: 130.68 milliseconds (45.0%)
        slowest intializers :
            libSystem.B.dylib :   3.08 milliseconds (1.0%)
            libMainThreadChecker.dylib : 118.62 milliseconds (40.8%)
The app launch time was nearly 4 times faster when linked statically!
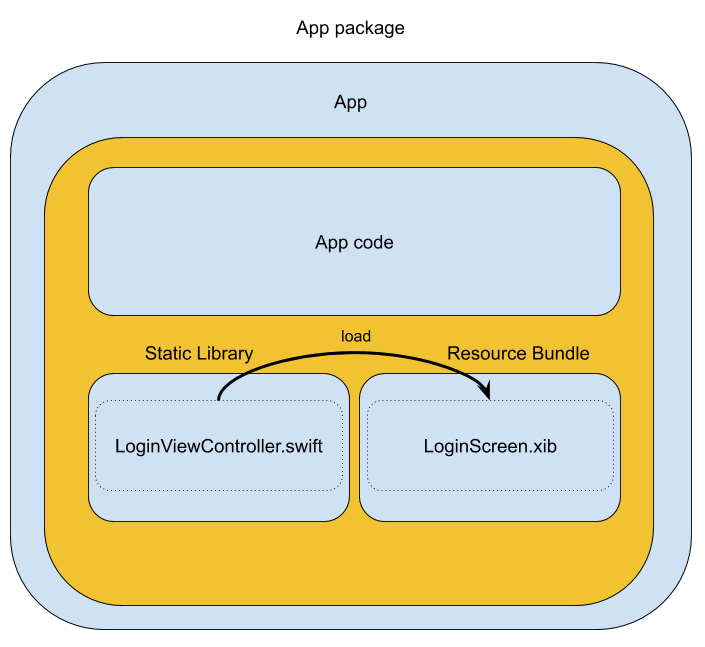
How to build Swift static libraries and resource bundles
In this section we will create a static library and a resource bundle. The resource bundle will contain a login screen in a xib file. The static library will contain the controller code for login screen.
In the next steps we will:
- Create a new project in Xcode using the Cocoa Touch Static Library template
- Add resource bundle to project
- Create Login screen using Interface Builder
- Create a controller for the Login screen
1. Create project
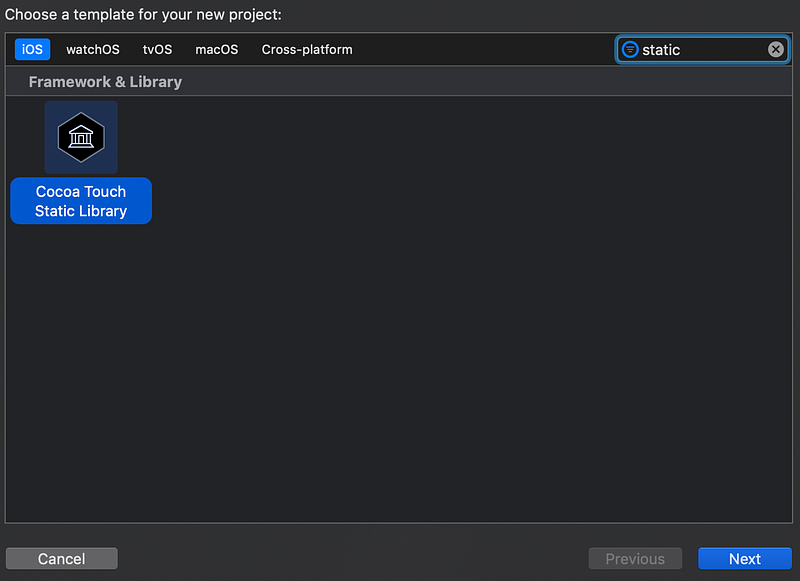
Let’s begin by creating a new Xcode project using the Cocoa Touch Static Library template. Open Xcode and from menu select File > New > Project… Next select the Cocoa Touch Static Library template.
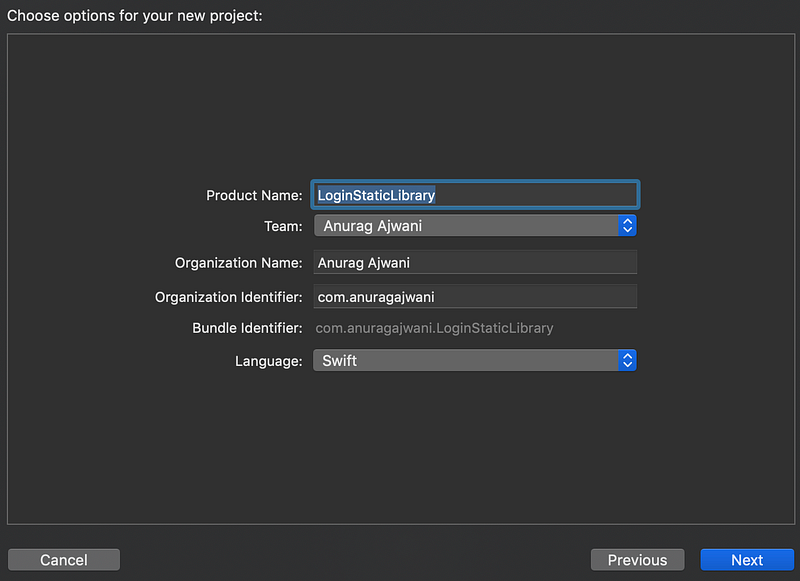
Click Next. Once the Xcode “Choose option for new project:” pop-up appears, set the Product Name LoginStaticLibrary. Make sure the language is set to Swift. Lastly click Next and then Create.
2. Add resource bundle to project
So far we have created a project with a static library. The static library can hold Swift code. However in this tutorial we will create a screen through the Interface Builder. We will create an XML Interface Builder(XIB) file that will hold the Login screen specification with all its views and layout rules. We will later load the Login screen based on the XIB file and control the interaction with it through a view controller. The view controller will be inside the static library.
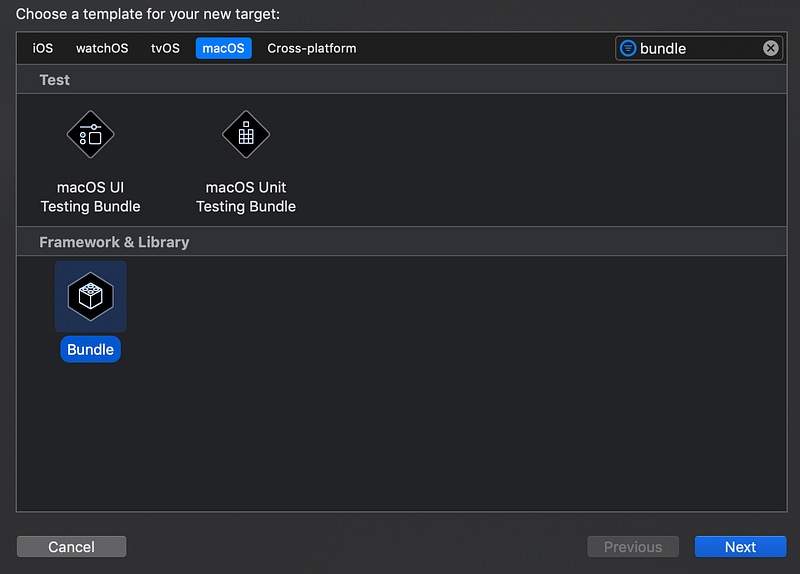
Let’s add the resource bundle to our project. From menu select File > New > Target… Next select from the Bundle template from the macOS tab.
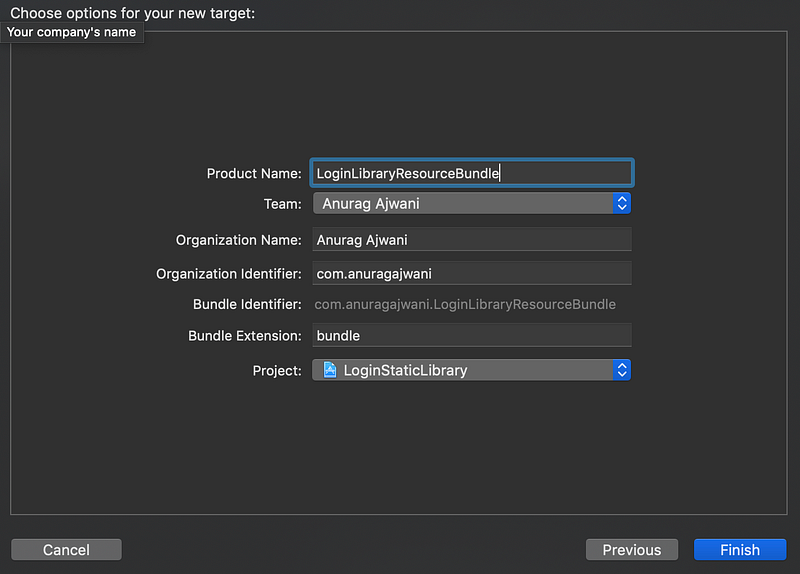
Name the bundle LoginLibraryResourceBundle and then click Finish.
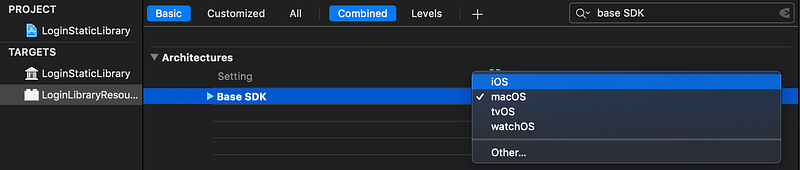
There is one more thing to do before we can make a resource bundle work with iOS apps. The bundle template was created for macOS app target. There is no bundle template for iOS. However it is very simple to make these work for iOS.
Once created on the project navigator select the Xcode project file (the one with the blue icon).

Next from the targets list within the project select LoginLibraryResourceBundle. Then select Build Settings tab. Search for Base SDK and change the value from macOS to iOS.
3. Create Login screen using the interface builder
As mentioned in the previous section, a static library can’t hold XML Interface Builder files (XIB) so we created a resource bundle to deploy the XIB file which would hold the Login screen. Next let’s add the Login screen to the resource bundle.
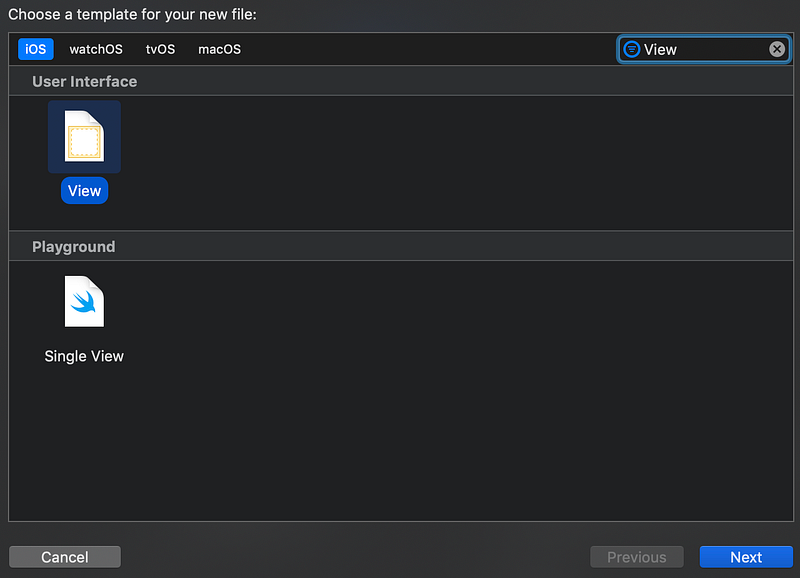
Select LoginLibraryResourceBundle from the project navigator. Next from menu select File > New > File… Select the View template. Click Next.
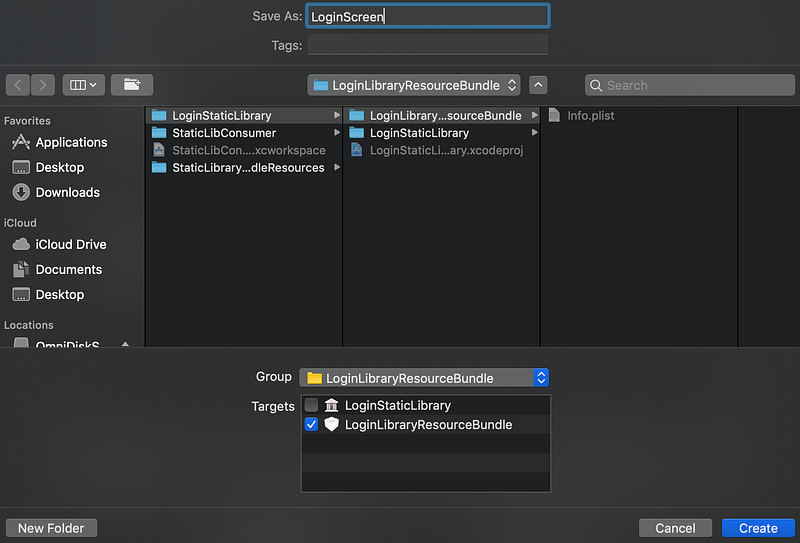
Name the file as “LoginScreen”. Make sure that LoginStaticLibrary is unchecked and LoginLibraryResourceBundle is checked. Lastly click on Create.
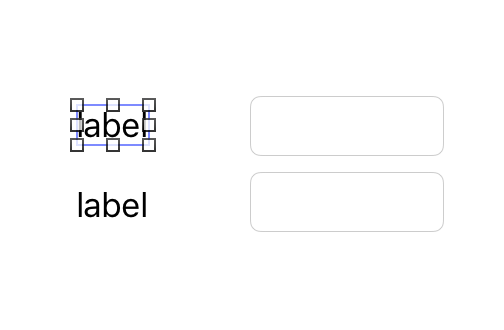
Once created drop a label and a text field for username and another label and text field for password.
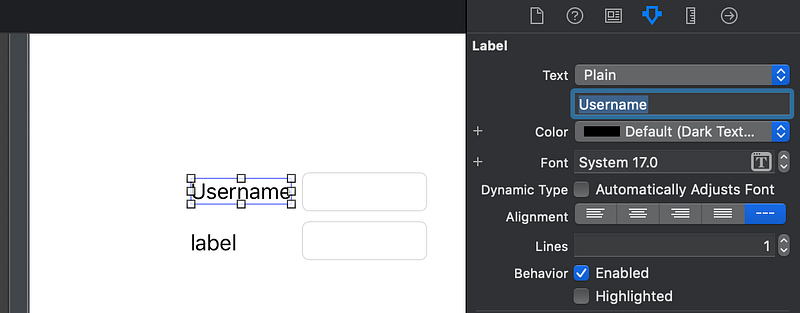
Change the text on the labels, select one of the labels and then open the attributes inspector (from menu select View > Inspectors > Show Attributes Inspector).
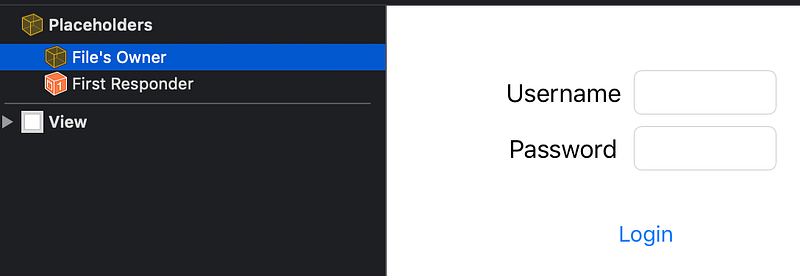
Next add a button to allow the user to login. Name it Login. The Login screen should look like the following:
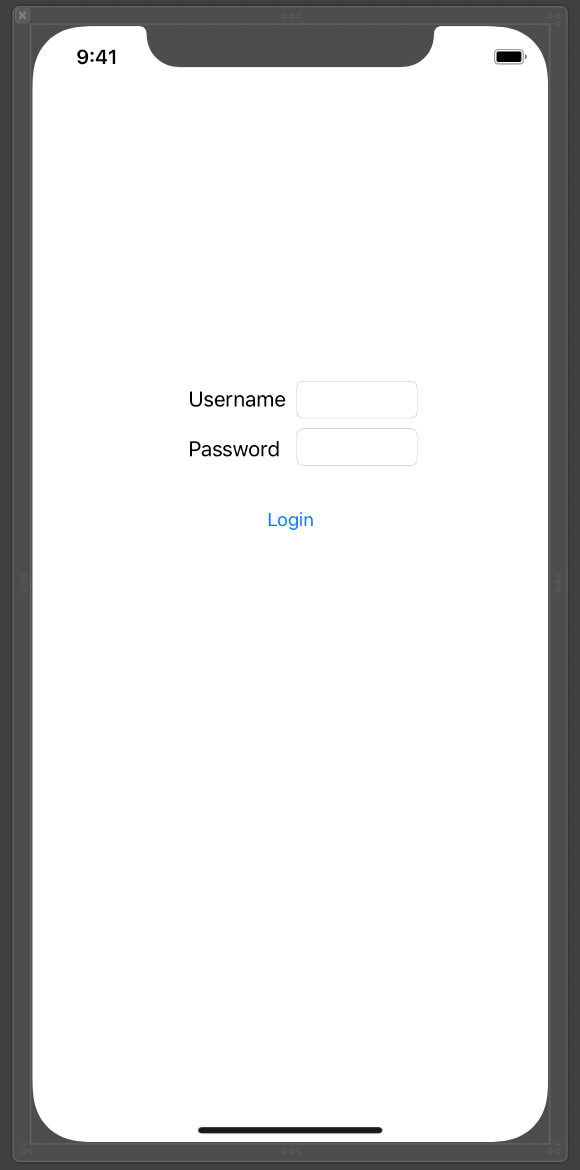
Don’t worry about making a perfect layout. Good layout and layout constraints are beyond the scope of the post.
4. Create a controller for the Login screen
In this section we will create a controller which will load the Login screen specification and bind the views of the controller.
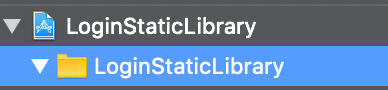
In the project navigator select the LoginStaticLibrary folder.
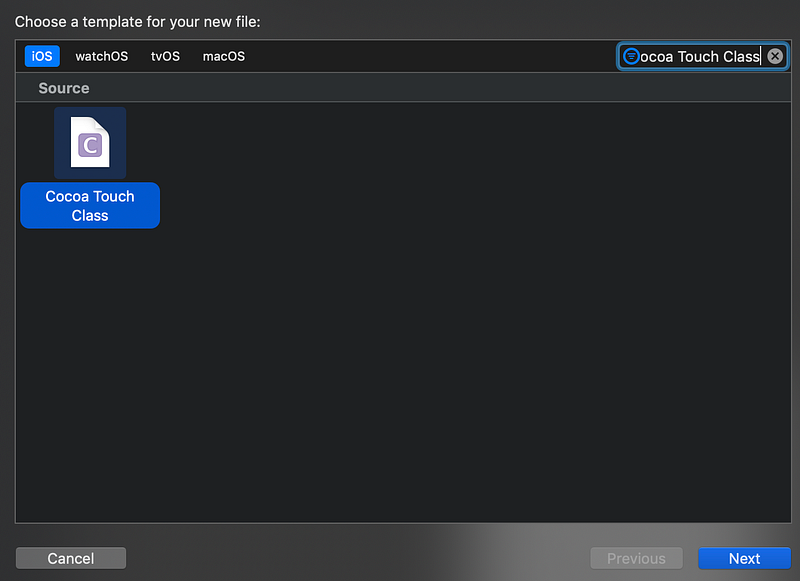
Next create a new Swift class file which will subclass UIViewController. From menu select File > New > File… Search and select for Cocoa Touch Class from the iOS templates. Click Next.
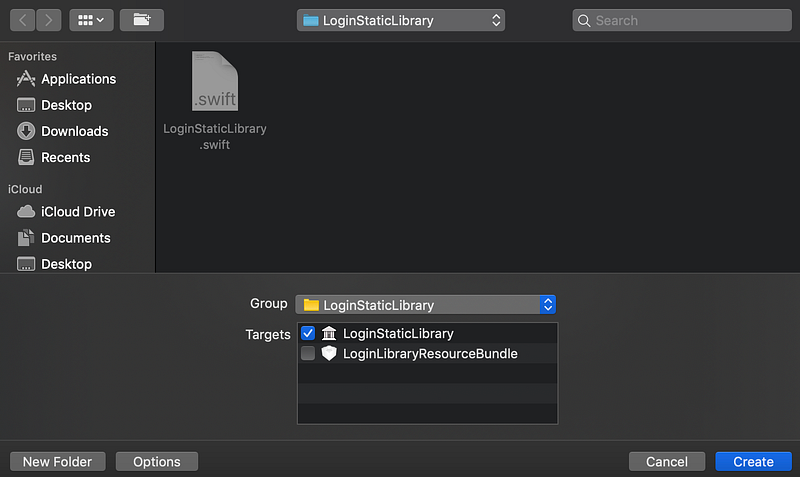
Name the Class LoginViewController. Set the Subclass to UIViewController. Uncheck Also create XIB file. Set the language to Swift. Click on Next.
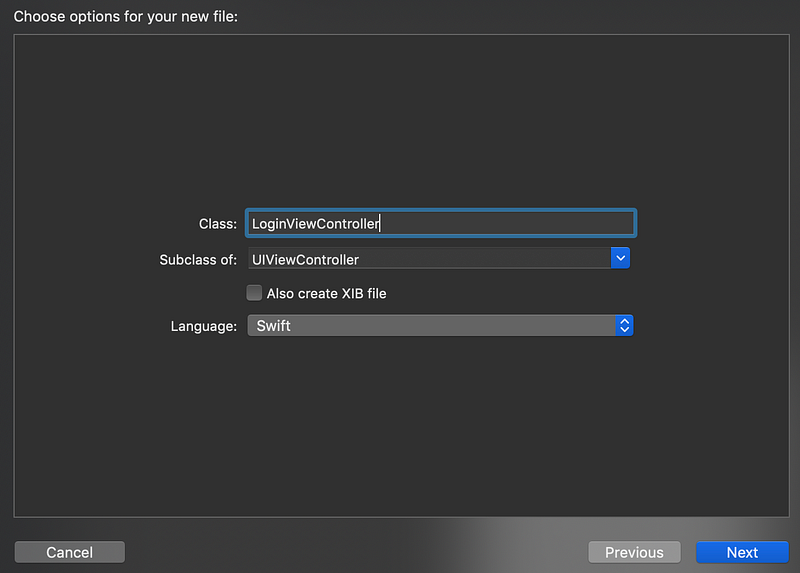
Before creating the file make sure the group is set to LoginStaticLibrary and the target list has LoginStaticLibrary checked and LoginLibraryResourceBundle unchecked. Finally click on Create.
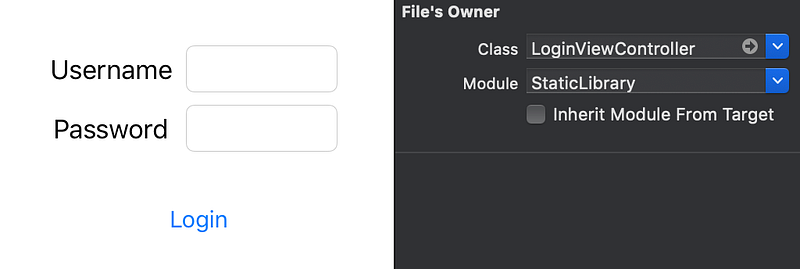
Next we will hook up the login button from the XIB file to the controller. For that open LoginScreen.xib. Then on the document outline select File's Owner.
Once File's Owner is selected open the attributes inspector (View > Inspectors > Show Attributes Inspector). The attributes inspector will open on the right hand pane of Xcode. For Class fill in LoginViewController. For Module make sure StaticLibrary is the value. Lastly, make sure Inherit Module From Target is unchecked.
Once the File’s Owner is selected we have to set the UIView within our LoginScreen.xib as the root UIView of the LoginViewController.
Select File's Owner from the document outline. Hold control and drag and drop File's Owner to the View.
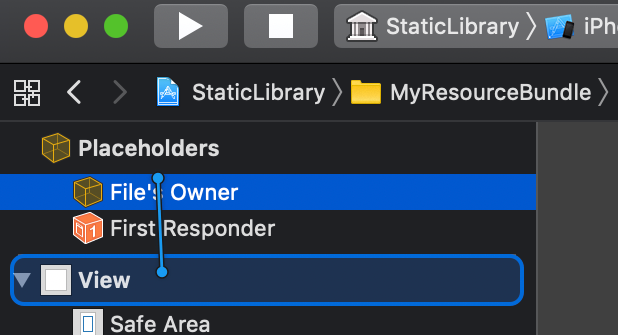
Once you let it go you will see a pop-up appear. Select view from the pop-up.

Next let’s hook up the tap to the Login button taps from the user to a function in our LoginViewController.
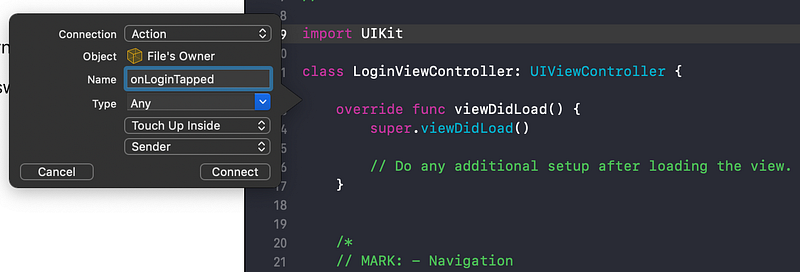
Open the assistant editor (View > Assistant Editor > Show Assistant Editor). LoginViewController should have opened up automatically on a new pane on the right hand side from the XIB editor.
Next hold the control button and drag and drop the login button inside the LoginViewController class. Once a pop-up for the linking option appears, set the Connection type as Action. Name the action as onLoginTapped. Finally click on Connect.
Now let’s add a property that will hold a closure that will be called when the user taps the login button. Add the following line to the LoginViewController class:
var onLogin: (() -> ())?Now call the onLogin closure when the user taps the login button from the onLoginTapped function:
@IBAction func onLoginTapped(_ sender: Any) {
    self.onLogin?()
}
One final thing to do so an app can consume our static library and resource bundle is to create functionality that the consumer can access. Our LoginViewController is internal by default. That means that only code within the static library can access our login screen. Next we will add a public convenience function so our integrators can login their users. Add the following function in the LoginViewController.swift file outside the LoginViewController class:
public func getLoginScreen(onLogin: @escaping ()->()) -> UIViewController {
    let bundlePath = Bundle.main.path(forResource: "LoginLibraryResourceBundle", ofType: "bundle")!
    let bundle = Bundle(path: bundlePath)!
    let loginViewController = LoginViewController(nibName: "LoginScreen", bundle: bundle)
    loginViewController.onLogin = onLogin
    return loginViewController
}
Above we have added a function that will load and return the LoginViewController using the LoginScreen xib from the resource bundle. The function takes a closure as parameter which is passed on to the LoginViewController’s onLogin property.
Note: the public keyword before the function declaration exposes this function to the consumer app. The function returns UIViewController instead of LoginViewController as LoginViewController is inaccessible (internal) to the integrator whereas UIViewController is accessible (public interface in UIKit).
That’s all for creating our own Static Library and Resource Bundle! 🎉
Consuming the static library and resource bundle
In this section we will consume the static library and resource bundle created in the previous section through an app.
We will:
- Create a new app target using the Single View App template
- Add sign in button to the app
- Link the LoginStaticLibrary and LoginLibraryResourceBundle to the app
- Present login screen from the static library on sign in button tap
1. Create a new app target using the Single View App template
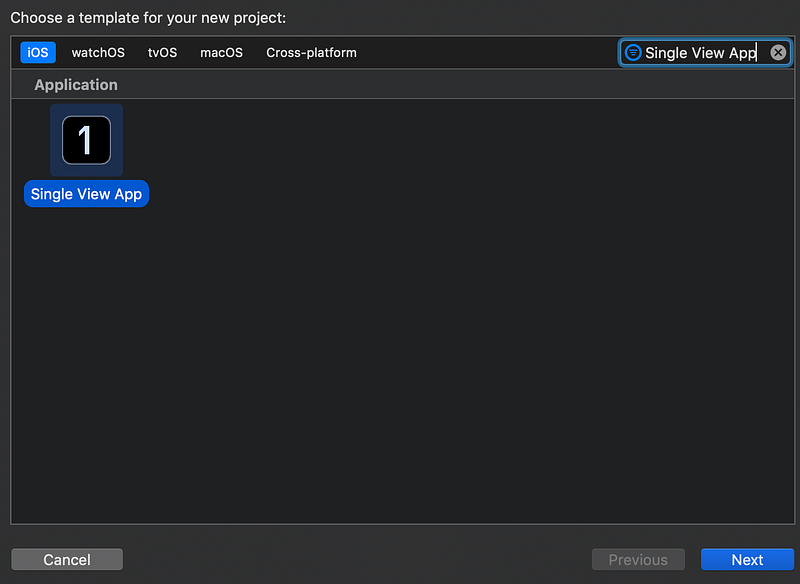
From menu select File > New > Target… Next select the iOS template Single View App. Click Next.
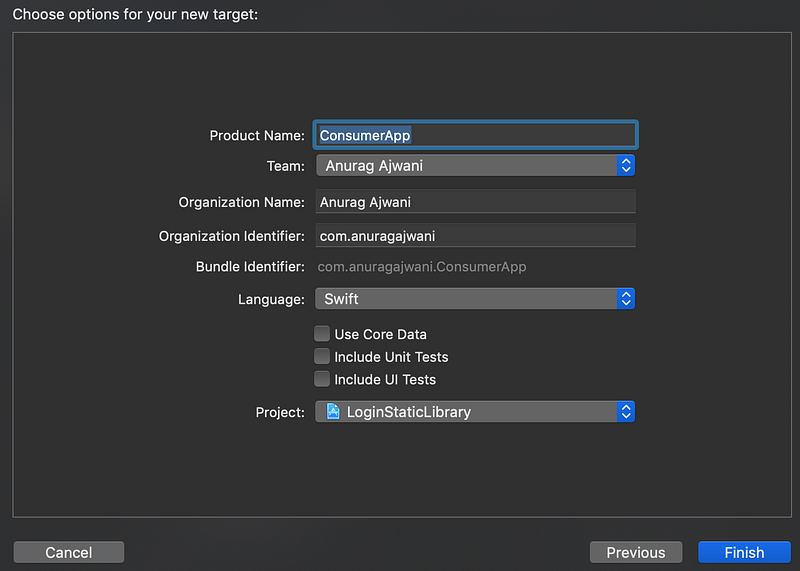
Name the app ConsumerApp. Set Swift as the language of the app. Make sure all checkboxes are unchecked. Click Finish.
2. Add sign in button to the app
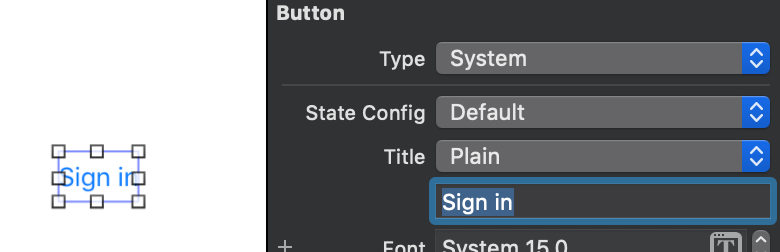
Next open Main.storyboard. On the blank canvas drop in a button. Select the button. Using the attributes inspector(View > Inspectors > Show Attributes Inspector) change the button text to Sign in.
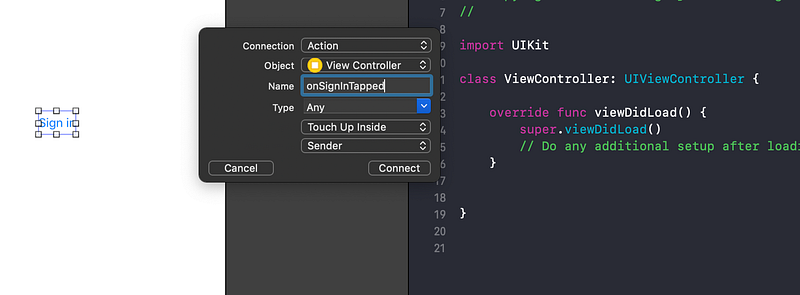
Next let’s hook up the tap on the sign in button to a function within the already created ViewController for this screen. Open the assistant editor (View > Assistant Editor > Show Assistant Editor). Hold control and drag and drop the sign in button inside the ViewController class.
Once the pop-up appears, change the Connection type to Action. Name the function as onSignInTapped. Finally click on Connect.
You should now see an empty onSignInTapped function within ViewController class. We will load and present login screen from the static library from within this function:
@IBAction func onSignInTapped(_ sender: Any) {
    // call Static Lib login from here!
}
3. Link the Static Library and Resource Bundle to the app
Before we can load the login screen from the consumer app we must link the static library and resource bundle to our consumer app.
Let’s link the static library to the app.
- Select the StaticLibrary project (with blue icon)
- Select the ConsumerApp target from the target list
- Select General tab
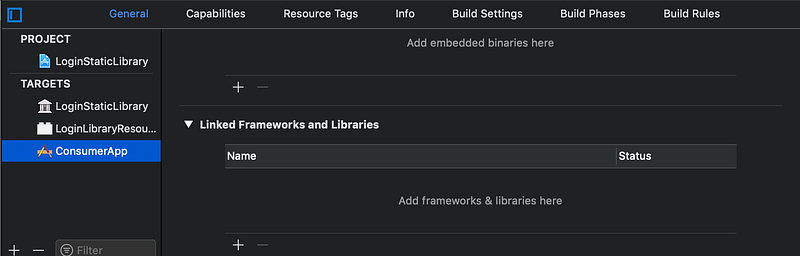
Under Linked Frameworks and libraries select the plus (+) button. Once the Choose frameworks and libraries to add option opens, select libStaticLibrary.a. Click Add.
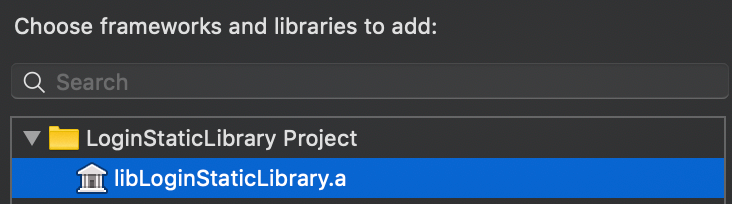
Note this tells Xcode to include the compiled code within the static library in the executable of the app.
Next select the Build Phases tab.

Under Target Dependencies click the plus icon (+).
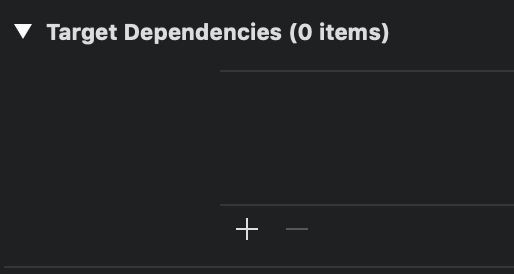
Select both LoginStaticLibrary and LoginLibraryResourceBundle. Click on Add.

Note: this will tell Xcode that the app relies on the static library and resource bundle target to be built before the app. The app depends on these targets to compile.
Finally under Copy Bundle Resources click on the plus icon (+).
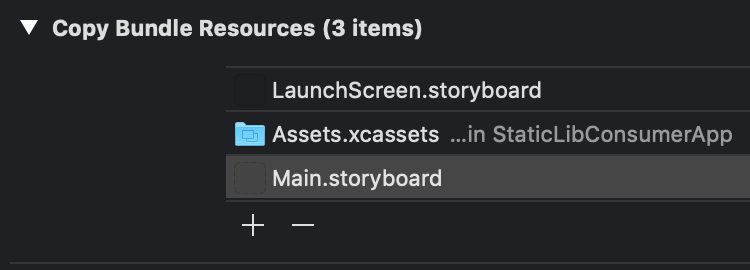
Search and select LoginLibraryResourceBundle.bundle. Click Add.
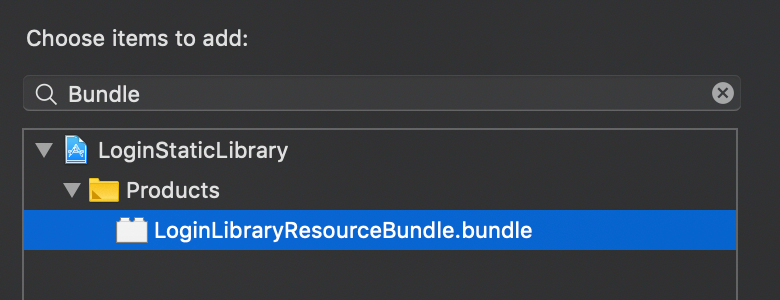
Note: this step packages the resource bundle with the app package.
4. Present login screen from the static library on sign in button tap
In this section we will open the login screen in the static library and bundle resource when the user taps the Sign in.
Open ViewController.swift file in ConsumerApp. Under import UIKit let’s import our static library.
import LoginStaticLibraryWhilst the compiled files are included with the app once linked the files are still separated under a module. So we still need a import statement. Modularisation helps in secluding files that are unrelated to the rest of the app i.e. login logic.
Next within the onSignInTapped function, add the following lines of code:
let loginViewController = getLoginScreen(onLogin: {
    self.dismiss(animated: true, completion: nil)
})
self.present(loginViewController, animated: true, completion: nil)
And that’s all! 🎉 Run the ConsumerApp and see it in action. You’ll see a screen with a single button Sign in. The Sign in button is from the app. Tap Sign in, the login screen from the static library and resource bundle will appear. Tap Login from the login screen and the screen will disappear.
You can find the full source code for this post here. Each git commit on the repo is a step on this post to follow along.
Summary
In this post we have learnt:
- what static libraries are
- what resource bundles are
- why use static libraries
- why use static libraries over dynamic frameworks
- how to build a static library and resource bundle
- create screen using Interface Builder and XIB’s hosted in resource bundle and controlled from code in static library
- how to consume static library and resource bundle
Final Notes
In this post we have seen the advantages in using static libraries along with resource bundles over dynamic framework. However we have also seen that this can be complex to build, maybe even to maintain over the more convenient dynamic framework. To check how to build dynamic framework checkout my earlier post on Reusing code with Swift frameworks.
Stay tuned for more on iOS development! Follow me on Twitter or Medium.