
Resilience4j Rate Limiting in Spring Boot API Gateway Guide

In modern distributed systems, API gateways are crucial in managing traffic flow, security, and fault tolerance. With applications handling vast user requests, rate limiting becomes essential to protect resources from being overwhelmed. Resilience4j, a popular Java library, provides several resilience mechanisms, including rate limiting, making it a great choice for Spring Boot applications. This guide covers implementing rate limiting in a Spring Boot API Gateway using Resilience4j to control the traffic and maintain stability.
1. What is Rate Limiting?
Rate limiting controls the rate of incoming requests to an API, helping protect against excessive or malicious requests that could otherwise degrade service. Limiting requests can ensure a consistent, fair user experience and prevent server overload. Resilience4j allows us to specify the number of permitted requests per time unit, rejecting or delaying requests that exceed this threshold.
2. Understanding Resilience4j and Rate Limiting
Resilience4j is a lightweight, functional, and customizable resilience library designed for Java applications. Its primary components include Circuit Breaker, Bulkhead, Retry, and Rate Limiter. The Rate Limiter component allows you to configure restrictions based on several requests in a specified duration. Key configurations for rate limiting in Resilience4j include:
- Limit For Period: Maximum allowed number of calls within a specified time.
- Limit Refresh Period: Duration for which the rate limit applies.
- Timeout Duration: Time to wait for permission if the limit is exceeded.
Resilience4j’s rate limiter can work effectively within Spring Boot to limit requests in REST APIs and API gateways.
3. Setting up Spring Boot Project with Resilience4j
Directory structure
resilience4j-ratelimiter/
├── src/
│   ├── main/
│   │   ├── java/
│   │   │   └── com/
│   │   │       └── example/
│   │   │           └── resilience4j_ratelimiter/
│   │   │               ├── Resilience4jRateimiterApplication.java  # Main application class
│   │   │               ├── controller/ # REST controllers
│   │   │               │   └── GreetingController.java
│   │   ├── resources/
│   │   │   ├── application.yml  # YAML config file
│   │   │   ├── static
│   │   │   ├── templates
│   ├── test/
│   │   ├── java/
│   │   │   └── com/
│   │   │       └── example/
│   │   │           └── resilience4j_ratelimiter/
│   │   │               ├── Resilience4jRatelimiterApplicationTests.java  # Test cases for the main app
├── target/          # Compiled output files
├── .gitignore       # Git ignore file
├── mvnw / mvnw.cmd  # Maven wrapper scripts
├── pom.xml          # Project configuration file (Maven)
└── README.md # Project documentation- Add Resilience4j Dependencies
<dependency>
    <groupId>io.github.resilience4j</groupId>
    <artifactId>resilience4j-spring-boot3</artifactId>
    <version>2.2.0</version>
</dependency>
<dependency>
    <groupId>io.github.resilience4j</groupId>
    <artifactId>resilience4j-ratelimiter</artifactId>
    <version>2.2.0</version>
</dependency>
<dependency>
   <groupId>org.springframework.boot</groupId>
   <artifactId>spring-boot-starter-aop</artifactId>
</dependency>
2. Configure Rate Limiting in application.yml
Configure the rate limiter with parameters like limitForPeriod, limitRefreshPeriod, and timeoutDuration:
resilience4j:
  ratelimiter:
    instances:
      greetingService:
        limitForPeriod: 1             # Max number of requests allowed per period
        limitRefreshPeriod: 10s         # Reset period for the rate limiter
        timeoutDuration: 500ms         # Max wait time for acquiring permission
This configuration allows 10 requests per second for GreetingController.
3. Apply Rate Limiting in RestController
In your service class, you can use the @RateLimiter annotation to apply the rate limiter to specific methods. Make sure to specify the rate limiter instance name configured in application.yml.
import com.example.resilience4j_ratelimiter.service.GreetingService;
import io.github.resilience4j.ratelimiter.annotation.RateLimiter;
import lombok.RequiredArgsConstructor;
import lombok.extern.slf4j.Slf4j;
import org.springframework.http.HttpStatus;
import org.springframework.http.ResponseEntity;
import org.springframework.web.bind.annotation.GetMapping;
import org.springframework.web.bind.annotation.RestController;

@RestController
@Slf4j
@RequiredArgsConstructor
public class GreetingController {

    public final GreetingService greetingService;

    @GetMapping(path = "/greeting")
    @RateLimiter(name = "greetingService", fallbackMethod = "rateLimitFallback")
    public ResponseEntity<String> greeting(){
        String message = greetingService.greeting();
        return ResponseEntity.ok().body(message);
    }

    public ResponseEntity<String> rateLimitFallback(Throwable t) {
        return ResponseEntity.status(HttpStatus.TOO_MANY_REQUESTS).body("Too many requests - please try again later.");
    }
}
In this example, if the rate limit for GreetingController is exceeded, the rateLimitFallback the method will be called.
Testing the Rate Limiter
The developer can test the Spring boot application with Postman.
Test Scenario Success case
- Send a request to the web service
- Web service response with HTTP status 200

Test Scenario Fail case
- Send a request to the web service
- Web service response with HTTP status 429
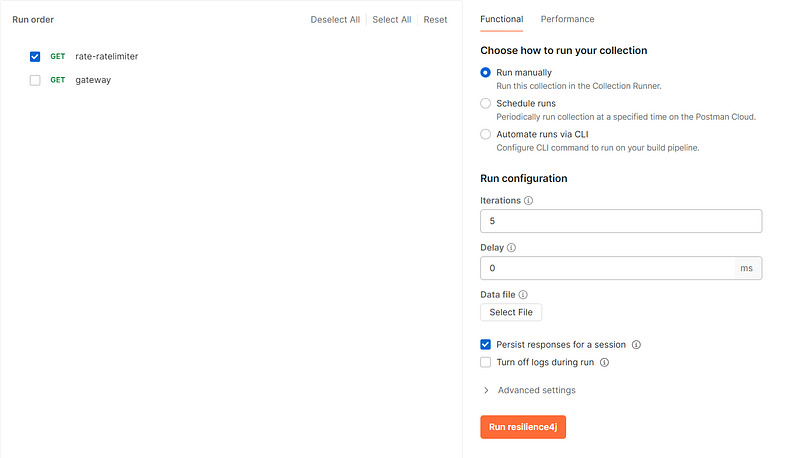
3. Test result for sending 5 requests simultaneously.
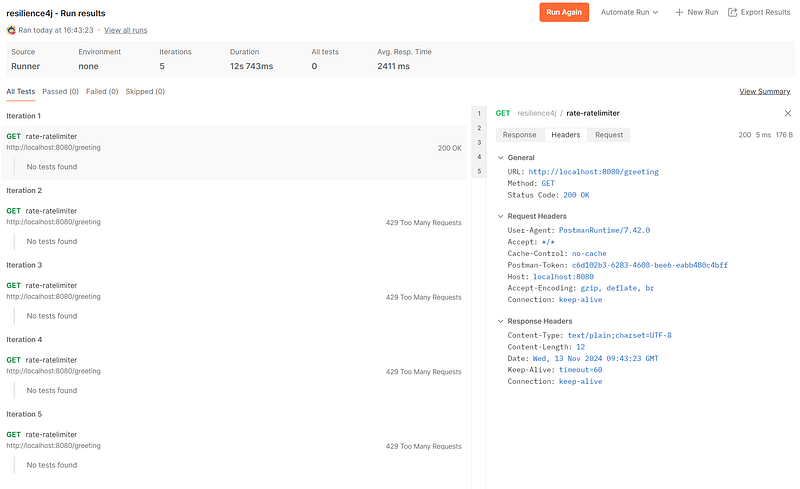
4. Check the header for fail response.

Resilience4j Response Status Code: 429 Too Many Requests to a Client.
Problem
When Resilience4j rate limiting is not working correctly, the developer should check.
spring-boot-starter-aopThe dependency.application.ymlCheck the name in RateLimiter annotation name in Controller must match the name inapplication.yml
4. Setting up Resilience4j rate limiting in a Spring Cloud Gateway.
Directory structure
resilience4j-ratelimiter/
├── src/
│   ├── main/
│   │   ├── java/
│   │   │   └── com/
│   │   │       └── example/
│   │   │           └── resilience4j_gateway/
│   │   │               ├── Resilience4jGatewayApplication.java  # Main application class
│   │   │               ├── controller/ # REST controllers
│   │   │               │   └── FallbackController.java
│   │   │               ├── config/    # Configuration
│   │   │               │   └── CustomRateLimiterGatewayFilterFactory.java
│   │   ├── resources/
│   │   │   ├── application.yml  # YAML config file
│   │   │   ├── static
│   │   │   ├── templates
│   ├── test/
│   │   ├── java/
│   │   │   └── com/
│   │   │       └── example/
│   │   │           └── resilience4j_gateway/
│   │   │               ├── Resilience4jGatewayApplicationTests.java  # Test cases for the main app
├── target/          # Compiled output files
├── .gitignore       # Git ignore file
├── mvnw / mvnw.cmd  # Maven wrapper scripts
├── pom.xml          # Project configuration file (Maven)
└── README.md # Project documentation- Add Dependencies
<dependency>
    <groupId>org.springframework.cloud</groupId>
    <artifactId>spring-cloud-starter-gateway</artifactId>
    <version>4.1.5</version>
</dependency>
<dependency>
    <groupId>io.github.resilience4j</groupId>
    <artifactId>resilience4j-spring-boot3</artifactId>
    <version>2.2.0</version>
</dependency>
<!-- https://mvnrepository.com/artifact/io.github.resilience4j/resilience4j-ratelimiter -->
<dependency>
    <groupId>io.github.resilience4j</groupId>
    <artifactId>resilience4j-ratelimiter</artifactId>
    <version>2.2.0</version>
</dependency>
<dependency>
    <!-- needed for Resilience4j -->
    <groupId>org.springframework.boot</groupId>
    <artifactId>spring-boot-starter-aop</artifactId>
</dependency>
2. Create CustomRateLimiterGatewayFilterFactory
The developer can create a custom filter for the Resilience4j rate limiter.
import io.github.resilience4j.ratelimiter.RateLimiter;
import io.github.resilience4j.ratelimiter.RateLimiterConfig;
import io.github.resilience4j.ratelimiter.RequestNotPermitted;
import io.github.resilience4j.reactor.ratelimiter.operator.RateLimiterOperator;
import lombok.Getter;
import lombok.Setter;
import lombok.extern.slf4j.Slf4j;
import org.springframework.cloud.gateway.filter.GatewayFilter;
import org.springframework.cloud.gateway.filter.factory.AbstractGatewayFilterFactory;
import org.springframework.cloud.gateway.support.ServerWebExchangeUtils;
import org.springframework.http.HttpStatus;
import org.springframework.stereotype.Component;
import org.springframework.web.server.ResponseStatusException;
import org.springframework.web.server.ServerWebExchange;
import reactor.core.publisher.Mono;

import java.net.URI;
import java.time.Duration;
import java.util.List;

@Component
@Slf4j
public class CustomRateLimiterGatewayFilterFactory extends AbstractGatewayFilterFactory<CustomRateLimiterGatewayFilterFactory.Config> {

    public static final String FALLBACK_URI = "fallbackUri";
    private final RateLimiter rateLimiter;

    public CustomRateLimiterGatewayFilterFactory() {
        super(Config.class);

        RateLimiterConfig config = RateLimiterConfig.custom()
                .limitForPeriod(1)
                .limitRefreshPeriod(Duration.ofSeconds(30))
                .timeoutDuration(Duration.ofSeconds(3))
                .build();
        this.rateLimiter = RateLimiter.of("custom-rate-limiter", config);
    }

    @Override
    public String name() {
        return "CustomRateLimiter";
    }

    @Override
    public List<String> shortcutFieldOrder() {
        return List.of(FALLBACK_URI);
    }

    @Override
    public GatewayFilter apply(Config config) {
        return (exchange, chain) -> {
            return chain.filter(exchange)
                    .transformDeferred(RateLimiterOperator.of(rateLimiter))
                    .onErrorResume(RequestNotPermitted.class, err -> {
                        if (config.getFallbackUri() != null) {
                            // Store exception in exchange
                            exchange.getAttributes().put(ServerWebExchangeUtils.CIRCUITBREAKER_EXECUTION_EXCEPTION_ATTR, err);

                            // Redirect to fallback
                            return handleFallback(exchange, config.getFallbackUri());
                        }
                        return Mono.error(new ResponseStatusException(HttpStatus.TOO_MANY_REQUESTS, "Too Many Requests"));
                    });
        };
    }

    private Mono<Void> handleFallback(ServerWebExchange exchange, String fallbackUri) {
        if (fallbackUri != null) {
            // Forward to fallback URI
            exchange.getResponse().setStatusCode(HttpStatus.SEE_OTHER);
            exchange.getResponse().getHeaders().setLocation(URI.create(fallbackUri));
        }
        return exchange.getResponse().setComplete();
    }

    @Setter
    @Getter
    public static class Config {
        private String fallbackUri;

    }
}
This configuration allows a maximum of 1 request per 30 seconds through the gateway before blocking additional requests.
3. Define a Rate Limiter Filter in Gateway Routes
Spring Cloud Gateway can use Resilience4j’s CustomRateLimiterGatewayFilterFactory with its routes by adding a filter in the route definition. Developers need to refer to the CustomRateLimiter instance defined in application.yml.
Here’s an example of configuring a rate-limited route in application.yml:
spring:
  application:
    name: resilience4j-gateway
  cloud:
    gateway:
      routes:
        - id: example_route
          uri: http://localhost:8080/greeting
          predicates:
            - Path=/**
          filters:
            - name: CustomRateLimiter
              args:
                fallbackUri: /fallback
server:
  port: 9090
In this configuration:
- Requests to
/**will be rate-limited based onCustomRateLimitersettings. - If the rate limit is exceeded, requests will be forwarded to a fallback endpoint (
/fallback).
4. Create a Fallback Endpoint
Create a fallback endpoint in your gateway application to handle requests when the rate limit is exceeded.
import org.springframework.http.HttpStatus;
import org.springframework.http.ResponseEntity;
import org.springframework.web.bind.annotation.GetMapping;
import org.springframework.web.bind.annotation.RestController;

@RestController
public class FallbackController {

    @GetMapping("/fallback")
    public ResponseEntity<String> fallback() {
        return ResponseEntity.status(HttpStatus.TOO_MANY_REQUESTS).body("Rate limit exceeded. Please try again later.");
    }
}
Testing the Rate Limiter
The developer can test the Spring boot application with Postman.
Test Scenario Success case
- Send a request to the web service
- Web service response with HTTP status 200
http://localhost:9090/greeting

Test Scenario Fail case
- Send a request to the web service
- Web service response with HTTP status 429

3. Test result for sending 5 requests simultaneously.

4. Check the header for fail response.

Spring cloud gateway and Resilience4j Rate Limiter Response Status Code: 429 Too Many Requests to a Client.
5. Monitor Rate Limiter Metrics (Optional)
To monitor rate limiter metrics, you can also add the Actuator dependency.
<dependency>
    <groupId>org.springframework.boot</groupId>
    <artifactId>spring-boot-starter-actuator</artifactId>
</dependency>
When Actuator is enabled, you can access rate limiter metrics at /actuator/ratelimiters.
6. Benefits of Using Resilience4j for Rate Limiting
Resilience4j’s rate limiting provides several benefits for Spring Boot API gateways:
- Flexibility: Allows you to fine-tune request limits per service or endpoint.
- Ease of Integration: Integrates seamlessly with Spring Boot and Spring Cloud Gateway.
- Observability: Supports metrics and monitoring, helping you track request flows and adjust limits as needed.
- Reliability: Rate limiting enables stable performance even under heavy load, reducing the risk of crashes.
Conclusion
Resilience4j rate limiting in a Spring Boot API Gateway offers an effective strategy to manage and control traffic. Implementing rate limiting helps ensure fair resource allocation, protects services from overload and enhances user experience. With configurable options and support for monitoring, Resilience4j gives developers control over request flows, enabling a resilient and stable API environment.
Implementing and tuning rate-limiting policies to fit your application’s needs will help you handle traffic spikes, mitigate abuse, and maintain seamless service availability. This guide provides a step-by-step setup, helping you start with rate limiting in Spring Boot using Resilience4j.
Snow Cloud Byte 🌨️
🔖 Thanks for reading.
- If you enjoyed this article, please consider giving it a clap.👏
- I would appreciate hearing your thoughts in the comments below! 💭
- Follow me for ongoing learning and connection!🔔


