React’s Context API Explained
All you need to know about React’s Context API

Nowadays, writing web applications can get extremely tedious and complex. If you’re building a React app, you will sometimes send data from one component to another component. However, due to the complexity of your project, there might be times where you’ve had to send states and props from component to component, thus further increasing the complexity. This is where React’s Context API can prove to be incredibly useful.
Let’s first discover why we need the Context API.
What Is Context and Why Is It Useful?
As an example, let’s create an example where we build a database of a list of movies and their respective prices.
Let’s first create a file called Movies.js and define states in it. These states contain values about the movies.
Movies.js
Line 21–24: Use themapmethod to display all of the array items in themoviesstate through theMovieListcomponent. TheMovieListcomponent simply displays thenameproperty as a header and thepriceproperty as a paragraph element.
We have rendered the MovieList component in this file. The MovieList.js file contains the following code:
This uses the simple props concept to display the data on the page. For refresher on props , you can read “A Guide to Props in React.”
In App.js, all we need to do is render these components:
However, I now want to build a navbar, which will show me the number of movies:
NavBar.js
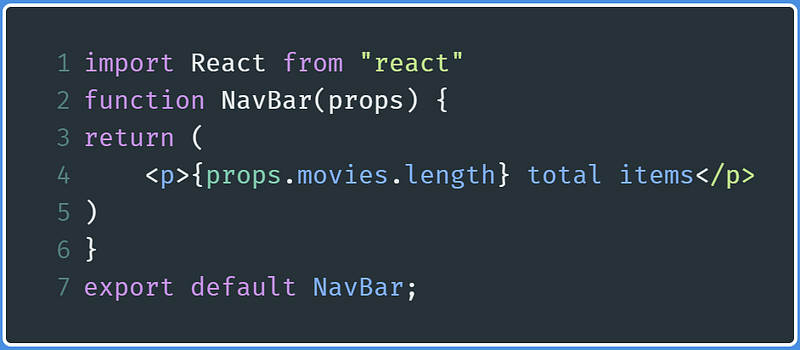
We simply have to pass in props that will then return the number of items in the database. Let’s just put it in App.js. This is where our problem occurs.
In App.js:
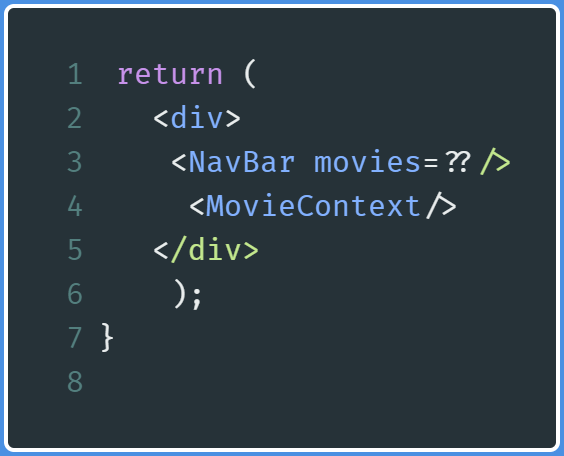
What should we put in the movies prop in NavBar so that we can output a result? There is one solution: We can define our movies state in App.js and then pass down those into our NavBar component. We need to manually pass down props at every level. This point is important.
However, this workaround still contradicts our objective. It still makes our program appear complex.
Let’s use Context to solve this problem. The React Context API provides the programmer a way to pass data from component to component without having to pass down props manually from each component to another.
Thus, this means that the React Context API will help us in making our application code appear simpler.
Let’s first start by altering this application’s code.
Usage of Context API
MovieContext.js
Let’s start by renaming our Movie.js file to MovieContext.js. This file will be responsible for passing data to other components.
Here we will start by importing createContext from the react module. Thus, alter your import statement as follows:

This createContext method will help us create a Context instance, which will aid in sending data to various other components.
Next, let’s export our Context instance like so:

Now, we will export a function called MovieContext and then define it like so:
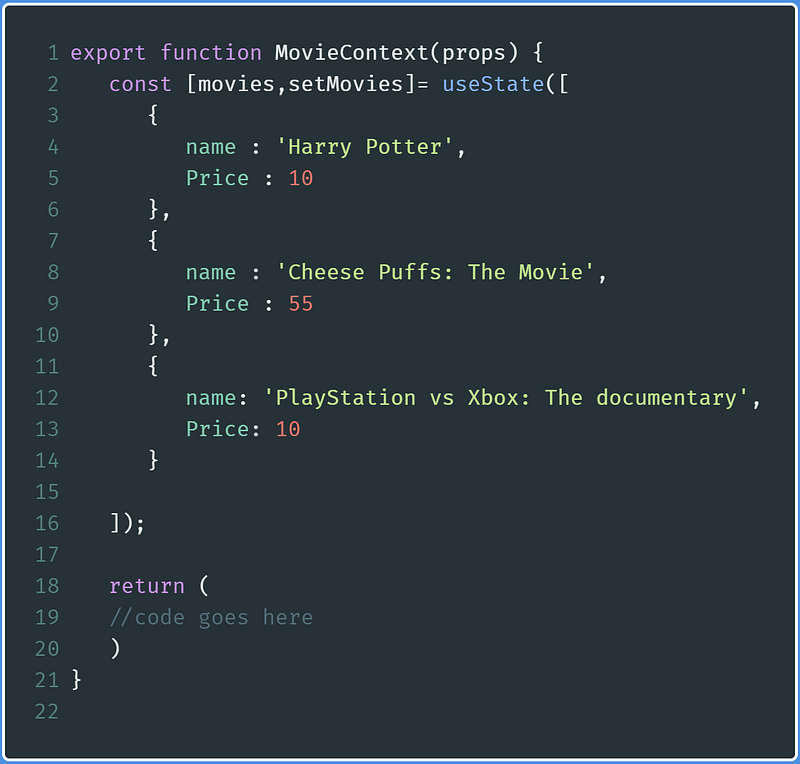
Lines 2–16: Standard definition of ourmoviesstate
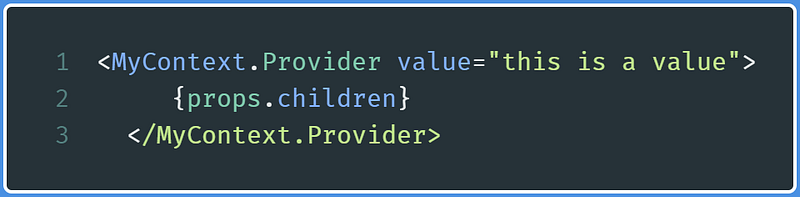
In our return block, write the following code (where code goes here is written on line 19):
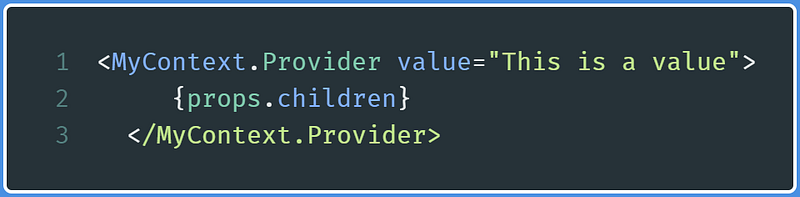
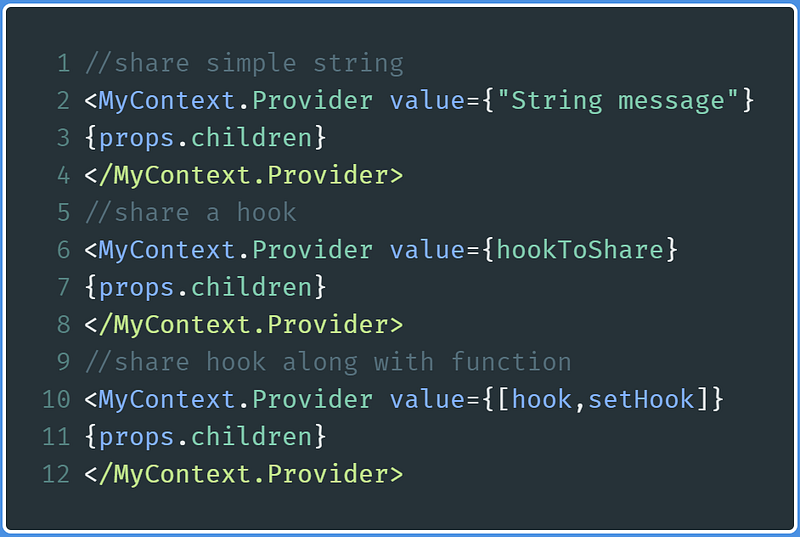
These lines of code indicate that we are now fully capable of sharing data between components without passing down props manually.
The value attribute in the MyContext.Provider tag in line 1 is the data that we will share to various components.
props.children on line 2 means that the components that will be rendered between the MovieContext tags will have access to the data located in MovieContext.
If this is unclear, don’t worry. It will be explained through code later in this post.
MovieList.js
If you recall, this component was used to display the movies array.
Let’s modify this file.
First, import MyContext from MovieContext:

Other than that, import useContext like so:

Within the MovieList function definition, start by writing the following line of code:

This line basically declares a context hook called NewContext. This useContext function takes in an argument that asks for what context object it should use. As we want to use the MyContext instance, we pass in MyContext as the argument.
One question though: What is the value of the MyContext variable? We’ll find out its value shortly. Before that, we’ll have to change our code further.
Now, write the following code after the NewContext declaration:
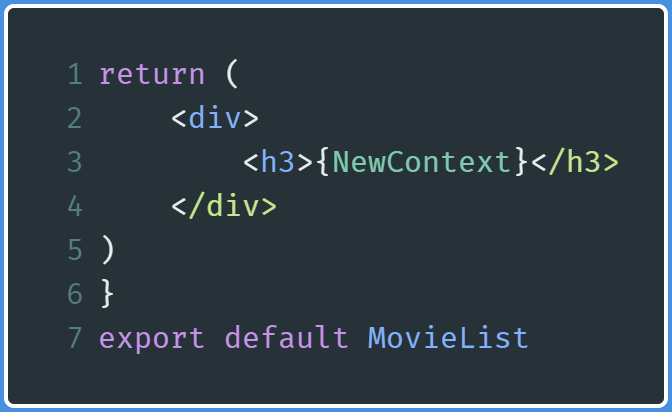
In this code, we are simply outputting the value of NewContext and then using the export statement so that the MovieList function can be used in other files.
In the end, our file will look like this:
App.js
First, add the following imports to App.js:

Now, in the return block, write the following code:
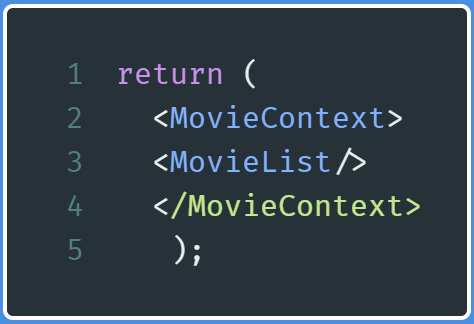
This code indicates that now MovieList has access to the data that was shared by MovieContext.
In the end, App.js looks like this:
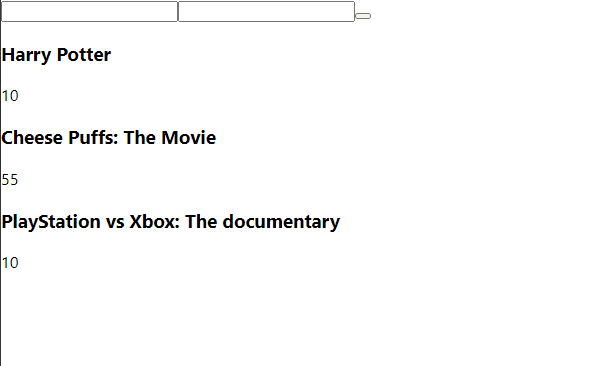
Run the code. This will be the output:

So where did this string come from?
Let’s backtrack to MovieContext.js and find the following piece of code:
In MovieContext.js:
This means that the data we write in the value attribute will be shared with the components.
We have successfully shared a string as data using the Context API. Let’s now move on to sharing the movies state.
Sharing States With Context
MovieContext.js
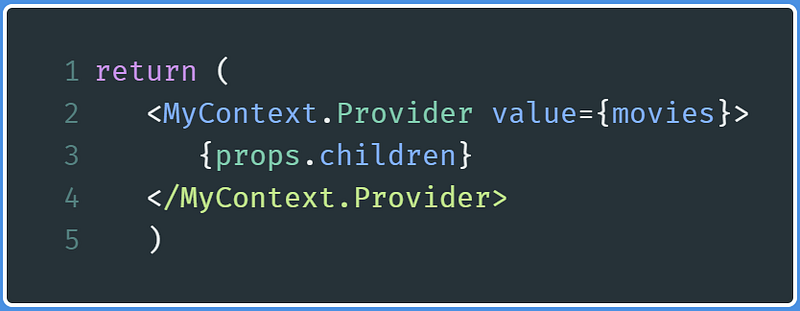
In MovieContext.js , in the return block, find the following line of code:
Since we want to share the movies state, go to the value attribute and replace this is a value with the movies state like so:
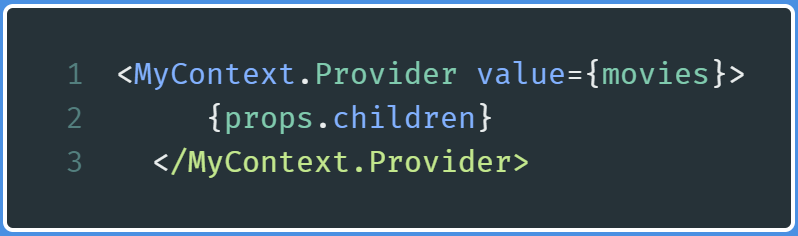
We have now passed the movies array as accessible data.
Since movies is an array, let’s use the map method to display the array elements to the browser.
MovieList.js
Go to the MovieList.js file and modify the return block like so:
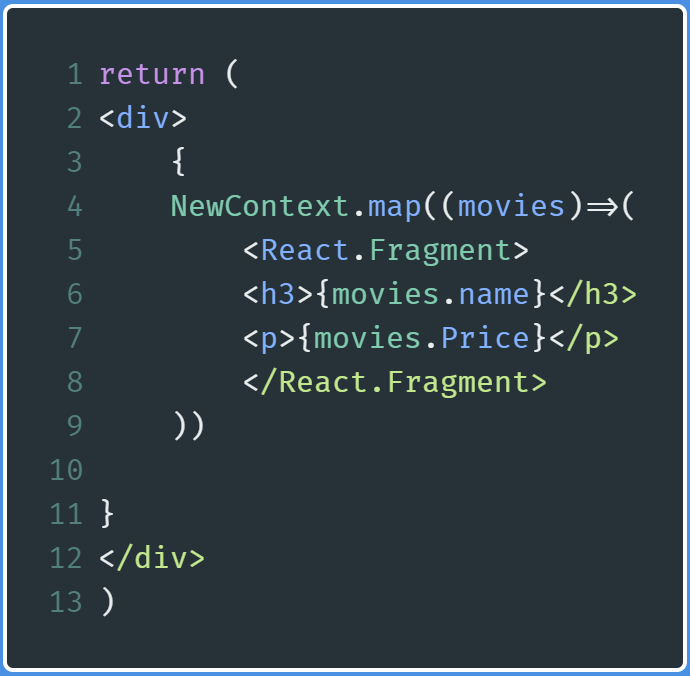
Lines 4–8: Since movies state is an array, we use themaparray method to display the elements of the array. Also, since React does not allow us to render multiple parent elements, we useReact.Fragmentas a parent element.React.Fragmentrepresents an empty element in React.
Run the code, and this will be the output:

We have finally displayed our movies state without passing it down as props.
Let’s say we want to add more elements to this array, which means that we want to now share the movies array as well as the setMovies function. In the world of React, this is easily possible. Let’s move on to the next section.
Sharing Data and Functions With Context
MovieContext.js
In MovieContext.js, find the following return block:
Since we want to share both movies and the setMovies function, modify the value attribute like so:
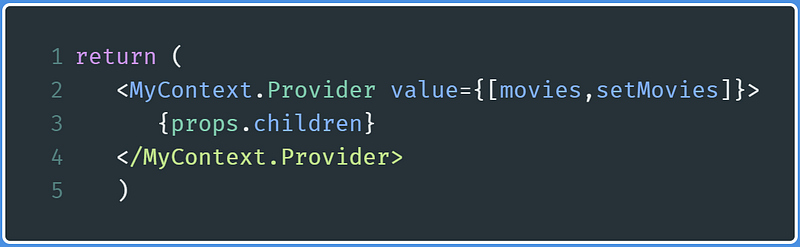
This means that we have sent an array as accessible data. The first element is the movies array and the second element is the setMovies function, which will be used to set the values of the movies array. This step now means that we have shared data as well as the function using Context.
MovieList.js
We will make a minor amendment to this file.
In the MovieList function, find this line of code:
Then replace it with the following:

As we sent an array as accessible data, we use array destructuring to process this array so that it can be used within MovieList.
If we run the code, we will get the same output as before.
Let’s now move on to using the shared function so that we can add elements to the movies array.
ChangeContext.js
In this file, we will build a form that will add movies to the movies array. This will be done with the help of the setMovies function.
Create a new file called ChangeContext.js and write the following code in it:
Line 5: Bring in the respective Context objects from theMovieContext.jsfile.Lines 6–7: We initialize thenameandpricehooks. These hooks will be assigned the respective values of their text fields.Lines 8–13: These functions will change the values of thenameandpricehooks. They will be executed whenever the user writes data in the text field(anonChangeevent has occurred).event.target.valueis the value present in the text field.Line 14: Whenever theSubmitbutton is clicked, then thechangeValuefunction is invoked.Line 15–17:event.preventDefaultprevents the page from reloading whenever the form is submitted. Since we cannot push elements to hooks, we use this method to add elements to themoviesarray.Lines 18–27: Here we are rendering a standard form component.
App.js
We will make minor changes to this file as well.
Import ChangeContext like so:

Now replace the return block with the following lines of code:
This means that now ChangeContext has access to the data shared by the MovieContext component.
Running the code will give you this output:
Notice that we entered the appropriate input and then it was rendered to the page accordingly.
The navbar component
During the Introduction section, we wanted to display the number of elements in the movies array. This is now possible using Context.
Create a new file called Navbar.js and write the following code:
Lines 1–2: Our standard importsLine 4: Using theMyContextContext objectLine 6: Display the number of elements in themoviesarray
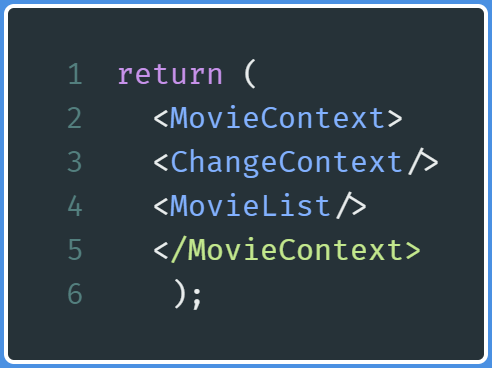
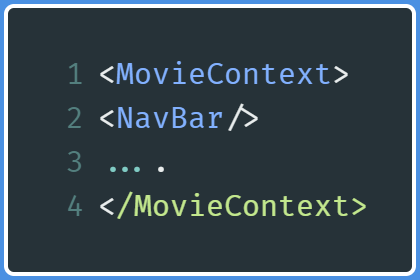
Now go to App.js and insert the NavBar self-closing tag between the MovieContext tags like so:
In App.js:
This will be the output:
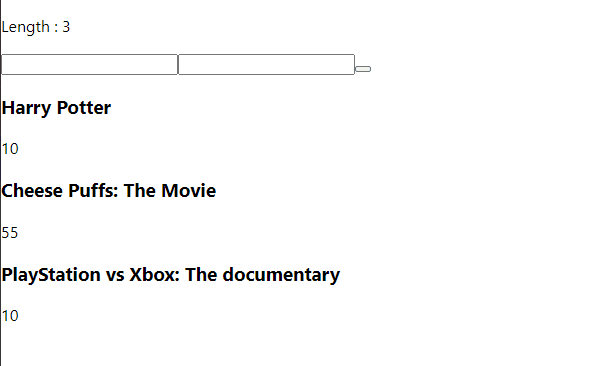
As you can see, whenever we add a new entry to this list, the element updates and the corresponding length of the movies array is shown.
Recap
Code
At the end of this tutorial, these are the files:
App.js
MovieContext.js
MoviesList.js
ChangeContext.js
NavBar.js
Additional Notes
- To create Context:

- To share data:
- To use Context:

Further Reading
- Here’s How the New Context API Works — Wes Bos
- React Context — Dev Ed
Conclusion
Even though Context is not very common in practical software, it is still an extremely useful and powerful API to utilize, as we have seen in this tutorial.
In case any of this is confusing, you are advised to play with the code and de-structure the above sample programs. Additionally, you can also use Google and further YouTube resources to go in-depth about Context.
Thank you so much for reading! Have a great day!
Next Post: Simple Web Scraping Project in Node.js Previous Post: Login System In Node.Js


