
React Native: Creating an In-App Inbox
How to create an inbox and message list components for iOS apps

Effectively communicate to your users with an in-app inbox
The ability to reach your users is a powerful tool that enables you to make announcements, ask for feedback, create a more human connection, and send other notifications of interest. With these vital pieces of information distilled into messages, comes a balance that you as the app developer need to judge as to not spam the user.
It is both yours and the user’s interest for an app to communicate up-to-date information that is relevant to the user’s app usage, but it needs to be done in a way that is not disruptive, does not feel like spam, and does not feel like an evasion of privacy. The key mistakes I have seen apps commit are:
- Users asking for ratings in the middle of app usage. Even though it is encouraged to ask for a rating after a positive app experience (such as completing a level within a game), this is not always effective — especially in educational apps where you do not wish to disrupt the user’s study flow.
- Spamming emails or notifications. The concept of inbox zero (the idea of having none or almost no email in your inbox at all times) was born due to the amount of junk, old or irrelevant email that people receive. Having a clean and organised inbox improves productivity and decreases anxiety, and one should be strict as to what newsletters, notifications, etc are allowed in their inbox. App developers should be aware of this concept, and should email users sparingly — and there are in fact strategies to do that.
- Using external services ineffectively. Ideally, users don’t want to be jumping around apps (or even worse, the browser) to deal with messages related to the app. Email is a good example of doing this, as well as team management tools such as Slack, that act as substitutes for message delivery channels.
The solution that circumvents these problems is that of an in-app inbox, that brings us to the purpose of this piece. More specifically, this piece will cover key components (that are summarised in the next section) to building your own inbox within a React Native app. Doing this comes with a range of benefits that both the developer and user enjoy:
- More reusability. Bringing the user back to your app where they’ll be more likely to carry out another session, as opposed to being contacted from an external service.
- Less reliance on third parties. Reducing your reliance on third party email service providers such as Send Grid or Mailgun, who adopt a tier based model and therefore enforce limits on how many emails you can send (unless you pay more).
- Minimal notifications. Being able to control notifications more efficiently. E.g. if you send 5 separate messages to a user, you can deliver a single notification notifying the user they have multiple messages.
- Easier navigation. Having the ability to link to other areas of your app with React Navigation only, without worrying about Deep Linking mechanisms.
- Customisation. Being able to customise the look and feel of your inbox inline with your app theming, as well as have different types of message that entail different UX. Delivery in-app is an order of magnitude more flexible than the offerings of third party services.
Somewhat surprisingly, implementing such a feature is relatively straight forward measured against the benefits mentioned above. An inbox feature that exists in your app is arguably the best way to keep your users up to date, and maintains a subtlety that does not frustrate or spam the user.
This article will document the key components to achieve such a feature, and will base the talk around a production app of mine. Here is a demo of an inbox in a production app of mine that has integrated these components amongst its solution:
In the next section we will break down the key components used to make this inbox. We’ll touch on 3 key components and how to configure them in more detail throughout this piece.
The key components of an inbox
This article will concretely discuss 3 major components of this inbox feature:
- The Navigator setup to make this work, including the iOS modal styling that adds a fluid native feel to the inbox modal.
- How to configure the Message List with
FlatList, switch between tabs (inbox and archive tab), as well as pull down to refresh. We’ll also document methods to pre-populate the inbox messages into state before a user opens it. Having an inbox hidden by default gives apps the opportunity to sync the inbox, ready to display the most up to date message state. - Each Message List Item in the inbox list represents a message that a user can tap to view. A
ScrollView component is used to incorporate a swipe to reveal the archive button, and this is where the complexity lies. This piece will document how to achieve this effect, and refers to my article on horizontal scroll views and carousels, that goes into a lot more detail on how to customise the component.
Inbox Navigator Setup
One of the first considerations of your inbox implementation is where it will go, that will in turn determine where it will be embedded within your navigator setup. For this piece, the inbox will be situated in a modal that will overlay your main content. This is what was demonstrated in the screen capture above, where a stack navigator housing the inbox opened as a modal over another stack navigator for the main app content.
In order to achieve this, a stack navigator to your inbox should be embedded within parent stack navigator of mode modal. Here is that setup:
// structure of your navigatorsNavigation Container
Main Stack Navigator
Dashboard Screen
Dashboard Navigator
Inbox Screen
Inbox Stack Navigator
Message List
MessageIf the reader is not yet familiar with React Navigation, check out my introductory article on React Navigation 5: Get Started with React Navigation 5 in React Native.
This is a common setup whereby Main Stack Navigator holds the screens of each section of your app, into various sub navigators. It is important that Inbox Screen is a part of this parent navigator to successfully overlay the currently active content (that’ll be some Dashboard screen in the above case). A full code example will follow to demonstrate this structure next.
Notice also that the primary content rolls back as the inbox slides up, and that the inbox leaves a small gap at the top of the screen, in addition to having rounded edges. This transition effect is actually built into React Navigation within the cardStyleInterpolator configuration option, requiring the value CardStyleInterpolators.forModalPresentationIOS.
This CardStyleInterpolators.forModalPresentationIOS modal presentation was introduced in iOS13. Adopting this styling will make your apps feel more native to iOS out of the box.
The following gist outlines exactly how to configure such a setup:
I have made some notes in the gist itself, but there are a couple of points of interest that are worth checking when you configure your own:
- Remember to include the
CardStyleInterpolators.forModalPresentationIOSvalue to thecardStyleInterpolatoroption for the screens you wish to appear as an iOS13 modal. - The
gestureEnabled: trueproperty within theoptionsprop of theMessagescreen ensures that the user can swipe horizontally to return to the mainMessageslist.
Now with the navigator setup in place, you can plug in your Messages and Message components to display the message list and message content itself. The following sections will detail exactly how these are set up.While we are on the topic of navigators, here are some additional configurations to consider:
- To close the modal via a button, simply call
navigation.goBack()on the button’sonPressevent. The ability to swipe down from the top of the modal is built in to the navigator. - When visiting the message screen to display message content, the
Messagecomponent needs to know which message to display, that will be relative to which item you tapped in the message list. Params can be used for such a case, where the entire message item can be sent toMessageas a param in the form of a JSON object:
// sending a message object to `Message` component via paramsonPress={() => navigation.navigate('Message', {
item: item, // `item` represents the entire message object
...
})}>This becomes simple when dealing with the FlatList component, that provides an item prop for each message in your data array when rendering each item in a list. The next section looks at this in more detail, including how to pre-populate messages in state.
Displaying the Message List
This section documents the usage of the FlatList component to populate the inbox itself, as well as methods to pre-populate this list before the user opens it. The latter is also known as syncing, and syncing usually takes place either when user signs in, or at a particular point of an app the user regularly visits.
Using FlatList to display messages
The FlatList component is by far the best component for listing messages for these main reasons:
FlatListcan support a large amount of items in an efficient way- It has header and footer support built in, that becomes useful for embedding toggles and other information, such as when you’ve reached the end of the inbox.
- Pull down to refresh is also built in, making it very easy to refresh your inbox.
This structure is ideal for displaying an inbox. Here is a visual representation of FlatList’s structure with each element’s corresponding prop:
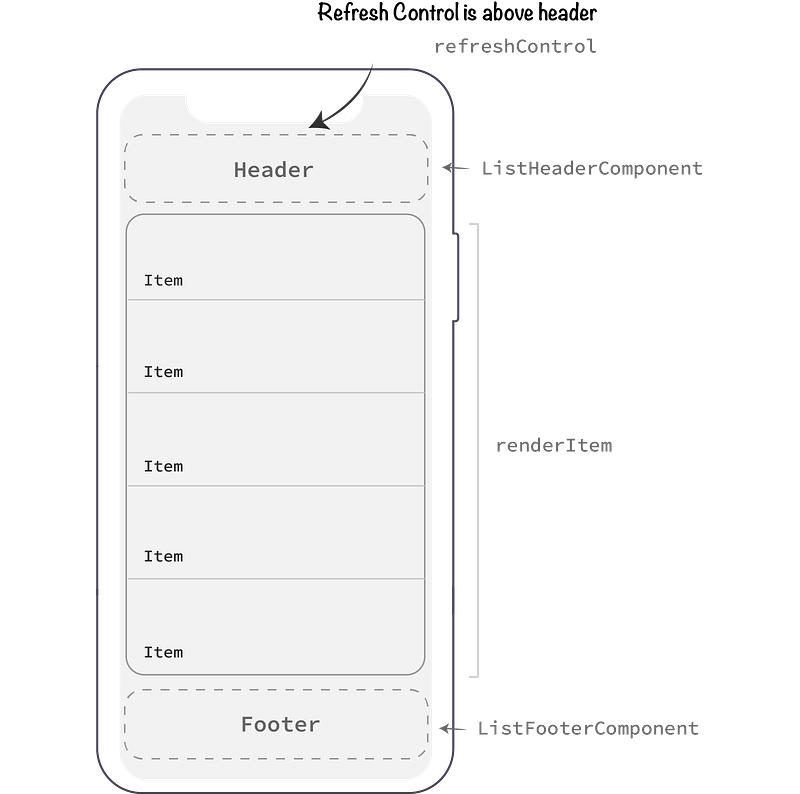
The following gist outlines the props of FlatList needed to make this happen. There are a few ideas expressed in the following JSX that will become useful when formatting your own inbox. Explanations to some of these props and conventions will follow.
What appears quite tidy and readable code actually has a lot of functionality happening here. Notably:
ListHeaderComponentandFooterHeaderComponentprops allow us to embed JSX directly into header and footer spaces, before and after theFlatListitems respectively. This support allows theFlatListitself to be the full height of the screen, whereby no extra space is needed to support external header components (unless you are designing a sticky header).datarepresents the actual message data, that will be an array of JSON objects representing the message content. ThekeyExtractorprop uses the_idfield of each item to assign a unique key each of them.- note that the
<RefreshControl />component inside therefreshControlprop is supplied byreact-native. Note thatrefreshMessages()should be defined in the same component asFlatList, with the job of contacting your backend to retrieve the latest message list. - Within
renderItemthere are actually two components that could be rendered, depending on theitem.templatefield. This demonstrates the flexibility of rendering different styles of message items depending on your needs. Revisit the demo screen cast further up and notice the “Rate and Review” message inside the inbox archive — this item is using a different template than the default messages. This is just one example of how you can customise your inbox.
Pre-populating your inbox with Redux
Storing messages in global state such as a Redux store is an efficient means of managing your inboxes. Tasks such as marking a message read, or archiving or deleting messages can simply be done by dispatching Redux actions.
But there is another benefit: other components can dispatch those same actions to update your inboxes, effectively syncing them from any screen of your app.
This “syncing” procedure (that will most commonly be a fetch request to your backend to fetch the inbox messages) can be done at various places in your app, such as:
- When a user opens the app into the foreground, the app can sync via an
AppState event callback. - When the user visits a screen in your app, such as a Dashboard. Trigging a sync on a commonly visited screen forces the app to stay up to date.
Here is what that process may look like with AppState:
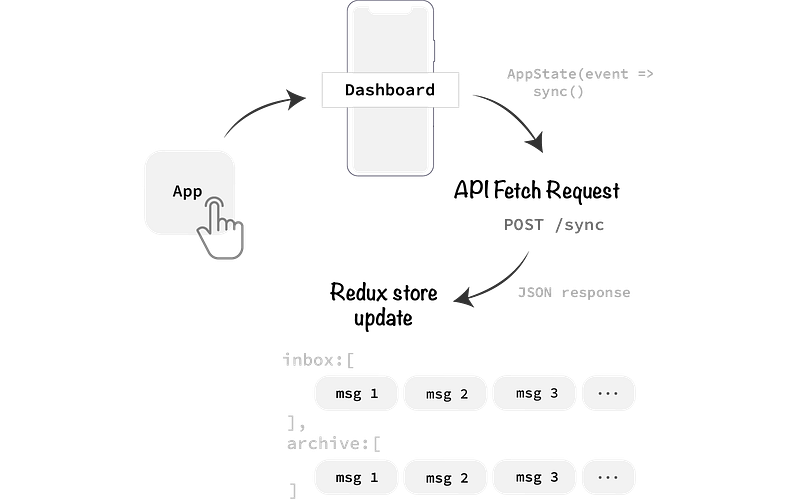
Now when the user visits their inbox, the true message state will be displayed without further fetching.
To read more about Redux, and using Redux hooks in-particularly, check out my article on the subject: Redux Hooks in React: An Introduction.
Messages should also be fetched upon the user’s initial sign in to the app, whereby messages are fetched in conjunction with other user settings and app state pertaining to the sign in process.
Before moving onto the next section, let’s visit one more concept with inbox fetching; the concept of fetching multiple inboxes and switching between them.
Switching between inboxes
The demo screencast of this article demonstrated two message lists; the “inbox” list and “archive” list. The functionality of moving messages between inboxes is one of importance so the user can keep messages of interest in the primary inbox, and remove others to a secondary one.
The data structure to adhere to within your Redux store does not change too much to support this. One structure that will work would be the following:
// JSON structure of multiple inboxes messages: {
inbox: [
{
_id: 1,
title: 'Welcome!',
...
}, {
_id: 2,
title: 'How to Use This App',
...
},
],
archive: [
{
_id: 3,
title: 'Not so interesting message.',
...
}
]
};Notice that the _id of each message should be unique. In the event you are moving a message from one inbox to the other, clashes in _id will interfere with indexing and updating the message.
To switch between inboxes, some simple local state could determine which inbox is displayed:
// `activeInbox` local component state to control which inbox is displayedconst [activeInbox, setActiveInbox] = useState('inbox');const data = activeInbox === `inbox`
? props.messages.inbox
: props.messages.archive;...Note that a Redux store could also manage UI based state such as activeInbox, and may be more useful if you wish to persist the inbox most recently visited by the user.
The final section of this piece will dive into the message item component itself, that displays each message in an inbox list.
Message Item Scroll View Component
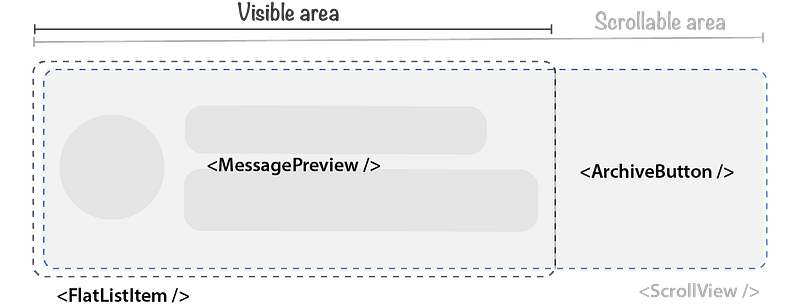
This is perhaps the most complex component of the inbox, being a horizontal ScrollView component combined with multiple TouchableOpacity components to handle interactions. There are two active touch areas in the following example:
- The message title / avatar display is a button that when pressed, navigates to the message content.
- The Archive / Unarchive text, that the user must swipe left to reveal, to move the message between inboxes.
With that said, let’s check out how this component is structured:
To read up more ways to use horizontal scroll views, and various configurations with the carousel use case, check out my dedicated article on them: React Native: Carousels with Horizontal Scroll Views.
This ScrollView has two items. The main item, and displayed by default, takes 100% width of its containing component (being the FlatList). This item displays the main content of this component — the title, avatar, and meta data about the message. The second item is that of an archive / unarchive button, that takes an additional 30% width.
To get more clarity on how this works, let’s see what this looks like in a stylesheet.
Stylesheet Setup
The following pseudo code reflects the components and applied styles to achieve the horizontal scroll with hidden button:
// structure of the message list with style names<View style={styles.container}>
<ScrollView style={styles.scrollview}>
<TouchableOpacity style={styles.item}>
{/* display message preview */}
</TouchableOpacity>
<TouchableOpacity style={styles.archive}>
{/* display archive text*/}
</TouchableOpacity> </ScrollView>
</View>The outer most <View /> component simply restricts the maximum viewable width to 100%, and and hides content that overlays:
container: {
  width: '100%',
  overflow: 'hidden',
}
The <ScrollView /> component is set at a fixed with of 130%, with a flex row configuration:
scrollview: {
  display: 'flex',
  flexDirection: 'row',
  width: '130%',
},
We have two <TouchableOpacity /> components that consume the whole space of the scroll view. The first one wraps the message preview, consuming the first 100% of space:
item: {
  flexBasis: '100%',
  maxWidth: '100%',
  paddingVertical: 5,
  paddingHorizontal: 20,
},
Note that the maxWidth property is important here to cap the width to the desired amount.
The second <TouchableOpacity /> hosts that Archive button, that adopts a centralised flex config to center the text both horizontally and vertically:
archive: {
  flexBasis: '30%',
  maxWidth: '30%',
  display: 'flex',
  flexDirection: 'row',
  alignItems: 'center',
  alignContent: 'center',
  justifyContent: 'center',
},
Scroll View Props
By default, <ScrollView /> is vertical scrolling and does not have paging enabled (snapping at certain scroll positions to denote sections). Here are some basic props to configure the horizontal scroll view, that will enable paging based on the <ScrollView />’s holding components (item and archive):
<ScrollView
  horizontal={true}
  contentContainerStyle={styles.scrollview}
  showsHorizontalScrollIndicator={false}
  scrollEventThrottle={200}
  pagingEnabled
  decelerationRate="fast">
    {/ * content */}
</ScrollView>
Note the horizontal and pagingEnabled props are key here. We don’t need scroll indicators in message lists, so the showsHorizontalScrollIndicator has been set to false. Also, a decelerationRate of fast feels a lot more natural when dealing with horizontal scroll views that do not consume the whole screen.
I have gone into detail about the various props and configuration options to <ScrollView /> in my Carousel centric article: React Native: Carousels with Horizontal Scroll Views.
Miscellaneous Message Item Notes
Here are some other small notes I deemed notable when configuring your message list items:
LayoutAnimation should be used for transitioning layouts when your message list changes; E.g. when you archive a message, it is removed from the inbox. LayoutAnimation automatically handles that transition, and supports a range of effects. For example, to simply fade out the item, applyLayoutAnimation.configureNextbefore the state update happens:
// apply `LayoutAnimation` before state updateLayoutAnimation.configureNext(
LayoutAnimation.create(
300,
LayoutAnimation.Types.easeInEaseOut,
LayoutAnimation.Properties.opacity
)
);// state updates
setInbox(newInbox);This example applies an easing function with an opacity function, and sets a duration of 300.
- SVG Support for avatars and icons. Although we could dive into a whole article for supporting SVGs in React Native, the simplest method is to install
react-native-svg-transformer as a dev dependency and configure yourmetro.config.jsandapp.jsfile to support the SVG file format. - To display relative time in your messages, such as when the message was sent or how long ago it was sent, be sure to use
moment.
In Summary
This piece has explored 3 key components for building an inbox in React Native. We firstly explored the navigator itself, built with React Navigation 5. Stack navigators support iOS 13 modal styling out of the box, giving your app a native and fluid feel.
The second section delved into the FlatList component to display a message list, and also covered the concept of pre-populating the message list into state before a user opens their inbox. FlatList comes with handy tools such as header and footer placement, as well as the pull to refresh functionality that is very well suited for inboxes.
The final section documents the message item component, that adopts a horizontal scroll view to host both the message preview and hidden Archive button. Specific stylesheet properties have been documented for each of the components to make this work, as well as the needed <ScrollView /> props.
These components are by no means an exhaustive list of components required for a fully functioning inbox, but they will indeed supply the fundamental structure of the inbox to expand upon. Here are some other components to consider:
- An Unread indicator (usually a coloured circle next to the message title) to signal that you have not opened the message yet.
- The message screen itself — how would you style this screen to best suite your app?
- Notifications and badges to let users know a new message has arrived. Read more about Apple Push Notifications for React Native and NodeJS here.
Further Reading
To expand this solution with notification badges, check out my follow-on article on how to integrate notification badges in React Native, invoking badges both locally within React Native and on the server-side with APN payloads:
If you on the other hand would like to go from manually delivering messages to your users to automatically deliver them in bulk, check out my Node.js article that walks through a demo of doing exactly that with a runtime service:


