
React JS + Spring Boot Microservices
In this tutorial, we will create a full-stack application using Microservices architecture. We will set up two microservices, an API Gateway and a React application as the client. The tutorial will cover setting up the project, creating the microservices, configuring the API Gateway, and building the React application. We will also use Bootstrap for styling.
Learn Microservices development: Spring Boot Microservices Tutorial.
Learn Spring Boot: Complete Spring Boot Tutorial.
Learn React JS: Complete React JS Tutorial.
Top Udemy course: Spring Boot 3 & React JS: Full-Stack Java Development.
Microservices Architecture for this Tutorial
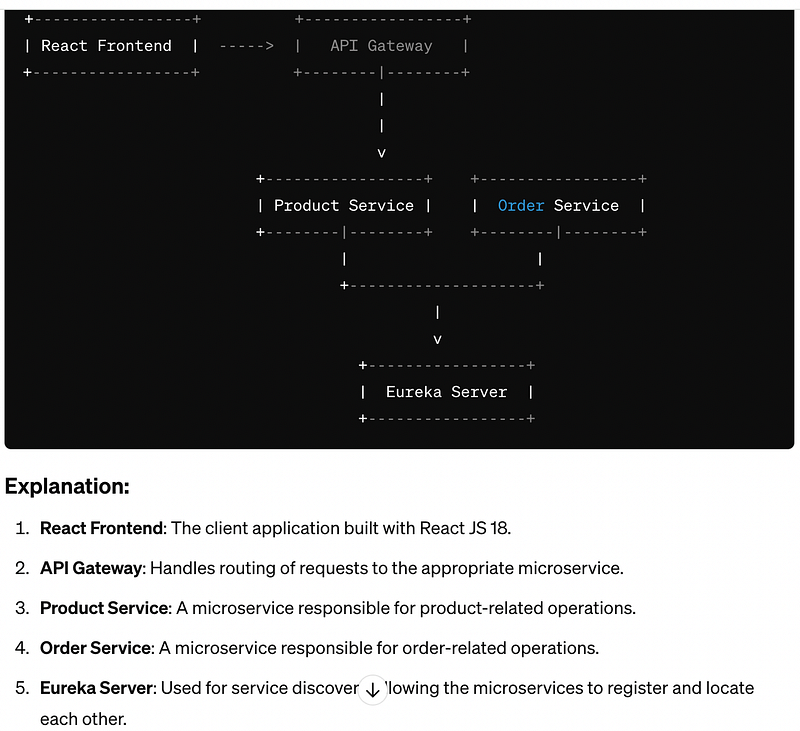
- React Frontend: The client application is built with React JS 18.
- API Gateway: Handles routing of requests to the appropriate microservice.
- Product Service: A microservice responsible for product-related operations.
- Order Service: A microservice responsible for order-related operations.
- Eureka Server: Used for service discovery, allowing the microservices to register and locate each other.
The arrows indicate the flow of communication:
- The React frontend communicates with the API Gateway.
- The API Gateway routes requests to either the Product Service or Order Service.
- Both the Product Service and Order Service register with the Eureka Server for service discovery.
Prerequisites
Before we start, ensure you have the following:
- Java Development Kit (JDK) installed
- Apache Maven installed
- Node.js and npm installed
- An IDE (such as IntelliJ IDEA, Eclipse, or VS Code) installed
- Docker installed (optional for running services in containers)
Step 1: Setting Up the Spring Boot Projects
1.1 Create Microservice 1: product-service
Open Spring Initializr:
- Go to Spring Initializr in your web browser.
Configure Project Metadata:
- Project: Maven Project
- Language: Java
- Spring Boot: Select the latest version of Spring Boot 3
- Group: com.example
- Artifact: product-service
- Name: product-service
- Description: Product Microservice
- Package Name: com.example.productservice
- Packaging: Jar
- Java Version: 17 (or your preferred version)
- Click
Next.
Select Dependencies:
- On the
Dependenciesscreen, select the dependencies you need: - Spring Web
- Spring Data JPA
- H2 Database
- Spring Boot DevTools
- Click
Next.
Generate the Project:
- Click
Generateto download the project zip file. - Extract the zip file to your desired location.
Open the Project in Your IDE:
- Open your IDE and import the project as a Maven project.
1.2 Create Microservice 2: order-service
- Repeat the steps in section 1.1 to create another Spring Boot project with the following metadata:
- Artifact: order-service
- Name: order-service
- Description: Order Microservice
- Package Name: com.example.orderservice
Select Dependencies:
- On the
Dependenciesscreen, select the dependencies you need: - Spring Web
- Spring Data JPA
- H2 Database
- Spring Boot DevTools
- Click
Next.
Generate the Project:
- Click
Generateto download the project zip file. - Extract the zip file to your desired location.
Open the Project in Your IDE:
- Open your IDE and import the project as a Maven project.
1.3 Create API Gateway: api-gateway
- Repeat the steps in section 1.1 to create another Spring Boot project with the following metadata:
- Artifact: api-gateway
- Name: api-gateway
- Description: API Gateway
- Package Name: com.example.apigateway
Select Dependencies:
- On the
Dependenciesscreen, select the dependencies you need: - Spring Cloud Gateway
- Spring Boot DevTools
- Click
Next.
Generate the Project:
- Click
Generateto download the project zip file. - Extract the zip file to your desired location.
Open the Project in Your IDE:
- Open your IDE and import the project as a Maven project.
1.4 Update pom.xml Files
Update the pom.xml files of the projects to include the necessary dependencies.
For product-service and order-service, add the following dependencies:
<dependency>
    <groupId>org.springframework.cloud</groupId>
    <artifactId>spring-cloud-starter-netflix-eureka-client</artifactId>
</dependency>
<dependency>
    <groupId>org.springframework.cloud</groupId>
    <artifactId>spring-cloud-starter-openfeign</artifactId>
</dependency>
For api-gateway, add the following dependencies:
<dependency>
    <groupId>org.springframework.cloud</groupId>
    <artifactId>spring-cloud-starter-netflix-eureka-client</artifactId>
</dependency>
1.5 Configure Eureka Server
Create a new Spring Boot project for the Eureka server.
Open Spring Initializr:
- Go to Spring Initializr in your web browser.
Configure Project Metadata:
- Artifact: eureka-server
- Name: eureka-server
- Description: Eureka Server
- Package Name: com.example.eurekaserver
Select Dependencies:
- On the
Dependenciesscreen, select the dependencies you need: - Spring Cloud Netflix Eureka Server
- Click
Next.
Generate the Project:
- Click
Generateto download the project zip file. - Extract the zip file to your desired location.
- Open your IDE and import the project as a Maven project.
1.6 Create application.properties Files
For eureka-server:
server.port=8761
spring.application.name=eureka-server
eureka.client.register-with-eureka=false
eureka.client.fetch-registry=false
For product-service and order-service:
spring.application.name=product-service
spring.datasource.url=jdbc:h2:mem:testdb
spring.datasource.driverClassName=org.h2.Driver
spring.datasource.username=sa
spring.datasource.password=password
spring.jpa.database-platform=org.hibernate.dialect.H2Dialect
spring.h2.console.enabled=true
spring.jpa.hibernate.ddl-auto=update
eureka.client.service-url.default-zone=http://localhost:8761/eureka
Change the spring.application.name for order-service to order-service.
For api-gateway:
server.port=8080
spring.application.name=api-gateway
eureka.client.service-url.default-zone=http://localhost:8761/eureka
1.7 Create Main Application Classes
For eureka-server, add the @EnableEurekaServer annotation:
package com.example.eurekaserver;

import org.springframework.boot.SpringApplication;
import org.springframework.boot.autoconfigure.SpringBootApplication;
import org.springframework.cloud.netflix.eureka.server.EnableEurekaServer;

@SpringBootApplication
@EnableEurekaServer
public class EurekaServerApplication {
    public static void main(String[] args) {
        SpringApplication.run(EurekaServerApplication.class, args);
    }
}
For product-service, order-service, and api-gateway, add the @EnableEurekaClient annotation:
package com.example.productservice;

import org.springframework.boot.SpringApplication;
import org.springframework.boot.autoconfigure.SpringBootApplication;
import org.springframework.cloud.netflix.eureka.EnableEurekaClient;

@SpringBootApplication
@EnableEurekaClient
public class ProductServiceApplication {
    public static void main(String[] args) {
        SpringApplication.run(ProductServiceApplication.class, args);
    }
}
Change the package name for each respective service.
Step 2: Implement Microservices
2.1 Implement product-service
2.1.1 Create the Product Entity
In the model package, create a new Java class named Product:
package com.example.productservice.model;

import jakarta.persistence.Entity;
import jakarta.persistence.GeneratedValue;
import jakarta.persistence.GenerationType;
import jakarta.persistence.Id;

@Entity
public class Product {

    @Id
    @GeneratedValue(strategy = GenerationType.IDENTITY)
    private Long id;
    private String name;
    private double price;

    // Getters and Setters
}
2.1.2 Create the ProductRepository Interface
In the repository package, create a new Java interface named ProductRepository:
package com.example.productservice.repository;

import com.example.productservice.model.Product;
import org.springframework.data.jpa.repository.JpaRepository;
import org.springframework.stereotype.Repository;

@Repository
public interface ProductRepository extends JpaRepository<Product, Long> {
}
2.1.3 Create the ProductService Class
In the service package, create a new Java class named ProductService:
package com.example.productservice.service;

import com.example.productservice.model.Product;
import com.example.productservice.repository.ProductRepository;
import org.springframework.beans.factory.annotation.Autowired;
import org.springframework.stereotype.Service;

import java.util.List;

@Service
public class ProductService {

    private final ProductRepository productRepository;

    @Autowired
    public ProductService(ProductRepository productRepository) {
        this.productRepository = productRepository;
    }

    public List<Product> getAllProducts() {
        return productRepository.findAll();
    }

    public Product saveProduct(Product product) {
        return productRepository.save(product);
    }

    public Product getProductById(Long id) {
        return productRepository.findById(id).orElse(null);
    }
}
2.1.4 Create the ProductController Class
In the controller package, create a new Java class named ProductController:
package com.example.productservice.controller;

import com.example.productservice.model.Product;
import com.example.productservice.service.ProductService;
import org.springframework.beans.factory.annotation.Autowired;
import org.springframework.web.bind.annotation.*;

import java.util.List;

@RestController
@RequestMapping("/products")
public class ProductController {

    private final ProductService productService;

    @Autowired
    public ProductController(ProductService productService) {
        this.productService = productService;
    }

    @GetMapping
    public List<Product> getAllProducts() {
        return productService.getAllProducts();
    }

    @PostMapping
    public Product saveProduct(@RequestBody Product product) {
        return productService.saveProduct(product);
    }

    @GetMapping("/{id}")
    public Product getProductById(@PathVariable Long id) {
        return productService.getProductById(id);
    }
}
2.2 Implement order-service
2.2.1 Create the Order Entity
In the model package, create a new Java class named Order:
package com.example.orderservice.model;

import jakarta.persistence.Entity;
import jakarta.persistence.GeneratedValue;
import jakarta.persistence.GenerationType;
import jakarta.persistence.Id;

@Entity
public class Order {

    @Id
    @GeneratedValue(strategy = GenerationType.IDENTITY)
    private Long id;
    private String product;
    private int quantity;

    // Getters and Setters
}
2.2.2 Create the OrderRepository Interface
In the repository package, create a new Java interface named OrderRepository:
package com.example.orderservice.repository;

import com.example.orderservice.model.Order;
import org.springframework.data.jpa.repository.JpaRepository;
import org.springframework.stereotype.Repository;

@Repository
public interface OrderRepository extends JpaRepository<Order, Long> {
}
2.2.3 Create the OrderService Class
In the service package, create a new Java class named OrderService:
package com.example.orderservice.service;

import com.example.orderservice.model.Order;
import com.example.orderservice.repository.OrderRepository;
import org.springframework.beans.factory.annotation.Autowired;
import org.springframework.stereotype.Service;

import java.util.List;

@Service
public class OrderService {

    private final OrderRepository orderRepository;

    @Autowired
    public OrderService(OrderRepository orderRepository) {
        this.orderRepository = orderRepository;
    }

    public List<Order> getAllOrders() {
        return orderRepository.findAll();
    }

    public Order saveOrder(Order order) {
        return orderRepository.save(order);
    }

    public Order getOrderById(Long id) {
        return orderRepository.findById(id).orElse(null);
    }
}
2.2.4 Create the OrderController Class
In the controller package, create a new Java class named OrderController:
package com.example.orderservice.controller;

import com.example.orderservice.model.Order;
import com.example.orderservice.service.OrderService;
import org.springframework.beans.factory.annotation.Autowired;
import org.springframework.web.bind.annotation.*;

import java.util.List;

@RestController
@RequestMapping("/orders")
public class OrderController {

    private final OrderService orderService;

    @Autowired
    public OrderController(OrderService orderService) {
        this.orderService = orderService;
    }

    @GetMapping
    public List<Order> getAllOrders() {
        return orderService.getAllOrders();
    }

    @PostMapping
    public Order saveOrder(@RequestBody Order order) {
        return orderService.saveOrder(order);
    }

    @GetMapping("/{id}")
    public Order getOrderById(@PathVariable Long id) {
        return orderService.getOrderById(id);
    }
}
Step 3: Configure API Gateway
3.1 Create Route Configuration
In the api-gateway project, create a new Java class named ApiGatewayConfiguration:
package com.example.apigateway;

import org.springframework.cloud.gateway.route.RouteLocator;
import org.springframework.cloud.gateway.route.builder.RouteLocatorBuilder;
import org.springframework.context.annotation.Bean;
import org.springframework.context.annotation.Configuration;

@Configuration
public class ApiGatewayConfiguration {

    @Bean
    public RouteLocator gatewayRoutes(RouteLocatorBuilder builder) {
        return builder.routes()
                .route("product_service", r -> r.path("/products/**")
                        .uri("lb://product-service"))
                .route("order_service", r -> r.path("/orders/**")
                        .uri("lb://order-service"))
                .build();
    }
}
Explanation:
- Route Configuration: The
ApiGatewayConfigurationclass defines routes for the API Gateway. It maps/products/**toproduct-serviceand/orders/**toorder-serviceusing the service names registered in Eureka.
We need to integrate the CORS configuration directly within the API Gateway’s route configuration to properly handle CORS issues. Here’s how you can update the ApiGatewayConfiguration class to include CORS settings:
package com.example.apigateway;

import org.springframework.cloud.gateway.route.RouteLocator;
import org.springframework.cloud.gateway.route.builder.RouteLocatorBuilder;
import org.springframework.context.annotation.Bean;
import org.springframework.context.annotation.Configuration;
import org.springframework.web.cors.CorsConfiguration;
import org.springframework.web.cors.reactive.CorsConfigurationSource;
import org.springframework.web.cors.reactive.UrlBasedCorsConfigurationSource;
import org.springframework.web.filter.reactive.CorsWebFilter;

@Configuration
public class ApiGatewayConfiguration {

    @Bean
    public RouteLocator gatewayRoutes(RouteLocatorBuilder builder) {
        return builder.routes()
                .route("product_service", r -> r.path("/products/**")
                        .uri("lb://product-service"))
                .route("order_service", r -> r.path("/orders/**")
                        .uri("lb://order-service"))
                .build();
    }

    @Bean
    public CorsWebFilter corsWebFilter() {
        CorsConfiguration corsConfiguration = new CorsConfiguration();
        corsConfiguration.addAllowedOrigin("*"); // You can specify the allowed origins here
        corsConfiguration.addAllowedMethod("*");
        corsConfiguration.addAllowedHeader("*");

        UrlBasedCorsConfigurationSource corsConfigurationSource = new UrlBasedCorsConfigurationSource();
        corsConfigurationSource.registerCorsConfiguration("/**", corsConfiguration);

        return new CorsWebFilter(corsConfigurationSource);
    }
}
Explanation:
- CorsConfiguration Class: This class is used to configure the CORS settings.
- Allowed Origins:
corsConfiguration.addAllowedOrigin("*")allows requests from any origin. You can specify a specific origin if needed (e.g.,http://localhost:3000). - Allowed Methods:
corsConfiguration.addAllowedMethod("*")allows all HTTP methods (GET, POST, PUT, DELETE, etc.). - Allowed Headers:
corsConfiguration.addAllowedHeader("*")allows all headers. - UrlBasedCorsConfigurationSource: This class is used to register the CORS configuration for all endpoints (
/**). - CorsWebFilter Bean: This bean creates a new
CorsWebFilterthat applies the CORS configuration to all incoming requests.
By adding the CorsWebFilter bean to the ApiGatewayConfiguration class, you ensure that CORS settings are applied across all routes managed by the API Gateway. This should resolve any CORS issues when the React frontend makes requests to the backend services through the API Gateway.
Step 4: Create the React Application
4.1 Set Up React Project
Open a terminal and navigate to your workspace directory.
Create a new React project using Create React App:
npx create-react-app react-frontend
Navigate to the project directory:
cd react-frontend
4.2 Install Axios and React Router DOM
Install Axios to make HTTP requests and React Router DOM for routing:
npm install axios react-router-dom@64.3 Install Bootstrap
Install Bootstrap for styling:
npm install bootstrap
4.4 Create Components
Create the necessary components for displaying products and orders.
4.4.1 Create ProductService.js
Create a new file ProductService.js in the src directory to handle API requests for products:
import axios from 'axios';

const API_BASE_URL = "http://localhost:8080/products";

class ProductService {
    getAllProducts() {
        return axios.get(API_BASE_URL);
    }

    getProductById(productId) {
        return axios.get(`${API_BASE_URL}/${productId}`);
    }

    createProduct(product) {
        return axios.post(API_BASE_URL, product);
    }

}

export default new ProductService();
4.4.2 Create OrderService.js
Create a new file OrderService.js in the src directory to handle API requests for orders:
import axios from 'axios';

const API_BASE_URL = "http://localhost:8080/orders";

class OrderService {
    getAllOrders() {
        return axios.get(API_BASE_URL);
    }

    getOrderById(orderId) {
        return axios.get(`${API_BASE_URL}/${orderId}`);
    }

    createOrder(order) {
        return axios.post(API_BASE_URL, order);
    }
}

export default new OrderService();
4.4.3 Create ProductComponent.js
Create a new file ProductComponent.js in the src/components directory:
import React, { useEffect, useState } from 'react';
import ProductService from '../ProductService';
import 'bootstrap/dist/css/bootstrap.min.css';

const ProductComponent = () => {
    const [products, setProducts] = useState([]);

    useEffect(() => {
        ProductService.getAllProducts().then((response) => {
            setProducts(response.data);
        });
    }, []);

    return (
        <div className="container mt-5">
            <h2>Products</h2>
            <ul className="list-group">
                {products.map(product => (
                    <li key={product.id} className="list-group-item">
                        {product.name} - ${product.price}
                    </li>
                ))}
            </ul>
        </div>
    );
};

export default ProductComponent;
4.4.4 Create OrderComponent.js
Create a new file OrderComponent.js in the src/components directory:
import React, { useEffect, useState } from 'react';
import OrderService from '../OrderService';
import 'bootstrap/dist/css/bootstrap.min.css';

const OrderComponent = () => {
    const [orders, setOrders] = useState([]);

    useEffect(() => {
        OrderService.getAllOrders().then((response) => {
            setOrders(response.data);
        });
    }, []);

    return (
        <div className="container mt-5">
            <h2>Orders</h2>
            <ul className="list-group">
                {orders.map(order => (
                    <li key={order.id} className="list-group-item">
                        {order.product} - {order.quantity}
                    </li>
                ))}
            </ul>
        </div>
    );
};

export default OrderComponent;
4.4.5 Create App.js
Modify the App.js file to include routing for the components:
import React from 'react';
import { BrowserRouter as Router, Route, Routes } from 'react-router-dom';
import ProductComponent from './components/ProductComponent';
import OrderComponent from './components/OrderComponent';
import 'bootstrap/dist/css/bootstrap.min.css';

const App = () => {
    return (
        <Router>
            <div className="container">
                <Routes>
                    <Route path="/" element={<ProductComponent />} />
                    <Route path="/products" element={<ProductComponent />} />
                    <Route path="/orders" element={<OrderComponent />} />
                </Routes>
            </div>
        </Router>
    );
};

export default App;
4.4.6 Update index.js
Ensure the index.js file is set up correctly:
import React from 'react';
import ReactDOM from 'react-dom/client';
import './index.css';
import App from './App';
import 'bootstrap/dist/css/bootstrap.min.css';

const root = ReactDOM.createRoot(document.getElementById('root'));
root.render(
    <React.StrictMode>
        <App />
    </React.StrictMode>
);
Step 5: Running the Application
5.1 Run the Eureka Server
- Open the
EurekaServerApplicationclass in thesrc/main/java/com/example/eurekaserverdirectory. - Click the green
Runbutton in your IDE or use the terminal to run the application:
./mvnw spring-boot:run
5.2 Run the Microservices
- Open the
ProductServiceApplicationclass in thesrc/main/java/com/example/productservicedirectory and run the application. - Open the
OrderServiceApplicationclass in thesrc/main/java/com/example/orderservicedirectory and run the application.
5.3 Run the API Gateway
- Open the
ApiGatewayApplicationclass in thesrc/main/java/com/example/apigatewaydirectory and run the application.
5.4 Run the React Application
Open a terminal and navigate to the react-frontend directory.
Start the React application:
npm start
Open your web browser and navigate to http://localhost:3000.
You can now use the microservices provided by the React frontend and Spring Boot backend.
Conclusion
In this tutorial, we created a simple full-stack application using Microservices architecture. We implemented two microservices and an API Gateway and created a React application to interact with them. This setup provides a solid foundation for developing more complex full-stack applications with microservices architecture.


