
React Flow Builds Interactive Node-Based Graphs
A beginner’s guide to React Flow

React Flow is a library for building node-based graphs, which can be anything from simple static diagrams to data visualizations, to complex visual editors. It draws nodes and edges, which can be customized for various applications. It supports dragging nodes around, zooming and panning, selecting multiple nodes and edges, and adding/removing edges.
React Flow has built-in support for rendering sub-graphs and nested nodes. It supports additional functionality for MiniMap, Controls, and more. React Flow renders efficiently, because it only renders nodes that have changed, and ensures that only those that are in the viewport are rendered.
Let’s take a look at how React Flow works.
Nodes and Edges
We set up the Create React App working environment to explore React Flow.
The following command creates a React project:
% yarn create react-app react-flow-app
% cd react-flow-app
Install reactflow.
% yarn add reactflowAfter the installation, reactflow becomes part of dependencies in package.json:
"dependencies": {
  "reactflow": "^11.7.4"
}
React Flow draws nodes and edges:
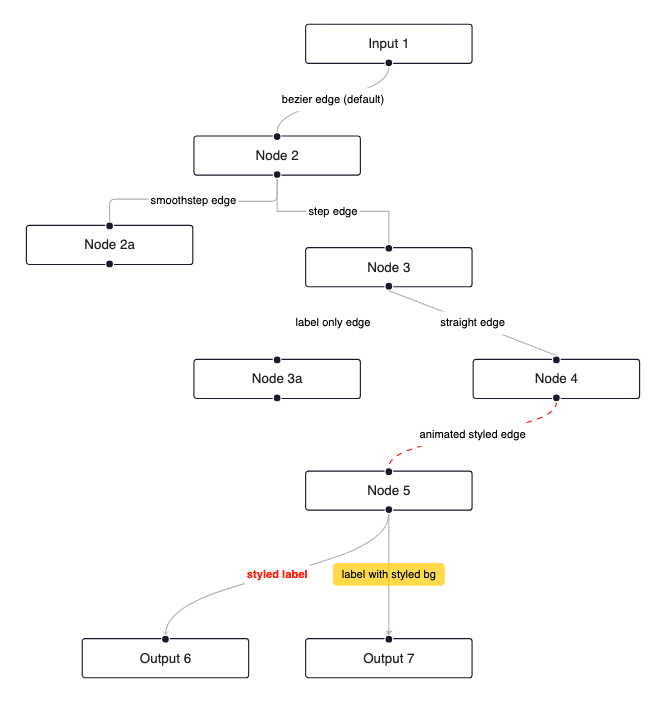
- A node is a React component, which has a coordinate of
xandy. By default, a node is rectangle-shaped, with dimension150px X 37px. A node label is a string or a React component. A node is a type of('input' | 'output' | 'default') & CustomNodeypes. An input node can be the source of an edge, an output node can be the target of an edge, and a default node can be both source and target. The black dot is the default handle where an edge connects to the node.

- An edge connects two nodes, a target and a source nodes. An edge is a type of
DefaultEdge<T> | SmoothStepEdgeType<T> | BezierEdgeType<T>, which connects nodes in various styles.
Modify src/App.js to use reactflow:
import ReactFlow from 'reactflow';
import 'reactflow/dist/style.css';

const initialNodes = [
  { id: 'node1', position: { x: 100, y: 20 }, data: { label: 'Node 1' } },
  { id: 'node2', position: { x: 100, y: 120 }, data: { label: 'Node 2' } },
];
const initialEdges = [
  { id: 'edge-node1-node2', source: 'node1', target: 'node2' },
];

function App() {
  return (
    <div style={{ width: '90vw', height: '90vh' }}>
      <ReactFlow nodes={initialNodes} edges={initialEdges} />
    </div>
  );
}

export default App;reactflow/dist/style.css, or a custom theme, must be imported to show nodes and edges.- The
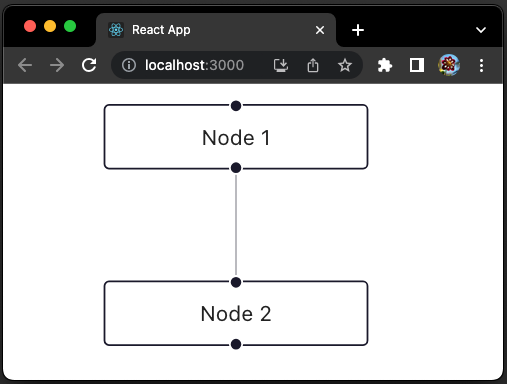
<ReactFlow />component must be wrapped in an element with width and height. <ReactFlow nodes={initialNodes} edges={initialEdges} />includes two initial nodes,Node 1andNode 2, which are connected by an initial edge.
Execute yarn start, and we see the graph.

There is an attribution label at the bottom-right corner, which can be removed by the following prop:
proOptions={{ hideAttribution: true }}However, for commercial use, it is required to show the attribution or sign up for one of the subscriptions.
There is also a fitView prop that automatically fits the graph into the viewport:
<ReactFlow
  nodes={initialNodes}
  edges={initialEdges}
  proOptions={{ hideAttribution: true }}
  fitView
/>
Here is the fitted graph without the attribution:
Controlled and Uncontrolled Flow
Controlled and uncontrolled components are two important concepts in React:
- A controlled component manages its children’s data.
- An uncontrolled component lets its children manage their own data.
There are also two ways to use React Flow — controlled or uncontrolled. Controlled means the application is in control of the state of the nodes and edges.
The following is an example of the controlled flow:
import ReactFlow from 'reactflow';
import 'reactflow/dist/style.css';

const initialNodes = [
  { id: 'node1', position: { x: 100, y: 20 }, data: { label: 'Node 1' } },
  { id: 'node2', position: { x: 100, y: 120 }, data: { label: 'Node 2' } },
];

function App() {
  return (
    <div style={{ width: '90vw', height: '90vh' }}>
      <ReactFlow nodes={initialNodes} edges={[]} />
    </div>
  );
}

export default App;
Without programming the interactivity, we can pan the graph while dragging the mouse, or zoom the graph while scrolling the mouse. But we cannot connect two nodes.
In an uncontrolled flow, the state of the nodes and edges is handled by React Flow internally.
The following is an example of the uncontrolled flow:
import ReactFlow from 'reactflow';
import 'reactflow/dist/style.css';

const initialNodes = [
  { id: 'node1', position: { x: 100, y: 20 }, data: { label: 'Node 1' } },
  { id: 'node2', position: { x: 100, y: 120 }, data: { label: 'Node 2' } },
];

function App() {
  return (
    <div style={{ width: '90vw', height: '90vh' }}>
      <ReactFlow defaultNodes={initialNodes} defaultEdges={[]} />
    </div>
  );
}

export default App;
We do not need further programming, and the connection just works out of the box.
The uncontrolled flow seems simpler, but it only works for simple use cases. In most of situations, the controlled flow is recommended. The examples in the remaining article adopt the controlled React Flow.
React Flow With Interactivity
For the controlled flow, the interactivity needs to be implemented. Typically, they are implemented by onNodesChange and onEdgesChange handlers:
onNodesChange: (nodeChanges: NodeChange[]) => void: It is called when nodes are dragged, selected, added, removed, etc., whereNodeChangeis defined as follows:
export type NodeDimensionChange = {
  id: string;
  type: 'dimensions';
  dimensions?: Dimensions;
  updateStyle?: boolean;
  resizing?: boolean;
};
export type NodePositionChange = {
  id: string;
  type: 'position';
  position?: XYPosition;
  positionAbsolute?: XYPosition;
  dragging?: boolean;
};
export type NodeSelectionChange = {
  id: string;
  type: 'select';
  selected: boolean;
};
export type NodeRemoveChange = {
  id: string;
  type: 'remove';
};
export type NodeAddChange<NodeData = any> = {
  item: Node<NodeData>;
  type: 'add';
};
export type NodeResetChange<NodeData = any> = {
  item: Node<NodeData>;
  type: 'reset';
};
export type NodeChange = NodeDimensionChange | NodePositionChange | NodeSelectionChange | NodeRemoveChange | NodeAddChange | NodeResetChange;
onEdgesChange: (edgeChanges: EdgeChange[]) => void: It is called when edges are selected, added, removed, etc., whereEdgeChangeis defined as follows:
export type EdgeSelectionChange = NodeSelectionChange;
export type EdgeRemoveChange = NodeRemoveChange;
export type EdgeAddChange<EdgeData = any> = {
  item: Edge<EdgeData>;
  type: 'add';
};
export type EdgeResetChange<EdgeData = any> = {
  item: Edge<EdgeData>;
  type: 'reset';
};
export type EdgeChange = EdgeSelectionChange | EdgeRemoveChange | EdgeAddChange | EdgeResetChange;
Here is the modified src/App.js:
import { useCallback, useState } from 'react';
import ReactFlow, { applyEdgeChanges, applyNodeChanges } from 'reactflow';
import 'reactflow/dist/style.css';

const initialNodes = [
  { id: 'node1', position: { x: 100, y: 20 }, data: { label: 'Node 1' } },
  { id: 'node2', position: { x: 100, y: 120 }, data: { label: 'Node 2' } },
];
const initialEdges = [
  { id: 'edge-node1-node2', source: 'node1', target: 'node2' },
];

function App() {
  const [nodes, setNodes] = useState(initialNodes);
  const [edges, setEdges] = useState(initialEdges);

  const onNodesChange = useCallback(
    (changes) => setNodes((nds) => applyNodeChanges(changes, nds)),
    [setNodes]
  );
  const onEdgesChange = useCallback(
    (changes) => setEdges((eds) => applyEdgeChanges(changes, eds)),
    [setEdges]
  );

  return (
    <div style={{ width: '90vw', height: '90vh' }}>
      <ReactFlow
        nodes={nodes}
        edges={edges}
        onNodesChange={onNodesChange}
        onEdgesChange={onEdgesChange}
      />
    </div>
  );
}

export default App;
Execute yarn start, and we can interact with the graph.
The interactivity includes:
- Selectable nodes and edges
- Draggable nodes
- Removable nodes and edges using Backspace
- Multi-selection area by pressing Shift + mouse action
- Multi-selection by pressing Command + mouse action
For convenience, we can use helper hooks, useNodesState and useEdgesState, to create the state of nodes and edges:
const [nodes, setNodes, onNodesChange] = useNodesState(initialNodes);
const [edges, setEdges, onEdgesChange] = useEdgesState(initialEdges);
In addition, we add the capability to connect two nodes with the prop, onConnect:
onConnect: (connection: Connection) => void: It is called when a user connects two nodes in a controlled flow, whereConnectionis defined as follows:
export interface Connection {
  source: string | null;
  target: string | null;
  sourceHandle: string | null;
  targetHandle: string | null;
}
Here is the modified src/App.js:
import { useCallback } from 'react';
import ReactFlow, { useNodesState, useEdgesState, addEdge } from 'reactflow';
import 'reactflow/dist/style.css';

const initialNodes = [
  { id: 'node1', position: { x: 100, y: 20 }, data: { label: 'Node 1' } },
  { id: 'node2', position: { x: 100, y: 120 }, data: { label: 'Node 2' } },
  { id: 'node3', position: { x: 100, y: 220 }, data: { label: 'Node 3' } },
];
const initialEdges = [
  { id: 'edge-node1-node2', source: 'node1', target: 'node2' },
];

function App() {
  const [nodes, setNodes, onNodesChange] = useNodesState(initialNodes);
  const [edges, setEdges, onEdgesChange] = useEdgesState(initialEdges);

  const onConnect = useCallback(
    (params) => setEdges((eds) => addEdge(params, eds)),
    [setEdges]
  );

  return (
    <div style={{ width: '90vw', height: '90vh' }}>
      <ReactFlow
        nodes={nodes}
        edges={edges}
        onNodesChange={onNodesChange}
        onEdgesChange={onEdgesChange}
        onConnect={onConnect}
      />
    </div>
  );
}

export default App;
Execute yarn start, and we can connect two nodes.
For the newly added edge, we can turn on animation:
const onConnect = useCallback(
  (connection) => setEdges((eds) => addEdge({ ...connection, animated: true }, eds)),
  [setEdges]
);
Execute yarn start, and the newly added edge is animated.
If we set defaultEdgeOptions animated, all edges will be animated.
<ReactFlow
nodes={nodes}
edges={edges}
onNodesChange={onNodesChange}
onEdgesChange={onEdgesChange}
onConnect={onConnect}
defaultEdgeOptions={{ animated: true }}
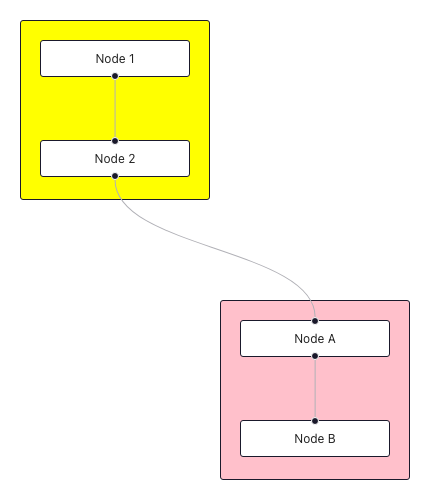
/>Sub Flows
A sub flow is a flow inside a node. It can be a separate flow or a flow that is connected with other nodes outside of its parent. This feature can also be used for grouping nodes.
Here is the modified src/App.js that has two groups that are connected:
import ReactFlow from 'reactflow';
import 'reactflow/dist/style.css';

const initialNodes = [
  {
    id: 'parent1',
    type: 'group',
    position: { x: 100, y: 20 },
    style: { width: 190, height: 180, backgroundColor: 'yellow' },
  },
  {
    id: 'node1',
    type: 'input',
    position: { x: 20, y: 20 },
    data: { label: 'Node 1' },
    parentNode: 'parent1',
    extent: 'parent',
  },
  {
    id: 'node2',
    type: 'default',
    position: { x: 20, y: 120 },
    data: { label: 'Node 2' },
    parentNode: 'parent1',
    extent: 'parent',
  },
  {
    id: 'parent2',
    type: 'group',
    position: { x: 300, y: 300 },
    style: { width: 190, height: 180, backgroundColor: 'pink' },
  },
  {
    id: 'nodeA',
    type: 'default',
    position: { x: 20, y: 20 },
    data: { label: 'Node A' },
    parentNode: 'parent2',
    extent: 'parent',
  },
  {
    id: 'nodeB',
    type: 'output',
    position: { x: 20, y: 120 },
    data: { label: 'Node B' },
    parentNode: 'parent2',
    extent: 'parent',
  },
];

const initialEdges = [
  { id: 'edge-node1-node2', source: 'node1', target: 'node2' },
  { id: 'edge-nodeA-nodeB', source: 'nodeA', target: 'nodeB' },
  { id: 'edge-nodeA-nodeB', source: 'node2', target: 'nodeA' },
];

function App() {
  return (
    <div style={{ width: '90vw', height: '90vh' }}>
      <ReactFlow
        nodes={initialNodes}
        edges={initialEdges}
      />
    </div>
  );
}

export default App;
Execute yarn start, and we see two grouped nodes. But, some edges are missing.

This can be fixed to set nodes’ z-index to -1 in src/index.css:
.react-flow__node {
  z-index: -1 !important;
}
Now two groups are displayed correctly.
Add Node On Edge Drop
We have added an edge to connect nodes. How do we add a node?
We are going to use the hook, useReactFlow, which has the following functions:
- Manipulate nodes, edges, and the viewport.
- Get information about the current state.
export default function useReactFlow<NodeData = any, EdgeData = any>(): ReactFlowInstance<NodeData, EdgeData>;useReactFlow can only be used if the component that uses it, is wrapped with a ReactFlowProvider or if it is a child of the <ReactFlow /> component.
Here is the definition of ReactFlowInstance, which has many useful methods to manipulate the graph:
export type ReactFlowInstance<NodeData = any, EdgeData = any> = {
  getNodes: Instance.GetNodes<NodeData>;
  addNodes: Instance.AddNodes<NodeData>;
  getNode: Instance.GetNode<NodeData>;
  getEdges: Instance.GetEdges<EdgeData>;
  setEdges: Instance.SetEdges<EdgeData>;
  addEdges: Instance.AddEdges<EdgeData>;
  getEdge: Instance.GetEdge<EdgeData>;
  toObject: Instance.ToObject<NodeData, EdgeData>;
  deleteElements: Instance.DeleteElements;
  getIntersectingNodes: Instance.GetIntersectingNodes<NodeData>;
  isNodeIntersecting: Instance.IsNodeIntersecting<NodeData>;
  viewportInitialized: boolean;
} & Omit<ViewportHelperFunctions, 'initialized'>;
In addition, ViewportHelperFunctions is defined as follows:
export type ViewportHelperFunctions = {
  zoomIn: ZoomInOut;
  zoomOut: ZoomInOut;
  zoomTo: ZoomTo;
  getZoom: GetZoom;
  setViewport: SetViewport;
  getViewport: GetViewport;
  fitView: FitView;
  setCenter: SetCenter;
  fitBounds: FitBounds;
  project: Project;
  viewportInitialized: boolean;
};
Among all viewport helpers, Project is a method that can be used to set a position:
export type Project = (position: XYPosition) => XYPosition;Here is the modified src/App.js:
import React, { useCallback, useRef } from 'react';
import ReactFlow, {
  useNodesState,
  useEdgesState,
  addEdge,
  useReactFlow,
  ReactFlowProvider,
} from 'reactflow';
import 'reactflow/dist/style.css';

const initialNodes = [
  { id: 'node1', position: { x: 100, y: 20 }, data: { label: 'Node 1' } },
];

function AddNodeOnEdgeDrop() {
  const reactFlowWrapper = useRef(null);
  const connectingNodeId = useRef(null);
  const [nodes, setNodes, onNodesChange] = useNodesState(initialNodes);
  const [edges, setEdges, onEdgesChange] = useEdgesState([]);
  const { project } = useReactFlow();

  const onConnect = useCallback(
    (params) => setEdges((eds) => addEdge(params, eds)),
    [setEdges]
  );

  const onConnectStart = useCallback((_, { nodeId }) => {
    connectingNodeId.current = nodeId;
  }, []);

  const onConnectEnd = useCallback(
    (event) => {
      const targetIsPane = event.target.classList.contains('react-flow__pane');

      if (targetIsPane) {
        // remove the wrapper bounds to get the correct position od the top left
        const { top, left } = reactFlowWrapper.current.getBoundingClientRect();
        const id = `node${nodes.length + 1}`; // node id
        const newNode = {
          id,
          position: project({ // project the position
            x: event.clientX - left - 75, // 75 is half of the width 150
            y: event.clientY - top,
          }),
          data: { label: `Node ${nodes.length + 1}` },
        };

        // add new node
        setNodes((nds) => nds.concat(newNode));

        // add new edge
        setEdges((eds) =>
          eds.concat({ id, source: connectingNodeId.current, target: id })
        );
      }
    },
    [project, nodes, setEdges, setNodes]
  );

  return (
    <div style={{ width: '90vw', height: '90vh' }} ref={reactFlowWrapper}>
      <ReactFlow
        nodes={nodes}
        edges={edges}
        onNodesChange={onNodesChange}
        onEdgesChange={onEdgesChange}
        onConnect={onConnect}
        onConnectStart={onConnectStart}
        onConnectEnd={onConnectEnd}
      />
    </div>
  );
}

function App() {
  return (
    <ReactFlowProvider>
      <AddNodeOnEdgeDrop />
    </ReactFlowProvider>
  );
}

export default App;
Execute yarn start, and we can add node on edge drop:
Save and Restore Graph
We can drag and drop nodes and edges, panning and zooming. Can we save the modified graph?
Yes, we can.
Panel is a helper component to position content on top of the React Flow viewport. We add two buttons on the panel, Save Diagram and Restore Diagram. The graph information is saved in the local storage.
Here is the modified src/App.js:
import React, { useCallback, useRef, useState } from 'react';
import ReactFlow, {
  useNodesState,
  useEdgesState,
  addEdge,
  useReactFlow,
  Panel,
  ReactFlowProvider,
} from 'reactflow';
import 'reactflow/dist/style.css';

const initialNodes = [
  { id: 'node1', position: { x: 100, y: 20 }, data: { label: 'Node 1' } },
];

function AddNodeOnEdgeDrop() {
  const reactFlowWrapper = useRef(null);
  const connectingNodeId = useRef(null);
  const [nodes, setNodes, onNodesChange] = useNodesState(initialNodes);
  const [edges, setEdges, onEdgesChange] = useEdgesState([]);
  const [reactFlowInstance, setReactFlowInstance] = useState(null);
  const { project, setViewport } = useReactFlow();

  const onConnect = useCallback(
    (params) => setEdges((eds) => addEdge(params, eds)),
    [setEdges]
  );

  const onConnectStart = useCallback((_, { nodeId }) => {
    connectingNodeId.current = nodeId;
  }, []);

  const onConnectEnd = useCallback(
    (event) => {
      const targetIsPane = event.target.classList.contains('react-flow__pane');

      if (targetIsPane) {
        // remove the wrapper bounds to get the correct position od the top left
        const { top, left } = reactFlowWrapper.current.getBoundingClientRect();
        const id = `node${nodes.length + 1}`; // node id
        const newNode = {
          id,
          position: project({
            // project the position
            x: event.clientX - left - 75, // 75 is half of the width 150
            y: event.clientY - top,
          }),
          data: { label: `Node ${nodes.length + 1}` },
        };

        // add new node
        setNodes((nds) => nds.concat(newNode));

        // add new edge
        setEdges((eds) =>
          eds.concat({ id, source: connectingNodeId.current, target: id })
        );
      }
    },
    [project, nodes, setEdges, setNodes]
  );

  // save the current graph
  const onSave = useCallback(() => {
    if (reactFlowInstance) {
      const flow = reactFlowInstance.toObject();
      localStorage.setItem('my-flow-data', JSON.stringify(flow));
    }
  }, [reactFlowInstance]);

  // restore the last saved graph
  const onRestore = useCallback(() => {
    const restoreFlow = async () => {
      const flow = JSON.parse(localStorage.getItem('my-flow-data'));

      if (flow) {
        const { x = 0, y = 0, zoom = 1 } = flow.viewport;
        setNodes(flow.nodes ?? []);
        setEdges(flow.edges ?? []);
        setViewport({ x, y, zoom });
      }
    };

    restoreFlow();
  }, [setNodes, setEdges, setViewport]);

  return (
    <div style={{ width: '90vw', height: '90vh' }} ref={reactFlowWrapper}>
      <ReactFlow
        nodes={nodes}
        edges={edges}
        onNodesChange={onNodesChange}
        onEdgesChange={onEdgesChange}
        onConnect={onConnect}
        onConnectStart={onConnectStart}
        onConnectEnd={onConnectEnd}
        onInit={setReactFlowInstance}
      >
        <Panel position="top-right" style={{ display: 'flex', gap: '10px' }}>
          <button onClick={onSave}>Save Diagram</button>
          <button onClick={onRestore}>Restore Diagram</button>
        </Panel>
      </ReactFlow>
    </div>
  );
}

function App() {
  return (
    <ReactFlowProvider>
      <AddNodeOnEdgeDrop />
    </ReactFlowProvider>
  );
}

export default App;
Execute yearn start, and we can save a diagram and restore it later.
Go to the local storage, we can read what is stored in 'my-flow-data':
{
  "nodes": [
    {
      "width": 150,
      "height": 37,
      "id": "node1",
      "position": {
        "x": 100,
        "y": 20
      },
      "data": {
        "label": "Node 1"
      },
      "positionAbsolute": {
        "x": 100,
        "y": 20
      }
    },
    {
      "width": 150,
      "height": 37,
      "id": "node2",
      "position": {
        "x": 137,
        "y": 103
      },
      "data": {
        "label": "Node 2"
      },
      "positionAbsolute": {
        "x": 137,
        "y": 103
      }
    },
    {
      "width": 150,
      "height": 37,
      "id": "node3",
      "position": {
        "x": 183,
        "y": 193
      },
      "data": {
        "label": "Node 3"
      },
      "positionAbsolute": {
        "x": 183,
        "y": 193
      }
    }
  ],
  "edges": [
    {
      "id": "node2",
      "source": "node1",
      "target": "node2"
    },
    {
      "id": "node3",
      "source": "node2",
      "target": "node3"
    }
  ],
  "viewport": {
    "x": 0,
    "y": 0,
    "zoom": 1
  }
}
Minimap
A minimap is a miniature map that is often placed at a screen corner to aid a user to manage the whole graph. Minimap is not interactive by default. But, it can be set to zoomable and pannable.
Here is the modified src/App.js, where each node is set to a specific color to be more identifiable:
import ReactFlow, { MiniMap } from 'reactflow';
import 'reactflow/dist/style.css';

const initialNodes = [
  {
    id: 'node1',
    position: { x: 100, y: 20 },
    data: { label: 'Node 1' },
    style: { backgroundColor: 'red' },
  },
  {
    id: 'node2',
    position: { x: 200, y: 120 },
    data: { label: 'Node 2' },
    style: { backgroundColor: 'green' },
  },
  {
    id: 'node3',
    position: { x: 100, y: 220 },
    data: { label: 'Node 3' },
    style: { backgroundColor: 'blue' },
  },
];
const initialEdges = [
  { id: 'edge-node1-node2', source: 'node1', target: 'node2' },
  { id: 'edge-node2-node3', source: 'node2', target: 'node3', animated: true },
];

function App() {
  return (
    <div style={{ width: '90vw', height: '90vh' }}>
      <ReactFlow nodes={initialNodes} edges={initialEdges}>
        <MiniMap
          nodeColor={(node) => node.style.backgroundColor}
          nodeStrokeWidth={3}
          zoomable
          pannable
        />
      </ReactFlow>
    </div>
  );
}

export default App;
Execute yarn start, and we can see how Minimap controls the graph’s viewport.
Here is the definition of MiniMapProps:
export type MiniMapProps<NodeData = any> = Omit<HTMLAttributes<SVGSVGElement>, 'onClick'> & {
    nodeColor?: string | GetMiniMapNodeAttribute<NodeData>;
    nodeStrokeColor?: string | GetMiniMapNodeAttribute<NodeData>;
    nodeClassName?: string | GetMiniMapNodeAttribute<NodeData>;
    nodeBorderRadius?: number;
    nodeStrokeWidth?: number;
    nodeComponent?: ComponentType<MiniMapNodeProps>;
    maskColor?: string;
    maskStrokeColor?: string;
    maskStrokeWidth?: number;
    position?: PanelPosition;
    onClick?: (event: MouseEvent, position: XYPosition) => void;
    onNodeClick?: (event: MouseEvent, node: Node<NodeData>) => void;
    pannable?: boolean;
    zoomable?: boolean;
    ariaLabel?: string | null;
    inversePan?: boolean;
    zoomStep?: number;
};
Controls
We can pan the graph while dragging the mouse, or zoom the graph while scrolling the mouse. But these operations are not obvious.
Controls is a customizable controls bar that displays the operation buttons explicitly on the viewport:
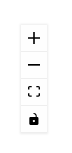
+: It zooms in the graph.-: It zooms out of the graph.- Area: It fits the graph into the viewport.
- Lock: In the locked mode, all nodes are moved together. In the unlocked mode, only the selected node is moved with mouse.
Here is the modified src/App.js:
import ReactFlow, { Controls } from 'reactflow';
import 'reactflow/dist/style.css';

const initialNodes = [
  {
    id: 'node1',
    position: { x: 100, y: 20 },
    data: { label: 'Node 1' },
    style: { backgroundColor: 'red' },
  },
  {
    id: 'node2',
    position: { x: 200, y: 120 },
    data: { label: 'Node 2' },
    style: { backgroundColor: 'green' },
  },
  {
    id: 'node3',
    position: { x: 100, y: 220 },
    data: { label: 'Node 3' },
    style: { backgroundColor: 'blue' },
  },
];
const initialEdges = [
  { id: 'edge-node1-node2', source: 'node1', target: 'node2' },
  { id: 'edge-node2-node3', source: 'node2', target: 'node3', animated: true },
];

function App() {
  return (
    <div style={{ width: '90vw', height: '90vh' }}>
      <ReactFlow defaultNodes={initialNodes} defaultEdges={initialEdges}>
        <Controls />
      </ReactFlow>
    </div>
  );
}

export default App;
Execute yarn start, and we can see how Controls works.
Here is the definition of ControlProps:
export type ControlProps = HTMLAttributes<HTMLDivElement> & {
  showZoom?: boolean;
  showFitView?: boolean;
  showInteractive?: boolean;
  fitViewOptions?: FitViewOptions;
  onZoomIn?: () => void;
  onZoomOut?: () => void;
  onFitView?: () => void;
  onInteractiveChange?: (interactiveStatus: boolean) => void;
  position?: PanelPosition;
};
The Definition of ReactFlow
There are many features of React Flow. You can go to React Flow website to read more details.
Here is the definition of ReactFlow:
declare const ReactFlow: import("react").ForwardRefExoticComponent<import("react").HTMLAttributes<HTMLDivElement> & {
    nodes?: import("../../types").Node<any, string | undefined>[] | undefined;
    edges?: import("../../types").Edge<any>[] | undefined;
    defaultNodes?: import("../../types").Node<any, string | undefined>[] | undefined;
    defaultEdges?: import("../../types").Edge<any>[] | undefined;
    defaultEdgeOptions?: import("../../types").DefaultEdgeOptions | undefined;
    onNodeClick?: import("../../types").NodeMouseHandler | undefined;
    onNodeDoubleClick?: import("../../types").NodeMouseHandler | undefined;
    onNodeMouseEnter?: import("../../types").NodeMouseHandler | undefined;
    onNodeMouseMove?: import("../../types").NodeMouseHandler | undefined;
    onNodeMouseLeave?: import("../../types").NodeMouseHandler | undefined;
    onNodeContextMenu?: import("../../types").NodeMouseHandler | undefined;
    onNodeDragStart?: import("../../types").NodeDragHandler | undefined;
    onNodeDrag?: import("../../types").NodeDragHandler | undefined;
    onNodeDragStop?: import("../../types").NodeDragHandler | undefined;
    onEdgeClick?: ((event: import("react").MouseEvent<Element, MouseEvent>, node: import("../../types").Edge<any>) => void) | undefined;
    onEdgeUpdate?: import("../../types").OnEdgeUpdateFunc<any> | undefined;
    onEdgeContextMenu?: import("../../types").EdgeMouseHandler | undefined;
    onEdgeMouseEnter?: import("../../types").EdgeMouseHandler | undefined;
    onEdgeMouseMove?: import("../../types").EdgeMouseHandler | undefined;
    onEdgeMouseLeave?: import("../../types").EdgeMouseHandler | undefined;
    onEdgeDoubleClick?: import("../../types").EdgeMouseHandler | undefined;
    onEdgeUpdateStart?: ((event: import("react").MouseEvent<Element, MouseEvent>, edge: import("../../types").Edge<any>, handleType: import("../../types").HandleType) => void) | undefined;
    onEdgeUpdateEnd?: ((event: MouseEvent | TouchEvent, edge: import("../../types").Edge<any>, handleType: import("../../types").HandleType) => void) | undefined;
    onNodesChange?: import("../../types").OnNodesChange | undefined;
    onEdgesChange?: import("../../types").OnEdgesChange | undefined;
    onNodesDelete?: import("../../types").OnNodesDelete | undefined;
    onEdgesDelete?: import("../../types").OnEdgesDelete | undefined;
    onSelectionDragStart?: import("../../types").SelectionDragHandler | undefined;
    onSelectionDrag?: import("../../types").SelectionDragHandler | undefined;
    onSelectionDragStop?: import("../../types").SelectionDragHandler | undefined;
    onSelectionStart?: ((event: import("react").MouseEvent<Element, MouseEvent>) => void) | undefined;
    onSelectionEnd?: ((event: import("react").MouseEvent<Element, MouseEvent>) => void) | undefined;
    onSelectionContextMenu?: ((event: import("react").MouseEvent<Element, MouseEvent>, nodes: import("../../types").Node<any, string | undefined>[]) => void) | undefined;
    onConnect?: import("../../types").OnConnect | undefined;
    onConnectStart?: import("../../types").OnConnectStart | undefined;
    onConnectEnd?: import("../../types").OnConnectEnd | undefined;
    onClickConnectStart?: import("../../types").OnConnectStart | undefined;
    onClickConnectEnd?: import("../../types").OnConnectEnd | undefined;
    onInit?: import("../../types").OnInit<any, any> | undefined;
    onMove?: import("../../types").OnMove | undefined;
    onMoveStart?: import("../../types").OnMove | undefined;
    onMoveEnd?: import("../../types").OnMove | undefined;
    onSelectionChange?: import("../../types").OnSelectionChangeFunc | undefined;
    onPaneScroll?: ((event?: import("react").WheelEvent<Element> | undefined) => void) | undefined;
    onPaneClick?: ((event: import("react").MouseEvent<Element, MouseEvent>) => void) | undefined;
    onPaneContextMenu?: ((event: import("react").MouseEvent<Element, MouseEvent>) => void) | undefined;
    onPaneMouseEnter?: ((event: import("react").MouseEvent<Element, MouseEvent>) => void) | undefined;
    onPaneMouseMove?: ((event: import("react").MouseEvent<Element, MouseEvent>) => void) | undefined;
    onPaneMouseLeave?: ((event: import("react").MouseEvent<Element, MouseEvent>) => void) | undefined;
    nodeTypes?: NodeTypes | undefined;
    edgeTypes?: EdgeTypes | undefined;
    connectionLineType?: ConnectionLineType | undefined;
    connectionLineStyle?: CSSProperties | undefined;
    connectionLineComponent?: import("../../types").ConnectionLineComponent | undefined;
    connectionLineContainerStyle?: CSSProperties | undefined;
    connectionMode?: ConnectionMode | undefined;
    deleteKeyCode?: import("../../types").KeyCode | null | undefined;
    selectionKeyCode?: import("../../types").KeyCode | null | undefined;
    selectionOnDrag?: boolean | undefined;
    selectionMode?: SelectionMode | undefined;
    panActivationKeyCode?: import("../../types").KeyCode | null | undefined;
    multiSelectionKeyCode?: import("../../types").KeyCode | null | undefined;
    zoomActivationKeyCode?: import("../../types").KeyCode | null | undefined;
    snapToGrid?: boolean | undefined;
    snapGrid?: [number, number] | undefined;
    onlyRenderVisibleElements?: boolean | undefined;
    nodesDraggable?: boolean | undefined;
    nodesConnectable?: boolean | undefined;
    nodesFocusable?: boolean | undefined;
    nodeOrigin?: NodeOrigin | undefined;
    edgesFocusable?: boolean | undefined;
    edgesUpdatable?: boolean | undefined;
    initNodeOrigin?: NodeOrigin | undefined;
    elementsSelectable?: boolean | undefined;
    selectNodesOnDrag?: boolean | undefined;
    panOnDrag?: boolean | number[] | undefined;
    minZoom?: number | undefined;
    maxZoom?: number | undefined;
    defaultViewport?: Viewport | undefined;
    translateExtent?: import("../../types").CoordinateExtent | undefined;
    preventScrolling?: boolean | undefined;
    nodeExtent?: import("../../types").CoordinateExtent | undefined;
    defaultMarkerColor?: string | undefined;
    zoomOnScroll?: boolean | undefined;
    zoomOnPinch?: boolean | undefined;
    panOnScroll?: boolean | undefined;
    panOnScrollSpeed?: number | undefined;
    panOnScrollMode?: PanOnScrollMode | undefined;
    zoomOnDoubleClick?: boolean | undefined;
    edgeUpdaterRadius?: number | undefined;
    noDragClassName?: string | undefined;
    noWheelClassName?: string | undefined;
    noPanClassName?: string | undefined;
    fitView?: boolean | undefined;
    fitViewOptions?: import("../../types").FitViewOptions | undefined;
    connectOnClick?: boolean | undefined;
    attributionPosition?: import("../../types").PanelPosition | undefined;
    proOptions?: import("../../types").ProOptions | undefined;
    elevateNodesOnSelect?: boolean | undefined;
    elevateEdgesOnSelect?: boolean | undefined;
    disableKeyboardA11y?: boolean | undefined;
    autoPanOnNodeDrag?: boolean | undefined;
    autoPanOnConnect?: boolean | undefined;
    connectionRadius?: number | undefined;
    onError?: import("../../types").OnError | undefined;
    isValidConnection?: import("../../components/Handle/utils").ValidConnectionFunc | undefined;
} & import("react").RefAttributes<HTMLDivElement>>;
export default ReactFlow;
It is a long list of capabilities that we can use to draw node-based graphs.
Conclusion
React Flow is a library for building node-based graphs. It draws nodes and edges, which can be customized for various applications. It supports dragging nodes around, zooming and panning, selecting multiple nodes and edges, and adding/removing edges.
React Flow is the number one choice of node-based graph drawing library, with its simplicity, capability, and efficiency.
Thanks for reading!
Thanks, John Wu, Ethan Brown, Elaine Lee, S Sreeram, and Sushmitha Aitha, for working with me on Domino products.
Want to Connect?

If you are interested, check out my directory of web development articles.
More content at PlainEnglish.io.
Sign up for our free weekly newsletter. Follow us on Twitter, LinkedIn, YouTube, and Discord.


