
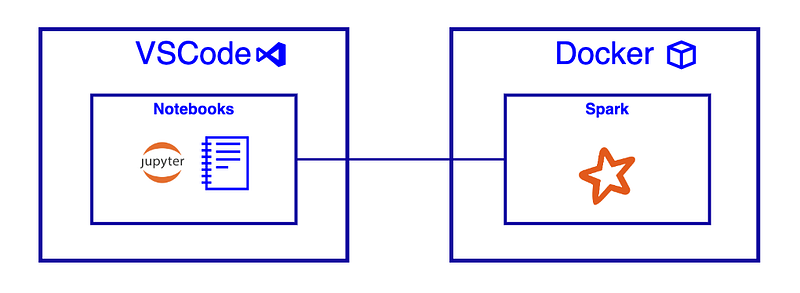
PySpark Development Made Simple
Using VS Code, Jupyter Notebooks, and Docker
A few weeks back, I was searching for that holy grail of a tutorial describing how to use VS Code with Jupyter Notebooks and PySpark… on a Mac. And surprisingly, I couldn’t find any. Well, none that passed my “explain-it-like-I’m-five” litmus test.
This article is the result of an agonising Saturday afternoon.
The Path of Least Resistance: REPLs to the Rescue
These days I have very little, if any, free time for playing around with new tech. When I do, I want it to be as painless as possible. And most importantly, I want it to be fun — otherwise, why bother?
Moreover, nothing is worse than wasting hours of your free time configuring a development environment. It’s just painful.
VS Code with Jupyter Notebooks
I’m a big fan of REPLs for rapid development — for example, evaluating a new framework, analysing data, data fixes, etc.
In these situations, I don’t want to configure a new project and get bogged down with trivial set-up complexities. I simply need a scratchpad to thrash out some code.
Jupyter Notebooks are a REPL-based system designed to analyse, visualise, and collaborate on data. They are also great as a scratchpad.
What is a REPL?
A read–eval–print loop (REPL), also termed an interactive top level or language shell, is a simple interactive computer programming environment that takes single user inputs, executes them, and returns the result to the user; a program written in a REPL environment is executed piecewise. Wikipedia
Visual Studio code has native support for Notebooks, including Jupyter.
Setup
Prerequisites
- Install Docker If you’re using a Mac and cannot install Docker Desktop due to licensing restrictions, check out Colima.
- Install VS Code
VS Code Development Container
- Create a new directory for your project.
- Create a Docker file within the root of the project directory using the code below. At the time of writing this, the current PySpark version is 3.3.0. I would check here to ensure you’re using the latest version.
3. Create a directory with the name .devcontainer.
4. Within the .devcontainer directory, add the following JSON configuration.
5. On the bottom left corner of VS Code, click the Open Remote Window button → Open In Container.
Click here to learn more about remote development within VS Code.
VS Code will restart the IDE and connect to the VS Code development container — instantiated from the Docker image defined in step 2.
That’s it for the setup.
Developing Your First PySpark Application
Creating a notebook
- Create a new file within your project directory with the extension .ipynb.
- Open the file — you should see the VS Code notebook experience.
Test data
- Within the root directory, add a new folder called data.
- Within the data directory, create a new CSV file called
users.csvand add the data below:
Example: Spark application
This section assumes you’ve installed Docker, configured a VS Code development container, and created an empty notebook.
OK, let’s break this down cell by cell.
- Import Libraries: The first cell imports the PySpark and Pandas Python libraries.
- Connection to Spark: The second cell is where we define the connection to Spark. As we’re running in local mode, we don’t need to worry about a connection string.
- Reading CSV into a Temp View: In the third cell, we ingest a CSV file from the local file system into Spark — the CSV contains test data. The second step creates a temporary view called ‘users’ — this allows us to query the table using plain old SQL.
- Query: In the last cell, we define a SQL query that will return the average age of all users by gender. The function call toPandas(), converts the Spark dataframe to Panda’s dataframe — allowing us to use VS Code’s dataframe rendering.
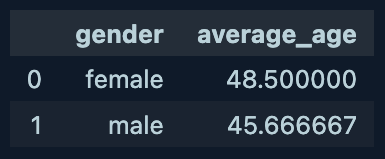
5. Click Run All at the top to execute all cells within the notebook. If it works, you should see a two-row dataframe — as depicted in the image above.
Final Thoughts
Using Visual Studio code with Jupyter notebooks and Docker is a simple way to get started with PySpark.
If you have any tips for improving the development workflow outlined above, please let me know in the comments.
I hope you found this interesting.
The Yam Yam Architect.
If you enjoy reading stories like these and want to support me as a writer, consider signing up to become a Medium member. It’s $5 a month, giving you unlimited access to stories on Medium. If you sign up using my link, I’ll earn a small commission.


