
PyCryptoBot on AWS EC2
Run your crypto bots (PyCryptoBot) in the AWS public cloud

My Python crypto bot has really gone from strength to strength. As of today there are 496 unique users using the bot and on average each user is running at least 2 bots according to Github.
I also setup a Telegram group chat for bot users to discuss crypto trading, configurations, and support each other. It really has taken the load off me and the community really has been amazing. There are currently 215 people chatting in the group and 36 are active in the chat at the moment.
The invite link to the main group chat is: https://t.me/joinchat/09hYKfelbRY2MDNk
There is a breakout group for developers to discuss the code, pull requests, and issues.
The invite link to the dev group chat is: https://t.me/joinchat/3xFJO_rWLcoxOGFk
Quite often people ask if the bot can be run in the cloud either because they don’t have a system they can leave on permanently or their Internet connection may be poor or intermittent. I know some people have bought a Raspberry Pi and installed it on there others have installed it in Amazon AWS EC2 or as a Docker container in Amazon AWS ECS.
This article will explain how to run your PyCryptoBot(s) *FOR FREE* in Amazon AWS EC2 for a year. Amazon AWS very kindly provides a “free tier” for personal use, studying, etc. You just need to take care you don’t include non-free items by accident but for the purpose of running a server instance in the cloud it’s free (for a year). It’s probably worth mentioning that Amazon AWS ECS does not have free tier options. If you are planning on running your PyCryptoBot(s) as Docker containers you are better off installing it locally or on an Amazon AWS ECS instance.
I’m going to walk you through this step by step as easily as I can. It still requires some technical competence but I’m hoping to make this as easy as possible for you. If you get stuck on any parts or would like me to be explain anything in more detail please do let me know on Telegram or in the comments.
I’m going to make the assumption you are familiar with PyCryptoBot already and that you have an account either on Coinbase Pro or Binance and have API keys to facilitate your access.
If you are completely new to this project I recommend the following as pre-reading.
Let’s get started…
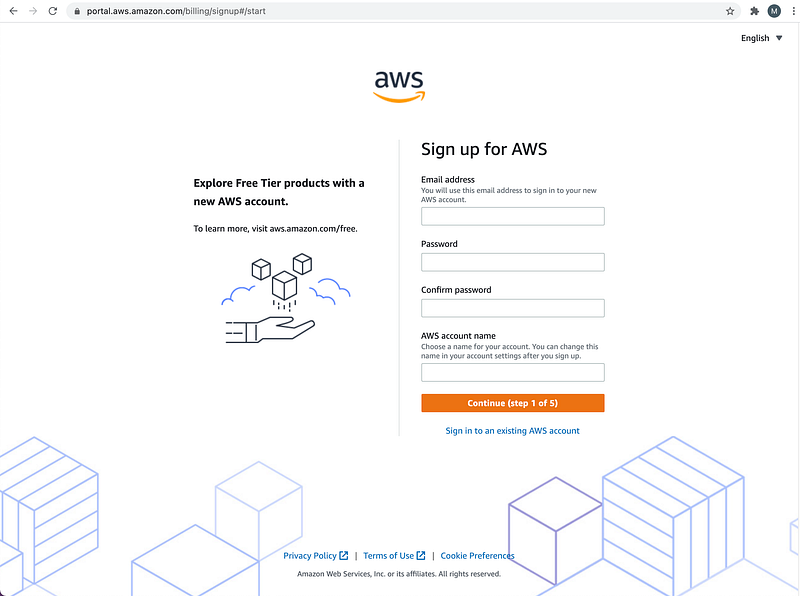
The first step is to create yourself a free account if you don’t already have one. You will require a valid email address and a credit/debit card. Yes, you still need a card even though you will be only using the “free tier”. Because it’s only free for the first year.
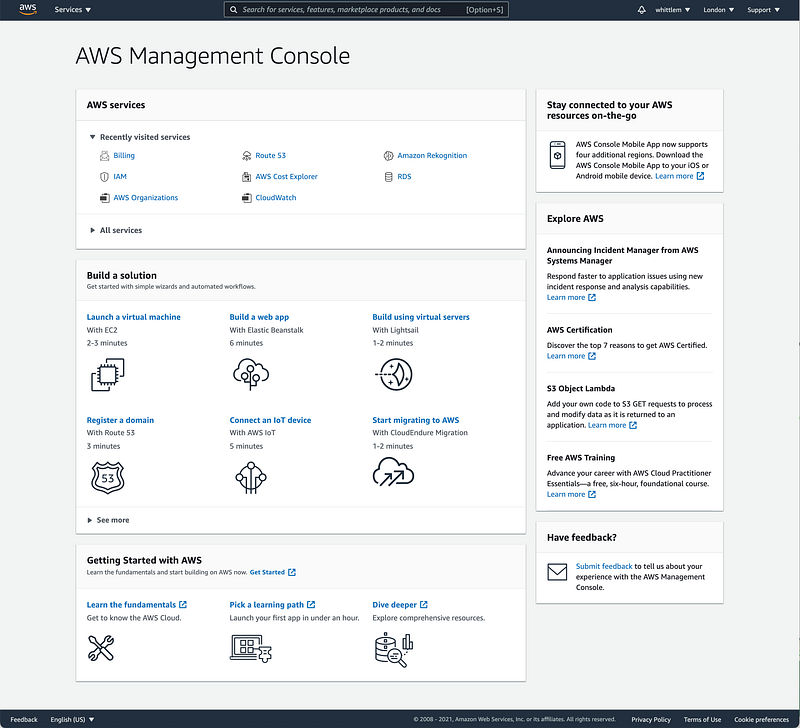
Once you have logged in, the opening console will look something like this. Amazon AWS is constantly improving and trying new interfaces but as of now this is what it looks like.
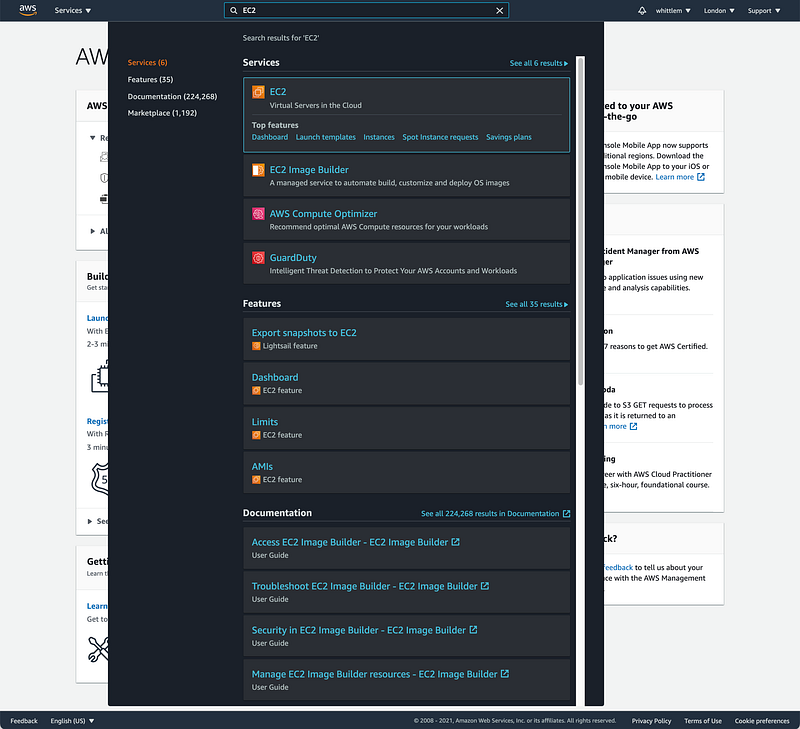
Search for “EC2” for “Elastic Compute Cloud” in the search bar at the top. If you are unfamiliar with what this is, it is a virtual server in the cloud.
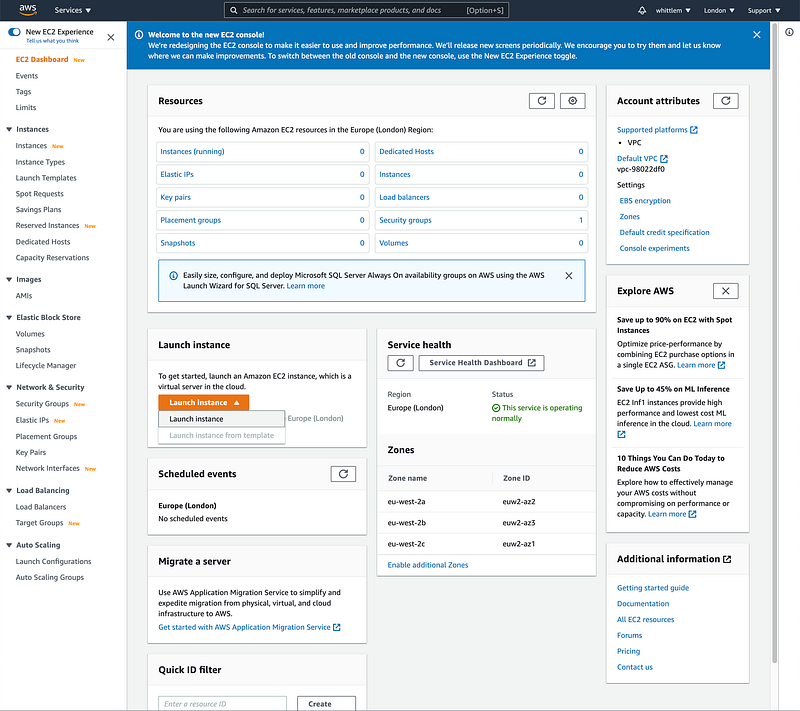
This is what the EC2 console looks like (as of today). Click on “Launch instance” in orange below.
You will notice I checked “Free tier only” below. It’s not mandatory but will avoid you selecting paid services by accident. For the purpose of this tutorial I’m going to spin up an “Ubuntu Server 20.04 LTS (HVM), SSD Volume Type” 64-bit (x86) instance. Select this one.
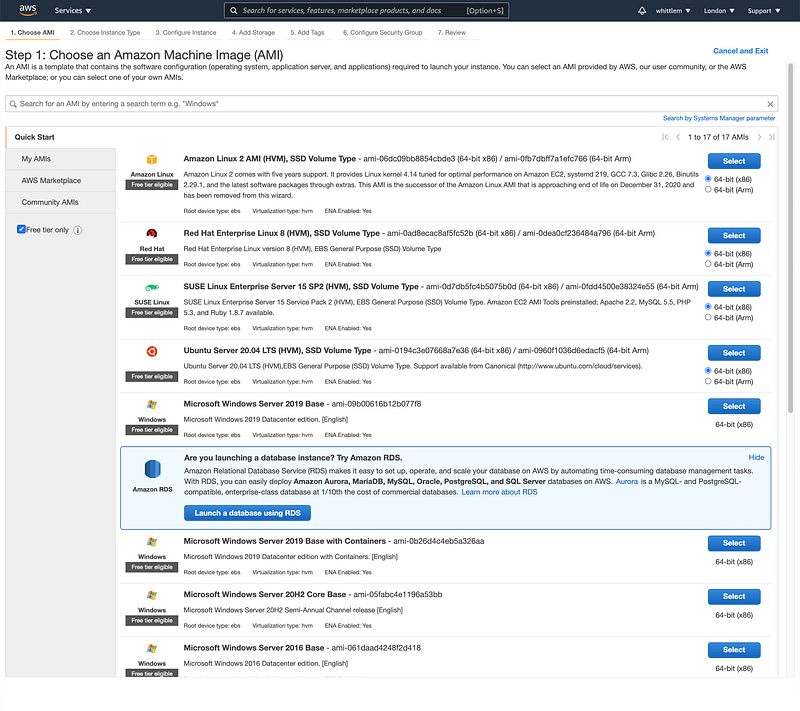
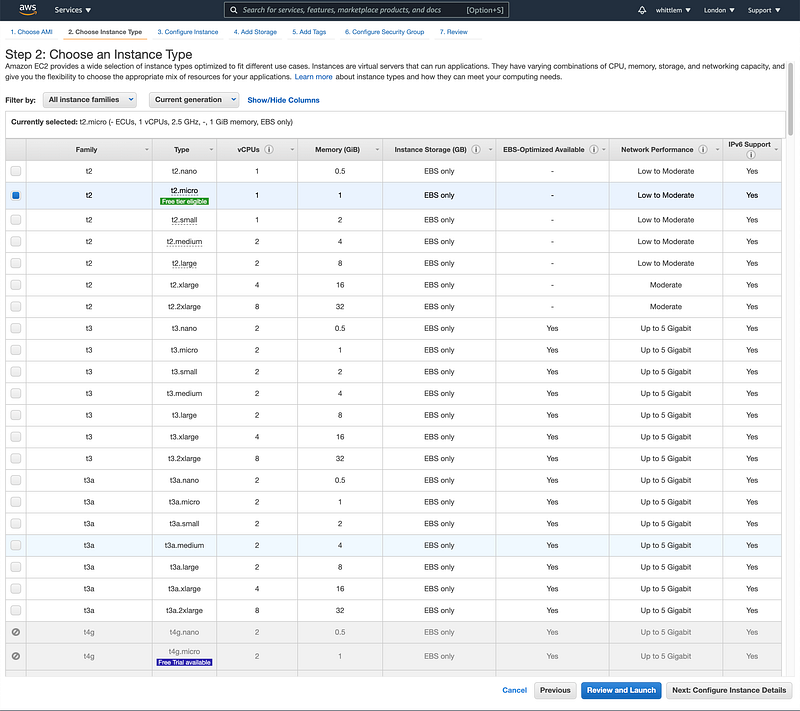
You will see the “Free tier eligible” option clearly highlighted in green below. This is the one we will be using. The “t2.micro” instance which is more than enough for what we need. One you have selected that one click on “Next: Configure Instance Details”.
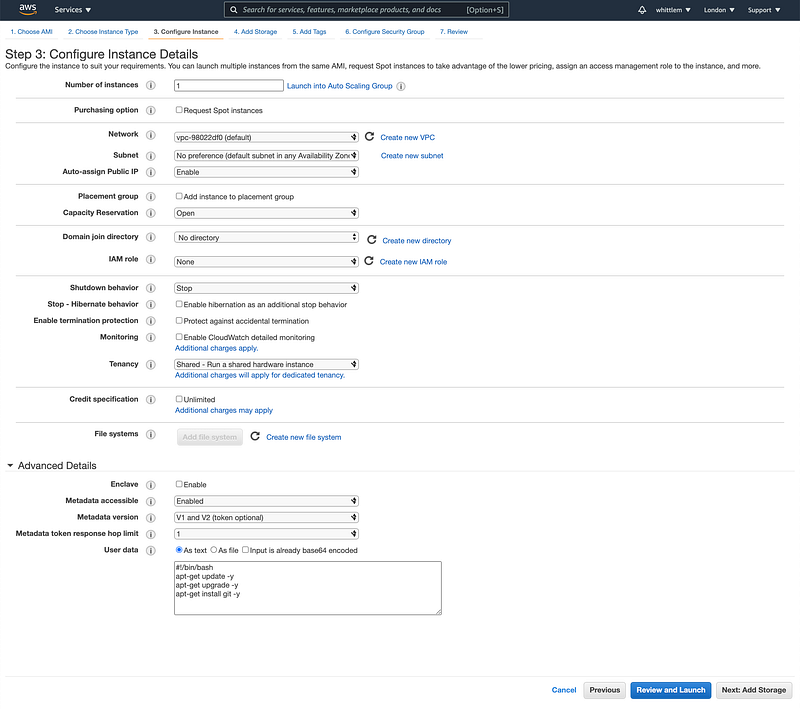
You will leave most of the options below default with the exception of “Auto-assign Public IP”. Make sure you select “Enable”. Please note that in the free tier you will get a public IP for your server instance but it will change every time you restart your system. You can assign what is called an Elastic IP but that is at an additional cost. It’s not necessary for this but it’s worth mentioning.
Another really important part on this page is “User data” under “Advanced Details”. This allows you to execute a whole series of commands automatically after the instance is provisioned. This is definitely what we’ll want to do as it will make our lives a whole lot easier here.
Please include the following script “As text” in the “User data” section.
#!/bin/bashapt-get update -y
apt-get upgrade -y
apt-get install git -y
apt-get install ubuntu-advantage-tools -ycurl https://bootstrap.pypa.io/get-pip.py -o get-pip.py
python3 get-pip.pysu - ubuntu -c 'mkdir ~/PyCryptoBot'# add one line like this for every bot
su - ubuntu -c 'git clone https://github.com/whittlem/pycryptobot ~/PyCryptoBot/BTC-GBP'# just add this once for the first bot you add E.g. BTC-GBP
su - ubuntu -c 'python3 -m pip install -r ~/PyCryptoBot/BTC-GBP/requirements.txt'When you are finished, click “Next: Add Storage”.
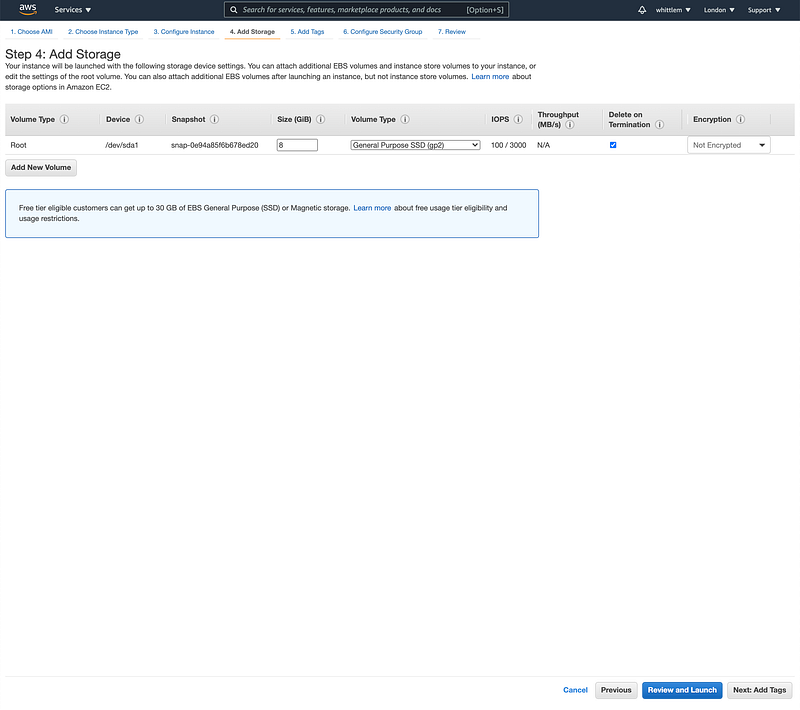
Nothing to do on this page, just click “Next: Add Tags”.
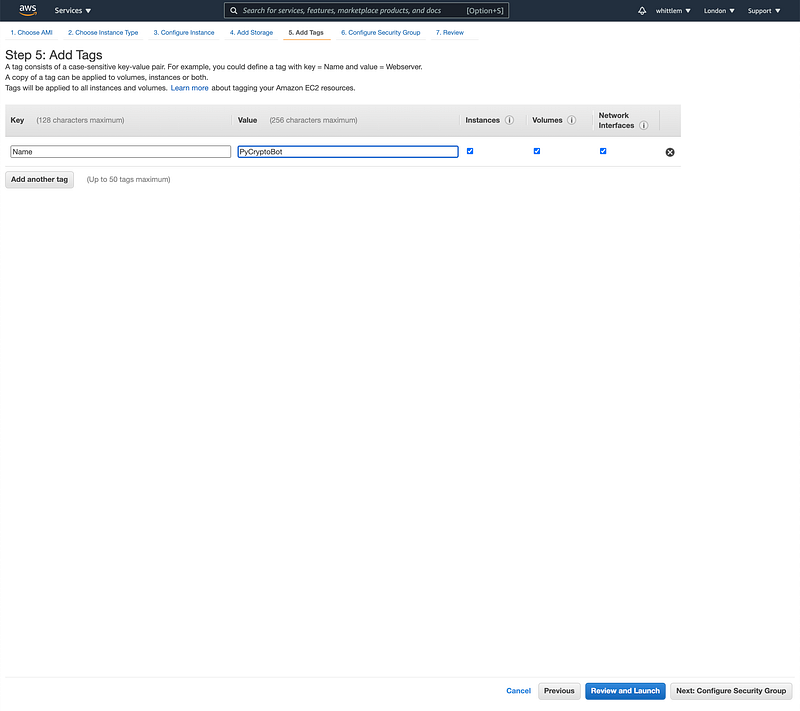
Adding tags is optional but it’s usually good practice. I usually add “Name” as a minimum. On my other projects I add a “Project” tag which is really handy when it comes to billing itemisation. In this case I’m just adding a “Name” of “PyCryptoBot”.
When you are done, click “Next: Configure Security Group”.
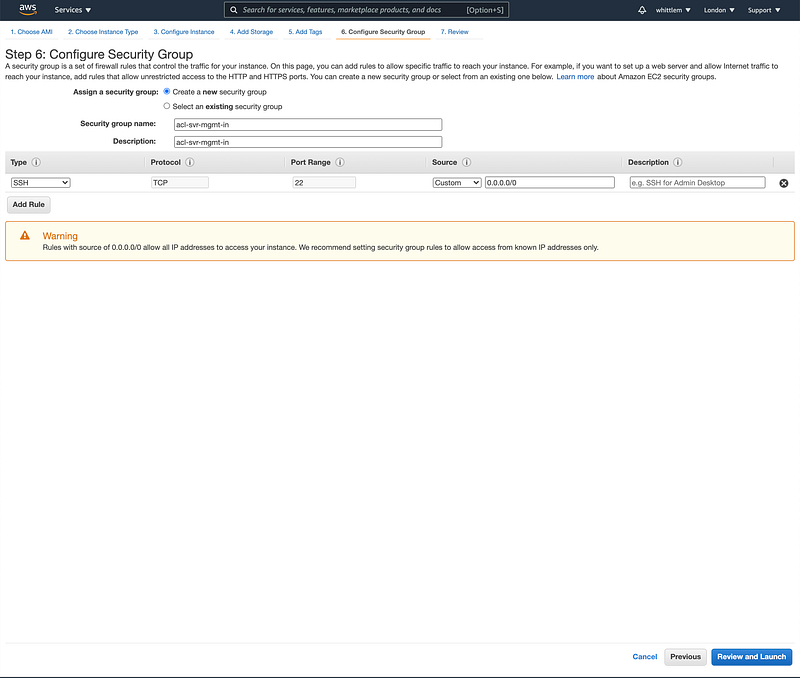
You can optionally just accept the defaults here but I personally like to give my access lists a proper name. I would recommend using “acl-svr-mgmt-in” for both the “Security group name” and “Description”.
When you are done, click “Review and Launch”.
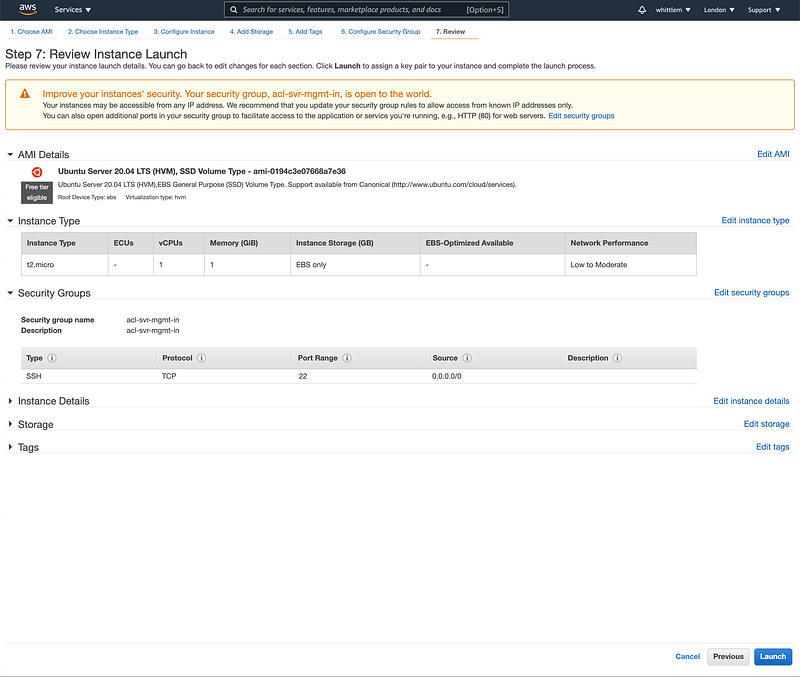
The summary screen should look like this.
Click “Launch”.
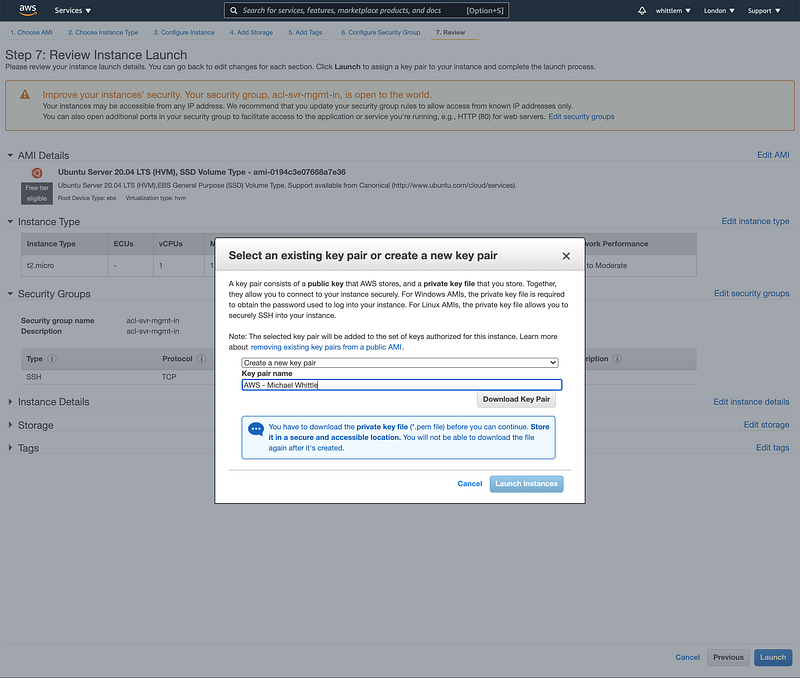
You now need to create your SSH keys to be able to access your system. Take care here as you can’t change the keys once your system is deployed. If you make a mistake you will not be able to access your instance and will have to start again.
“Create a new key pair” and give it a name. I called mine “AWS — Michael Whittle” but you can call it what ever you like. Make sure you “Download Key Pair”, this is really important and keep it extremely safe. If this falls into the wrong hands, not only will they have full control of your system but your crypto currency funds as well. This is no joke! This is your main protection running this in the cloud so be careful.
In my case the private key that was downloaded is called “AWS-MichaelWhittle.pem”. Yours should be something similar.
Once you are done, click “Launch Instance”.
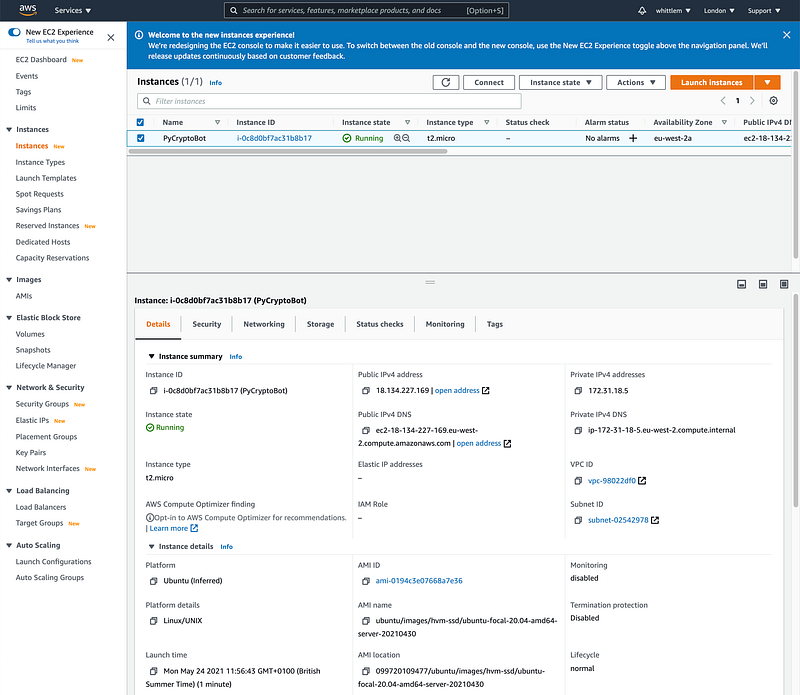
This is the example instance I created for this tutorial. You can see that the “Instance state” is “Running”. You need to copy the “Public IPv4 address” under “Details”. Not my one, yours. Just to confirm you are looking in the correct place below mine is (or was) 18.134.227.169.
The next part will be a little tricky to explain because it depends if you will be accessing your instance from a Linux, macOS or Windows based system. If you are using Linux or macOS it is pretty straight forward as you can use the .pem file as is.
Linux and macOS
- Go to a command line terminal
- Make a directory called .ssh in your home directory if it doesn’t already exist (“mkdir ~/.ssh”)
- Make sure the .ssh directory has only read, write and execute permissions for you only (“chmod 700 ~/.ssh”)
- Copy your .pem file into your ~/.ssh directory. In my case “AWS-MichaelWhittle.pem” (“cp AWS-MichaelWhittle.pem ~/.ssh”) — I am making the assumption you are in the directory where your .pem file is located. It’s likely to be your “Downloads” directory or where ever you saved it.
- Make sure the .pem file has the correct permissions. It should be read and write to you only (“chmod 0600 ~/.ssh/AWS-MichaelWhittle.pem”)
- Go into your .ssh directory (“cd ~/.ssh”)
- And SSH to your new instance (“ssh -i AWS-MichaelWhittle.pem [email protected]”) — please note that you will use your own .pem file (not mine), the “ubuntu” user is the default user for Ubuntu systems in EC2, and the IP address above was my tutorial IP. You need to use your own Public IP for your instance here. Just as an aside, the default user for a Redhat system in AWS is “ec2-user”. Not applicable here but worth knowing.
Please note that on your first SSH session to the instance it will ask you if you want to add your source system to the known hosts. Make sure you answer “yes” to this question.
The authenticity of host '<removed> (<removed>)' can't be established.
ECDSA key fingerprint is SHA256:<removed>.
Are you sure you want to continue connecting (yes/no/[fingerprint])? yes
Warning: Permanently added '<removed>' (ECDSA) to the list of known hosts.
A successful login should look something like this…
% ssh -i AWS-MichaelWhittle.pem ubuntu@18.134.227.169
Welcome to Ubuntu 20.04.2 LTS (GNU/Linux 5.4.0-1045-aws x86_64)
* Documentation: https://help.ubuntu.com
* Management: https://landscape.canonical.com
* Support: https://ubuntu.com/advantageSystem information as of Mon May 24 11:00:17 UTC 2021System load: 0.15 Processes: 104
Usage of /: 18.6% of 7.69GB Users logged in: 0
Memory usage: 24% IPv4 address for eth0: 172.31.18.5
Swap usage: 0%8 updates can be applied immediately.
7 of these updates are standard security updates.
To see these additional updates run: apt list --upgradable*** System restart required ***The programs included with the Ubuntu system are free software;
the exact distribution terms for each program are described in the
individual files in /usr/share/doc/*/copyright.Ubuntu comes with ABSOLUTELY NO WARRANTY, to the extent permitted by
applicable law.To run a command as administrator (user "root"), use "sudo <command>".
See "man sudo_root" for details.ubuntu@ip-172-31-18-5:~$You shouldn’t need to access root but if you do you can do it like this.
ubuntu@ip-172-31-18-5:~$ sudo su -
root@ip-172-31-18-5:~#
And “exit” to go back.
root@ip-172-31-18-5:~# exit
ubuntu@ip-172-31-18-5:~$
Windows
This part is going to be tricky to explain as there are many SSH clients for Windows. I personally use “PuTTY” and “PuTTYgen” but it’s really up to you. The problem is for “PuTTY” and I assume for most Windows clients it won’t know what to do with a .pem file. It’s probably going to expect to you create a .ppk file from the .pem file.
Please follow this guide by Amazon on how to do it: https://docs.aws.amazon.com/AWSEC2/latest/UserGuide/putty.html
If you don’t have a strong preference just stick with “PuTTY” and follow the Amazon guide on how to access your system.
Confirming it’s all there…
If all has gone to plan you should have your Amazon AWS EC2 instance up and running and you have an SSH connection to it. Let’s just check that their first or only bot is ready to go.
ubuntu@ip-172-31-29-62:~$ ls -la
total 36
drwxr-xr-x 6 ubuntu ubuntu 4096 May 24 22:46 .
drwxr-xr-x 3 root   root   4096 May 24 22:45 ..
-rw-r--r-- 1 ubuntu ubuntu  220 Feb 25  2020 .bash_logout
-rw-r--r-- 1 ubuntu ubuntu 3771 Feb 25  2020 .bashrc
drwxrwxr-x 3 ubuntu ubuntu 4096 May 24 22:47 .cache
drwx------ 4 ubuntu ubuntu 4096 May 24 22:46 .local
-rw-r--r-- 1 ubuntu ubuntu  807 Feb 25  2020 .profile
drwx------ 2 ubuntu ubuntu 4096 May 24 22:45 .ssh
drwxrwxr-x 3 ubuntu ubuntu 4096 May 24 22:46 PyCryptoBotubuntu@ip-172-31-29-62:~$ cd PyCryptoBotubuntu@ip-172-31-29-62:~/PyCryptoBot$ ls -la
total 12
drwxrwxr-x 3 ubuntu ubuntu 4096 May 24 22:46 .
drwxr-xr-x 6 ubuntu ubuntu 4096 May 24 22:46 ..
drwxrwxr-x 10 ubuntu ubuntu 4096 May 24 22:46 BTC-GBPubuntu@ip-172-31-29-62:~/PyCryptoBot$ cd BTC-GBPubuntu@ip-172-31-29-62:~/PyCryptoBot/BTC-GBP$ python3 --version
Python 3.8.5ubuntu@ip-172-31-29-62:~/PyCryptoBot/BTC-GBP$ python3 -m pip --version
pip 21.1.2 from /usr/local/lib/python3.8/dist-packages/pip (python 3.8)ubuntu@ip-172-31-29-62:~/PyCryptoBot/BTC-GBP$ python3 pycryptobot.py --sim fast
Invalid config.json: [Errno 2] No such file or directory: 'config.json'For this tutorial I just added one bot for “BTC-GBP” but maybe you added additional bots or used a completely difference market. Just use what ever you have.
As you can see above the bot is complaining that no configuration exists yet (i.e. no config.json). You can initialise a configuration easily like this. This is just an example but please follow the prompts which will create your “config.json” for you.
ubuntu@ip-172-31-29-62:~/PyCryptoBot/BTC-GBP$ python3 pycryptobot.py --init
*** config.json Configuration Builder ***
Do you have API keys for the Coinbase Pro exchange (1=yes, 2=no:default)? 1What is your Coinbase Pro API Key? 00000000000000000000000000000000
What is your Coinbase Pro API Secret? 0000/0000000000/0000000000000000000000000000000000000000000000000000000000/00000000000==
What is your Coinbase Pro API Passphrase? 00000000000What is your Coinbase Pro base currency (what you are buying) E.g. BTC? BTC
What is your Coinbase Pro quote currency (what you are buying with) E.g. GBP? GBPDo you want to smart switch between 1 hour and 15 minute intervals (1=yes:default, 2=no)? 1Do you want to start live trading? (1=live, 2=test:default)? 1Do you have API keys for the Binance exchange (1=yes, 2=no:default)? 2Do you have a Telegram Token and Client ID (1=yes, 2=no:default)? 2Do you want to ever sell at a loss even to minimise losses (1:yes, 2=no:default)? 2
Do you want to sell at the next resistance? (1:yes:default, 2=no)? 1
Do you only want to trade in a bull market SMA50 > SMA200? (1:yes, 2=no:default)? 2
Do you want to avoid buying when the price is too high? (1:yes:default, 2=no)? 1
Do you want to disable the On-Balance Volume (OBV) technical indicator on buys? (1:yes:default, 2=no)? 2
Do you want to disable the Elder-Ray Index on buys? (1:yes:default, 2=no)? 2
Do you want to disable saving the CSV tracker on buy and sell events? (1:yes:default, 2=no)? 1
Do you want to disable writing to the log file? (1:yes, 2=no:default)? 1
Do you want the bot to auto restart itself on failure? (1:yes:default, 2=no)? 1config.json saved!After you have done this you should be able to run a simulation to confirm it all works.
ubuntu@ip-172-31-29-62:~/PyCryptoBot/BTC-GBP$ python3 pycryptobot.py --sim fastIt may not be obvious yet but once you have started your bot it will only be running while you have your SSH connection open. This kind of defeats the purpose. The way you get around this is to use a really handy application called “screen”. It will allow you to run your bot(s) and then “detach” allowing you to close your SSH session and it will keep running. When you log into your system again you will “re-attach” to your “screen” and you are ready to go again.
Persisting your session with “screen”
You will already have “screen” installed on your Ubuntu system.
ubuntu@ip-172-31-29-62:~/PyCryptoBot$ screen --version
Screen version 4.08.00 (GNU) 05-Feb-20
The way you access screen is to just run “screen” but let’s first take a look to see if there are any screens running (there shouldn’t be if this is a fresh install).
ubuntu@ip-172-31-29-62:~/PyCryptoBot$ screen -ls
No Sockets found in /run/screen/S-ubuntu.
I usually run my screens with “screen -R” which re-attaches to an existing detached screen or starts a new screen. You can run “screen” on its own but this will create a new screen each time.
ubuntu@ip-172-31-29-62:~/PyCryptoBot$ screen -RYou may notice once “screen” is loaded that it doesn’t look any different to your existing terminal.
I’ve created a very basic config.json file without valid API keys. If I run my bot now it looks like this.
ubuntu@ip-172-31-29-62:~/PyCryptoBot/BTC-GBP$ git pull; python3 pycryptobot.py
Already up to date.
Exception: GET (401) https://api.pro.coinbase.com/orders?status=done - Invalid API Key
If the keys were valid the bot would start at this point. Now how do you de-attach to allow this to keep running even after you log off. Please “Ctrl+a, then d”. This will detach from the session and take you back to your original terminal screen.
If you want to confirm the (Detached) screen is running you can run “screen -ls”.
ubuntu@ip-172-31-29-62:~/PyCryptoBot$ screen -ls
There is a screen on:
 17770.pts-0.ip-172-31-29-62 (05/25/21 11:43:38) (Detached)
1 Socket in /run/screen/S-ubuntu.
To re-attach to your screen just run “screen -R” again and you will be back into your screen. Just out of interest you can also provide the screen ID to attach to a specific screen if you have more than one running and if you break something you can type “screen -D” to power detach and start over.
So this is great and all for one bot but how do you run multiple bots….
In a screen you can spawn additional screens by typing “Ctrl+a, then n”. It may be obvious by now but “Ctrl+a” tells screen that your next key will be an action. “d” to “detach”, “c” for “create screen”, etc.
Once you have your new screen within “screen” you can spawn you next bot. To toggle back and forward between your screens you can type “Ctrl+a, then n” to go to the next screen and “Ctrl+a, then p” to go back to the previous screen. And as I have mentioned to detach just “Ctrl+a, then d”. “screen” is pretty great in that if you lose connection while in a screen the screen keeps running.
And that’s it really. You now have one or more bots running securely in the cloud.
Thinking forward
For those helpful project contributors if you would like a hobby project what may be an interesting addition is a secure API to drive the bot. The bot already has Telegram functionality to keep you updated with what the bot(s) are doing but maybe an API to start, stop, restart the bot(s) would be pretty handy especially with a cloud implementation like this.
And finally…
This is my first fully open source project and I really have been pleasantly surprised how helpful the community has been. Loads of developers are now helping me develop new functionality, improve the bot, fix issues, and just support each other. I really appreciate it so thanks :)
Just a reminder, all my technical analysis and PyCryptoBot articles can be found in my Trading Data Analysis publication on Medium. If you would like to be kept up to date with further updates, I recommend following the publication.
I hope you found this article interesting and useful. If you would like to be kept informed, please don’t forget to follow me and sign up to my email notifications.
Michael Whittle
- If you enjoyed this, please follow me on Medium
- For more interesting articles, please follow my publication
- Interested in collaborating? Let’s connect on LinkedIn
- Support me and other Medium writers by signing up here
- Please don’t forget to clap for the article :) ← Thank you!