
Push Custom Notification in Android studio
Hello buddy’s
This article is about how to push custom notifications from an Android application.
let’s start with adding permission to the manifest file
<manifest ...>
    <uses-permission android:name="android.permission.POST_NOTIFICATIONS"/>
    <application ...>
        ...
    </application>
</manifest>
once you added this, add runtime permission code in your MainActivity.kt
class MainActivity : AppCompatActivity() {

    override fun onCreate(savedInstanceState: Bundle?) {
        super.onCreate(savedInstanceState)
        setContentView(R.layout.activity_main)

        Check and request notification permission if necessary
        if (Build.VERSION.SDK_INT >= Build.VERSION_CODES.TIRAMISU) {
            checkAndRequestNotificationPermission()
        }
    }

    private fun checkAndRequestNotificationPermission() {
        if (ContextCompat.checkSelfPermission(this, Manifest.permission.POST_NOTIFICATIONS))
            != PackageManager.PERMISSION_GRANTED) {

            // Permission is not granted, request it
            ActivityCompat.requestPermissions(this,
                arrayOf(Manifest.permission.POST_NOTIFICATIONS),
                PERMISSION_REQUEST_CODE
            )
        } else {
            // Permission has already been granted
            handleNotificationPermissionGranted()
        }
    }

    // Handle the permission request response
    override fun onRequestPermissionsResult(
        requestCode: Int,
        permissions: Array<out String>,
        grantResults: IntArray
    ) {
        super.onRequestPermissionsResult(requestCode, permissions, grantResults)
        if (requestCode == PERMISSION_REQUEST_CODE) {
            if ((grantResults.isNotEmpty() && grantResults[0] == PackageManager.PERMISSION_GRANTED)) {
                // Permission was granted
                handleNotificationPermissionGranted()
            } else {
                // Permission denied
                handleNotificationPermissionDenied()
            }
        }
    }

    private fun handleNotificationPermissionGranted() {
        // Handle the case where the notification permission is granted
        For example, you can now schedule or show notifications
    }

    private fun handleNotificationPermissionDenied() {
        // Handle the case where the notification permission is denied
        You can show a message to the user explaining why the permission is important
    }

    companion object {
        private const val PERMISSION_REQUEST_CODE = 100
    }
}
Once runtime permission is granted,. we can start working on the notification. First, we’ll create a notification channel.
if (Build.VERSION.SDK_INT >= Build.VERSION_CODES.O) {
    Create the notification channel.
    val name = getString(R.string.channel_name)
    val descriptionText = getString(R.string.channel_description)
    val importance = NotificationManager.IMPORTANCE_DEFAULT
    val mChannel = NotificationChannel(CHANNEL_ID, name, importance)
    mChannel.description = descriptionText
    Register the channel with the system. You can't change the importance
    or other notification behaviors after this.
    val notificationManager = getSystemService(NOTIFICATION_SERVICE) as NotificationManager
    notificationManager.createNotificationChannel(mChannel)
}
Now, your ready to push the notification from your main activity. In the below image, you can see two types of notifications: one is a basic notification, and the other is a big message notification.
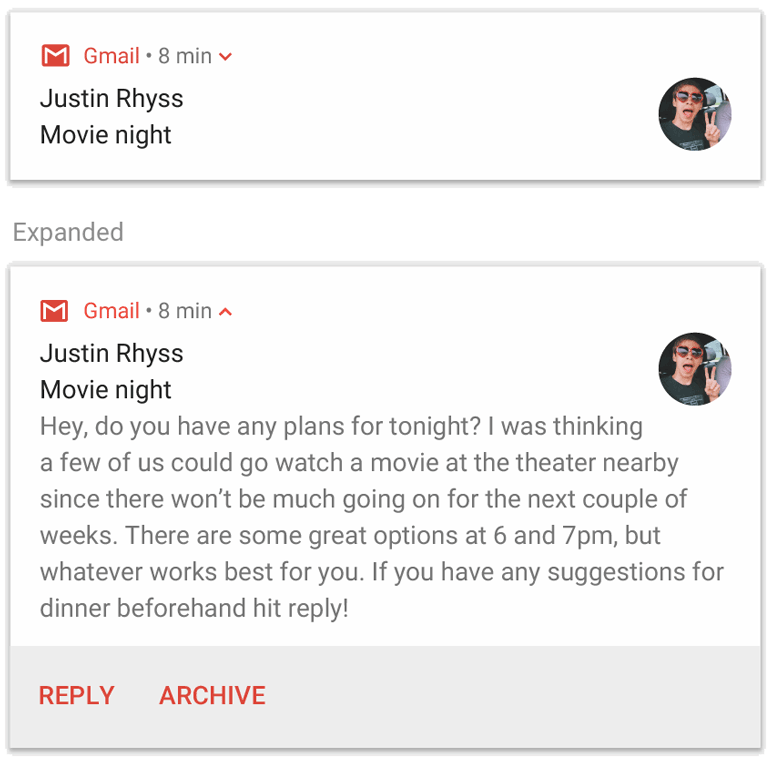
First, we’ll see Basic notification. You can build the basic notification using the below code. You can set the title and content, as well as the notification priority.
var builder = NotificationCompat.Builder(this, CHANNEL_ID)
        .setSmallIcon(R.drawable.notification_icon)
        .setContentTitle(textTitle)
        .setContentText(textContent)
.setPriority(NotificationCompat.PRIORITY_DEFAULT)You can build the big text notification by the below code.
var builder = NotificationCompat.Builder(this, CHANNEL_ID)
        .setSmallIcon(R.drawable.notification_icon)
        .setContentTitle("My notification")
        .setContentText("Much longer text that cannot fit one line...")
        .setStyle(NotificationCompat.BigTextStyle()
                .bigText("Much longer text that cannot fit one line..."))
        .setPriority(NotificationCompat.PRIORITY_DEFAULT)
Once you create a builder for the notification, you need to check the permissions before you can notify. In the notification manager, you can notify to the user. once the permission is granted , we can send the notification using notify(Notification_Id,builder.build()) the notification_id, which is the unique ID for each notification. then the builder is the notification builder we created above.
with(NotificationManagerCompat.from(this)) {
    if (ActivityCompat.checkSelfPermission(
            this@MainActivity,
            Manifest.permission.POST_NOTIFICATIONS
        ) != PackageManager.PERMISSION_GRANTED
    ) {

        return@with
    }
    // notificationId is a unique int for each notification that you must define.
    notify(NOTIFICATION_ID, builder.build())
}
This way, you can push a custom in-app notification.
Conclusion
This is a simple way to push a notification in your Android application.
To know more about Mobile Development Follow my blog and subscribe


