
Prediction using Regression Model in Azure Machine Learning without coding
Microsoft Azure has a very powerful Machine Learning Service that makes best use of Microsoft Azure capabilities. In this story, you are going to learn how to create a Regression Model in Azure Machine Learning without writing code. You will discover how simple and easy it is to create machine learning models in Azure with the well supported set of tools provided by Azure.
Before starting in implementing the model you need to know that machine learning modules mainly consist of 6 steps:
1- Dataset import in this step you import the data you use for training your model.
2- Data preparation in this step you clean your data by removing the columns that you don’t need for your model and as well handling the empty entries in the dataset.
3- Model Selection in this step you select the suitable model for your problem. This includes selecting the type of the model (Regression, classification, clustering … etc.) and the mathematical model (Linear, polynomial … etc.). Note that this step might require plotting or assessing the dataset in different way. We will ignore this step in this tutorial as we already knows that the model is Linear Regression model.
4- Data split as it is clear in the name of the step, in this step, we split the dataset into training and testing sets. The main input here is the percentage of the training set vs the whole dataset.
5- Model Training you have already selected the model and prepared and split the dataset, it is time now to train your model based on the training set of the dataset. You simply run the selected model on the training set so that you have a proper prediction model that can be run vs the testing set and eventually and data in the future.
6- Model evaluation this is the time you evaluate all what you have done in previous steps and decide if the selected model and data split ratio are good enough for your ML problem you something needs to be optimised or changed to best match your data.
Back to Azure Machine learning and how to achieve these steps in the portal.
Before going into more details on how to achieve previous steps, you need to have an active Machine Learning workspace on Azure.
Preparing Azure Machine Learning workspace
If you don’t have a Microsoft Azure subscription, please create one on https://azure.microsoft.com/. For new accounts you have $200 free credit for first month and there are also tons of free and great offerings in addition to consumption plans and pay as you go payment options (Please look at the documentations to have a good overview of available options with Azure).
After creating a new account in Microsoft Azure or if you already have one, you should be able to create Machine Learning Workspace.
1- Create a new resource
2- Select Machine Learning from market place and create a new one, enter a name, select or create a resource group and select Enterprise as the Workspace edition. Following animated image show the how to create a machine learning workspace
Creating Machine Learning models in Azure Machine Learning
1- Sign in to ml.azure.com using same account you use in Microsoft Azure and select the workspace you have just created.
2- From design page select Easy-to-use prebuilt modules

3- Click the settings icon to select the compute. If you are using this workspace for the first time, you have to create new compute target. Otherwise, you could either select an existing compute target or create one.
From now on you will follow the six steps mentioned at the beginning (Dataset import, Data preparation, Model selection, Data Split, Model training and Model evaluation).
1- Dataset Import
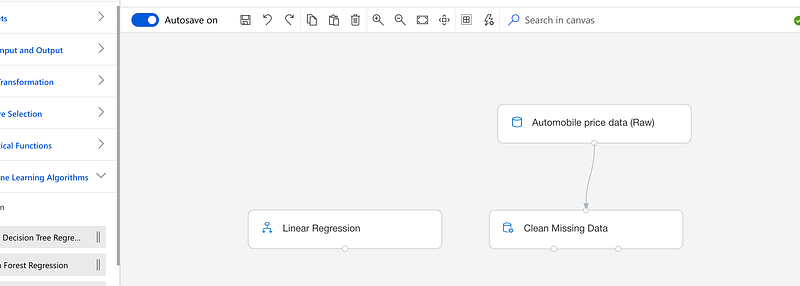
As a POC we will use one of the example datasets in Azure Machine Learning. The example dataset in our case is Automobile Price Data. From datasets select the required dataset and drag it to the designer view.
2- Data preparation
Practically in this step we need to view the dataset and assess which columns are with no real value and assess how many records are empty. Let’s visualise the data and have a look at it to determine what is required to prepare for the final model. From Outputs tab in the right panel click on the graph icon to view the dataset.
It is clear that “normalized-losses” column has many missing entries, so that you are going to exclude this column totally from the dataset and exclude the rows that have any missing fields in other columns.
To achieve this step, you should drag Clean Missing Data module from Data Transformation Panel.
You could use Clean Missing Data in any pipeline for handling empty columns and rows in your dataset. In our case, you should click on the Clean missing data step in from right panel select edit columns. Then select include all columns and exclude “normalized-losses” column. Look at the following animated image for clear steps.

To remove all rows with empty fields select “Remove entire row” from cleaning mode.
3- Model Selection
In most cases, you have to visualise and asses the dataset to select the proper model. In our case we already know that it is a linear regression problem, so that you should select the Linear Regression model from the Model Learning Algorithms menu.
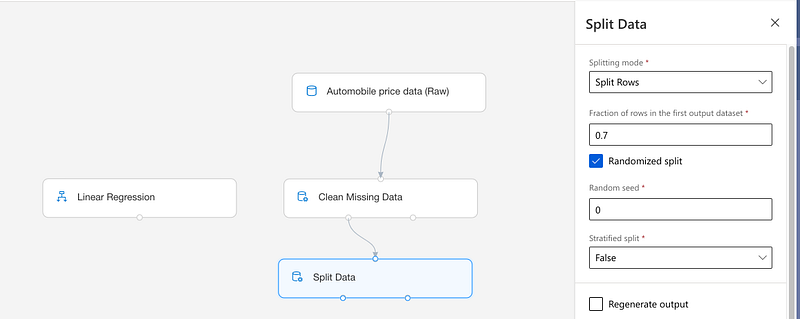
4- Data split
For data splitting you should use the Split data module from data transformation menu. Enter 0.7 in the Fraction of rows in the first output dataset input from properties panel.
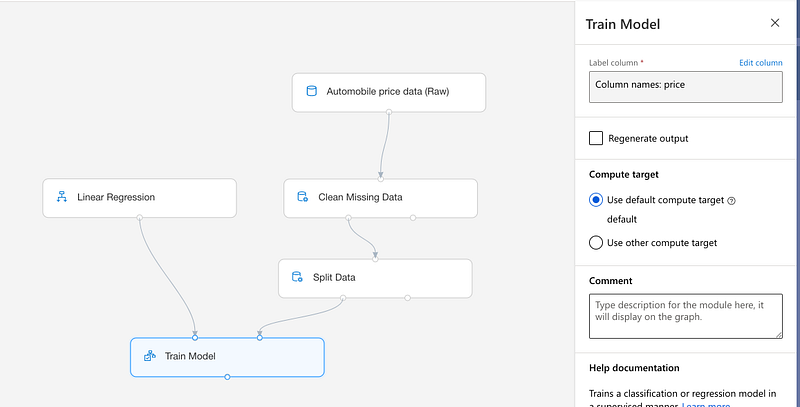
5- Model Training
To train your model, drag the Train Model from Model Training menu and connect it to Linear Regression and first output of Split data (this is the 0.7 part of you data). Our target here is to predict the price of an automobile based on different properties of it. So, the column we use to train our model in evaluating is the price of the car. From properties panel of the train model click edit columns and enter price as the name of the column.
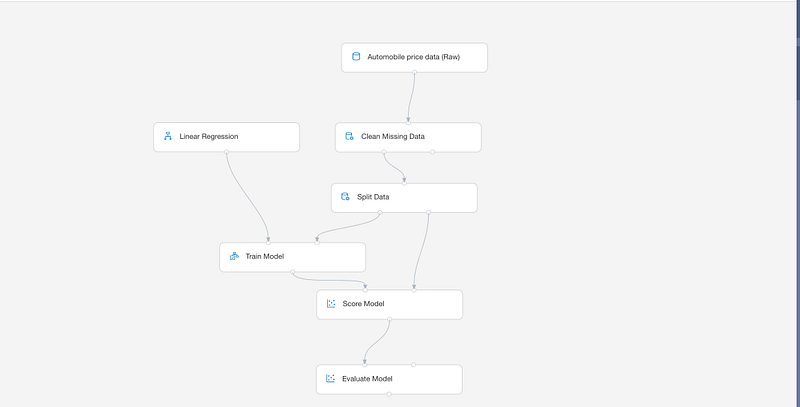
6- Model evaluation
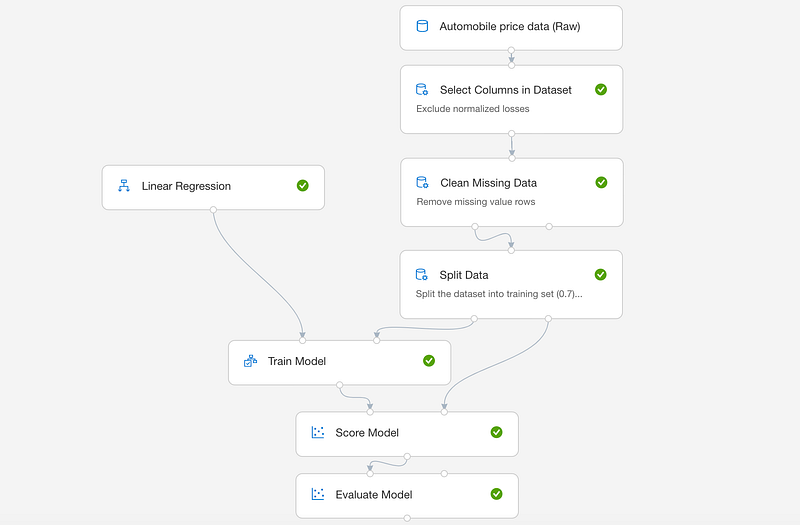
The model evaluation step consists of two parts. First part is Score Model and this part takes the output from Train Model and compare it to the 0.3 ratio of the Split Data output. The second part is the evaluate model and this is the last step in our pipeline and it responsible of evaluating the overall performance of our regression model. Select both Score Model and Evaluate Model from Model Scoring and Evaluation menu and add them to your model in sequence as per the following image and submit.
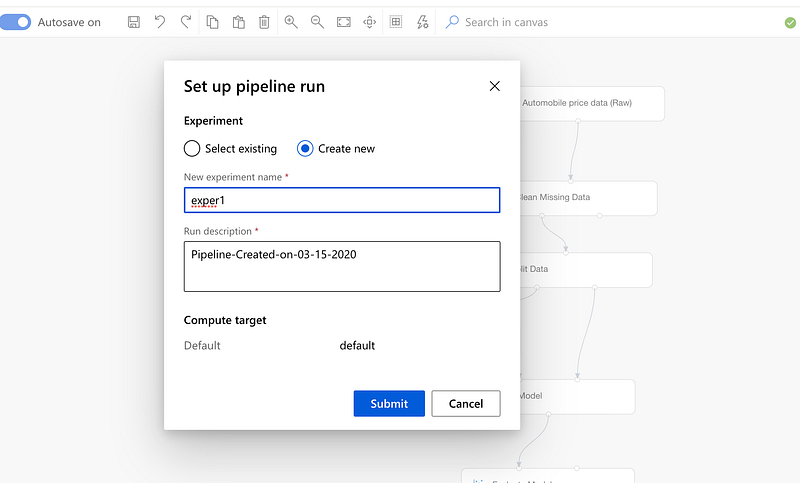
Create a new experiment for your pipeline in the displayed dialog and submit.
The pipeline should take several minutes to run your training model and generate a report with its performance. After you pipeline finishes it run you should see green ticks on the steps. To see the output of the model evaluation click on Evaluate Model and visualise the output as per the following animate image.
The evaluation of your model show four numbers that represent the overall performance of your model. The four performance evaluation factors of your model are:
Mean Absolute Error, Root Mean Squared Error, Relative Squared Error and Relative Absolute Error
Thank you for reading the regression model in Azure Machine Learning and waiting for your responses.