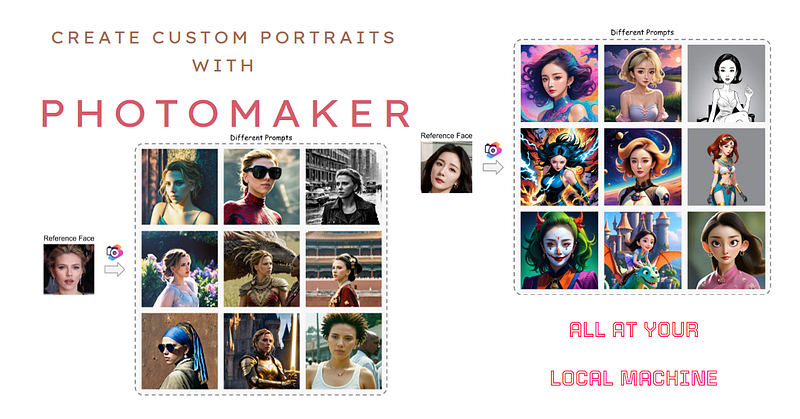
“PhotoMaker” : Tool that Brings AI-Powered Personalization at your local machine with 16GB GPU!
Forget expensive software or online tools! PhotoMaker, with its stacked embedding technique, Craft highly detailed and customized portraits on your own computer.
Introduction
Recent advances in generative models have led to remarkable progress in synthesizing realistic human photos conditioned on text descriptions. However, existing personalized generation methods cannot simultaneously satisfy high efficiency, identity fidelity, and flexible text controllability.
To address these limitations, researchers from Nankai University, Tencent PCG, and The University of Tokyo introduced PhotoMaker — an efficient personalized text-to-image generation method that encodes input ID images into a stacked ID embedding to preserve identity information.
This article provides an in-depth look at how PhotoMaker works and details key innovations like the stacked ID embedding, merging cross-attention mechanism, automated dataset construction pipeline and its applications.
The Stacked ID Embedding
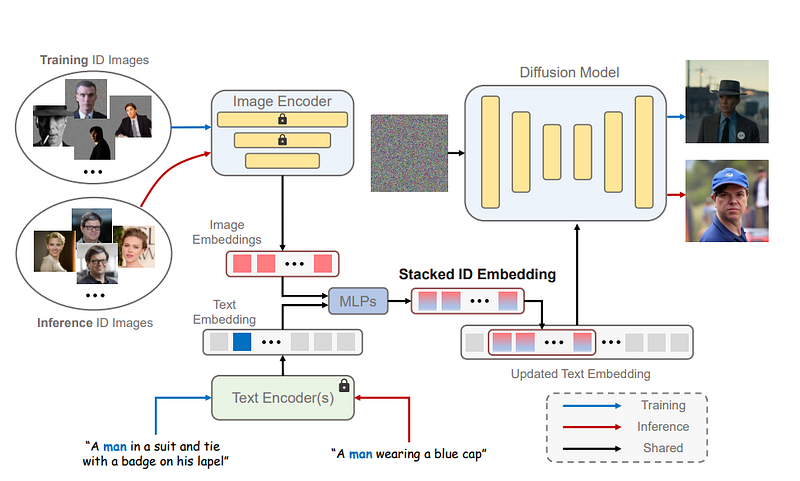
The core innovation of PhotoMaker is the stacked ID embedding which serves as a unified representation encapsulating visual information from multiple input ID images. This allows comprehensive preservation of identity characteristics necessary for generating customized portraits.
The pipeline starts by encoding input images using a CLIP ViT-L/14 image encoder to obtain embeddings which are projected to match text embedding dimensions. The class embedding (man/woman) is then fused with each image embedding using MLPs. The resulting fused embeddings {eˆ1, …, eˆN} represent semantic identity information.

These are concatenated along the length dimension into a single stacked ID embedding s* ∈ RNxD where N is the variable number of input images and D is the projected dimension.
Crucially, at inference the stacked embedding can be constructed from different ID images enabling identity mixing applications. The sub-parts maintain correspondence to each input image.
Merging Cross-Attention Mechanism
The key advantage of diffusion models is the cross-attention layers which can naturally integrate signals from text and image. PhotoMaker exploits this to merge identity information from the stacked embedding.
First, the class word is replaced with s* in the text embedding to get an updated embedding t* containing both text and ID semantics. The cross-attention is formulated as:
Attention(Q, K, V) = softmax(QKT/√d) · V
Where Q,K and V projections of the text embedding attend to the latent image representation to direct generation.
Additional LoRA training on attention matrices helps better perceive ID characteristics. The model itself learns to integrate signals based on relevance which outperforms other composition approaches.
Automated Dataset Construction
Generating the stacked ID embedding necessitates simultaneous multi-image input of consistent identities during training. However, existing human datasets do not provide fine-grained identity annotation.
Encoders
- Uses CLIP ViT-L/14 model to encode input ID images into embeddings
- Image encoder layers are fine-tuned to focus on human identity features
- Projection layers align dimensions to text embedding space
Stacking
- Text embedding class word (man/woman) fused with each image embedding
- Fused embeddings concatenated along length dimension into single stacked tensor
- Allows variable number of input ID images to compose rich identity representation
Merging
- Cross-attention in diffusion model exploits stacked embedding for generation
- Text embedding class word replaced with stacked ID embedding
- Attention learns to selectively integrate identity features from input images
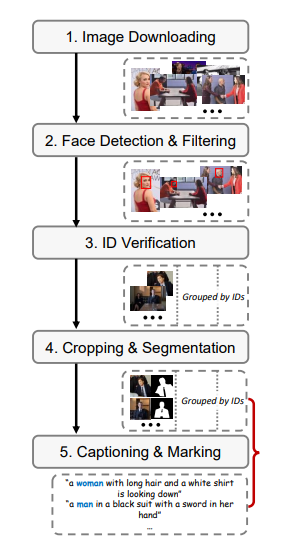
Automated Dataset Pipeline Construct training data with fine-grained identity labels:
Image Downloading
- Web crawl celebrity names from face datasets to retrieve images
Face Detection and Filtering
- Use RetinaNet model to detect face regions
- Filter low quality or irrelevant non-face images
Identity Verification
- Employ ArcFace model to extract embeddings
- Verify consistent ID between images based on similarity
Cropping and Segmentation
- Crop main focus region and person segment using Mask2Former
Captioning and Marking
- Generate captions with BLIP model
- Mark corresponding class words for identities
Applications
PhotoMaker empowers intuitive control over identity in generated images leading to creative applications:
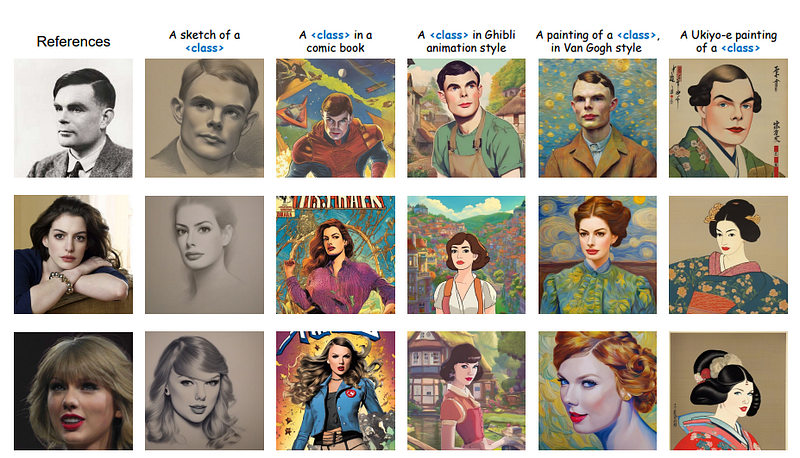
Attribute Editing: Properties like hair color, age and accessories can be specified in the text prompt. The model modifies input characteristics accordingly while preserving recognition.
Artwork to Reality: Paintings or vintage photos of people can be transformed to realistic modern day counterparts in various contexts.
Identity Mixing: Pooling multiple IDs, including fictional characters, merges their visual features into a hybrid human.
Stylization: Artistic renditions like Ukiyo-e portraits can be produced by providing a style example while maintaining identity.
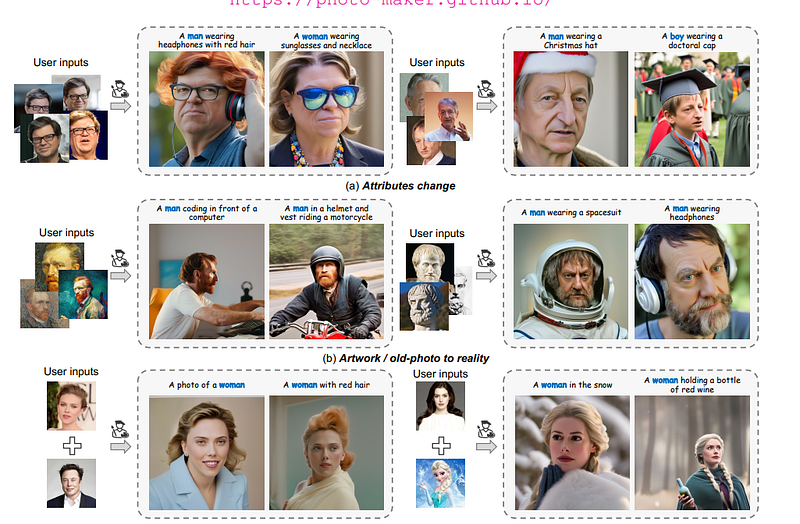
The flexibility stems from the stack embedding’s ability to fuse aspects from separate inputs. This releases more possibilities compared to single image conditional methods.
Detailed Model Architecture
Now we take a brief look at the complete architecture and training process of PhotoMaker:
Note: I am just giving Idea here in short bullet points, for detal please check research paper
Base Model
- Stable Diffusion v1–4 XL is used as the backbone generator
- Chosen for state-of-the-art text-to-image capabilities
- Strong results for high-resolution photorealistic human images
- UNet architecture with dual attention mechanism
- 48 Transformer layers with dimension d=2016
- Trained on LAION-400M diverse image-text pairs
Encoders
- Image Encoder: CLIP ViT-L/14
- 14 Transformer layers forming visual backbone
- Patch size of 32x32 pixels, hidden size d=1024
- Pre-trained on 400M image-text pairs
- Fine-tune top 4 layers during PhotoMaker training
- Projection head added to match text embedding dimensions
- Text Encoder: Dual from Stable Diffusion
- RNN-based 5 layer encoder with d=1536
- Transformer-based 12 layer encoder with d=1024
- Both pre-trained from scratch on LAION-400M
Losses
- Adversarial Loss, Masked Diffusion Loss
- Discriminator updates on real vs. generated images
- Optimizes general image quality and coherence
- Compares early noised latents in masked identity regions
- Ensures faithfulness of personalization, Classifier-Free Guidance and Adds lightweight decoder guidance
- Improves text-image semantic consistency
Optimization Scheme
- PhotoMaker components trained from scratch
- Stable Diffusion backbone frozen for efficiency
- Adam optimizer with learning rates 1e-4 and 1e-5
- 48 batch size for 8 days on 8 A100 40GB GPUs
- FP16 mixed precision for faster throughput
The composed model strikes a balance between leveraging state-of-the-art pretrained networks and introducing customizations
The resulting model strikes an optimal balance between quality, editability and inference speed by exploiting state-of-the-art methods as building blocks within an innovative framework tailored for human image generation.
At inference, only a forward pass is required to encode input images. This allows realistic identity-consistent editing in around 10 seconds on a V100 GPU rather than hours of fine-tuning.
Evaluation
PhotoMaker was rigorously evaluated on held-out test identities and prompts against comparisons like DreamBooth and FastCompose:
- Achieves best identity preservation with +11 DINO points vs FastCompose
- High prompt relevance only -2 CLIP-T points below DreamBooth
- Generates more diverse facial expressions than all methods
- Matches overall image quality with state-of-the-art FID
- Roughly 100x faster inference than DreamBooth

The results validate effectiveness at balancing fidelity, flexibility and speed. Ablations also confirm the benefits of critical proposal components.
🔧 Dependencies and Installation
- Python >= 3.8 (Recommend to use Anaconda or Miniconda)
- PyTorch >= 2.0.0
pip install -r requirements.txt⏬ Download Models
The model will be automatically downloaded through following two lines:
from huggingface_hub import hf_hub_download
photomaker_path = hf_hub_download(repo_id="TencentARC/PhotoMaker", filename="photomaker-v1.bin", repo_type="model")
You can also choose to download manually from this url.
💻 How to Test
Realistic generation
import torch
import os
from diffusers.utils import load_image
from diffusers import EulerDiscreteScheduler
from photomaker.pipeline import PhotoMakerStableDiffusionXLPipeline
## I downloaded the model locally in my colab notebook
## gloal variable and function
def image_grid(imgs, rows, cols, size_after_resize):
assert len(imgs) == rows*cols
w, h = size_after_resize, size_after_resize
grid = Image.new('RGB', size=(cols*w, rows*h))
grid_w, grid_h = grid.size
for i, img in enumerate(imgs):
img = img.resize((w,h))
grid.paste(img, box=(i%cols*w, i//cols*h))
return grid
base_model_path = 'SG161222/RealVisXL_V3.0'
photomaker_path = 'release_model/photomaker-v1.bin'
device = "cuda"
save_path = "./outputs"
# Load base model
pipe = PhotoMakerStableDiffusionXLPipeline.from_pretrained(
base_model_path,
torch_dtype=torch.bfloat16,
use_safetensors=True,
variant="fp16",
# local_files_only=True,
).to(device)
# Load PhotoMaker checkpoint
pipe.load_photomaker_adapter(
os.path.dirname(photomaker_path),
subfolder="",
weight_name=os.path.basename(photomaker_path),
trigger_word="img"
)
pipe.scheduler = EulerDiscreteScheduler.from_config(pipe.scheduler.config)
pipe.fuse_lora()# define and show the input ID images
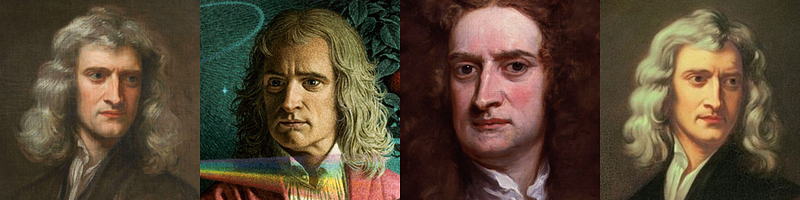
input_folder_name = './examples/newton_man'
image_basename_list = os.listdir(input_folder_name)
image_path_list = sorted([os.path.join(input_folder_name, basename) for basename in image_basename_list])
input_id_images = []
for image_path in image_path_list:
input_id_images.append(load_image(image_path))
input_grid = image_grid(input_id_images, 1, 4, size_after_resize=224)
print("Input ID images:")
input_grid
# Note that the trigger word `img` must follow the class word for personalization
prompt = "sci-fi, closeup portrait photo of a man img wearing the sunglasses in Iron man suit, face, slim body, high quality, film grain"
negative_prompt = "(asymmetry, worst quality, low quality, illustration, 3d, 2d, painting, cartoons, sketch), open mouth"
generator = torch.Generator(device=device).manual_seed(42)

## Parameter setting
num_steps = 50
style_strength_ratio = 20
start_merge_step = int(float(style_strength_ratio) / 100 * num_steps)
if start_merge_step > 30:
    start_merge_step = 30

images = pipe(
    prompt=prompt,
    input_id_images=input_id_images,
    negative_prompt=negative_prompt,
    num_images_per_prompt=4,
    num_inference_steps=num_steps,
    start_merge_step=start_merge_step,
    generator=generator,
).images
# Show and save the results
## Downsample for visualization
grid = image_grid(images, 1, 4, size_after_resize=512)
os.makedirs(save_path, exist_ok=True)
for idx, image in enumerate(images):
image.save(os.path.join(save_path, f"photomaker_{idx:02d}.png"))
print("Results:")
grid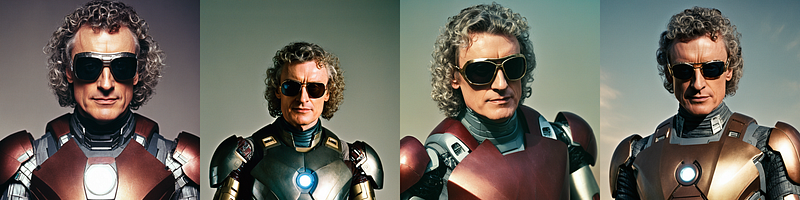
For more examples, you can check here
Stylization generation
Note: only change the base model and add the LoRA modules for better stylization
import torch
import numpy as np
import random
import os
from PIL import Image

from diffusers.utils import load_image
from diffusers import DDIMScheduler
from huggingface_hub import hf_hub_download

from photomaker.pipeline import PhotoMakerStableDiffusionXLPipeline
# gloal variable and function
def image_grid(imgs, rows, cols, size_after_resize):
    assert len(imgs) == rows*cols

    w, h = size_after_resize, size_after_resize

    grid = Image.new('RGB', size=(cols*w, rows*h))
    grid_w, grid_h = grid.size

    for i, img in enumerate(imgs):
        img = img.resize((w,h))
        grid.paste(img, box=(i%cols*w, i//cols*h))
    return grid

base_model_path = './civitai_models/sdxlUnstableDiffusers_v11.safetensors'
photomaker_path = './release_model/photomaker-v1.bin'
lora_path = './civitai_models/xl_more_art-full.safetensors'
#here is lora path rest code is same actually

device = "cuda"
save_path = "./outputs"
# Load base model
pipe = PhotoMakerStableDiffusionXLPipeline.from_single_file(
    base_model_path,
    torch_dtype=torch.bfloat16,
    original_config_file=None,
).to(device)

# Load PhotoMaker checkpoint
pipe.load_photomaker_adapter(
    os.path.dirname(photomaker_path),
    subfolder="",
    weight_name=os.path.basename(photomaker_path),
    trigger_word="img"
)

pipe.scheduler = DDIMScheduler.from_config(pipe.scheduler.config)
print("Loading lora...")
pipe.load_lora_weights(os.path.dirname(lora_path), weight_name=os.path.basename(lora_path), adapter_name="xl_more_art-full")
pipe.set_adapters(["photomaker", "xl_more_art-full"], adapter_weights=[1.0, 0.5])
pipe.fuse_lora()
# define and show the input ID images
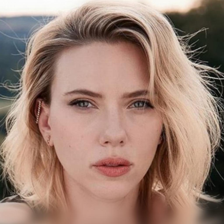
image_path = './examples/scarletthead_woman/scarlett_0.jpg'
input_id_images = []
input_id_images.append(load_image(image_path))
input_grid = image_grid(input_id_images, 1, 1, size_after_resize=224)
print("Input ID images:")
input_grid
## Note that the trigger word `img` must follow the class word for personalization
prompt = "A girl img riding dragon over a whimsical castle, 3d CGI, art by Pixar, half-body, screenshot from animation"
negative_prompt = "realistic, photo-realistic, bad quality, bad anatomy, worst quality, low quality, lowres, extra fingers, blur, blurry, ugly, wrong proportions, watermark, image artifacts, bad eyes, bad hands, bad arms"
generator = torch.Generator(device=device).manual_seed(42)

## Parameter setting
num_steps = 50
style_strength_ratio = 20
start_merge_step = int(float(style_strength_ratio) / 100 * num_steps)
if start_merge_step > 30:
    start_merge_step = 30

images = pipe(
    prompt=prompt,
    input_id_images=input_id_images,
    negative_prompt=negative_prompt,
    num_images_per_prompt=4,
    num_inference_steps=num_steps,
    start_merge_step=start_merge_step,
    generator=generator,
).images
# Show and save the results
## Downsample for visualization
grid = image_grid(images, 1, 4, size_after_resize=512)
os.makedirs(save_path, exist_ok=True)
for idx, image in enumerate(images):
image.save(os.path.join(save_path, f"photomaker_style_{idx:02d}.png"))
print("Results:")
grid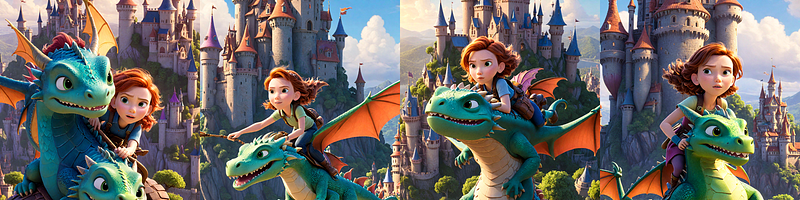
Resources Required:
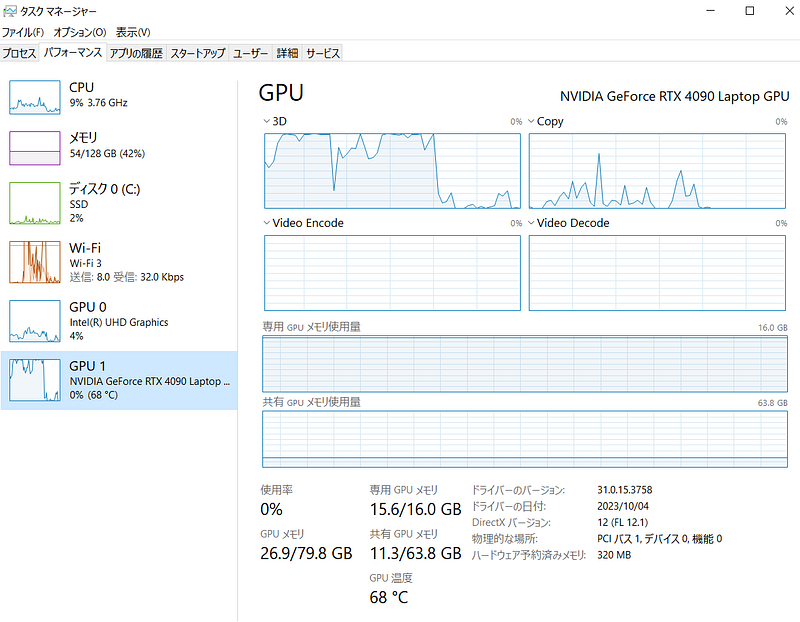
As you can see above with RTX 4090 i was able to run it on local PC
Conclusion
PhotoMaker introduces an elegant technique to distill visual identity cues through the stacked embedding for diffusion model text conditioning. This uniqueness enables practical applications within an efficiently trainable framework.
Ongoing innovations in conditioned image synthesis hold exciting potential. Embedding identity semantics is a promising direction to pursue, as PhotoMaker has demonstrated by producing creative, recognizable and customizable human portraits through intuitive text prompts.