
Getting Started
OpenCV: Complete Beginners Guide To Master Basics Of Computer Vision With Codes!
A tutorial Guide with codes to master all the important concepts of computer vision and how to implement them using OpenCV

Computer Vision is perhaps the most intriguing and fascinating concept in artificial intelligence. Computer Vision is an interdisciplinary field that deals with how computers or any software can learn a high-level understanding of the visualizations in the surroundings. After obtaining this conceptual perspective, it can be useful to automate tasks or perform the desired action.
The tasks that are obvious to the human brain are not so intuitive to the computers as they need to be trained specifically on these jobs to produce effective results. This process involves complicated steps like acquiring the data from the real world, processing the acquired data in a suitable format, analyzing the processed images, and finally teaching and training the model to perform the complex task with very high accuracy.
To understand computer vision more intuitively, let us consider an example. Assume you have to teach a computer to differentiate between the various colors. Consider, you have three objects with the following colors, namely red, blue, and green, and you want to differentiate these colors accordingly. This job is an extremely simple task for the human brain to perform, but it is quite a complicated task for the computer to perform.
The task mentioned above is one of the most basic actions that can be performed by using computer vision. We will learn about how images in the digital world work and also try to understand the image and how these stacked layers exactly work. . We will also learn in-depth about the basics of the open-cv module. Finally, we will also be implementing some hands on basic level projects with this library. So, without further ado let us dive into understanding all the aspects required for mastering the basic computer vision skills.
Dealing With Images:
The composition of these three colors, namely red, green, and blue can be used to compose almost any other color. Mixing them in the right proportion allows us to frame any other desired color. This concept has existed since the cathode ray televisions a few decades ago. So how does this exactly work?
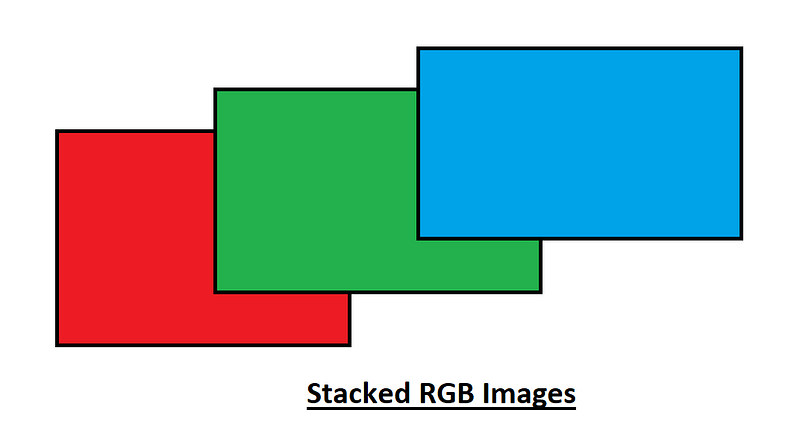
Each of these colors has an 8 bit integer value. This means a matrix of these could range from 0 to 255. The reasoning for this is because 2⁸ is 256 and 0–255 consist of 256 values. Each of these colors will have a value of this range and since we have a 3-Dimensional image, we can stack each of these upon each other. This might be a slightly more complex example, so let us switch over to the grayscale images which only consists of black and white and that would be easier to understand. Below is the grayscale representation.

This grayscale representation shown above should be a good starting point to understand the concept of how images work in computer vision better. The below figure shows how the level change starts to happen as we move from the 0th mark to the 255th mark. After 256 levels of changing we go from a completely black shade to a fully white shade.
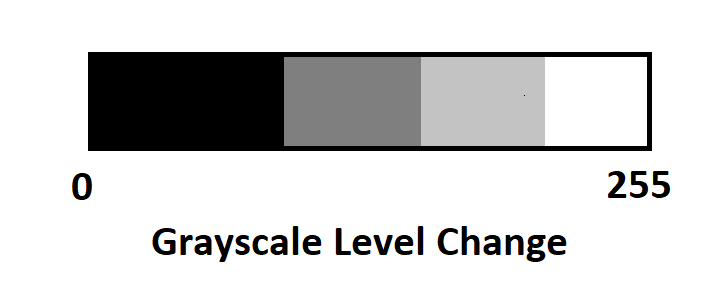
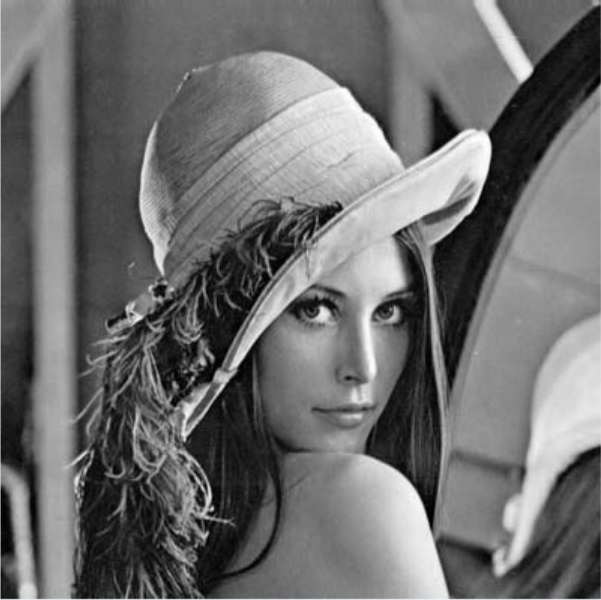
This is just one color. The grayscale image at 0 has the value of black and at 255 has the value of white. Using just the grayscale image pattern which has the number of channels = 1, we are able to achieve complex images like the image shown below.
.png)
With even just one channel, we are able to achieve such a cool picture. Now imagine you had three colors which are red, green, and blue, and you stack them one upon the other you would be able to get a perfect picture of the desired RGB colors. Let us look at the image we are able to get with three channels and notice the significant increase in patterns of the colors.
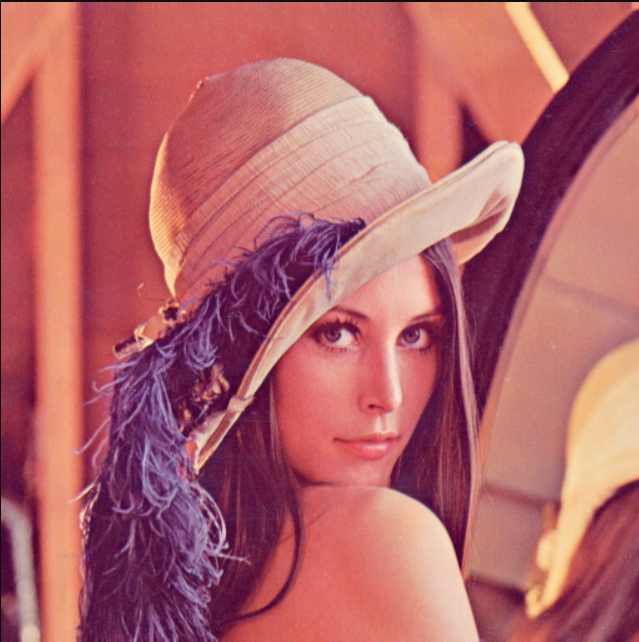
The above image is when all the three channels are stacked together. Note that you have a red, a green, and a blue image of the picture above, and all of them are placed in a 3-Dimensional matrix which gives us the required image above as desired. I hope this explanation gives you a brief idea of how to tackle images in computer vision. With this brief understanding of how images work you can understand the next few models that we encounter accordingly. Now, let us dive into the open cv module available in python to perform some computer vision tasks.
Working with OpenCV and Computer Vision
Now that we have a brief understanding of how images work, we can proceed further to learn about the openCV library, and how to utilize this module to perform computer vision tasks. OpenCV module is by far the best module for the execution of complex machine learning, deep learning, and computer vision tasks. It offers simplicity and high standards for the analysis and performance of the models being built. It is an open-source library and can be integrated with other python modules such as NumPy to accomplish complicated real-time applications. It is supported for a wide range of programming languages and runs remarkably on most platforms such as Windows, Linux, and MacOS.
The installation process for opencv module is quite simple. I have mentioned both the ways to install openCV for python as well as build the module in an anaconda virtual environment. Feel free to choose whichever method suits you the best.
Installation:
The straightforward installation process of openCV can be done by using the following command in the command prompt.
pip install opencv-pythonIf you are using the anaconda environment, then you also choose to use the below installation process to build the library opencv module in your virtual environment. Type the command below in the anaconda command terminal.
conda install -c conda-forge/label/cf202003 opencvOnce we are done with the installation procedure, we can focus on some coding. Today, we will mainly look at the three basic aspects of computer vision i.e., as follows:
- Reading, writing, and viewing an image.
- Drawing with openCV
- Accessing the Webcam
So, without further ado, let us get started with these three basic concepts.
1. Reading, Writing, and Viewing an Image:
We will be performing these three tasks consecutively. The reading, displaying, and writing of images is an essential part of computer vision as you have to consistently deal with images. The best part about opencv apart from the previously mentioned advantages is that it grants you access to a variety of image formats as well. So, we can work on all these image formats without facing any major issues. I will be making use of the lena.png image format for the rest of this section.
You can feel free to download the same image and follow along. Download the image and place it in the same folder or directory as your python file. This will help us to directly access the image without the requirement of continuously mentioning the path to view each of the respective images. Once you have placed the images in the same location as your python file, we can start accessing them and working on the various functionalities provided by the opencv module. Let us start with importing and reading the images accordingly.
- Reading and Displaying the image:
The most paramount thing in any computer vision task is obviously to know how to read an image and display it appropriately.
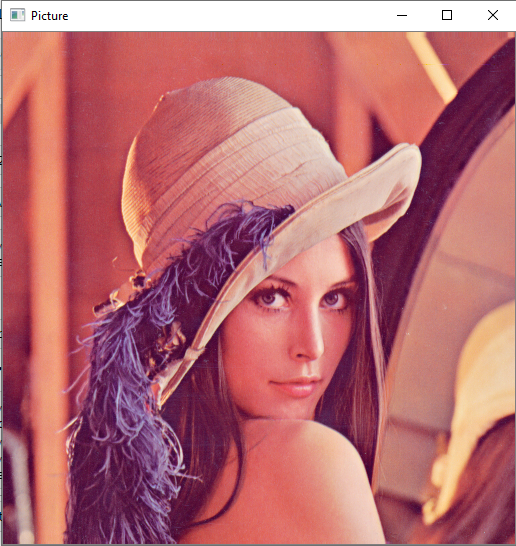
The first step here is to import the cv2 module. This is how you can check if your installation is successful. Once you have imported the cv2 module run the above program with the respective lines of code to read the image. The cv2.imread performs a similar task of the pillow module where you can use open() to read the image of your choice. Once you have read the image, you need some way to display the following image. There are mainly two ways of achieving this task.
The first method is to use the cv2.imshow() command as shown in the above code block. It is essential to give the waitKey() command to ensure that the cv2 window which opens upon passing the cv2.imshow() command stays intact. The number inside the waitKey() is a representation of the time for the image to be displayed. The time period used is in milliseconds. The second method to deal with the analysis of the image shown above is to make use of the matplotlib library module. Using the pyplot function in the matplotlib library module, we can use the plt.imshow() function to directly display the image within the jupyter notebook without having to show the cv2 graphical window that appears when we use cv2.imshow(). You have to however make sure to convert it to an RGB image because cv2 for some reason utilizes the BGR format. I will be exploring this concept too in the further topics in the same section.
Let us analyze the main characteristics of the image we are working with by using the image.shape attribute. Using this we can figure out all the dimensions and the number of channels in which the image is being displayed. The following are the features of our lena.png image stored in your directory —
Height of the Image = 512Width of the Image = 512Number of channels = 3The height and width of the image are of the dimensions of 512 pixels. The number of channels of the above image are obviously three because we are working with mainly three colors, i.e., red, blue, and green. With our image and dimensions how analyzed, we can proceed to the next topic in this section that deals with the writing of the images.
- Writing the image:
In this section, we will look at how we can write the images, and save it to our desktop. The example I will be showing will be simple and I will be rewriting the same image as we read. You can however feel free to draw your own images and write them with the file format and save them appropriately. The below code line shown is an accurate representation of how you can write the image to your desktop and save it.
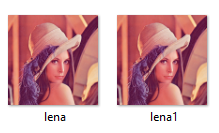
The above images are taken from my respective folder / directory, where you can see there are two images. One is the original Lena image and other is the image we wrote, that is the lena1 image. You can also specify the path you want to write and save the image too. Now, that we have an idea of how to perform the basic operations of reading the image, displaying the image, and writing and saving the image, we can move forward to the next topic where we will learn how to manipulate these images.
- Resizing the image:
Now that we have a brief understanding of the basic operations related to computer vision, let us proceed to understand the ways we can manipulate an image. This is extremely useful and important for specific tasks that need to be performed effectively. The resize function helps us to rescale the image into a different dimension. We can choose to make it bigger or smaller and this is completely up to the user and also highly dependent on the task that is being performed. Below is the code block representing the resizing of the image. I have halved the dimensions of the original image to receive a new image which half as big as the original image.
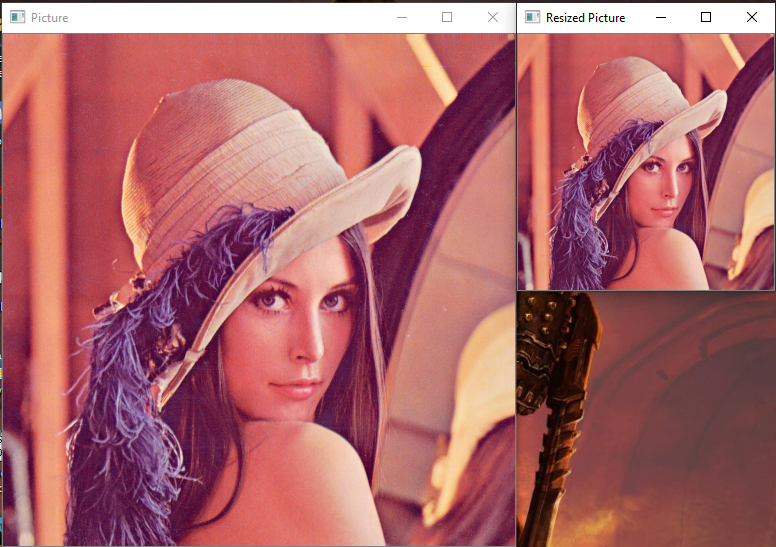
The above images are a representation of how we can successfully manipulate the image we have and rescale them to a bigger or smaller dimensionality. This is useful in a variety of applications where you need an image of a particular dimension to perform a task more effectively. An example of this can be the transfer learning deep neural networks model we build.
- Converting into grayscale image:
The next way to maneuver to handle the functionality of images is converting them into a grayscale image. This is sometimes an extremely important step as it is useful to reduce the load on the model that is being trained. Working on grayscale images is comparatively less complex than working with RGB images. The computational strength can be increased for models which do not have effective resources for the processing and computing of RGB images. The step to convert the RGB image convention to the grayscale image convention is just as referenced in the below code block. The cv module has an in-built system for the effective computation of these color images to grayscale images effectively.
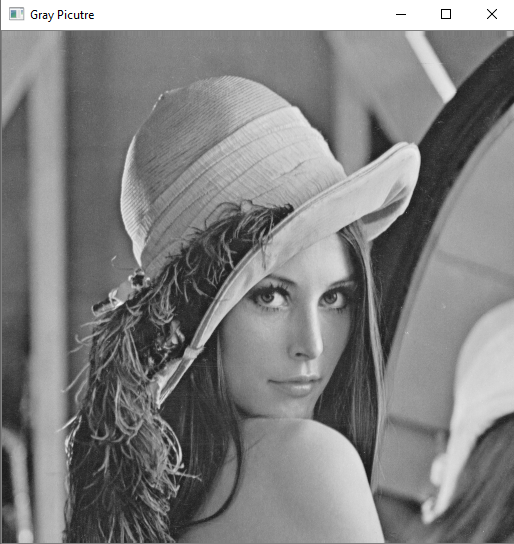
OpenCV uses a BGR instead of the standard RGB convention, so don’t be too confused about this particular notion used while converting the RGB image to a grayscale image. This was also referenced in the earlier section. When you are trying to implement the matplotlib library on the opencv read image, there is a chance that you read it as a BGR image formatting instead of RGB. This issue can be solved by using the simple convert color operation that is provided by the computer vision module.
- Blurring the image:
The final task we will be looking at in this particular section is the blurring of the images. The main reason for blurring the image is to remove the external noise that impacts the performance of the actual image and help in the smoothing process of the images. This is like using a kernel based filtering technique implemented to tackle the unevenness and the overall noise distribution in the image. The low intensity edges are also removed which is extremely useful for the better processing, and improving the overall quality of the images. It can also be used to hide the data for security purposes or privacy issues. The below code block can be used to activate the blur operation by using the opencv module. The blur operation similar to the grayscale and rescaling operations are extensively used in dealing with the various computer vision tasks.
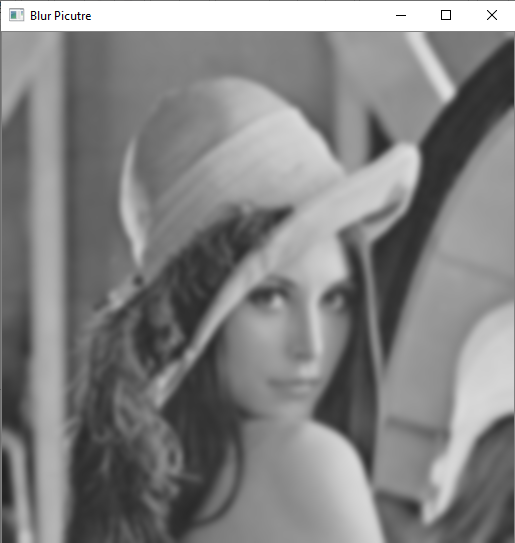
The Gaussian Blur is a widely used effect in graphics software, typically to reduce image noise and reduce detail. It is also used as a preprocessing stage before applying on the machine learning or deep learning models. The (19,19) is the kernel size I have used to get a more blur image on the existing picture. Make sure to only use an odd number of kernels, and not an even sized one. You can change and edit the kernel size of (19,19) to one that suits your purpose more appropriately.
This completes the first section of dealing with images. The next step is to look at how we can draw using the opencv module. This concept is the next significant topic to master computer vision. Let us proceed to next section and learn how to draw some important diagrams.
2. Drawing with OpenCV:
This next is going to some pretty obvious drawing methods which can be used and implemented using the opencv module. Hence we will looking at each of these more quickly and understanding them intuitively. Let us start of with drawing a simple line using this library.
- Drawing a line:
The below code block is the method used to draw a simple line in the cv2 graphical window. The first command is to make sure the entire image that is being displayed is of black color for a better visualization. You can choose to use the traditional white background approach if it suits you better. We are then defining a line to be drawn as follows:
- The image where the line should be drawn.
- The starting point with both the x and y coordinates.
- The ending point with both the x and y coordinates.
- In the next property, we are assigning the color to the line. Here, the format is BGR. By utilizing the method that I have used we can get a blue line.
- The last slot of attribute defines the thickness of the line.
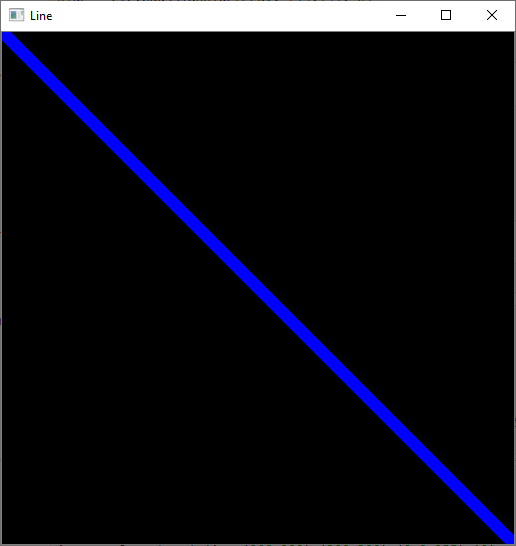
The above image is a representation of a line cutting diagonally through the entire graphical window. You can use your preferred starting and ending coordinates to visualize and display your lines.
- Drawing a rectangle:
The next operation which the opencv module allows us to perform is the drawing of the rectangle. This can be effectively done by using the below code block. I won’t be explaining too much for this because it is very similar to the previously mentioned drawing of line. Here, also you define a start and end point, and if the defined points are satisfactory for a rectangle to be drawn, then the operation will be successfully performed.
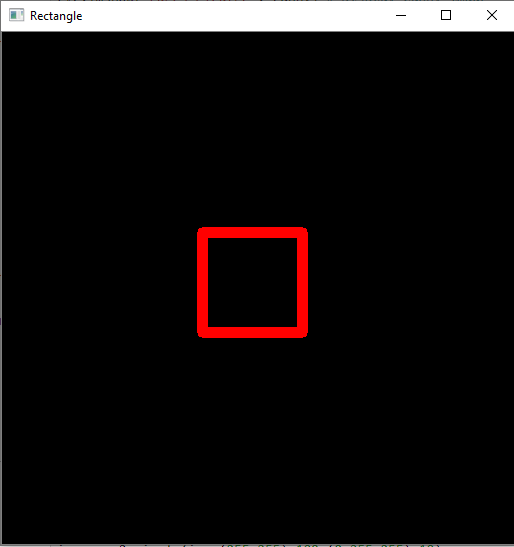
The above image is of a rectangle drawn in the center of the graphical window. You can render your images in any direction and dimension as well as change the color.
- Drawing a circle:
The opencv library also allows us to draw a circle in a similar fashion to that of the line and the rectangle. However, there is one key difference when it comes to drawing a circle. You need to give a central location point and give the x and y centered coordinate point. After this step, you can specify the radius of the circle. The radius of the circle will define how big the circle will be and you can adjust the color and thickness as well according to your preferences. The below code block shows and accurate representation of how to draw a circle with the help of the opencv module.
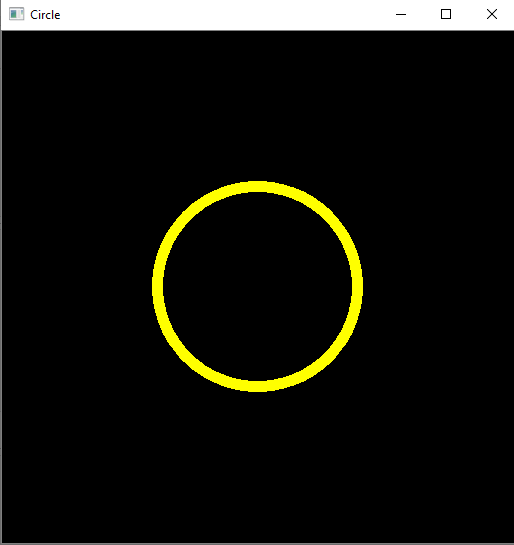
The image of a circle in yellow color drawn from the center. As usual, you can render your circle with your respective coordinates, color, and radius of variable thickness.
- Inserting the text:
We are done with most of the drawings but at some point it also becomes essential to add some text to the displayed images. Thankfully, opencv grants us access to the putText() command which can be used to add textual visualizations in the graphical window. The below code block is precise representation of how exactly you can perform this task. I have used the Hershey Simplex font in this code block but I would highly recommend you guys to check out the various font options available in opencv and choose one according to your preference. Choose the image and the text to be displayed with the right dimensions, the font, the scale of the font used, the color, the thickness, and an optional line type. I would also suggest the viewers to look deeper into the various line type options available.
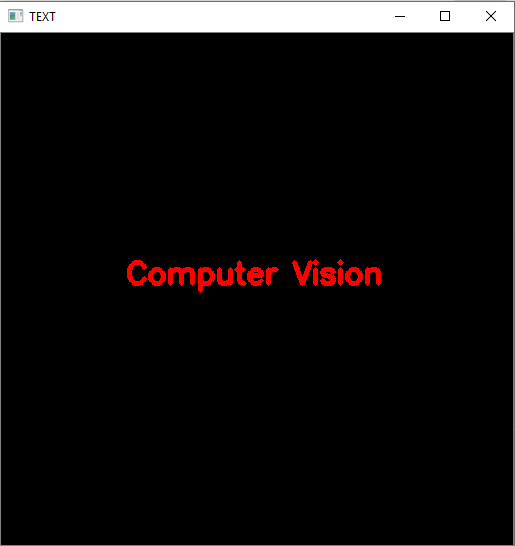
The images shows the text computer vision displayed at the center. I have chosen a red color for my text with a thickness of 3. Please feel free to try out the various options according to your preferences and explore more. Only with exploration and practice can you truly master computer vision and artificial intelligence.
- Drawing Polygons:
This is the final drawing operation we will be performing in this section before moving on to the next topic. The polylines function in the opencv module can be used to draw absolutely anything you wish. The main methodology of this function can be noted from the below code block. I am constructing a hexagon in the below image. I have mentioned an array of 6 points holding the respective positions of the hexagon that is being designed. Once the array is successfully designed and we have all the necessary points we are reshaping it into an array of polygonal curves. We are making sure that it is a closed polygonal image, and finally defining the color attribute to represent the polygon with its respective color.
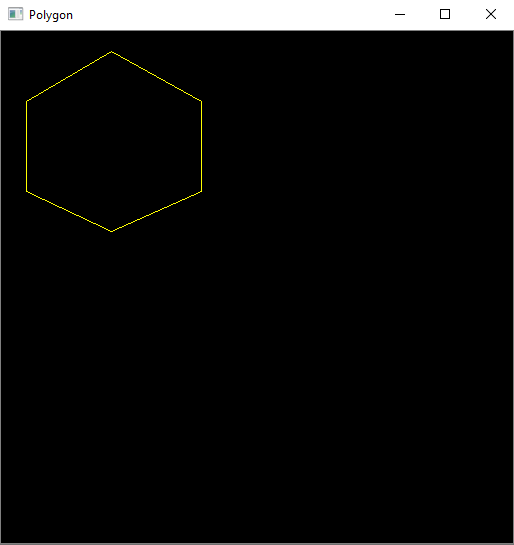
The above representation belongs to a hexagon. Needless to say, you can use this method to draw any other polygon sized images by using the polylines method. We can also draw triangles, squares, and rectangles, with this method. Just make sure you define the right number of co-ordinates and that they are all aligned in their right respective positions.
We have successfully completed all the basics of drawing involved in the computer vision module. Before we move on to the final topic I would like to reiterate that practicing and exploring is key to success in computer vision. With this basic knowledge of computer vision, you can try out the drawing function in opencv to design something really cool. If you interested in working on this project then please do send me screenshots of whatever you design. I would totally love to see what you guys have designed.
Let us move to the final topic under this section where we will cover all the intricate details on how to access the webcam which will be extremely useful for computing real-time and real-life scenarios. So, let us move on to the next section to understand this topic in further detail.
3. Accessing the Webcam:
We have reached the final part of this section that is to access your webcam for real-time as well as live image or video analysis. This access is useful for real-time object detection, face recognition, video surveillance, among many other applications. Opencv allows you to access external cameras, and provides you the option to choose which camera you want to choose as well. This same option can also be used to view the image in a similar manner as compared to the way we viewed the images. The procedure to access your webcam can be done in the following way:
Let us understand each line in the above code block in detail and in a conceptual manner. the cap variable is used capture and access the webcam. While the capture video by the webcam exists, we will proceed to read the respective video image by image in the external cv2 graphical window that will be displayed during this process. We are giving a waitKey command as specified in the earlier sections. If the button ‘q’ is pressed during this interval while the video is running, then the program immediately exits the graphical window and no other operations can be performed. The cap.release() command is used to release the webcam, and the destroy all windows command is used to exit and destroy the cv2 based graphical window.
If you want to play a saved video from your folder, then that can also be easily done. Instead of specifying the external webcam option to use, if you choose to specify the location of a video file to play in a similar manner to how we worked while dealing with images, you will be able to achieve a similar result. You can successfully play the video you desire. Just to make sure that we are all on the same page and you are not confused by the statements made in this paragraph, please follow the below code line in order to execute and play the video you select.
Video = cv2.VideoCapture(“your path”) # Read The VideoWith this we have come to an end of the basic concepts of dealing with computer vision problem statements, and how to effectively use the opencv module to successfully achieve the desired task. However, this is not the end though because we still need to know how this knowledge will help us to solve more complicated and complex computer tasks, and what exactly are these tasks that we need to perform. To have a more strategic understanding of this, let us look at the applications of computer vision in detail in the next section of this article.

Applications of Computer Vision
Apart from all the previously discussed content in this article, there are billions more project choices available to you. I will mention a few of these projects and the methodologies behind them, and you can try out these too if you feel comfortable. At the end of this section, I will also provide you guys with a helpful link to help you, and guide you through five computer vision projects. Let us dive into the applications of computer vision.
- Face detection and face recognition projects are some of the most popular computer vision projects. Face recognition is the procedural recognition of a human face along with the authorized name of the user. Face detection is a simpler task and can be considered as a beginner level project. Face detection is one of the steps that is required for face recognition. Face detection is a method of distinguishing the face of a human from the other parts of the body and the background while the face recognition performs the task of enveloping the face and recognizing who the particular person is.
- Object Detection and object tracking are other popular choices for computer vision projects. Object detection is a computer vision technique that allows us to identify and locate objects in an image or video. With this kind of identification and localization, object detection can be used to count objects in a scene and determine and track their precise locations, all while accurately labeling them. Object tracking is the task of identifying a particular object and following the already identified object throughout the video or in real-time.
- Image Segmentation tasks are extremely useful to coordinate and visualize the surroundings and train the program to perform a specific task. The model trained is capable of achieving good results on tasks such as content-based image retrieval, traffic control and analysis systems, video surveillance, and the biomedical field for distinct pre-determined purposes. Image segmentation is the task of classifying every object in a particular frame or image with fixed names and compute them accordingly with respect to the color, pattern, or some fixed characteristic.
- Optical Character Recognition — This is another basic project best suited for beginners. Optical character recognition is the conversion of 2-Dimensional text data into a form of machine-encoded text by the use of an electronic or mechanical device. You use computer vision to read the image or text files. After reading the images, use the pytesseract module of python to read the text data in the image or the PDF and then convert them into a string of data that can be displayed in python. Optical character recognition finds various applications in data entry, billing details, OCR receiver, and OCR clients, tasks, etc., amongst many other use cases.
- Emotion or Gesture Recognition is another amazing computer vision application that uses deep learning technologies along with computer vision to perform highly complex tasks such as emotion and gesture recognition. The various faces are detected and classified according to the emotions shown with regards to that of the particular face. Not only do the models classify the emotions but also detects and classifies the different hand gestures of the recognized fingers accordingly. After distinguishing the human emotions or gestures a vocal response is provided by the trained model with the accurate prediction of the human emotion or gesture respectively. This is a slightly complex task and requires a lot of steps for the procedure to be accomplished successfully. Please refer to the conclusion section for further links on how to develop these projects from scratch. You can follow my guides to implement these projects from scratch on your own.
If you are further interested in diving deeper into the amazing subject of computer vision, want to understand all the aspects related to it more conceptually, then working on a variety of projects is the way to go. I would highly recommend you guys to look at one of my previous articles provided in the link below to have a glance at five awesome computer vision projects you can try out. All of them have reference links as well to help you out and guide you on your endeavor to accomplish the goals of completing the project you choose.

Conclusion:
With this, we have come to an end on the computer vision tutorial. I hope this guide was helpful to all of you to strengthen your basics and understand the significant aspects of this fabulous interdisciplinary field. Understanding how things work internally is crucial in computer vision because it helps you figure out how exactly the computer analyzes and processes the data as well as appreciate the beauty behind its methodologies.
I hope the examples provided with a detailed explanation helped you all in grasping the open-cv concepts more intuitively. In case you have any queries, issues, or problems related to the same, then feel free to hit me up and let me know what you could not understand. I will try my best to explain it to you and help you conceptually solve it. In the next tutorial, I will elaborate on the face detection, and how it exactly works from scratch. So stay tuned for that!
For some more awesome computer vision projects, check out the following links below. These consist of face recognition, emotion, and gesture detection. I will be putting up more computer vision projects in the future, so stay tuned for the upcoming articles.
Check out my two most recent and well-performing articles from the below link:
Thank you all for sticking on till the end. I hope you all enjoyed the read and learned the basics of computer vision. Thank you once again, and I hope all of you have a wonderful day!