Obsidian Editor Settings for Beginners
Obsidian Beginner’s Series: Setting> Editor Settings | Part 1
Confused about Obsidian Editor Settings. Not sure what to choose? Don’t know what happens if it’s ON or OFF? This article is for you. It’s part one of a multi-part Obsidian settings series.

TABLE of CONTENTS
Editor > GENERAL MENU Default View for New Tabs Default Editing Mode Editor Status Editor > DISPLAY MENU Show Inline Title Readable Line Length Strick Line Break Show Frontmatter Fold Heading and Indent Show Line Number Show Indentation Guides Right-to-left (RTL) Editor > BEHAVIOR MENU Spellcheck Spellcheck Languages Auto Pair Brackets Auto Pair Markdown syntax Smart Indent Lists Use Tabs Tab Size Editor > ADVANCED MENU Auto Convert HTML VIM Key Bindings Use Legacy Editor
Index to all Obsidian Beginner’s Series Articles
TL/DR: One Page Summary Settings for Beginners
General Editor Settings

The Editor section defines how things show up on your page when it opens. But before we talk about the individual settings, let’s discuss the difference between VIEW modes and EDITING modes.
View Modes are: EDITING VIEW and READING VIEW Editing Modes are: LIVE PREVIEW and SOURCE MODE
🤷♀️ Note that EDITING VIEW and EDITING MODE are different.
Confusing, I know.

Live Preview represents a what-you-see-is-what-you-get (WYSIWYG) approach. Thus, markdown syntax such as double asterisks for bold, hashtags, double-bracket links, etc., do NOT show in Live Preview mode once you click off the active line.
While your cursor is still in the active line, the markdown shows.
DEFAULT VIEW FOR NEW TABS
DEFAULT VIEW for new tabs defines in which VIEW mode new tabs will open.
From the drop-down, you can choose to have new tabs open in:
- EDITING VIEW (where you can start typing right away), or
- READING VIEW (where the page is NOT editable, but it renders the most readable form).
DEFAULT EDITING MODE
How your default EDITING mode renders will differ depending on your selected VIEW mode above.
If you set —
VIEW MODE to EDITING AND EDITING MODE to LIVE PREVIEW
- When you type on a page — it will render with NO markdown syntax (after you move to another line).
- Remember LIVE PREVIEW is a type of WYSIWYG.
When you set —
VIEW MODE to EDITING and EDITING MODE to SOURCE MODE
- When you type on a page, markdown syntax is displayed whether or not you are on the active line.
The READING and EDITING options above are DEFAULT values only, and you can switch, at will, on any page.
Option 1 to switch between READING and EDITING
- Use the MORE options (three vertical dots) or
- Use the BOOK/PENCIL options in the upper right corner of your screen (may vary by theme) as shown below.

Hovering over the book icon

or the Pencil icon,

it tells you
- what mode you’re in and
- CLICKing will toggle between EDIT MODE / READING mode. You can toggle at will.
Option two is to switch between READING and EDITING
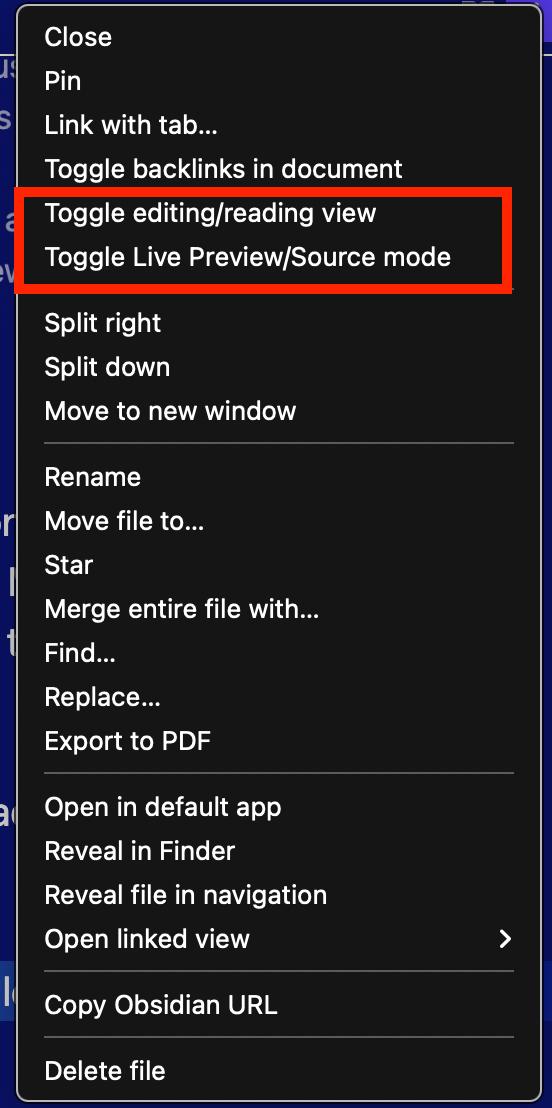
- The icon next to BOOK/PENCIL icon is the VERTICAL THREE DOT icon (aka hamburger, vertical ellipses, or action menu).
- From this drop-down menu, you can toggle: * EDITING/READING modes (as above), and * LIVE PREVIEW/SOURCE modes
🤷 Which should I choose? READING or EDITING? Your favorite answer… wait for it…

it depends on how you use your vault.
👉 If you use your vault as one might use a reference book, then you likely will want the DEFAULT VIEW MODE set to READING
👉 If your primary use is to write notes, then SET DEFAULT VIEW MODE to EDITING.
✅ If in doubt, for DEFAULT VIEW FOR NEW TABS, select EDITING VIEW MODE
🤷 Which should I choose, SOURCE or LIVE PREVIEW? 👉 IF you want to see all the markdown syntax, set the default editing mode to SOURCE 👉 If you want a more WYSIWYG mode, then set it to LIVE PREVIEW
✅ If in doubt, for DEFAULT EDITING MODE: start with LIVE PREVIEW EDITING VIEW
you can always change it later.
EDITOR STATUS
EDITOR STATUS is an ON/OFF setting.
If you turn on —
- In MINIMAL theme, you will see the - PENCIL ICON if you’re in EDITING mode, and - the BOOK ICON if you’re in READING mode.
- In the default theme, you won’t see any icon - if you’re in the READING mode, but - you will see the PENCIL ICON if you’re in EDITING mode.
Other themes may vary.
DISPLAY EDITOR SETTINGS

SHOW INLINE TITLE
🟢 ON — The title of your NOTE will display at the top of your note. 🔴 OFF — Note name will not display on your note

📝 Things to note: 👉 The red arrow in the image above points to the note name that is displayed, if this option is 🟢ON.
👉 The red circle in the image above is the tab name — which is an option discussed later in the series.
👉 As you know, each note in Obsidian is its own markdown file. So if you use a text editor to view one of your .md files, as shown below, you won’t see the file name at the top of the .md file, even if this option is on.
This is because settings in this section are DISPLAY settings, and thus Obsidian does NOT actually write the note title to the file.

🤷 Which should I choose?
✅ If in doubt, set SHOW INLINE TITLE to 🟢 ON
READABLE LINE LENGTH
You can define the width of the text displayed in your active pane with the READABLE LINE LENGTH.
The images below show the differences between ON and OFF, as rendered, on one active pane.
🟢 On — text width is narrowed and centered on the active pane (more like an ebook view)
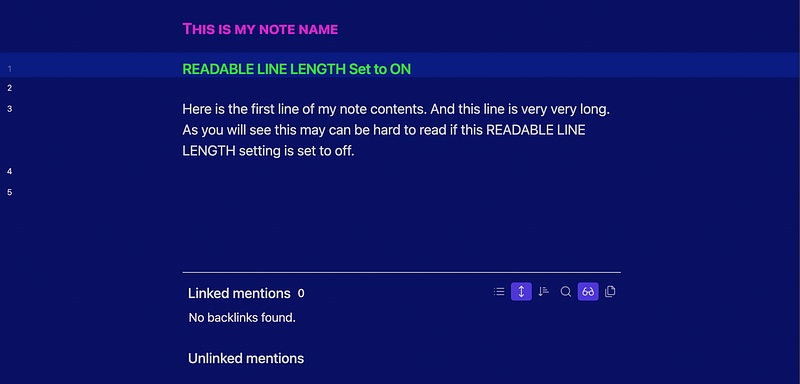
🔴 Off — text width will use almost all of the screen:

📝 Things to note:
👉 If you have more than one active pane or a smaller active pane-width because you are using:
- the STACKING Tab feature, or
- split panes
- open left and/or right sidebars
The text width difference between ON and OFF is reduced, if not eliminated, because there is less screen real estate for the active pane.
👉 READABLE LINE LENGTH does not affect the width of a DATAVIEW table or list. DATAVIEW is a popular Obsidian Plugin (for more info see Beginner’s Guide to DATAVIEW)
🤷 Which should I choose?
✅ If you want your text to expand the width of the screen and use as much real estate as possible, then — set READABLE LINE LENGTH to 🔴 OFF (my preference)
✅ If you prefer your text to be centered on the screen and mimic the width of a typical reading page, then — set READABLE LINE LENGTH to 🟢 ON
✅ If in doubt, set READABLELINE LENGTH to 🔴 OFF
STRICT LINE BREAKS
Pressing your RETURN key after a line of text is the most common way to create, what programmers call, a LINE BREAK.
The STRICT LINE BREAKS setting defines how your line breaks appear in READING VIEW (only).
🟢 ON — Line breaks will have no effect in READING View and thus your text will appear as one long line, even though in EDITING view it renders as separate lines.

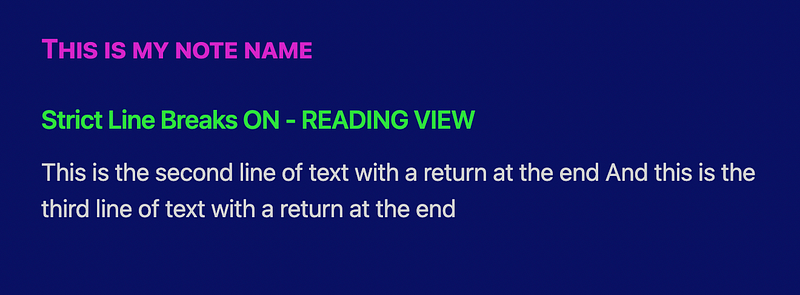
🔴 OFF — Text will appear almost the same in READING view as you typed it in EDITING VIEW
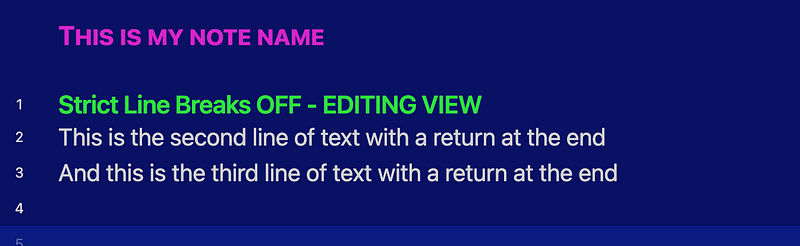
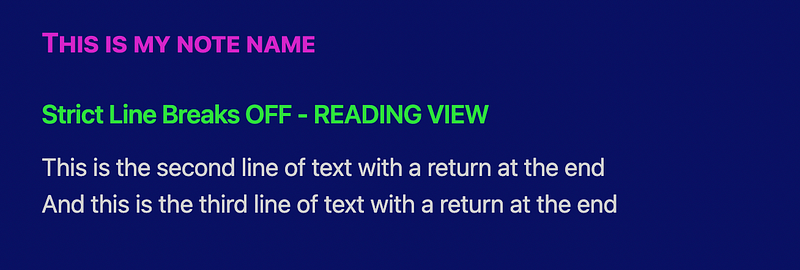
📝 Things to note: 👉 There is a slight vertical spacing difference between the LINE BREAK 🔴 OFF Reading and Editing Views, but other than that, they are the same
👉 I’m told that this setting is likely to facilitate folks coming from other markdown applications, and if this setting is 🟢 ON, it aligns better with standard markdown. If you know of other use cases, please reply in the comments below.
🤷 Which should I choose?
✅ If in doubt, set STRICT LINE BREAKS to 🔴 OFF
SHOW FRONT MATTER
Front Matter is also referred to as YAML. Since most readers of this beginner’s article are, well, beginners, understanding how and why to use YAML should be a low priority on your list of Obsidian-things-to-learn.
That said, this setting will determine how YAML renders in EDITING VIEW vs READING VIEW.
YAML is placed at the very top of a note and is fenced-off from the body of the note by three dashes, YAML code, and three dashes, as shown here:
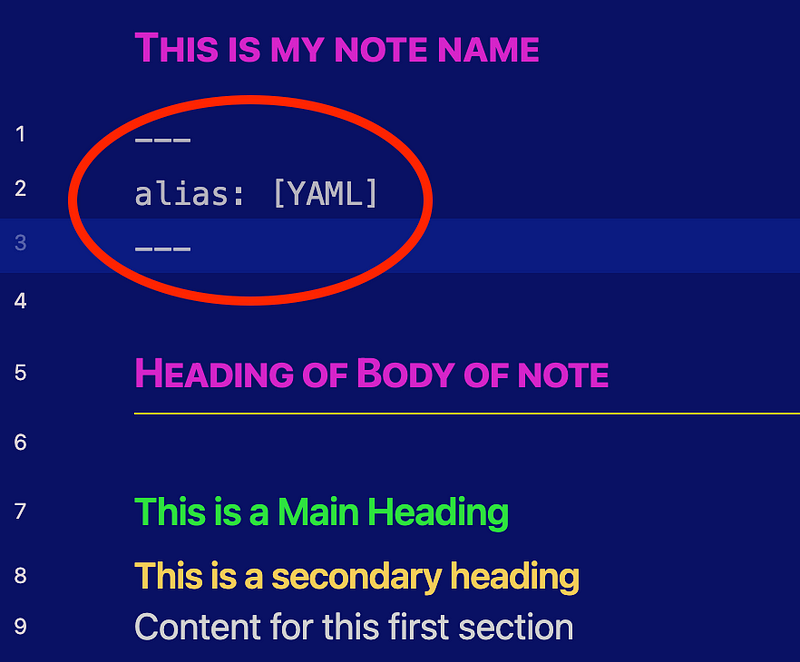
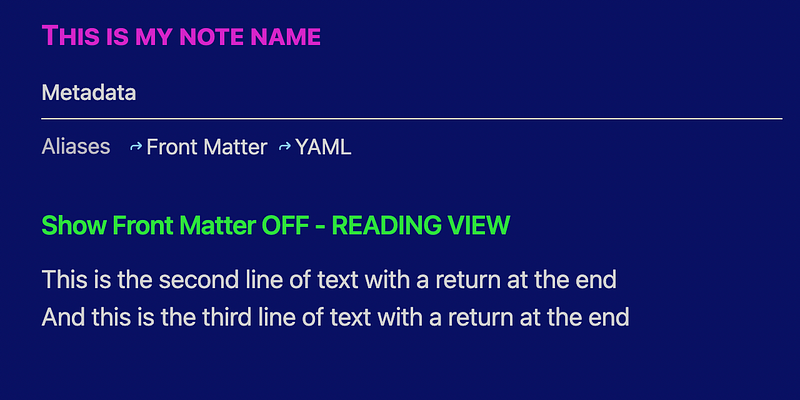
🟢 ON — With SHOW FRONT MATTER ON YAML appears in READING VIEW and in EDITING VIEW, but renders differently:

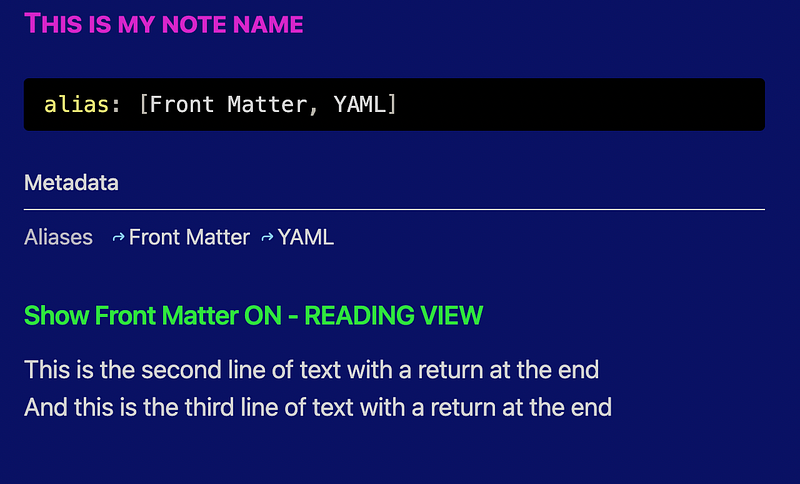
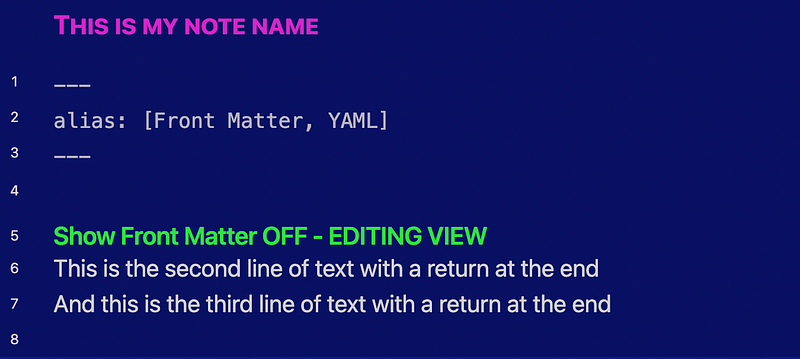
🔴 OFF — the YAML code block itself does NOT appear in READING VIEW but WILL in EDITING view.
Reading view still shows the resulting YAML metadata.
Editing View:
Reading View:
🤷 Which should I choose?
✅ If in doubt, set to SHOW FRONT MATTER to 🔴 OFF
FOLD HEADING AND INDENT
Determines if headings or lists can fold (aka collapsed) up to a heading level, subheading, or list level
🟢 ON — allows you to collapse to a heading level or list level

In the image above, nothing is folded.
But notice the red arrow pointing out the small “v” in the left margin.
Click that “v” and all the contents below that heading will collapse or fold into the main heading, as shown below:

Note also the three dots at the end of the Main Heading line . That designates that the line is folded, or in other words, has more content. To display this content, just click the “>” in the left margin.
🔴 OFF — You cannot fold or collapse to a header or list level
📝 Things to note: 👉 With FOLD INDENT OFF — the “v” will still render in the left margin but will not function (this may vary by theme but is true for both Minimal and Default themes)
👉 If FOLD INDENT is ON — AND — you have a list folded — and then you turn FOLD INDENT OFF — you will not be able to unfold your list until you turn it back ON. Not a likely scenario, but one that will drive you nuts if you’re not aware.
🤷 **Which should I choose?
✅ If in doubt, set FOLD INTENT to 🟢 ON
SHOW LINE NUMBER
Enables lines numbers in the left margin (AKA gutter) that display only in EDITING View
🟢 ON — Line numbers display in the gutter, in EDITING view

🔴 OFF — Line numbers do NOT display in EDITING view
🤷 Which should I choose?
👉 If you write long notes, having SHOW LINE NUMBERS on might be helpful to you 👉 Many people find the line numbers add noise and clutter to the note
✅ If in doubt, set SHOW LINE NUMBERS to 🔴 OFF
SHOW INDENTATION GUIDE
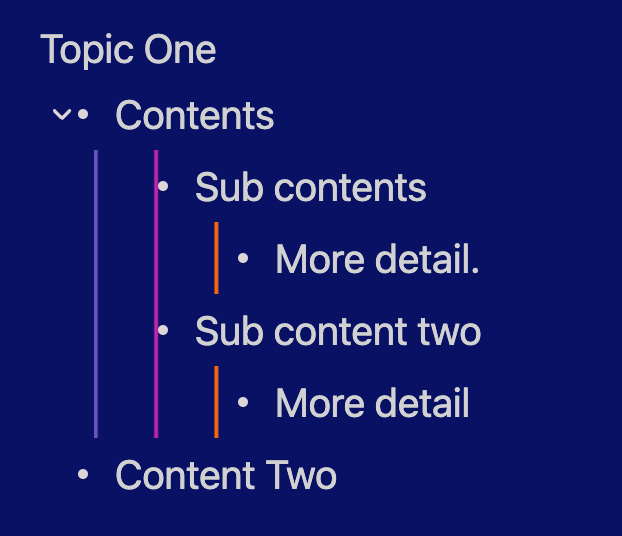
When working with indented outlines or nested lists, a vertical line CAN show the relationship.
🟢 ON — Shows the vertical relationship line. NOTE — My personal color scheme isn’t great to show these guides, but if you look closely at the tip of the red arrows, you spot the lines.

🔴 OFF — Does not show the vertical relationship line
📝 Things to note: 👉 If you want colorful lines (as shown below) you can change this with a CSS snip from @Murf’s Github site. More on CSS Snippets in a future article.
If you use the CSS snippet, you should have - SHOW INDENTATION Guide 🔴 OFF
🤷 Which should I choose? ✅ If in doubt, AND you’re not using the CSS Snippet, set SHOW INDENTATION GUIDE to 🟢 ON
RIGHT-TO-LEFT (RTL)
Shows text from Right-to-Left instead of what you are reading here, which is Left-to-Right.
Often used for languages such as Arabic, Hebrew, and sometimes Japanese and Chinese (among others).
🟢 ON — displays text right-to-left 🔴 OFF — displays text left-to-right as shown here
🤷 Which should I choose?
✅ If in doubt, set Right-to-Left to 🔴 OFF
Behavior

SPELLCHECK
🟢 ON — enables spellchecker which will underline misspelled words 🔴 OFF — disables spellchecker which ignores misspelled words
📝 Things to note:
👉 Obsidian uses an editable text file for the dictionary located: C:\Users<username>\AppData\Roaming\obsidian\Custom Dictionary.txt
🤷 Which should I choose?
✅ If in doubt, set SPELLCHECK to 🟢 ON
SPELLCHECK LANGUAGES
This feature is automatically on and will detect which language you are using.
AUTO PAIR BRACKETS
To link notes, you enclose the note-name within double brackets like so: [[Note-Name]]
🟢 ON — the system will automatically add the closing brackets when you type [[ and it correctly positions the cursor for you to enter the note name between the brackets
🔴 OFF — you will have to type the opening double brackets, the note name, and the closing double brackets
📝 Things to note: 👉 This feature handles not only brackets but also quotes
🤷 Which should I choose?
✅ If in doubt, set AUTO PAIR BRACKETS to 🟢 ON
AUTO PAIR MARKDOWN SYNTAX
To BOLD a word using markdown syntax, you enclose the word in double asterisks; for italics, it’s enclosed in single asterisks.
This AUTO PAIR MARKDOWN SYNTAX works exactly like AUTO PAIR BRACKETS (discussed above) but for asterisks.
🟢 ON — — the system will automatically add the closing asterisk(s) when you type
** or *
and it will correctly position the cursor between the asterisks
🔴 OFF — you will have to type the closing asterisk(s) before and after the word or phrase you want to bold or italicize
📝 Things to note: 👉 If you start to bold a word, and only enter the first double asterisk and forget to close it — all formatting below that line will not be correct.
So if something looks odd and you can’t figure it out — it’s likely that a BOLD or ITALIC wasn’t closed with asterisk(s). (Not that I’ve ever done it myself! 😉) Example:

🤷 Which should I choose?
✅ If in doubt, set AUTO PAIR MARKDOWN SYNTAX 🟢 ON
SMART INDENT LINES
This one is a mystery to me. It seems to render the same when on or off. If anyone knows something different, please let everyone know in the comments.
🟢 ON — properly aligns lists 🔴 OFF — also seems to align lists properly 🤷
🤷 Which should I choose?
✅ If in doubt, set SMART INDENT LINES to 🟢 ON
USE TABS
This is another one that seems to work the same if ON or OFF. Documentation states:
🟢 ON — Use TAB key to indent 🔴 OFF — Will indent up to four spaces (defined in TAB SIZE option below)
🤷 Which should I choose?
✅ If in doubt, set USE TABS 🟢 ON
TAB SIZE
This determines the number of characters for the indent (mentioned in the prior setting)
🤷 Which should I choose?
✅ If in doubt, set TAB SIZE to four (4)
Advanced

Since this is a beginner’s guide, we won’t go into these, other than to note the default setting. You should keep at default settings unless you understand the impact.
AUTO CONVERT HTML
🤷 Which should I choose?
✅ If in doubt, set AUTO CONVERT HTML to 🟢 ON (default setting)
VIM KEY BINDINGS
🤷 Which should I choose?
✅ If in doubt, set VIM KEY BINDINGS to 🔴 OFF (default setting)
USE LEGACY EDITOR
There is really no reason to use the Legacy Editor if you’re just getting started with Obsidian. They may not support it in the future (just my opinion).
🤷 Which should I choose?
✅ If in doubt, set USE LEGACY EDITOR to 🔴 OFF
INDEX to Obsidian Beginner’s Series Articles
PDF Summary of Settings for Beginners
The above PDF is a Beginner’s summary of the most common choices for settings.
Become a member and read every story with a Medium Membership. If you use my link, I’ll earn a small commission, and it will cost you nothing. Thanks!


