
Learning Mobile Development
Node.js Push Notification Server Made Easy
Setup your own server to generate Push Notification to your app without login into Firebase

Early on I shared the simplest Android Push Notification tutorial without using any server. One can log into the Firebase console to generate test push notifications.
However, this has some limitations as
- One will have to have the account to access the Firebase console to send a Push Notification
- One cannot test a Push Notification with just a simple Data Payload without any Title or Message
Therefore, it will be handy for us to learn the most basic essentials to set up a simple push notification from the probably most popular backend service these days, node.js.
It’s just 3 steps below
- Get all the necessary keys e.g. Firebase Project Private Key, Project ID, and Your App Device Token.
- Set up your node.js environment, code it, add the relevant keys to it, and start the server
- Trigger the call to send the notification.
Simple!
1. Get all the Necessary Keys
Even though we set our node.js server, it has to channel through the Firebase Server to send the push notification

Hence, we’ll need to get the relevant keys for one to connect to Firebase
1. Firebase Project Private Key
This is a JSON file that will need to be downloaded from Firebase.
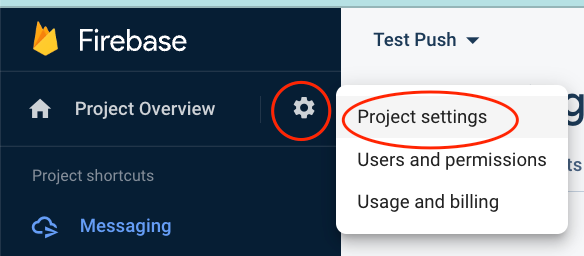
Access your Firebase Project Overview Settings as below
Then get to the Service accounts, and then click Generate a new private key to get your Firebase project private key JSON file.
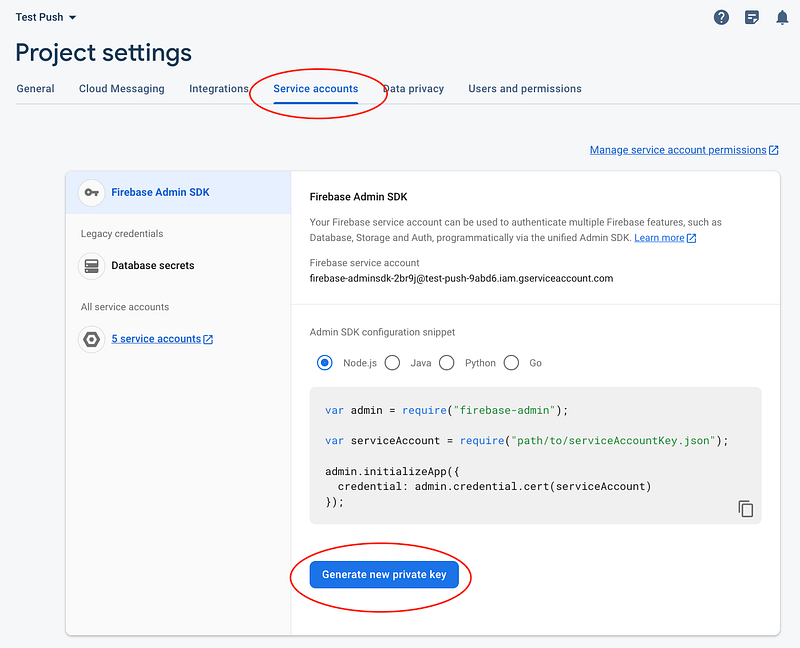
Put that file in your node.js project folder you’ll be creating later.
2. Firebase Project ID
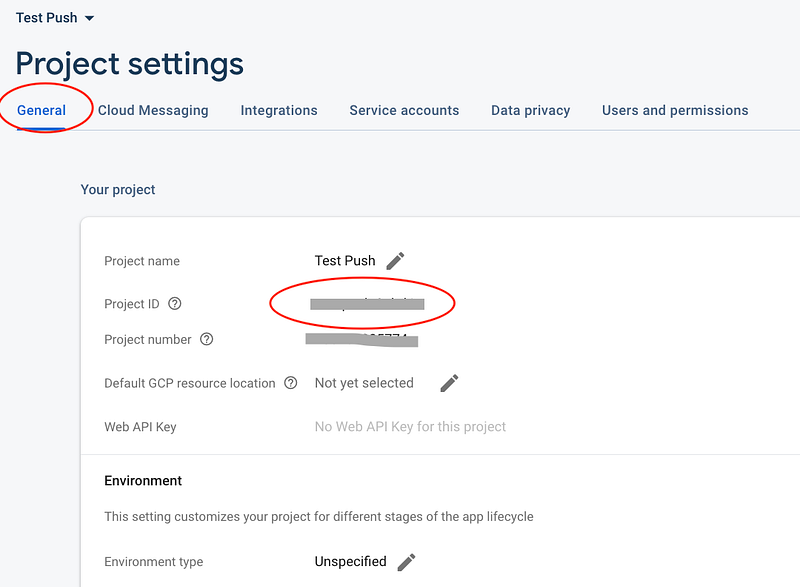
Similarly, you can get the ID from the Project Setting
Then get to General, and you’ll see your Project ID.
3. Device-specific ID Token
This is to help you to test a specific push notification to the particular test device. You can find the step Testing Push-Notification section in the article below.
2. Create A Node.js Project
Here we’ll be using npm (optionally you can consider yarn)
1. Set up the node.js environment
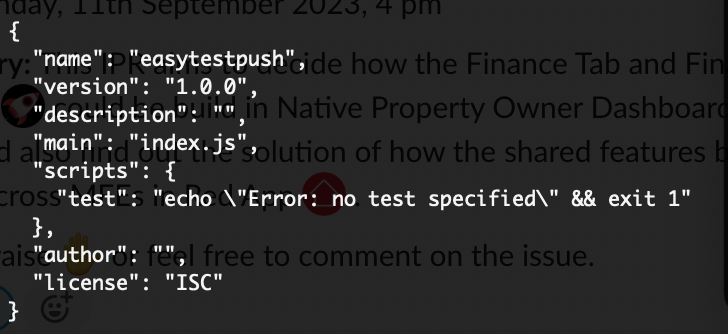
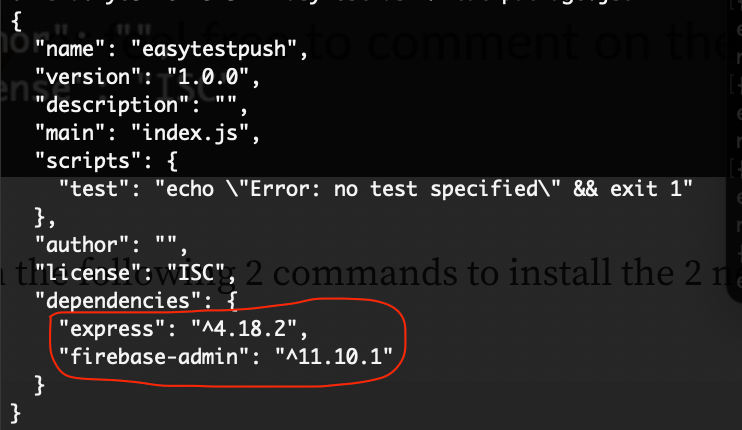
Just npm init, it will generate a blank project same as the project directory name, with the package.json file as below
Then run the following 2 commands to install the 2 needed packages
npm install express
npm install firebase-admin
These are the 2 libraries you’ll need for your code
expressis for networking purposesfirebase-adminis for connecting to the Firebase server
If you read your package.json, it is now
Now modify your project to a module

The environment is good to go.
2. Code your project
First, set up your imports library.
Also your Google’s Firebase Project Private Key JSON file (remember to copy that file you created from Step 1 above into your folder)
import {initializeApp, applicationDefault } from 'firebase-admin/app';
import { getMessaging } from "firebase-admin/messaging";
import express, { json } from "express";

process.env['GOOGLE_APPLICATION_CREDENTIALS'] = "<project-private-key>.json";
Initialize your project, and remember to provide the Project ID (that you get from Step 1 above).
const app = express();
app.use(express.json());

initializeApp({
  credential: applicationDefault(),
  projectId: '<Project-ID>',
});
Now code a post command, with /send folder to send the notification. The below notification message is just a sample of
- Title
- Body
- Data (in JSON), and
- Token (the Device ID Token from Step 1 above)
In it, you also capture the response, either it is successful (200) or fail (400).
app.post("/send", function (req, res) {
  const receivedToken = req.body.fcmToken;

  const message = {
    notification: {
      title: "Notif",
      body: 'This is a Test Notification'
    },
    data: {Key1: 'ValueSomething', AgainKey: 'NewHelp', OwnKey: '12345'},
    token: "<Device ID Token>",
  };

  getMessaging()
    .send(message)
    .then((response) => {
      res.status(200).json({
        message: "Successfully sent message",
        token: receivedToken,
      });
      console.log("Successfully sent message:", response);
    })
    .catch((error) => {
      res.status(400);
      res.send(error);
      console.log("Error sending message:", error);
    });
});
Finally, create a listener of the server port at 3000.
app.listen(3000, function () {
  console.log("Server started on port 3000");
});
Once you combine all the code above into a file index.js, you can now run it using the command node index.js, it will run as below
> % node index.js
Server started on port 3000
3. Trigger the call to send the notification.
After step 2 above, your server is run locally at http://0.0.0.0:3000. To trigger the post, you just need to run it on
curl -X POST http://0.0.0.0:3000/send
You can see something below if the push notification is successfully sent
> % curl -X POST http://0.0.0.0:3000/send
{"message":"Successfully sent message"}%
That’s it!
If your App doesn’t receive the push notification, below are a few troubleshooting points
- Check if the IDs match
- Check your app granted the post permission *especially after Android T (13)
- Check your device is connected to the internet
References
- Trigger FCM using Node JS Server | How to send push notifications using Node JS and Firebase?
- The original code gist I refer to. It has
cor that I didn’t use. - Firebase official doc: Add the Firebase Admin SDK to your server
- Firebase official doc: Authorize send requests
- Firebase official doc: Build app server and send requests


