
No-Engineers Guide to AutoTrain: The Easiest Way for Beginners to Fine-Tune Mistral AI!
Empower Yourself with Simplified Machine Learning Using AutoTrain Advanced
In my previous article, we explored the process of fine-tuning a Language Model (LLM) using HuggingFace libraries like Peft, Transformers, and Bitsandbytes. While these libraries certainly make the process much more accessible, there’s no denying that fine-tuning an LLM still involves writing lines of code. From loading the model to configuring PEFT parameters, it can be quite a coding adventure.
Is there an easier way to fintune a LLM model? How to join in if you dont’t know how to code or just a seasoned software engineer?
Well, let us meet 🤗 AutoTrain Advanced, a no-code tool that empowers not just Machine Learning Engineers, but even non-developers, to train state-of-the-art ML models with ease.
In fact, after giving it a whirl for fine-tuning both Mistral 7B and LLama 2, I’m ready to declare that it’s the easiest way to date to fine-tune a model. All you need to do is run a single command line to get your model fine-tuned!
In this article, we’re going to showcase how to use AutoTrain Advanced to effortlessly fine-tune an AI model through a free Google Colab instance.
What is AutoTrain Advanced?
🤗 AutoTrain is a no-code tool designed to simplify and accelerate the training of state-of-the art models.
You can use AutoTrain to train models for various tasks, including Natural Language Processing (NLP), Computer Vision (CV), Speech, or Tabular tasks, all using your own data.
Who Should Use AutoTrain?
AutoTrain Advanced is versatile, catering to a wide range of users:
- Non-Coders: If you’ve never written a line of code, fear not! Hugging Face is committed to making machine learning accessible to all.
- Seasoned Software Engineers New to Machine Learning: If you’re a software pro looking to integrate some ML into your side project without diving into a new tech stack, AutoTrain is your ally.
- Data Scientists and Machine Learning Engineers: AutoTrain can also grants you control over hyperparameters per job. This feature allows you to train multiple models with different hyperparameters and easily compare results.
How to Use AutoTrain?
AutoTrain offers two ways to get started:
- No-Code Users: Hugging Face provides an intuitive interface that requires zero coding or configuration. Just select your task (translation, anyone? How about question answering?), upload your data, and let Hugging Face do the heavy lifting.
2. Developers, ML engineers, Data Scientists: For those who prefer a more hands-on approach, you can harness the AutoTrain Python API. Simply run the command “autotrain llm” to initiate model training.
In this tutorial, we’ll focus on how to use AutoTrain API within a Google Colab instance.
Let’s get started! 🚀
Step-by-Step Walkthrough
In this tutorial, we’ve chosen the Mistral 7B model, known as the best model to date for its size, and it’s completely open and freely accessible. But you can also train any other AI models through AutoTrain.
You can access the Google Colab notebook directly here, where all the instructions are ready for you to explore.
Step 1 — Install Necessary Packages
First, install the required packages.
!pip install -q pandas
!pip install -q autotrain-advanced safetensors
!autotrain setup --update-torch
Additionally, we will define some helper functions to improve the display and simplify interactions with the model.
# Import necessary libraries for customizing display in Jupyter Notebook
from IPython.display import HTML, display

# Define a function to set CSS styles for text wrapping
def set_css():
    display(HTML('''
    <style>
        pre {
            white-space: pre-wrap;
        }
    </style>
    '''))

# Register the 'set_css' function to be executed before running a cell in Jupyter Notebook
get_ipython().events.register('pre_run_cell', set_css)

# Define a wrapper function for getting model completions based on a user's query
def get_completion(query: str, model, tokenizer) -> str:
    # Specify the device to be used for model inference (e.g., "cuda:0" for GPU)
    device = "cuda:0"

    # Define a template for creating a prompt for the model
    prompt_template = """
    Below is an instruction that describes a task. Write a response that appropriately completes the request.
    ### Question:
    {query}

    ### Answer:
    """

    # Create a prompt by formatting the user's query into the template
    prompt = prompt_template.format(query=query)

    # Tokenize the prompt and convert it into model inputs
    encodeds = tokenizer(prompt, return_tensors="pt", add_special_tokens=True)
    model_inputs = encodeds.to(device)

    # Generate text completion using the model
    generated_ids = model.generate(**model_inputs, max_new_tokens=1000, do_sample=True, pad_token_id=tokenizer.eos_token_id)

    # Decode the generated text
    decoded = tokenizer.batch_decode(generated_ids)

    # Return the decoded completion
    return decoded[0]
Step 2— Load the Dataset
Begin by fetching a small finance knowledge dataset from the hub and save it locally in CSV format within the Colab root directory.
from datasets import load_dataset
data = load_dataset("ronal999/finance-alpaca-demo", split='train')
# we'll only load 1/6 of the original dataset for the demo purpose
data = data.shard(num_shards=6, index=0)
data.to_csv("train.csv")
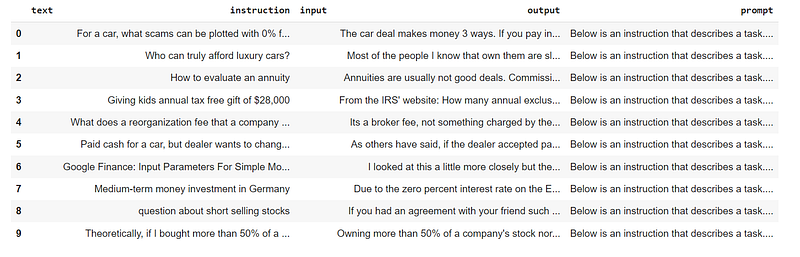
print(data)To further explore the dataset, you can use the following code.
# Explore the data
df = data.to_pandas()
df.head(10)
In essence, the dataset contains four columns. We’ll primarily focus on the last column labeled ‘prompt.’ This column is created by concatenating the ‘instruction’ and ‘output’ columns into a unified ‘prompt’ format. This will help the model better understand our instructions.
Step 3 — Run AutoTrain
Now, it’s time to start the fine-tuning process with AutoTrain. You can initiate fine-tuning by running the AutoTrain command. AutoTrain empowers us to efficiently fine-tune models using straightforward parameters:
--use_peft: Enables Parameter-Efficient-Finetuning to optimize memory usage.--use_int4: Utilizes INT4 quantization to reduce model size and speed up inference at the cost of some precision.
!autotrain llm \
--train \  # This flag indicates that training should be performed.
--project_name [YOUR_PROJECT_NAME]\  # Specifies the project name.
--model mistralai/Mistral-7B-v0.1 \  # Specifies the model to be used.
--data_path . \  # Specifies the path to the data. In this case, it's the current directory.
--text-column prompt \  # Specifies the column in the data that contains the text prompts.
--learning_rate 2e-4 \  # Sets the learning rate for training.
--train_batch_size 1 \  # Defines the batch size used during training.
--num_train_epochs 3 \  # Specifies the number of training epochs.
--trainer sft \  # Specifies the trainer used for training.
--use_peft \  # Use of Parameter-Efficient Finetuing
--use_int4 \  # Use of 4bit quantization
--lora-r 16 \  # Sets the "lora-r" parameter to 16
--lora-alpha 32 \  # Sets the "lora-alpha" parameter to 32
--lora-dropout 0.05 \  # Sets the dropout rate for the "lora" module to 0.05.
--target_modules q_proj,v_proj \  # Specifies the target modules for training.
--push_to_hub \  # Indicates that the trained model should be pushed to a hub or repository.
--repo_id [Your_REPO_ID] \  # Specifies the repository ID where the model should be pushed.
--token [YOUR_TOKEN]\"  # Specifies the token required for authentication and pushing to the repository.
If you’re curious about the available command-line parameters, you can find more details by running the following command.
!autotrain llm -hStep 4: Load the Fine-Tuned Model for Inference
Once the fine-tuning process is complete, you can load the model directly from the 🤗Hub.
# Import necessary libraries
import torch
from peft import PeftModel, PeftConfig
from transformers import AutoModelForCausalLM, AutoTokenizer

# Define the identifier for the pre-trained model
peft_model_id = "Ronal999/mistral-7b-autotrained-finance"

# Load the configuration for the PeftModel using the specified model identifier
config = PeftConfig.from_pretrained(peft_model_id)

# Load the base model for causal language modeling
# - `return_dict=True` indicates that the model should return outputs as dictionaries.
# - `load_in_4bit=True` suggests that the model should be loaded with 4-bit quantization (possibly for memory efficiency).
# - `device_map='auto'` suggests automatic device placement (GPU if available, otherwise CPU).
model = AutoModelForCausalLM.from_pretrained(
    config.base_model_name_or_path,
    return_dict=True,
    load_in_4bit=True,
    device_map='auto'
)

# Load the tokenizer associated with the base model
tokenizer = AutoTokenizer.from_pretrained(config.base_model_name_or_path)

# Load the PeftModel on top of the base model
model = PeftModel.from_pretrained(model, peft_model_id)
You can use the trained model immediately for inference purposes.

Step 5 — Creating an interface to chat with your finetuned model (optional)
I highly recommend taking it a step further by creating an interface with just a few lines of code using Gradio.
This way, you can demonstrate the fine-tuned model to your friends and colleagues in an interactive chatbot format.
Closing thoughts
In conclusion, our experience with AutoTrain for fine-tuning the Mistral 7B model highlights several key advantages:
- Ease of Use: AutoTrain simplifies the model training process significantly, requiring only a single command to get started.
- Efficiency with Advanced Techniques: AutoTrain employs advanced techniques such as Parameter-Efficient-Finetuning and Quantization (QLoRA), resulting in faster model fine-tuning without compromising quality.
- Versatility Across ML Tasks: While we demonstrated fine-tuning for a Language Model (LLM), AutoTrain is adaptable to a wide range of machine learning tasks, including NLP, CV, Speech, and Tabular tasks.
- Continuous Support: AutoTrain benefits from the support of Hugging Face, indicating ongoing development with additional supported tasks and features on the horizon.
In light of our experience, I strongly recommend giving AutoTrain a try!
It’s a true game-changer in the world of machine learning, whether you’re a seasoned pro or just starting your journey. Plus, you have the flexibility to experiment with hyperparameters for each training job.
So, why wait? Dive into the world of AutoTrain, and let the magic of simplified, efficient, and flexible model training transform your machine learning endeavors. Happy training! 🚀
What’s on the Horizon?
Our journey into the world of LLM customization is far from over. Upcoming topics include :
- ✨ Stop Hard Coding and Fine-tuning LLM through Configuration Files.
- ✨ Creating and curating your dataset from scratch, drawing from various sources like PDFs, Excel sheets, and web pages for fine-tuning.
- ✨ Privacy and safety for LLM usage
Please drop me a message if you’re particularly intrigued by any of these topics!
Before you go! 🦸🏻♀️
If you liked my story and you want to support me:
- Clap my article 50 times, that will really really help me out.👏
- Follow me on Medium and subscribe to get my latest article🫶
Reference


