
#30DaysOfNLP
NLP-Day 12: Get Your Words In Order With Convolutional Neural Networks (Part 2)
Text classification with Convolutional Neural Networks
Yesterday, we entered the realm of deep learning. We learned about Convolutional Neural Networks, the underlying concepts, how they work, and how they’re able to extract the deeper meaning of a text by accounting for spatial relationships between words.
However, we covered only the theory.
Now, it’s time to stretch our wrinkled fingers and start coding.
In the following sections, we‘re going to build our own Convolutional Neural Network by utilizing the Keras API. We will load, clean, and preprocess our data, as well as create a model that classifies movie reviews as either positive or negative.
So take a seat, don’t go anywhere, and make sure to follow #30DaysOfNLP: Get Your Words In Order With Convolutional Neural Networks.
No Data. No Model
In order to create and train a Convolutional Neural Network, we need data.
Fortunately for us, we can rely on the existing IMDB Movie Review dataset provided by Stanford University. The dataset, a tarfile, can be downloaded here.
Once, we obtain our dataset, we need to open and extract the tarfile. This allows us to reveal its content — our training data.
We simply import Python’s tarfile module, open the file, and call the function extractall(). This unpacks the tarfile into the current folder. Depending on your machine this process may take a few minutes.
Creating a dataset
After extracting the file, we have a lot of raw data lying around, just waiting for us to be preprocessed.
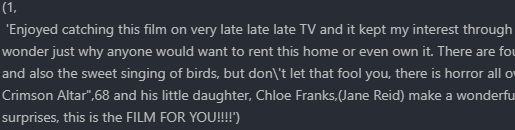
For the sake of simplicity, we simply work with the /train folder and the data it contains. 25,000 reviews are sufficient enough.
First of all, we define a function that creates and returns a dataset in the form of a Python list.
After specifying the subfolders /pos and /neg as well as a simple regex pattern to clean the raw text from HTML tags, we define another helper function append_data().
Inside the helper function, we basically run through either the positive or negative subfolder, read every text document, clean it from HTML tags, and store both labels and reviews inside our dataset. Positive reviews are labeled with the value 1 and negative reviews are represented by a 0.
Next, we shuffle our dataset and return the complete list.
We can take a quick look at the first element to get a feel for what we’re working with. A list with tuples, each containing the label and the cleaned review text.
Vectorizing the dataset
So far, we created a list of data, containing the labels and the lightly preprocessed reviews.
However, we need a numerical representation of the text. We need a vector representation. Luckily, we already spent some time with word vectors and know how to use them.
Now, it’s time to vectorize our data.
As usual, we define a function that returns a tuple of two lists. First the vectorized data and second the target labels.
After instantiating the TreebankWordTokenizer and loading the pre-trained “Google News” word vector, we iterate through every sample in our dataset and extract the tokens.
Once every token is stored inside the token list, we iterate over this list as well. We take each token and retrieve the associated vector representation from our pre-trained word vector.
We store the results as well as the target labels in two separate lists and return both at the end of the function.
Just a little bit more preprocessing
We’re getting closer to the finish line.
However, we have to do some more preprocessing, in order to get our data ready for the Convolutional Neural Network.
Since every input to convnet must be of equal length, we have to truncate or pad our data depending on the length of the movie review.
We define yet another function that returns the preprocessed data as a list. Next, we iterate over each sample in the dataset and compare its length to the specified maximum length of 400 tokens.
If the sample is too long, we simply drop the last tokens. If it is too short, we simply append some zero vectors with the same shape as our word vector to the end of the sample.
Now, we have a pretty dataset at our hands.
The last thing we have to do is to split our dataset into training and test data as well as reshape it into a numpy.array in order to make Keras happy.
Finally, a model
Phew, after a lot of work to prepare our data, we’re finally here.
We finally arrived at the modeling section.
We build our model by utilizing the Keras Functional API.
First of all, we specify the input layer with the shape of maximum tokens per sentence as rows and the embedding, word vector size as columns.
Next, we define our 1-D convolutional layer.
We pass in the number of filters, kernel size, padding, type of activation function, and the step size of 1.
Moving on, we create a GlobalMaxPooling layer, downsampling the input representation by taking the maximum value of the convolution layer’s output.
The GlobalMaxPooling layer is connected to a dense layer with 250 neurons. Passing through a dropout layer and the activation function, we arrive at the final dense layer with 1 unit and a sigmoid activation function.
The final layer represents our output, which is basically the probability of the review either being positive or negative.
Now, it’s time to train our model.
We set a random seed and start the training process.
Next, we train the model for two epochs with a batch size of 32.
Once the training process is finished, we can save our model. The structure as well as the weights.
After training our model for 2 epochs we receive an accuracy score of ~ 0.91 and a validation accuracy of ~0.87.

And this is it. We’re done.
Our model is working and we received a not-so-bad result.
However, there is room for optimization. We can tune the hyperparameters like the filter size, dropout rate, number of dimensions, etc. We can also use a different tokenizer or increase the limit when loading our pre-trained word vectors.
One thing to keep in mind, we defined a maximum length of tokens per sentence, resulting in either a truncated or padded version of the same sentence. Dropping or adding unrelated tokens can heavily influence our outcome, decreasing the accuracy score.
Conclusion
In this article, we got down to business.
We implemented our own Convolutional Neural Network, loaded and preprocessed the IMDB Movie Review Dataset, and trained our model to classify each review as either being positive or negative.
Nonetheless, we still have room to improve.
So far, we’re able to account for word relationships based on the order of words within a small frame of a few tokens. But what if we want to do that over a longer period of time, a broader window than just a few words?
In the next article, we will shed some light on the concept of Recurrent Neural Networks.
So take a seat, don’t go anywhere, make sure to follow, and never miss a single day of the ongoing series #30DaysOfNLP.
Enjoyed the article? Become a Medium member and continue learning with no limits. I’ll receive a portion of your membership fee if you use the following link, at no extra cost to you.
References / Further Material:
- IMDB Movie Review Dataset
- Keras API, Code Examples
- Hobson Lane, Cole Howard, Hannes Max Hapke. Natural Language Processing in Action. New York: Manning, 2019.


