

New Android Injector with Dagger 2 — part 1
Dagger 2.10 released with android support module and android compiler. I think this was a huge change for us and all android developers should switch to new dagger android injection as soon as possible.
Before I start to explain new AndroidInjector class and dagger 2.11 library, If you are not familiar and never used dagger 2 before, I highly recommend you to read dagger 2 tutorials and understand what dependency injection is. Why am I saying that? Because android-dagger is all about annotations and I think It’s learning curve is a bit hard. In my opinion, Dagger 2 and dependency injection should be understood before we use dagger-android. Here is tutorials and blogpost about dependency injection and dagger 2 version. Blog 1 and Blog 2 about Dagger 2.
Old Way
Before Dagger 2.10 version, I used to use dagger 2 like,
((MyApplication) getApplication())
        .getAppComponent()
        .myActivity(new MyActivityModule(userId))
        .build()
        .inject(this);
What is wrong with that? We want to use dependency injection. But what is dependency injection’s core principle?
A class shouldn’t know anything about how it is injected.
So we have to get rid of these builder methods and module instance creation.
Sample Project
I created sample project that does nothing. Yes. I wanted to keep it as simple as possible. It has MainActivity and DetailActivity. Both activities inject to their presenter implementations and make api call(not actually http call, I created a fake method.).
Setup
Add these dependencies to your build.gradle.
compile 'com.google.dagger:dagger:2.11-rc2'
annotationProcessor 'com.google.dagger:dagger-compiler:2.11-rc2'
compile 'com.google.dagger:dagger-android-support:2.11-rc2'
Project Package Structure
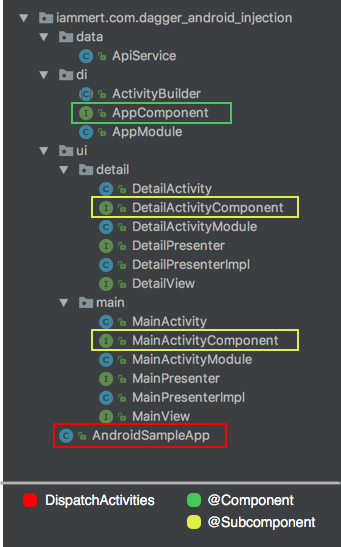
Application class build a graph using AppComponent. AppComponent has @Component annotation top of its class. When AppComponent is build with its modules, we have a graph with all provided instances in our graph. For instance, If app module provides ApiService, we will have ApiService instance when we build component which has app module.
If we want to attach our activity to dagger graph to get instances from ancestor, we simply create a @Subcomponent for it. In this case, DetailActivityComponent and MainActivityComponent classes are marked with @Subcomponent annotation. Then, last step we have to take, we need to tell ancestor about subcomponent info. So all subcomponents have to be known by its ancestor.
Don’t worry. I will explain @Subcomponent, @Component and what DispatchActivity means. I just wanted to give a warm welcome to you by component/subcomponent.
@Component and @Component.Builder
@Component(modules = {
        AndroidInjectionModule.class,
        AppModule.class,
        ActivityBuilder.class})
public interface AppComponent {

    @Component.Builder
    interface Builder {
        @BindsInstance Builder application(Application application);
        AppComponent build();
    }

    void inject(AndroidSampleApp app);
}
@Component: Component is a graph. We build a component. Component will provide injected instances by using modules.
@Component.Builder: We might want to bind some instance to Component. In this case we can create an interface with @Component.Builder annotation and add whatever method we want to add to builder. In my case I wanted to add Application to my AppComponent.
Note: If you want to create a Builder for your Component, your Builder interface has to has a build(); method which returns your Component.
Inject Into AppComponent
DaggerAppComponent
        .builder()
        .application(this)
        .build()
        .inject(this);
As you see from code, we can bind our application instance to our Dagger graph.
I think we understood the concept behind @Component.Builder and @Component. Now I want to give skeleton structure of our project.
Component/Module Skeleton
We can think apps in three layer while using Dagger.
- Application Component
- Activity Components
- Fragment Components
Application Component
Android apps have one application class. That is why we have one application component. This component is responsible for providing application scope instances (eg. OkHttp, Database, SharedPrefs.). This Component is root of our dagger graph. Application component is providing 3 module in our app.
- AndroidInjectionModule : We didn’t create this. It is an internal class in Dagger 2.10. Provides our activities and fragments with given module.
- ActivityBuilder : We created this module. This is a given module to dagger. We map all our activities here. And Dagger know our activities in compile time. In our app we have Main and Detail activity. So we map both activities here.
- AppModule: We provide retrofit, okhttp, persistence db, shared pref etc here. There is an important detail here. We have to add our subcomponents to AppModule. So our dagger graph will undestand that.
Activity Components
We have 2 activity here. MainActivity and DetailActivity. They both have module and they both have component. But they are subcomponents like we define in AppModule above.
- MainActivityComponent: This component is just a bridge to MainActivityModule. But here is an important change here. We don’t add inject() and build() method to this component. MainActivityComponent has these methods from ancestor class. AndroidInjector class is new dagger-android class which exist in dagger-android framework.
- MainActivityModule: This module provides main activity related instances (eg. MainActivityPresenter). Did you see provideMainView() method takes MainActivity as parameter? Yes. We create our MainActivityComponent with our
class. So dagger will attach our activity to it’s graph. So we can use it because it is on the graph.
We can create DetailActivityComponent and DetailActivityModule just like MainActivityComponent/MainActivityModule. I will skip this for that reason.
Fragment Components
Let say we have couple fragments in our DetailActivity. What will we do in that case? Actually it is not hard to guess. Lets think our Activity and Application relationship. Application knows Activities with a mapping module(ActivityBuilder in my sample). And we add our activities to AppModule as subcomponent.
Same relationship between Activity and its Fragments. We will create a FragmentBuilder module and add as module to DetailActivityComponent.
Now we can create DetailFragmentComponent and DetailFragmentModule just like we did in MainActivityComponent and MainActivityModule.
DispatchingAndroidInjector<T>
Last thing we have to do is injecting into Injector. What is the reason of This injector. I want to give you simplified code because It explains itself.
Application has activities. That is why we implement HasActivityInjector interface. So Activities have fragments? Do I mean that we have to implement HasFragmentInjector in our activities? Yes! That’s exactly what I mean.
If you don’t have child fragment and don’t inject anything in your fragments, then you don’t need to implement HasSupportFragmentInjector. But in our case we want to create DetailFragment in our DetailActivity.
AndroidInjection.inject(this)
Why is all jobs for? Because Activity and Fragment should not know about how it is injected. So how do we inject now?
In Activity
@Override
protected void onCreate(Bundle savedInstanceState) {
    AndroidInjection.inject(this);
    super.onCreate(savedInstanceState);
}
In Fragment
@Override
public void onAttach(Context context) {
    AndroidSupportInjection.inject(this);
    super.onAttach(context);
}
Yes! Congratulations. It is all done.
I know it is a bit complicated. And I think learning curve is really hard. But we have reached our goal. Now, Our classes don’t know about how it is injected. We can inject into our provided instances by using @Inject annotation in our UI elements.
You can find this project on my github page. And I suggest you to check dagger 2 official doc.
In part 2 , I want to simplify android-dagger injection by using some new annotation which is provided by dagger. But I wanted to show you pure version before I simplify it.
Part 2 is ready here.
Thanks for reading. Happy coding.


