
Neovim for Beginners — Status Line
Customize the status line to show useful information, with and without plugins.

Let’s learn how to customize the status line with and without any plugins.
We are going to
- Configure the status line without using any plugins (
:h statusline). - Use the
Lualine plugin to configure the status line in Lua. - Integrate
nvim-gps withLualineto see the current scope in the status line.
This article is part of the Neovim for Beginners series.
The Neovim configuration files can be found in this repository.
Configure Status Line without Plugin
The Basics
By default Neovim status line is empty (:h statusline). The laststatusoption determines when the last window will have a status line (:h status-line).
- 0: No status line.
- 1: Display the status line if there is more than one window.
- 2: Always display a status line.
- 3: have a global statusline at the bottom instead of one for each window (available since release 0.7)
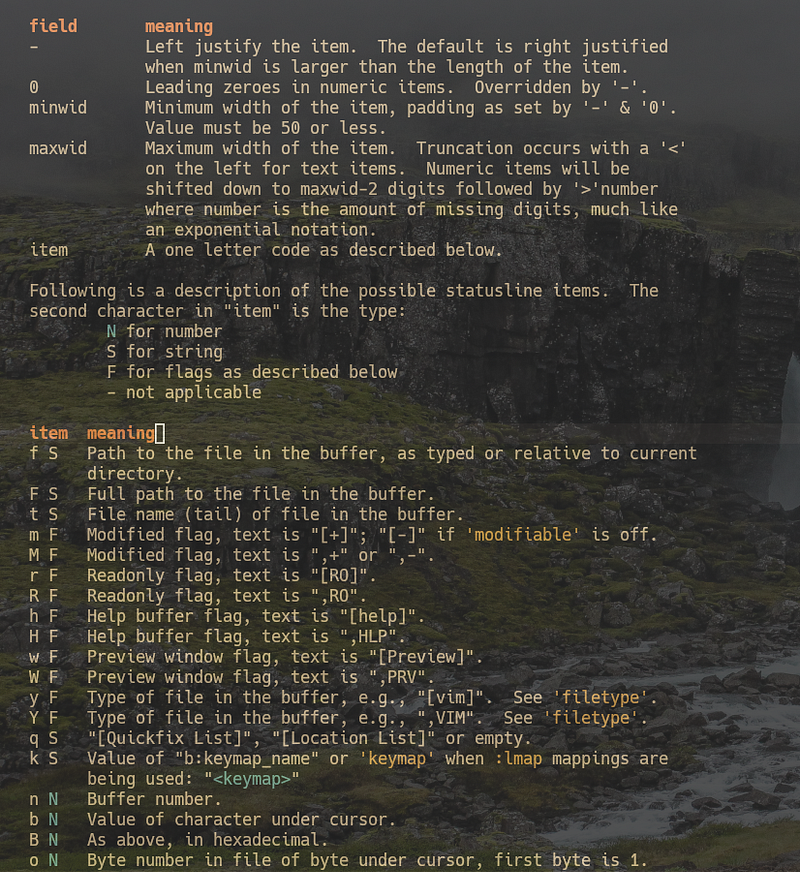
The status line consists of multiple items, e.g. file name, current line number, total line numbers, date and time, etc.
For each item, it consists of printf style ‘%’ items interspersed with normal text. Each status line item is of the form
%-0{minwid}.{maxwid}{item}All fields except the {item} are optional. A single percent sign can
be given as %%. (:h statusline).
Configure the Status Line with Lua
With the basics, let’s proceed to configure the status line using Lua.
Type :luafile % to run the Lua file below.
We should get a status line similar to the below.

Let’s go through the items from left to right.
- We show the current mode by using
v:lua(:h v:lua) to call the mode (:h mode()) function, and left align it with a minimum width of 5. - We show the file name and left align it with a maximum width of 16.
- We show the buffer number next to the file name.
- We show the modified flag. Text is
[+]or[-]ifmodifiableis off. - We show the file type.
%=is used to right-align the following items.- We display the current line number and the total line numbers. We use an item group (start with
(and followed by%)). - We show the percentage through the file.
Configure Status Line using Lualine
To have a more snazzy status line, we can use lualine.nvim.
Let’s install it using packer.nvim.
use {
  "nvim-lualine/lualine.nvim",
  event = "VimEnter",
  config = function()
   require("config.lualine").setup()
  end,
  requires = { "nvim-web-devicons" },
}
Without any customization, the default status line, using the Everforest theme, should look similar to the following.

Lualine has many features, including support for LSP diagnostics and extensions for changing the status line appearance for a window/buffer with specified file types. For now, let’s customize it using nvim-gps to show the current scope we are working inside.
use {
  "SmiteshP/nvim-gps",
  requires = "nvim-treesitter/nvim-treesitter",
  module = "nvim-gps",
  config = function()
    require("nvim-gps").setup()
  end,
}
nvim-gps needs nvim-treesitter so let’s install it.
use {
  "nvim-treesitter/nvim-treesitter",
   run = ":TSUpdate",
   config = function()
     require("config.treesitter").setup()
   end,
}
In lua/config/treesitter.lua, add the following lines.
Now in thelua/config/lualine.luafile, we can add the section for nvim-gps(lines 20 to 24).
Now as we navigate through our source code, we can see the scope in the status line.

nvim-gps is deprecated. Check out this article to use nvim-navic to display the current code context.
Tips:
- If we want to have a global status line, set the Lualine
globalstatusoption to true. This option configures the Neovimlaststatusoption to 3 (available since release 0.7). I prefer a global status line.

- We can also set
cmdheight(:h ‘cmdheight’) to 0 to hide the command line.

Check out Learn Neovim The Practical Way for all the Vim/Neovim articles!
If you are not a Medium member yet and want to become one, click here. (A part of the subscription fee will be used to support alpha2phi.)


