
Multiple Kubernetes Cluster Integration with Gitlab Core features

In this article, I will describe how you can integrate your Kubernetes clusters to Gitlab CI/CD progress with the Gitlab Core license. In our case, we are using this method for Kubernetes integration. Let’s check gitlab official support and our solution.
Gitlab Official Kubernetes Features
Gitlab provides Kubernetes support for three levels. These are instance-level, group-level, and project-level. Let’s see these configuration levels.
The first one is the instance level. Instance level Kubernetes clusters allow you to connect a Kubernetes cluster to the GitLab instance. It’s enabling you to use the same cluster configuration across multiple projects.
Another configuration level is group-level clusters. Group level Kubernetes clusters allow you to connect a Kubernetes cluster to your group. It’s enabling you to use the same cluster configuration across multiple projects.
The last configuration is the project level. Project-level configuration allows integrating projects with your Kubernetes cluster. But you can do that for all projects.
These configurations are free for only one Kubernetes cluster. For multiple Kubernetes cluster integration, you can pay and get a premium or silver GitLab license. These licenses will use with GitLab Enterprise Edition. Because of that, we will suggest you use Enterprise Edition Core as a minimum for upgradeable GitLab.
We have Multiple Kubernetes cluster. Should I pay money for Kubernetes Integration?
The answer is no. If you have “.kubeconfig” files, you should not pay money for Kubernetes Integration.
How can we do that?
We are using customized kubectl base images for deployments that have their own kubeconfigs.
Let’s start with CI/CD enabling
Let’s give kubeconfigs to base kubectl images, First of all, you can create an empty project on your GitLab. After the creation of the project, you can add a .gitlab-ci.yml file to the project root. This file enables your CI/CD pipeline for this project.
How we store kubeconfig files
To use kubeconfig files in CI/CD pipeline, create a folder like “kube-configs” and put your kubeconfig files inside that as an environment subgroups like dev, stage, prod, etc.


Example config file,
Project structure
Our project structure is shown in Figure 3,
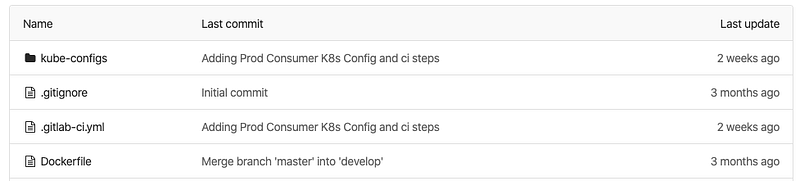
We have a kube-configs folder, .gitognore, .gitlab-ci.yml and Dockerfile in our project.
- Kube-configs: for store config files
- .gitignore: for ignore some files on a repository.
- .gitlab-ci.yml: to creating and manage CI/CD progresses.
- Dockerfile: for build docker images.
Build with Dockerfile
To create a docker image, you must use Dockerfile. Our Dockerfile is like that,
In our Dockerfile, we use alpine Linux distro.
Why we select Alpine as a base Docker image?
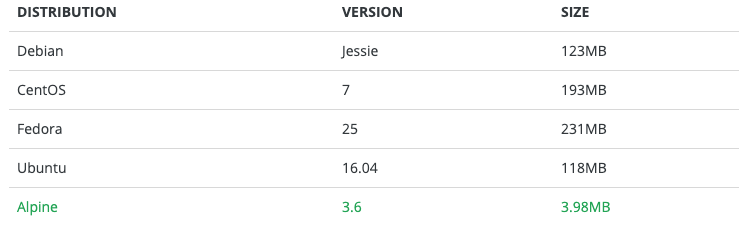
The reason is in that sentence, Small. Simple. Secure. Alpine Linux is a security-oriented, lightweight Linux distribution based on musl libc and busybox. Also, alpines’ size is very minimal. It is only 3.98MB.
Comparing Linux OS images
This chart shows us alpine Linux is very small.
After the base image selection, we have a docker argument for the passing environment to Dockerfile. And we have some environments like KUBECTL_VERSION and KUBE_ENVIRONMENT on our Dockerfile. KUBECTL_VERSION is used for deciding the kubectl package version while installation. Also, we use KUBE_ENVIRONMENT for selecting the kubeconfig environment.
Our base image Alpine is very small and simple. For that reason, we should add some missed packages for our build process. These packages are git, gettext, and curl.
Let’s continue with kubectl, kubectl is the most important command for Kubernetes deployment. Kubectl is a command-line interface for running commands against Kubernetes clusters. We use this command on the CI/CD pipeline, to deploy our projects to Kubernetes.
Our build steps are almost ready, only one thing is left; to give kubeconfig files to kubectl. After these steps, we are ready to build a Docker base image. Let’s see these steps below.
CI/CD Steps
Our .gitlab-ci.yml file is shown below with descriptions. You can re-arrange your steps to read our descriptions.
After configuring the GitLab CI/CD file (.gitlab-ci.yml), We are ready to build our customized kubectl images.
The Pipeline
We have 7 steps but in this article only dev and stage steps are mentioned. Other steps are the same as dev and stage. Nothing is different.
Our pipeline is shown below in Figure 5,

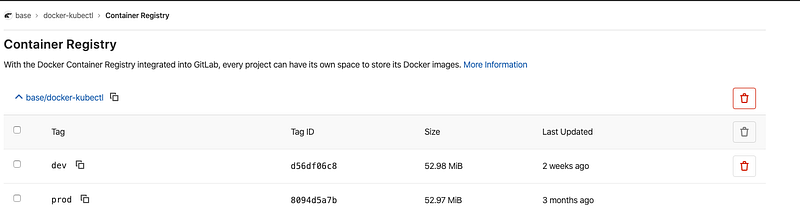
The Container Registry
We are using GitLabs’ own docker container registry, These built images are located in the docker container registry for ready to use when we need it.
Container registry in GitlLab is shown below in Figure 6,
Use-Case
Our environment based kubectl images are ready for use. Go to your project and open your .gitlab-ci.yml file. Add a new stage as Deployment.
After, add new deployment jobs for each environment.
As you can see, our deployment jobs have different base images. Images are docker-kubectl:{ENVIRONMENT}. After giving a base image, we should execute some shell script with some pipeline values ({ENVIRONMENT}, $CI_PROJECT_NAME, $CI_COMMIT_SHORT_SHA). These values are respectively environment, project name and commit short SHA. After passing these values to a shell script which is “deploy.sh” in this example, complete the deployment process.
Deployment Script
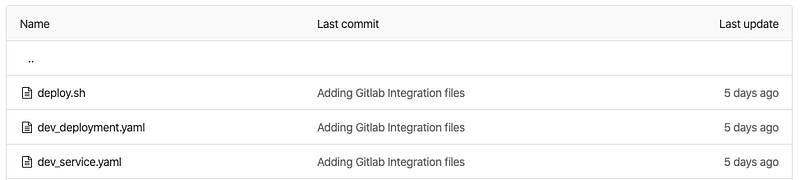
In our project, we have a Kubernetes folder for store deployment script and Kubernetes YAML files. Such as deployment and service YAML files.
We give environment prefix for these YAML files. And deploy.sh script uses this environment prefix.
In deploy.sh, we have passed values from the pipeline to YAML files, we replace template values with these. After we generate final Deployment and Service YAML files to push Kubernetes.
Kubectl applies command sends generated YAML files to Kubernetes and complete deployment process. After deployment removes generated files and completes the clean-up process.
Deploy.sh file as shown below,
Conclusion
We use this structure in our Kubernetes deployment processes and we find it easy to apply after creation base kubectl images.
What did we do?
- Create a kubectl base image from alpine Linux with environment kubeconfigs.
- Create a CI/CD pipeline to build and push kubectl base images.
- Add the deployment step on our existing project pipelines (.gitlab-ci.yml). And gives that kubectl base images as a job base image.
- Create a deployment script.
- Generate Kubernetes service and deployment YAML files with pipeline values.
- Apply YAML files to the Kubernetes cluster with kubectl command.
- Clean-up generated files.
If you are using GitLab EE with a Core license. You can integrate multiple Kubernetes cluster with this way.