
Multi-Tenancy Implementation using Spring Boot + Hibernate
In this tutorial, we will learn how to provide multi-tenancy in a Spring Boot application.
What Is Multi-tenancy?
Multi-tenancy is an architecture in which a single instance of a software application serves multiple customers. Each customer is called a tenant. Tenants may be given the ability to customize some parts of the application, such as the color of the user interface (UI) or business rules, but they cannot customize the application’s code.
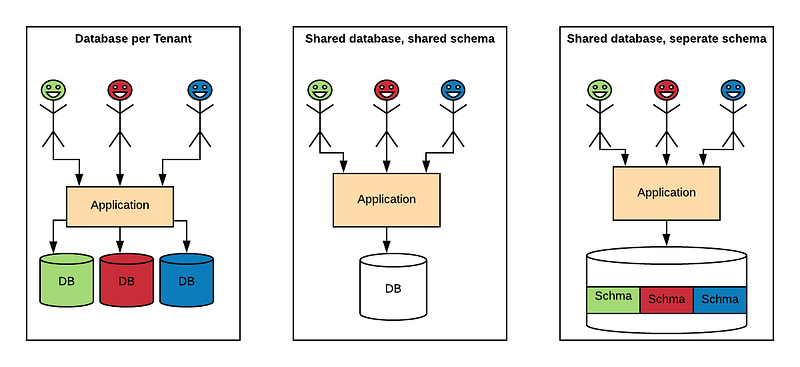
There are multiple well-known strategies to implement this architecture, ranging from highly isolated (like single-tenant) to everything shared. We can implement multi-tenancy using any of the following approaches:
- Database per Tenant: Each Tenant has its own database and is isolated from other tenants.
- Shared Database, Shared Schema: All Tenants share a database and tables. Every table has a Column with the Tenant Identifier, that shows the owner of the row.
- Shared Database, Separate Schema: All Tenants share a database, but have their own database schemas and tables.
How to Implement Multi-tenancy?
We can use Spring Boot and Hibernate to implement all the three approaches of multi-tenancy architecture.
We will use the below steps to implement the Multi-tenant Rest API:
- Understanding the Request Flow
- Identifying Tenants
- Connecting to the Database
- The REST Layer
- Conclusion
Prerequisites
For this tutorial, we will use Spring Boot 1.5.9.RELEASE project with following dependencies:
spring-boot-starter-data-jpa
postgresql
spring-boot-starter-web
spring-boot-starter-actuator
1. Understanding the Request Flow
The process to establish a multi-tenant communication usually consists of the following three steps:
- Accept the incoming connection, and authenticate the user if necessary.
- Intercept the request and identify the tenant for which the user is issuing the request.
- Establish a connection with the database or schema of the tenant.
Tenant identification is performed against a default schema, which contains the user's information. A user can authenticate himself on an external service and then pass the tenant information using an HTTP header.
To keep things simple, we are not performing any kind of authentication. We will use a custom HTTP header “X-TenantID” for Tenant identification. Let us start with identifying tenants.
2. Identifying Tenants
To start, we’ll need a way to determine which tenant is making requests. We will use Spring Interceptor to intercept the HTTP request and get the tenant information from the HTTP header. The selected tenant is then stored in a ThreadLocal variable that is cleared after the request is completed. The interceptor gets the value of the “X-TenantID” HTTP header for every request and sets the current tenant inTenantContext class. If no header is provided, it responds with an error.
The interceptor is configured in the WebMvcConfigurer class.
TenantContext class is used to store the tenant Identifier for each request. We have used the InheritableThreadLocal variable. This enables the child threads created from the main thread in our application to use the tenantId of the Parent Thread.
Once the tenant is identified we need to make a database connection.
3. Connecting to the Database
We can use any of the three approaches discussed below to connect to the database.
Let’s start with when each tenant has a separate database.
3.1 Database per Tenant
We will use a table to store the database configuration for each tenant in public schema. The advantage of using a database table is that if a new tenant gets added then we have to just add a new row in the table with database configuration related to tenant.
Create Table
CREATE TABLE if not exists public.DATASOURCECONFIG (
   id bigint PRIMARY KEY,
   driverclassname VARCHAR(255),
   url VARCHAR(255),
   name VARCHAR(255),
   username VARCHAR(255),
   password VARCHAR(255),
   initialize BOOLEAN
);
INSERT INTO DATASOURCECONFIG VALUES (1, 'org.postgresql.Driver', 'jdbc:postgresql://localhost:5432/tenant1?ApplicationName=MultiTenant', 'tenant1', 'postgres', 'postgres', true);
INSERT INTO DATASOURCECONFIG VALUES (2, 'org.postgresql.Driver', 'jdbc:postgresql://localhost:5432/tenant2?ApplicationName=MultiTenant', 'tenant2', 'postgres', 'postgres', true);JPA Entity for DataSourceConfig
JPA Repository for DataSourceConfig
public interface DataSourceConfigRepository extends JpaRepository<DataSourceConfig, Long> {
    DataSourceConfig findByName(String name);
}
Let’s write a class to store the database connection details for each tenant. We will load the connection details during server startup using @PostConstruct.
Hibernate Configuration
Below are the three hibernate related configurations which need to be performed to enable Multi-tenancy:
- CurrentTenantIdentifierResolver: It tells hibernate which is the current configured tenant. It uses the previous ThreadLocal variable set by the interceptor.
- AbstractDataSourceBasedMultiTenantConnectionProviderImpl: Spring Boot provides the
AbstractRoutingDataSourcefor determining a data source at runtime according to the tenant identifier. We need to override the selectDataSource method.
- HibernateConfig class that composes the pieces and configures the LocalContainerEntityManagerFactoryBean. In LocalContainerEntityManagerFactoryBean we set the MultiTenancyStrategy as DATABASE and override the connection provider and Tenant Identifier Resolver.
3.2 Shared Database, Shared Schema
Hibernate officially supports two different multi-tenancy mechanisms: a separate database and separate schema. A third Hibernate multi-tenancy mechanism, a tenant discriminator, also exists, and it’s usable — but it’s still considered a work-in-progress by some. Unlike the separate database and separate schema approaches, which require distinct database connections for each tenant, Hibernate’s tenant discriminator model stores tenant data in a single database and partitions records with a simple column value. We will add a column called tenant_id in all the tables. Then we can use standard Spring, Hibernate, and AspectJ mechanisms to populate the tenant_id column at runtime.
Define Interface
We will first define an Interface called TenantSupport, which will help us to identify entities with multi-tenancy capabilities.
public interface TenantSupport {
   void setTenantId(String tenantId);
}
JPA Entity
Now let’s define the JPA entity with tenantId filter.
Define Class
The class is defined with standard JPA and Hibernate annotations. Notably, the @FilterDef and @Filter annotations will allow us to inject a tenant discriminator clause to every SQL query generated for this entity. We will use AspectJ advice, which will set the Filter value.
The aroundExecution() method enables the Hibernate filter on the City entity when any of the data-access methods on the CityService class is executed. It populates the filter criteria with the tenant value from the TenantContext to limit the query results to only those records that match.
Hibernate Configuration
Following is the hibernate related configuration:
- EmptyInterceptor: Finally, we need to add tenant discriminator value whenever a database recorded is created or destroyed. For this, we need to use Hibernate Interceptor, as shown below:
Hibernate Interceptor also uses the tenantId from TenantContext.
Once we create the entities in Public schema with tenant_id column we are good to go. Depending upon the “X-TenantID” header value present in the request “tenant_id” column will be populated accordingly.
3) Shared Database, Separate Schema
Let us see what all configuration changes are required to implement multi-tenancy using schema-per-tenant paradigm with one connection pool for all tenants.
Hibernate Configuration
Following are the three hibernate related configurations:
- CurrentTenantIdentifierResolver: It tells hibernate which is the current configured tenant. It uses the previous ThreadLocal variable set by the interceptor. If no Tenant id is found then the Public schema is used as default tenant.
- MultiTenantConnectionProvider: This is required by Hibernate to provide the connection to the context. We are getting a connection from the data source and setting its schema to the relevant tenant.
- HibernateConfig class that compose the pieces and configures the LocalContainerEntityManagerFactoryBean. In LocalContainerEntityManagerFactoryBean we set the MultiTenancyStrategy as SCHEMA and update the connection provider and Tenant Identifier Resolver.
The REST Layer
Let’s now see how can we create a sample REST application using one of the above Multi-tenancy models. We are going to use a City REST resource to demonstrate the multi-tenancy approach. Sample Rest application will consist of the REST resource, a Spring interceptor to select and set the tenant identifier and the configuration to associate the interceptor with the REST resource. We will expose the City resource as a Web Service.
RestController
CityController is used to expose the API related to our resources.
Service
CityService is used to write all the business logic related to our resources.
Repository
CityRepository is used to perform all the database related operations on the resource.
Verifying the Workflow
The basic information required for testing and verification is as follows:
We will test the Shared Database, Separate Schema model. We need to execute the DDL statements mentioned below.
Note : The X-TenantID value which will be passed by Tenants should match the schema name. Whichever tenants we want to support the corresponding schema needs to be created.
The below script will create the database schema test1 and test2. It will also create the resource table required for testing in the above schema.
##### Schema Creation ############
create schema if not exists test1;
create schema if not exists test2;
###### Resource Table ###########
create table test1.city(id bigint, name varchar(200));
create table test2.city(id bigint, name varchar(200));
CREATE SEQUENCE "test1".hibernate_sequence
START WITH 1
INCREMENT BY 1
NO MINVALUE
NO MAXVALUE
CACHE 1;
CREATE SEQUENCE "test2".hibernate_sequence
START WITH 1
INCREMENT BY 1
NO MINVALUE
NO MAXVALUE
CACHE 1;Once the Schema and Table creation is done, then we need to call the rest API to store and retrieve the data.
Call the Rest API to Store the Data for X-TenantID: test1
curl -X POST http://localhost:8080/ -H 'Content-Type: application/json' -H 'X-TenantID: test1' -d '{"name":"Mumbai"}'Call the Rest API to Store the Data for X-TenantID: test2
curl -X POST http://localhost:8080/ -H 'Content-Type: application/json' -H 'X-TenantID: test2' -d '{"name":"Kolkata"}'Call the Rest API to retrieve the Data for X-TenantID: test1
curl -X GET http://localhost:8080/ -H 'Content-Type: application/json' -H 'X-TenantID: test1'Call the Rest API to retrieve the Data for X-TenantID: test2
curl -X GET http://localhost:8080/ -H 'Content-Type: application/json' -H 'X-TenantID: test2'Conclusion:
Every model has a trade-off between isolation and resource sharing, which is explained in detail at Microsoft: Popular multi-tenant data models.
I personally opt for the Schema-per-Tenant approach, because it provides the data isolation between Tenants and is also easy to implement.
Whichever approach we take we need to create the database, schema, and tables externally prior to executing the code. Once we enable multi-tenancy DDL needs to be executed externally.
If you would like to refer to the full code, do check https://github.com/sumanentc/multitenant.git


