
Modern Neovim — LSP and Remote Development
Set up LSP and remote development environment with Neovim.

In this article, we continue our journey to set up a modern and blazingly fast development environment using Neovim. We will configure completion and LSP, optimize the user interface, and set up a remote development environment with Neovim.
This article is part of the Modern Neovim series.
The Neovim configuration files are available in this repository.
Getting Started
Using the modernlazy.nvimplugin manager, our Neovim configuration now has a powerful user interface to manage every plugin that we need. In this article, we are going to
- set up completion using
nvim-cmp and other related completion plugins. - set up LSP using
nvim-lspconfig and other related plugins. - fine-tune the user interface to use the window bar to display the code context, and the status line to show the connected language servers.
- set up a remote development environment.
Completion
For completion, we create the lua/plugins/completion/init.lua file to configure related plugins.
- We set up completion for the path, buffer, LSP, and command line.
- We set up snippets using
LuaSnip. - We use the icons in the
lua/config/icons.lua file.
For the basics, check out the beginner series.

LSP
Configuration
For LSP, we create the lua/plugins/lsp/init.lua file to configure the plugins.
There are many ways to configure LSP. Check out this article for details!
- We use
mason.nvim andmason-lspconfig.nvim to manage LSP servers, DAP servers, linters, and formatters. - We use
null-ls.nvim to inject LSP diagnostics, code actions, and more via Lua. E.g., we use stylua for Lua formatting and ruff as Python linter (line 48 — line 49). - We use
mason.nvim to ensure the stylua and ruff utilities are installed (line 25 — line 28). neoconf.nvim is used to manage global and project local settings.neodev.nvim provides full signature help, docs, and completion for the Neovim Lua APIs.- We also installed the language-specific plugins for Rust (line 10 — line 11).
fidget.nvim is used to display LSP progress.inc-rename.nvim provides incremental LSP renaming based on Neovim’s command-preview feature.
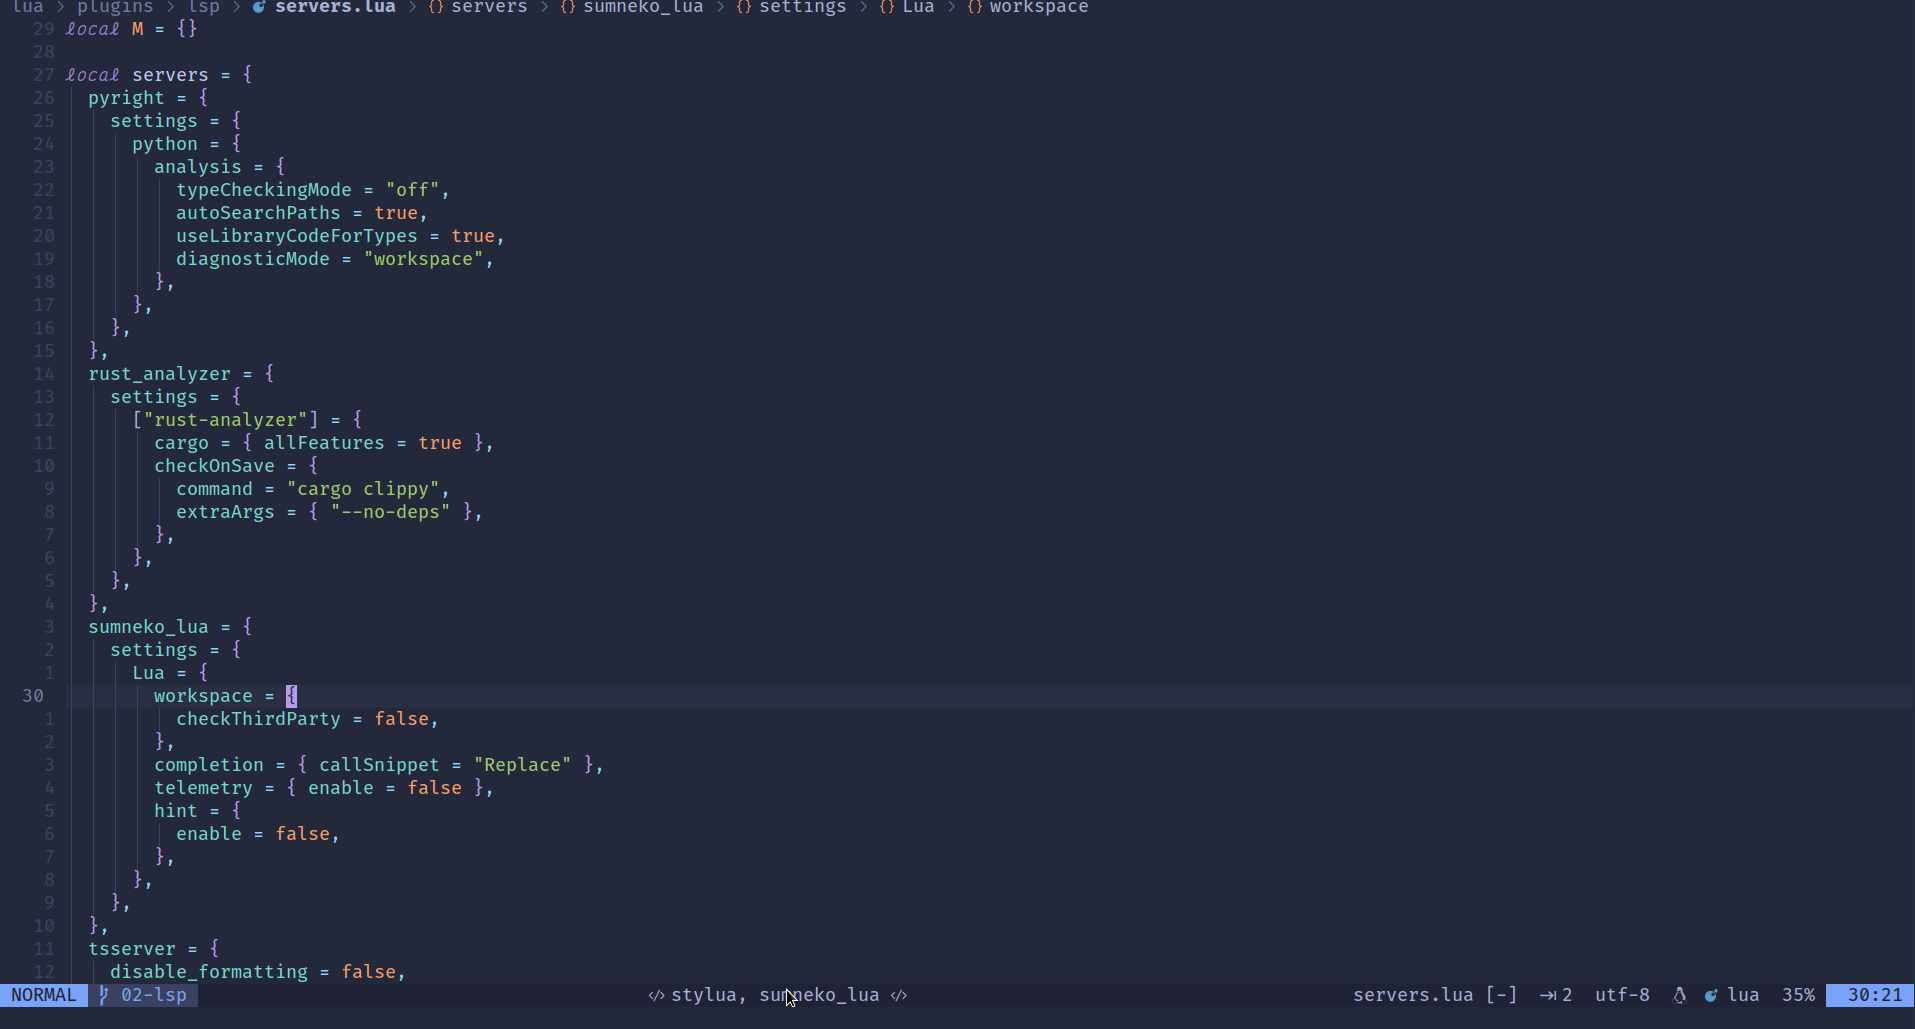
The language servers are configured in the lua/plugins/lsp/servers.lua file.
- We want to configure the language servers for Python (
pyright), Rust (rust_analyzer), Lua (sumneko_lua), JavaScript/TypeScript (tsserver), and Docker (dockerls) (line 3 — line 45). - We use the
LspAttach(h :LspAttach) event to configure code formatting and LSP key mappings (line 62 — line 66). - We use
mason-lspconfig.nvimto configure the language servers (line 61 — line 81). For language-specific configuration, e.g.rust_analyzer, we use a different setup function (line 75 — line 80).
The LSP key mappings are configured in the lua/plugins/lsp/keymaps.lua file.
We configure code formatting in the lua/plugins/lsp/format.lua file.
- By default, we want to format the buffer automatically if code formatting is supported by the language server (line 26 — line 38).
- We will use
null-ls.nvimfor code formatting if a source is configured. For example, we want to use stylua to format Lua code.
The screenshot below shows the different LSP features we configured.

Code Context using Window Bar
In the lua/plugins/lsp/init.lua file, we also configure the barbecue.nvim plugin to show the current code context in the window bar.
{
  "utilyre/barbecue.nvim",
  event = "VeryLazy",
  dependencies = {
    "neovim/nvim-lspconfig",
    "SmiteshP/nvim-navic",
    "nvim-tree/nvim-web-devicons",
  },
  config = true,
},
The screenshot below shows the current code context in the window bar as we navigate the current buffer. If we click on the method or function, the cursor will be positioned at the method/function.

We can also develop a Lua module to display the current code context. Check out the following article for details!
Status Line with Connected LSP Servers
We configure the status line in the lua/plugins/statusline/init.lua file.
Using the status line, we display the connected language servers for the current buffer.
The screenshots below show the language servers for Lua (stylua, sumneko_lua). When we click on the status line component, the LSP information is displayed.

The custom status line components are in the lua/plugins/statusline/components.lua file.
- The
git_repo(line 11) component shows the Git repository when there is more than 1 tab page. - The
diagnostics(28) component shows LSP diagnostics. - The
lsp_client(line 39) component shows the connected language servers, including those we configure usingnull-ls.nvim(formatters, linters, hovers, and code actions).
The lua/plugins/lsp/utils.lua file contains the utility functions to get the sources provided by null-ls.nvim.
Remote Development Environment
For remote editing, Netrw makes reading files, writing files, browsing over a network, and local browsing easy. It supports many protocols like scp, ftp, http, rsync, sftp, fetch, dav, etc (:h netrw-ref).
For the basics, check out this article!
Using Docker, we can set up a better remote development environment easily.
Below is the Dockerfile to set up our current Neovim configuration.
- We clone the Neovim repository and compile the latest Neovim release from the master branch.
- We set up our Neovim configuration using the XDG paths (
XDG_DATA_HOME,XDG_CACHE_HOME,XDG_CONFIG_HOME) and the GNUstow utility. - We start up Neovim in headless mode (
:h — headless) without any UI (line 50). - We also make Neovim listen (
:h — listen) on TCP port 6666 (line 50).
We use the docker-compose.yml file below to start the docker container.
Run the following command to start the docker container.
# docker compose up
We talked about the Neovim plugin UI architecture and the different GUIs that provide remote TCP support.
For details, check out this article!
For this article, let’s use Neovide to connect to a remote Neovim instance.
Our docker container can run locally or under a remote server.
Using Neovide, we can connect to the remote docker container with Neovim.
# neovide --remote-tcp=<host name>:6666
Alternatively, we can use Neovim to connect to the remote server (:h — server) and display the remote UI (:h — remote-ui).
# nvim --server <host name>:6666 --remote-ui
Now we can have a modern development environment to edit files locally or remotely.
Check out the article Learn Neovim The Practical Way for all the Vim/Neovim articles!
If you are yet to be a Medium member and want to become one, click here. You will gain unlimited access to all Medium articles and support my work directly.


