
MLflow & Azure Databricks
Databricks is one of the top choices among data scientists to run their ML codes. To help them to manage their codes and models, MLflow has been integrated with Databricks.
MLflow is an open source platform for managing the end-to-end machine learning lifecycle..Azure Databricks provides a fully managed and hosted version of MLflow integrated with enterprise security features, high availability, and other Azure Databricks workspace features..
Find below the components of MLFlow and few other important components have been added along with.

In this blog, we’ll cover few of the components — tracking, models & model registry.
Prerequisite
I’m using Azure Databricks Runtime for Machine Learning specifically, 8.3 ML Beta throughout this blog.
Data Preparation
We have used the Pima Indians Diabetes dataset (download it from here and for details, refer here).
df = spark.table ('pima_indians_diabetes')
print(f"""There are {df.count()} records in the dataset.""")
df.show(5)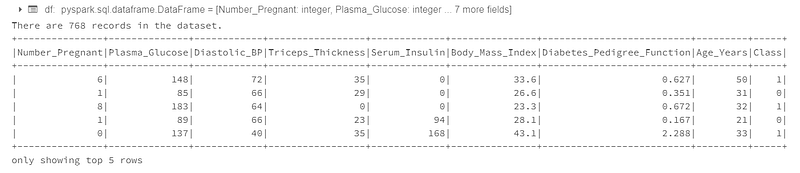
Train & Test Datasets
We’ll split the dataset into train and test sets.
# Convert Spark DataFrame into Panda DataFrame
import pandas as pd
dataset = df.toPandas()
# Extract features & labels
X = dataset.iloc[:,:-1].values
y = dataset.iloc[:, -1].values# Splitting the dataset into the Training set and Test set
from sklearn.model_selection import train_test_split
X_train, X_test, y_train, y_test = \
train_test_split(X, y, \
test_size = 0.25, \
random_state = 0)Standard Scaling
We’ll use feature scaling to keep the features into a same scale.
from sklearn.preprocessing import StandardScaler
sc = StandardScaler()
X_train = sc.fit_transform(X_train)
X_test = sc.transform(X_test)Enter MLflow
We’ll start by enabling or configuring logging of all the parameters, metrics and artifacts by calling mlflow.autolog() method. This will avoid to explicitly log models, libraries and parameters.
import mlflow
# Enable MLflow autologging for this notebook
mlflow.autolog()
Start run
We’ll start the MLflow by calling start_run method.
with mlflow.start_run(run_name='Pima_Indians_Diabetes_KNN') as run:
from sklearn.neighbors import KNeighborsClassifier
knn = KNeighborsClassifier(\
n_neighbors = 5, \
weights = 'uniform', \
algorithm = 'auto', \
leaf_size = 20, \
p = 2, \
metric = 'minkowski', \
metric_params = None, \
n_jobs = None)
knn.fit(X_train, y_train)
# Predicting the Test set results
y_pred_knn = knn.predict(X_test)
from sklearn.metrics import accuracy_score
acc_knn = accuracy_score(y_test, y_pred_knn)
# Explicitly log the metric (optional)
mlflow.log_metric("test_accuracy_score", acc_knn)
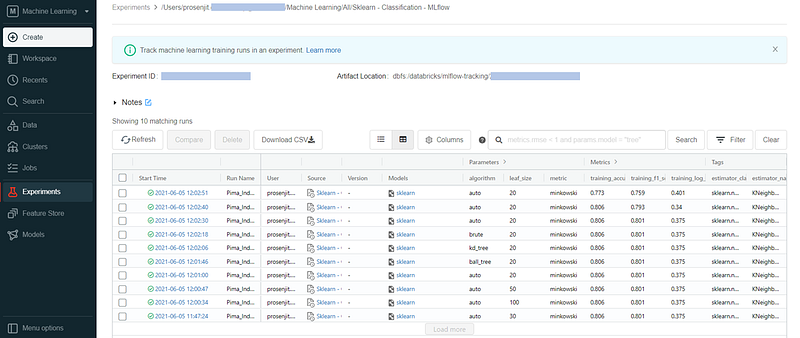
print ("Test Accuracy Score: {}".format(acc_knn))We’ll try passing KNeighborsClassifier with different parameters and compare the accuracy score. All of these experiments will be tracked by Databricks. Select the Experiment icon at top-right of the notebook to see all of the notebook runs.

Otherwise, we can select Experiments option from the left menu to see all experiments for all notebooks. We’ll then select our current notebook.

By selecting our current notebook, all of the experiment runs will be listed with model details, parameters, generated metrics and tags.
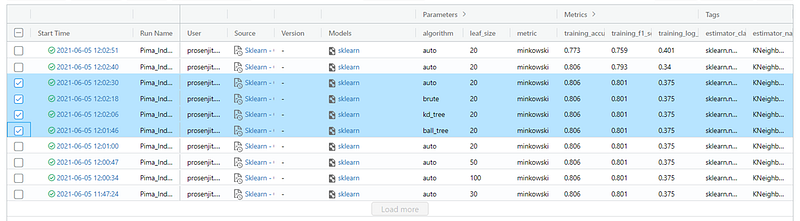
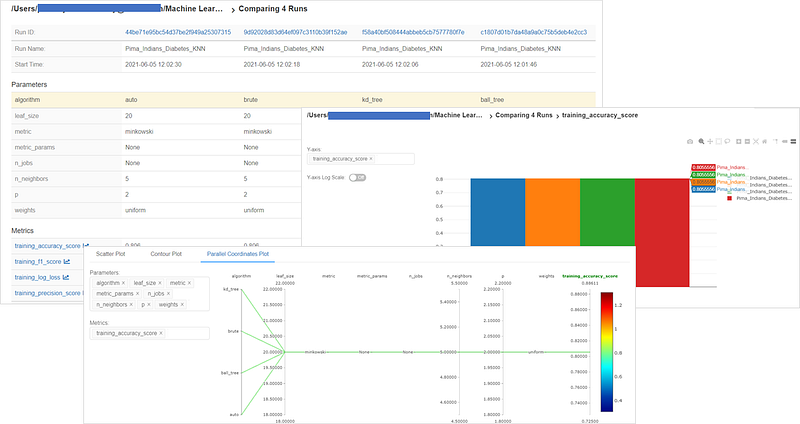
Comparing runs manually
We can select two/multiple experiments and compare.
Databricks MLflow will automatically calculate & log different metrics like — training_accuracy_score, training_f1_score, training_log_loss, training_precision_score, training_recall_score, training_roc_auc_score, training_score.
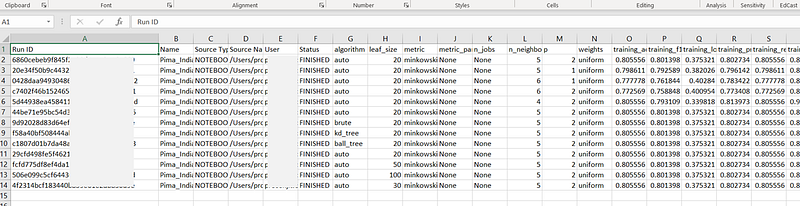
We can also download the runs as CSV.
Retrieve the best model
We’ll use the mlflow.search_runs() to search and retrieve the best model.
# Sort runs by their test accuracy;
# in case of ties, use the most recent run
best_run = mlflow.search_runs(
 order_by  = ['metrics.test_accuracy_score DESC', \
                 'start_time DESC'], \
 max_results = 10).iloc[0]
print ("Test Accuracy Score: {}"\
.format(best_run["metrics.test_accuracy_score"]))
Predict inputs with the best model
model_loaded = mlflow.pyfunc.load_model(
  'runs:/{run_id}/model'.format(
    run_id=best_run.run_id
  )
)

best_model_predictions = model_loaded.predict(X_test[1:2])
print("Test prediction: {}".format(best_model_predictions))
print("Actual value: {}".format(y_test[1:2]))
Register the final model in Model Registry
Once we’re happy with our model, we can register it in the Model Registry. By default, current stage will be None.
import time

model_name = "pima_indians_diabetes"
model_uri = best_run.artifact_uri+"/model"
new_model_version = mlflow.register_model(model_uri, model_name)

# Registering the model takes a few seconds,
# so add a delay before continuing with the next cell
time.sleep(5)
print ("Model Name: {}".format(new_model_version.name))
print ("Model Current Stage: {}"\
       .format(new_model_version.current_stage))
print ("Model Version: {}".format(new_model_version.version))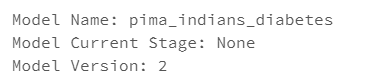
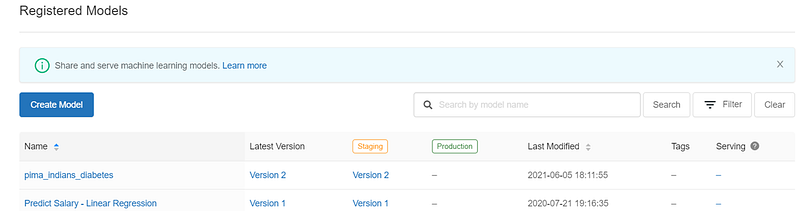
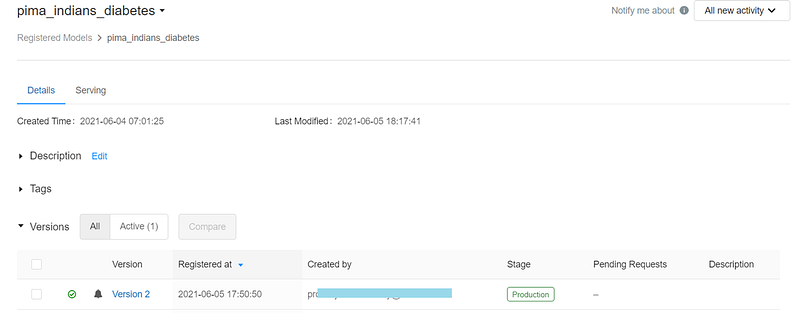
We can browse the registered model from Models menu.
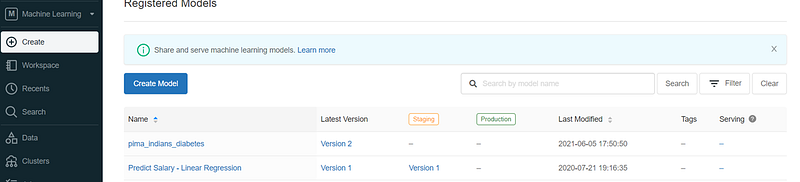
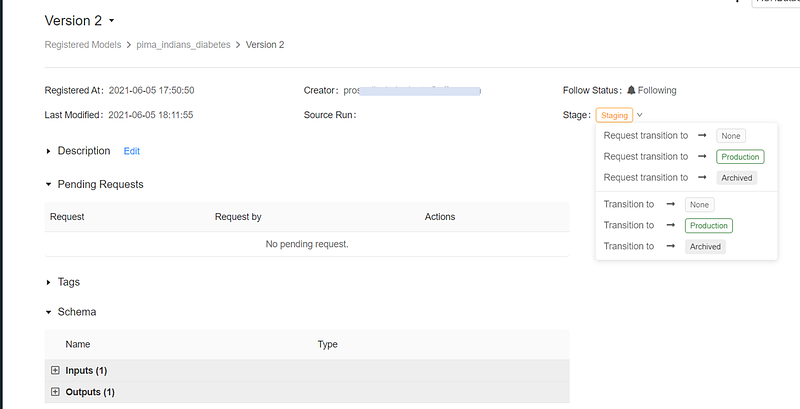
Managing the Model Lifecycle
Transition model to Staging
We can promote the code from None to Staging or Production using UI or code. Transiting the model from None to Staging using code:
from mlflow.tracking import MlflowClient
client = MlflowClient()
client.transition_model_version_stage( \
      name=model_name, \
      version=new_model_version.version, \
      stage="Staging"
)
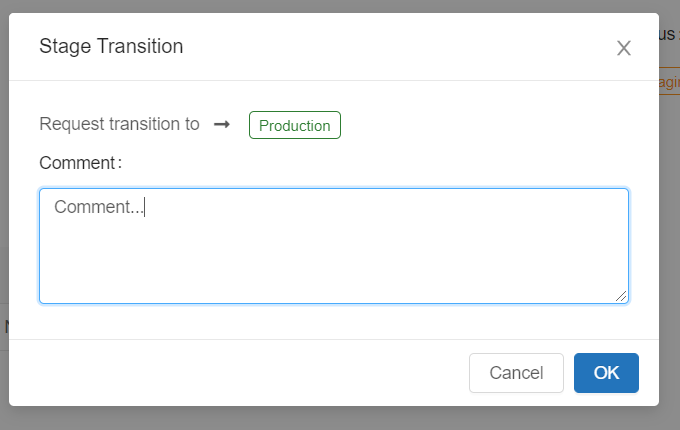
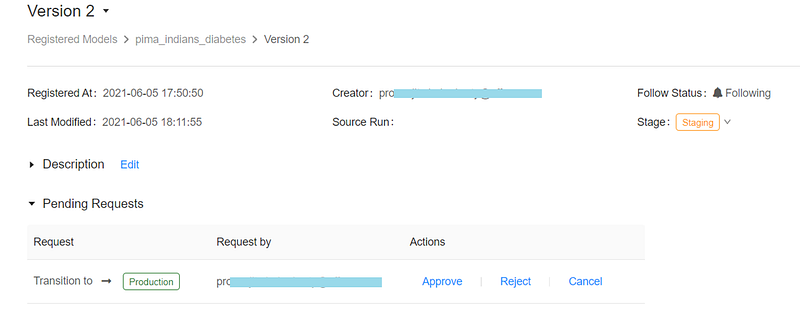
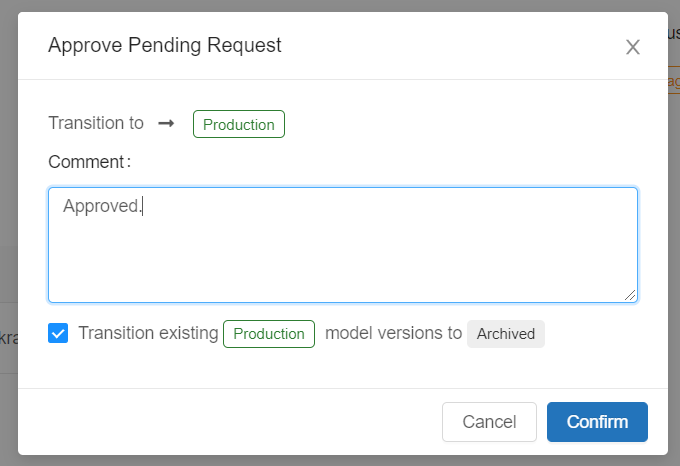
Transition model to Production
We can promote our model to Production programmatically or using Models screen. We’ll use Request transition to rather than direct Transition to.
Sharing Models across Workspaces
In a large enterprise, there are multiple business groups, teams and projects. They use separate instances of Databricks and not share in general. However, it’ll be good if individual data science teams can log & maintain their final machine learning models into a central model registry with proper description so, these can be used by other teams as well.
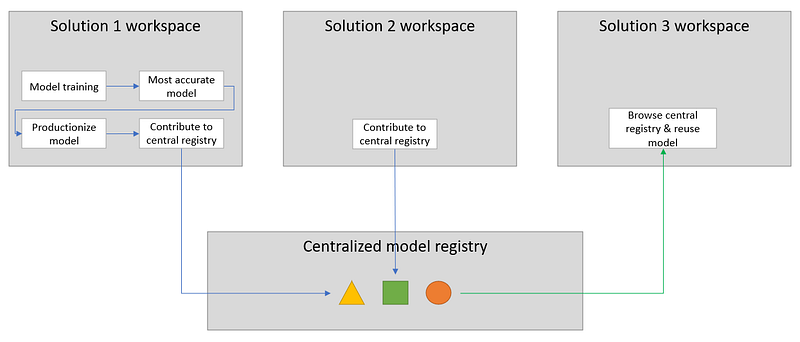
Or, there can be cases where users use different instances of Databricks for development, staging & production and use a separate centralized model registry.
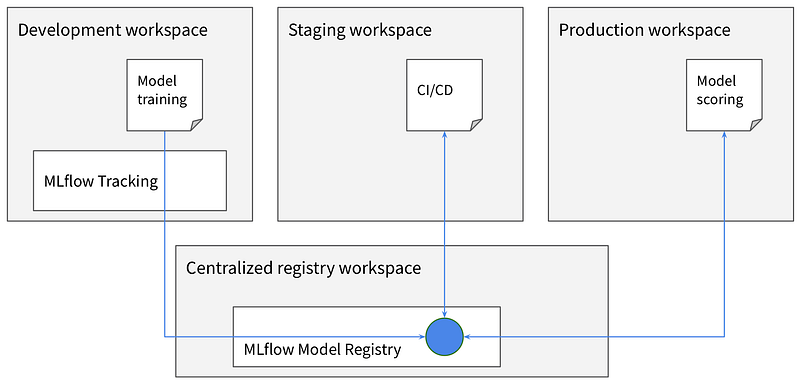
Whatever is the usecase, find below the steps to access a remote Model Registry.
Step 1 — Generate token in central model registry or remote registry
Access to the centralized registry is maintained using Databricks personal access tokens (PATs). Share the PATs with the teams who want to use the registry.
Step 2 — Store the remote PAT in local workspace
We need to store the given PAT & remote store information in local Databricks secret scope.
We can use Databricks CLI to configure the secret scope.
# Install databricks-cli
pip install databricks-cli
# Configure databricks-cli to connect local workspace
databricks configure
Create the secret scope (I’m using Databricks Standard).
databricks secrets create-scope --scope my_prod_scope --initial-manage-principal usersOnce the scope is created, the following keys need to be setup.
databricks secrets put --scope <my_prod_scope> --key <central_model_registry>-hostdatabricks secrets put --scope <my_prod_scope> --key <central_model_registry>-tokendatabricks secrets put --scope <my_prod_scope> --key <central_model_registry>-workspace-id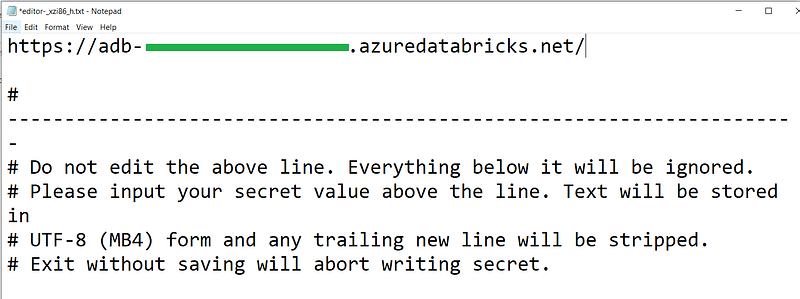
Step 3 — Code to connect to the remote registry & use required model(s)
Construct the remote registry URI:
#registry_uri = f'databricks://<scope>:<prefix>'
registry_uri = f'databricks://my_prod_scope:central_model_registry'
Specify to the remote registry:
import mlflow
mlflow.set_registry_uri(registry_uri)
Verify the current specified registry:
mlflow.get_registry_uri()
List all of the models available in the remote registry.
client = MlflowClient(tracking_uri=None, registry_uri=registry_uri)
registered_models = client.list_registered_models()
for model in registered_models:
  print ("Model Name: {}".format(model.name))
Predict with the production version model (I’ve already scaled the inputs i.e. feature scaling has been applied).
model = mlflow.pyfunc.load_model(f'models:/pima_indians_diabetes/Production')
import numpy as np
input = np.array([[-0.82986389, -1.26778492, 0.12192245, -0.19524251, -0.37696732, -0.70520517, -0.558692, -0.79908332]])
output = model.predict(input)
print ("Model predicted output:{}".format (output))
Conclusion
In this blog, we have seen how to experiment with models & parameters, track our experiments, manage ML models, register final models into Model Registry and share across enterprise. In the next blog, we’ll see how to deploy our model for online serving.
References
Thanks for reading!! If you have enjoyed, Clap & Share it!! To see similar posts, follow me on Medium, Blogger & LinkedIn.


