
Ultimate Guide for Migrating from Google Photos to iCloud Photos
I hate when the word ‘ultimate’ appears in an article headline. It just feels too much like clickbait. Yet, throughout this adventure, I could only find bits and pieces to the puzzle, but nothing that addressed the journey in its entirety. So ‘ultimate,’ if you ask me, is justified and is what makes this excursion different than anything else. It’s a complete journey to migrate two Google Photos libraries with Partner Sharing to two iCloud Photos libraries that have a Shared Photo Library.
Pre-requisites
To manage this, you’ll unfortunately need a Mac to import all of the photos to your library… though I suppose you might be able to import by connecting an external drive to an iPad? You’ll also need to be comfortable with command line tools.
Also, everything I outline below will ignore albums because they add a ton of complexity. Your albums (even shared ones) will still exist in Google Photos, so there would be no pressing need to migrate them. There’s nothing like a fresh start, which is exactly what I plan to do myself. If you care about those things, you’ll need to modify the process.
Why?
Like many others, I wasn’t pleased by Google’s decision to stop unlimited free photo storage though I understand their reasoning to do so. We had started paying for storage anyway, partly because we were there, partly because we weren’t paying for iCloud storage, partly because iCloud Photos wasn’t really at feature parity.
Then we started paying for more storage with Google, while at the same time paying for iCloud storage. iCloud Photos also caught up with more useful features and added Shared Photo Libraries. This, combined with the desire to just ‘have a photo library in one app that isn’t complicated and works with all of our stuff in the Apple ecosystem drove our decision.
Sure, there are some things Google Photos does better and probably always will. But I trust more in Apple’s privacy controls and I’m confident they won’t just kill this thing off for no reason. Moreover, in dealing with this entire process, I realized that I was pretty frustrated with how Google Photos works and didn’t even know it.
So… let’s dive in!
Stop the bleeding
The very first thing I did was disable automatic saving of photos from Partner Sharing (you’ll see why in a minute) from both accounts. You can leave your device backup on as it won’t make a huge difference, but do not turn off Partner Sharing yet.
Get things going
There are likely some photos locally on your devices in your camera roll, which will always be better to keep than the ones from Google Photos. Enable iCloud Photos syncing on all of your devices (also across both accounts) that have photos so they can start chugging away. Yes, this means there will be duplicates later on, but that’s going to be unavoidable.

Bonus: you can start familiarizing yourself with the features in the native Photos app!
Isolate
This is, by far, the most painful step of the entire process. I didn’t initially realize it until I had already performed the subsequent steps, which means I had to backtrack.
There are two distinct behaviors in Google Photos. The first behavior actually shares your photos with your partner. It includes settings to choose how those photos are selected (time-based, faces, all photos, etc.) allowing your partner to view those shared photos at any time. That isn’t hugely useful on its own because you have to explicitly navigate to them.
The second and perhaps more important step is to save your partner’s photos in your library, which is great since they’re then ‘in your library view’ based on your settings (either photos with specific faces or all photos). Importantly, they really are in your library at that point. When you request your photos from Google Takeout, they’re in there too, just like the photos you took personally, which is… not conducive to associating photos with their owners when we migrate everything into iCloud.
Worse yet, there are a few views to see what your partner has shared with you, but no views or mechanisms to easily remove all of those photos from your library. You can’t search or filter for them (even using the internal id of your partner) and in the view where you can see them, you can’t take action on them. It’s possible you could do this via the Google Photos api, but I didn’t want to spend a ton of extra time on something that likely wouldn’t work anyway… it’s clear they don’t want you to do this.
Luckily, I found this comment on Reddit, because it’s the only method I’ve found that works. It’s incredibly tedious, but it does isolate your library in order to prepare you for the rest of the process.
To make things easier:
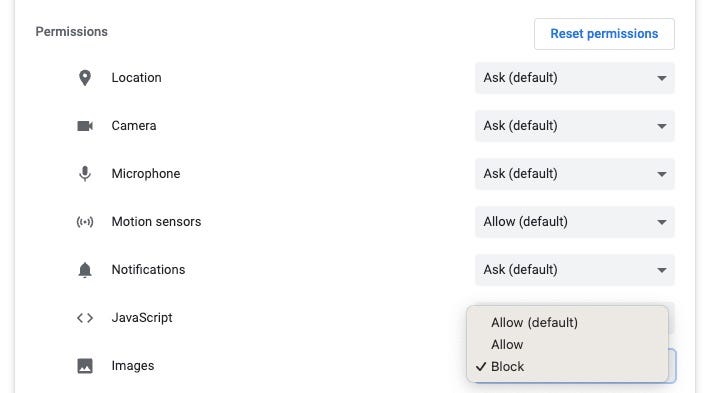
- Set Chrome to disable image loading for Google Photos at this settings page (see below): chrome://settings/content/siteDetails?site=https%3A%2F%2Fphotos.google.com
- Install an auto-scroll or fast-scrolling Chrome extension to get you to the bottom of the page faster (I used Fast Scroll, mainly because nothing else worked)
Note of caution
This will, obviously, remove those photos from your library. It will also remove them from any albums or shared albums you added them to. This sounds perfectly obvious in retrospect, except for the fact that you may have inadvertently added them to albums because they looked like your photos even though they were your partner’s. So, if that knowledge is important to you, make note of your albums and what they contain, download them separately first, or use the steps below for Google Takeout just for those albums as a separate backup.
Download
The most tedious part is done, but the most time-consuming parts are still on deck… this is one of them. You need to download everything you have stored in Google Photos.
- Head to Google Takeout
- Deselect all, then select Google Photos
- One bit they don’t mention is that if you have large videos, they’ll be silently excluded from the export… for that reason I chose the largest export size I could (which was 50GB)
- Wait (and wait and wait) then download the archives
Cleanup
For these steps, you’ll need a few tools:
- The amazing
gpthtool will handle a lot of basic cleanup and organization, date restoration, duplicate (and edited file) removal, etc. exiftool (available on homebrew) will help us correct bad metadata- Handbrake to re-encode the corrupted files (you may not have any, see the appropriate section below)
Setup
We’re not going to use gpth yet, but their instructions are helpful to get started. Follow steps 1–2 only to install the tool and combine the takeout archives. For extra caution and safety before you start (I was absolutely glad I did this), keep a separate copy of the combined library that you can restore if something goes awry.
Once you have a copy, open your terminal and cd to the directory that contains your working copy.
Initial metadata correction
There are loads of reports that Takeout doesn’t strip metadata from files except if they’ve been edited directly in Google Photos. I found this to be the case with many of my files, but not for all of them. I don’t know if they were very old files, if I inadvertently edited them, or something random happened with my backup… The point is: there were a decent number of files that had no embedded metadata, but that did have metadata in the corresponding json file. So we should try to fix as many of these files as we can.
Incorrect filenames
Our first step is making sense of the json files. For duplicate files, Takeout has put the (1) identifiers in an incorrect spot in the filename 🤦♂. Given an image named IMG_01234(1).jpg, there should be a corresponding IMG_01234(1).jpg.json file, buuuuuut the file is actually named IMG_01234.jpg(1).json, so exiftool won’t be able to find any files to restore metadata from. I was lucky enough to find someone who had already solved this. The below command will fix the json filenames to match.
exiftool -if '$filename=~/(\.[^.]+)(\(\d+\)).json$$/i' '-filename<${filename;s/(\.[^.]+)(\(\d+\)).json$/$2$1.json/}' -progress -ext json -r ./Image GPS data
The next step is to find any images (jpg or heic format) without embedded GPS data and restore that from the corresponding json file.
exiftool -if 'not defined $GPSPosition' -tagsfromfile '%d/%F.json' '-GPSAltitude<GeoDataAltitude' '-GPSLatitude<GeoDataLatitude' '-GPSLatitudeRef<GeoDataLatitude' '-GPSLongitude<GeoDataLongitude' '-GPSLongitudeRef<GeoDataLongitude' -d %s -overwrite_original -progress -ext jpg -ext heic -r ./Movie GPS data
There were also a bunch of mov files that had no embedded GPS data (even in an incorrect spot) that we need to restore from the json file. I didn’t find any mp4 videos that needed correcting, I believe those to be original uploads that Google hasn’t touched. This post was hugely helpful in figuring this step out.
exiftool -if 'not defined $Keys:GPSCoordinates' -tagsfromfile '%d/%F.json' '-Keys:GPSCoordinates#<$GeoDataLatitude $GeoDataLongitude $GeoDataAltitude' '-Keys:CreationDate<$PhotoTakenTimeTimestamp' '-QuickTime:CreateDate<$PhotoTakenTimeTimestamp' -d %s -overwrite_original -progress -ext mov -r ./Validation
If you’d like to check to see the remaining files without GPS data embedded, you can use the below commands to list them.
# images
exiftool -if 'not defined $GPSPosition' -p '$filename' -ext jpg -ext heic -r ./

# movies
exiftool -if 'not defined $Keys:GPSCoordinates' -p '$filename' -ext mov -r ./
There are legitimate reasons there may not be GPS data. I’ve found that the below won’t have GPS data:
- Saved FaceTime videos
- The video portion of a live photo
- A shared image saved to your library that wasn’t shared with location data (not from Partner Sharing, as we’ve removed all of those)
- Saved screenshots
- Probably a thousand other little reasons
This isn’t going to be perfect, we just want to get most of the way there. Once you’re satisfied that enough of your collection has metadata, proceed!
Running gpth
Now that we have all of the information we’ll need from the json files, we can run gpth to get everything organized.
- Follow step 3 from their instructions
- Choose option 1 at the first prompt to generate one large folder
- Choose option 2 at the second prompt to put album data into a json file and all of the images in one folder… the symlinks never worked well for me and the rest of the process really benefits from one large directory
- This may take a while to process, depending on the size if your library and how many albums you have
- When it finishes,
cdinto<output directory>/ALL_PHOTOSto execute the remaining commands
Secondary metadata correction
Some of our mov files will have metadata embedded, but on a metadata key that the Photos app won’t read. We can take this opportunity to correct that.
exiftool -if 'not defined $Keys:Make' '-Keys:Make<UserData_mak' '-Keys:Model<UserData_mod' -execute -if 'not defined $Keys:GPSCoordinates' '-Keys:GPSCoordinates<GPSCoordinates' -execute -if 'not defined $Keys:CreationDate' '-Keys:CreationDate<CreateDate' '-QuickTime:CreateDate<CreateDate' -overwrite_original -progress -ext mov ./Corrupt video files
Some of my downloaded mov files appeared to be corrupted. On further examination, they were just encoded with the vp09 codec, which was created by Google. So they were either split/edited in Google Photos, re-encoded to save space, or (my leading theory) HDR videos. Either way, we can’t import them into iCloud without fixing them first =(
I could have created a fancy bash script to handle all of the below steps, but that would have taken more time than I was willing to commit. There are a few manual steps to take here, mainly with regard to Handbrake.
Isolate any corrupted files
Once again, exiftool to the rescue! We can sort through all of our video files and move the corrupted ones to a new directory so we can easily deal with them.
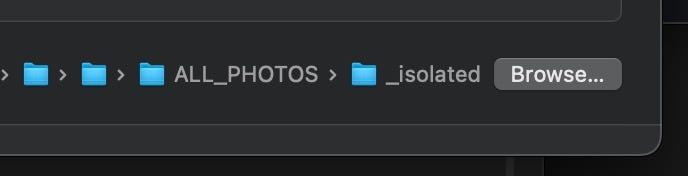
exiftool -if '$CompressorID eq "vp09"' -ext mov -o '%d/_isolated/%F' ./If you don’t end up with a new_isolated directory, then you don’t have any video files that need to be re-encoded… hooray! Jump down to the Re-cloud section below.
If you do have an _isolated directory, those will need to be re-encoded so that iCloud can play them. You’ll need to download Handbrake before following the next steps.
Re-encode
Open Handbrake, then select the _isolated directory that was just created. This will load all of the videos that need encoding.

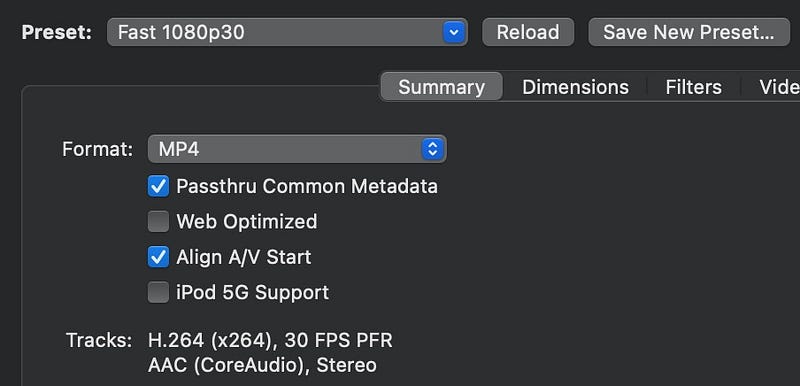
Choose the encoding preset. I just used the default Fast 1080p30 with all of the defaults… you’re welcome to choose the best combination of file size and quality for your needs.
Make sure you change the output directory to be the same as the input directory! Otherwise, you’ll have to move files another time.
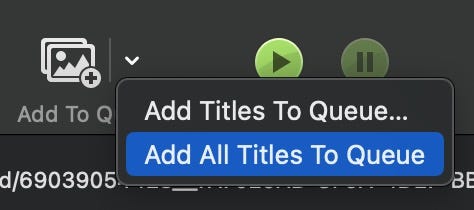
We can now add all of the videos to the queue and start them processing. This could take a few minutes to a few hours, so go grab a snack.
Fix metadata, again
The newly encoded video files are once again without metadata, even though Handbrake should have dealt with it properly. However, the original files still have it. So we can just copy everything over.
exiftool -tagsfromfile '%d/%f.mov' '-All:All' -overwrite_original -progress -ext mp4 ./_isolatedFinal cleanup
Last step, then we’re done correcting files! We don’t need the original mov files or the _isolated directory anymore. So we move the new files into the main directory and remove the rest.
mv _isolated/*.mp4 ./ && rm -rf _isolatedRe-cloud
After all of the above steps, we’re left with a gigantic folder of images and videos that largely have the correct metadata. It’s time to bring them into your iCloud library. Before doing that, make sure to turn off the Google Photos backup on all your devices! Otherwise, it will start re-uploading everything you import.
This step is really straightforward, buuuut it takes potentially forever. Open the Photos app, use the Import menu item and point it at your output directory. Once everything is copied to your library, it will start uploading to iCloud.
Note: the ‘count’ of items imported won’t match the ‘count’ of items you’re uploading to iCloud. Your exported files include everything from your library, including the video portion of a live photo and bursts… the import will only count the distinct items. The photo and video that make up the live photo are one ‘item,’ all of the photos in a burst are on ‘item’, etc.
Apple Photos will now start to scan your library for people and duplicates. I’ve found this step painfully slow because you can’t manually trigger it, you can’t always see the progress and you just sort of have to wait. As they’re found, feel free to tag and review the people album and merge any duplicates that were on your devices already.
Note: I did end up downloading (and paying for) an app called PhotoSweeper to help clean up some duplicates. While the duplicate detection that Apple has built in is fine, this app offered far more control in our transferring situation.
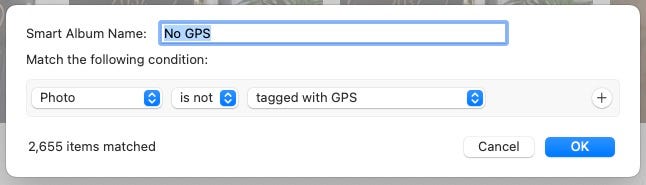
I also used this opportunity to correct dates that were odd (I found a few that were at the beginning of unix time and a few that were hundreds of years in the future) and locations that were still missing. You can create a smart album (Mac only) that will find any items that have no GPS data.
Repeat
So yeah, that was just one library. This guide is all about moving away from Google Photos with Partner Sharing, which means you have another library waiting for you. Follow all of the above steps, this time from the perspective of the other account.
Re-share
There are two schools of thought here for when to set up the shared library:
- As soon as you can so that you can actually start using the dang thing. This will leave you with a smaller initial shared library because not all of your people were found and tagged… you’ll be relying on the ‘For Your Shared Library’ recommendations to fill in these gaps later. Note: this is a big departure from how Partner Sharing in Google Photos works. After initial setup, nothing will be put into the Shared Photo Library unless you explicitly move it yourself. Which I actually quite like.
- When more of the library is synced and more photos of your people have been found and tagged. This is the option I went with as I wanted the Shared Library to start out as complete as possible.
That said, you’re now ready to set up the shared library! Apple’s docs can walk you through it. Personally, I’ll be setting things up to share familiar faces and not all images taken at home. Those choices are completely up to you, though, and will depend on your requirements for sharing photos.
Note: make sure to check back regularly to categorize your people and check for ‘For Your Shared Library’ suggestions!
Recover storage
I haven’t gotten to this step yet, but my plan is to leave everything as-is in Google Photos for a while to make sure nothing is missing. Once I’m satisfied all is accounted for, I’m going to delete content to get back under the 15BG free limit so that other Google services can continue to function, but also so that we don’t have to keep paying for storage. Probably just images from after the cutoff of totally free storage that existed for years, but I haven’t decided yet.
The end
That’s it! You have one app to manage your photos that works fantastically well within the Apple ecosystem.
More references
There were a lot of helpful tidbits I found as I went through this journey. Here’s a list (in no particular order) of them. Some are also linked above, but I added them here for the sake of thoroughness.
- https://legault.me/post/correctly-migrate-away-from-google-photos-to-icloud
- https://readmedium.com/the-painful-experience-of-leaving-google-photos-914d9c63d4b2
- https://robbie.antenesse.net/2020/11/25/exporting-google-photos.html
- https://github.com/TheLastGimbus/GooglePhotosTakeoutHelper
- https://www.reddit.com/r/googlephotos/comments/jhn6ym/comment/hhum8f2/
- https://exiftool.org/forum/index.php?topic=10412.30


