
MidJourney V6 Deep-Dive Series
😵 MidJourney Won’t Listen to You? Use These 5 Prompting Tricks to Fix It! 🔧
Struggle No More — Apply These 5 Simple Tricks to Get MidJourney Back on Track. 🛤️✨
If later you find any value in this article, throw me some Medium love! 🥰 To support my work: Clap up to 50 times, leave a message to share your thoughts & Be sure to follow for more future content like this one! 💌
Hello, my creative friends! 😊 Lately, I’ve been hopping around online forums and chat groups, soaking up all the discussions about our favorite AI text-to-image generator, MidJourney.
You know what I keep seeing? Loads of MidJourney users seem to have a tough time getting MidJourney to create exactly what they want — they pop into these groups, share their prompt troubles, and look for some friendly advice. However…
90% of these prompt problems come down to one simple fact:
😣 Most MidJourney users are not aware of the simple little prompting tricks that can make a huge difference in how well MidJourney ‘listens’ to them.
Now, I’m not saying MidJourney is some kind of magic genie that grants your every wish — that’s not what MidJourney is for — As its founder, David Holz, said in the recent MidJourney Office Hours, “MidJourney is a vehicle for imagination. You don’t have full control, but you do have some control.” And it’s that bit of ‘control’ we’re going to talk about.
Today, I’ve got 5 MidJourney prompting tricks to share with you. They’re super simple and will help you steer MidJourney in the direction you want — it’s all about getting that bit of ‘control’ to make the magic happen! 🛤️✨
Let’s dive in, shall we? 😊

📌 If you’re new to MidJourney V6, don’t worry! Here is <Your Quick Start Guide> to get started:
💡 Trick #1: “Style Raw” — The Essential Setting for Getting MidJourney to Follow Your Lead
If you asked me what I would do if MidJourney isn’t responding to my instructions, the first thing I would try is enabling the “Style Raw” setting.
Think of this as a magical switch that temporarily turns off MidJourney’s creative interpretation, allowing it to follow your instructions more precisely.
What Exactly is “Style Raw” For?
“Style Raw” tells MidJourney to apply less of its default aesthetic and beautification, resulting in image outputs that adhere more closely to your prompt instructions, particularly with specific art styles.
It removes some of the “MidJourney bias” — like the over-the-top styling, intricate image composition, and dramatic lighting — to make your AI images appear more “raw” and “un-opinionated.”
So, to put it all in one simple sentence: Style Raw is the go-to setting for MidJourney users who crave more control over the final look of their images.
How Do You Apply “Style Raw”?
There are two ways to apply “Style Raw”:
1️⃣ — If you only use “Style Raw” occasionally
You can add --style raw in your prompts whenever you need more control over your images:

2️⃣ — If you use “Style Raw” often
Activate “Style Raw” permanently by typing /settings in your prompt box, and select RAW Mode:

This activation will be valid until the next time you change the setting. So it’s ideal if you use “Style Raw” quite often.
In What Situations Does “Style Raw” Work Best?
1. When creating images that look like ‘everyday photos’
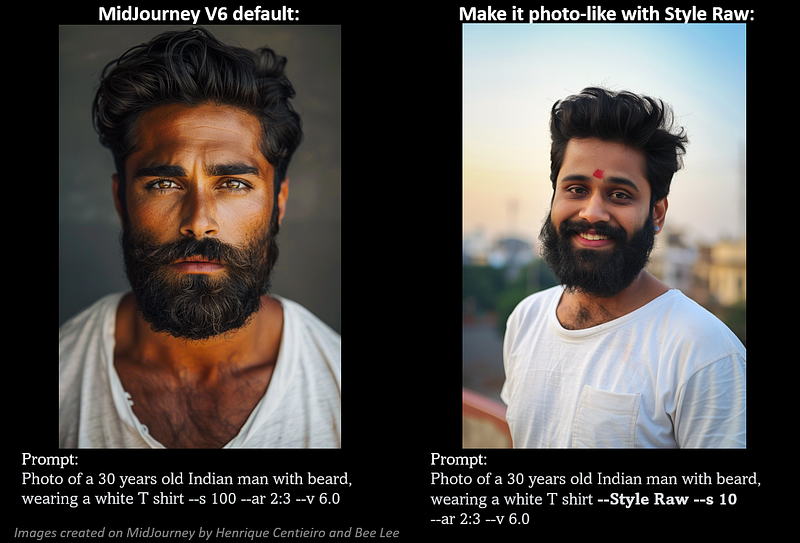
For more details on creating “everyday photos,” check out this article under “Prompting Trick #1 — Want to create images that look like real photos? Tell MidJourney to make it “uglier”!”
2. When creating images with accurate text
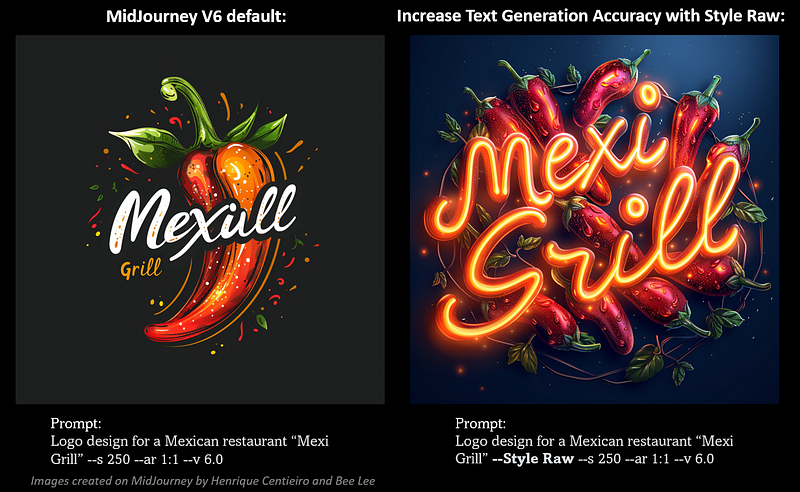
For more details on text generation on MidJourney, check out this Essential Guide for more tips & tricks and practical use cases in Text Generation on MidJourney V6.
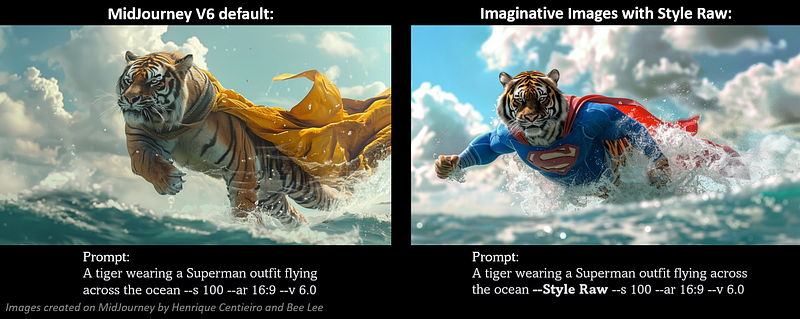
3. When creating more out-of-ordinary / imaginative images
To create images that are more unusual or imaginative, using the “Style Raw” command can help guide MidJourney to listen closely to your prompt, rather than running wild with its default style and creativity:
4. When your prompt is complex with lots of details
If your prompts contain many essential elements, adding “Style Raw” can increase the likelihood that MidJourney will capture the details more accurately. However, it’s important not to include any ‘junk’ words that could diminish the importance of the essential details.
For more details on what ‘junk words’ to avoid, check out this article under “Prompting Trick #3”.
5. When you can’t create the ideal images as intended despite many attempts
While not a guarantee, oftentimes throwing in “Style Raw” may just be the solution. 😉
💡 Trick #2: “Stylize” Value — Why Less is More for Optimal Results
Sometimes, if “Style Raw” alone doesn’t yield the desired results, pairing it with a --stylize value lower than the default (100) can further reduce MidJourney's default styling and aesthetics, ensuring a closer match to your prompts.
So personally, I would lower the “Stylize” value as my second step if MidJourney isn’t responding to my prompts as expected!
What Exactly is “Stylize” For?
The MidJourney Bot is trained to generate images, emphasizing aesthetic color schemes, structural composition, and artistic shapes — the intensity of the bot’s artistic training comes into play through the --stylize (or --s) setting.
Therefore, “stylize” value has a significant role in determining whether your AI image will look more or less “MidJourney-like”.
Opting for lower stylization values (< 100) ensures the resulting images match more strictly to the prompt, with less MidJourney artistic aesthetics applied.
Conversely, higher stylization values (100–1000) result in highly artistic images, but are less connected to the prompt.
How Do You Adjust the “Stylize” Value?
The default value of “Stylize” is 100 and accepts integer values from 0 to 1000.
1️⃣ — If you only adjust the “Stylize” value occasionally
Simply type --stylize or --s, hit space, and insert the value at the end of your prompt:

2️⃣ — If you use the same “Stylize” value often
Type /settingsand select your preferred “Stylize” value from the menu:

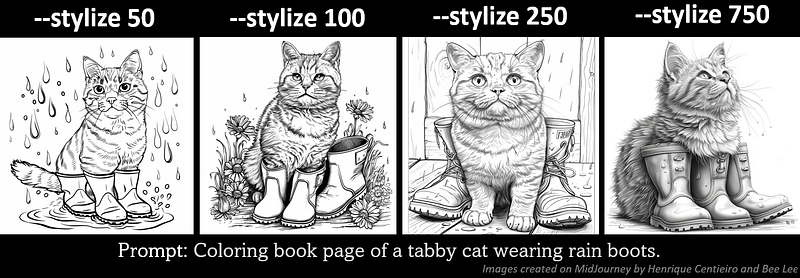
Stylize low: value 50Stylize med: value 100 (default)Stylize high: value 250Stylize very high: value 750
Image Examples: Influence of Different “Stylize” Values on MidJourney Images
As you can see in this coloring book page example, the higher the “stylize” value, the less the images connect to the prompt, and the more “beautification” is applied, which may not be desirable for a coloring book image:
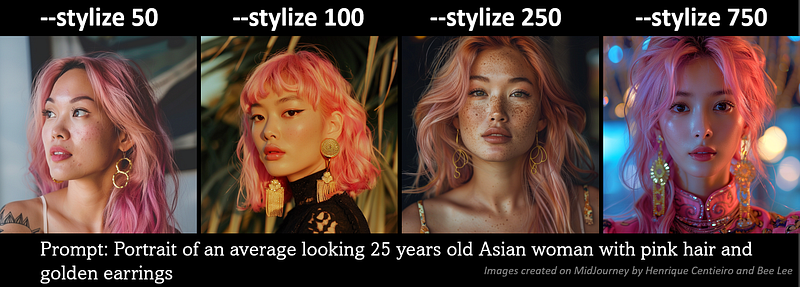
Let’s take a look at another example. Note that I included “average-looking Asian woman” in the prompt. As you can see, the lower the “Stylize” value is, the more “average” and realistic the woman appears; conversely, the higher values yield results that resemble an over-polished supermodel, which isn’t really what I asked for in the prompt:
💡 Trick #3: “Describe” Command — Your Trusty Guide to Improve Your Prompting Skills
After applying the “Style Raw” setting and lowering the “Stylize” value, what can you do if MidJourney still doesn’t closely follow your prompt’s instructions?
Have you considered that your prompt might not be effectively crafted? How can you learn the best way to craft prompts that MidJourney will ‘listen’ to?
The recently updated “Describe” feature is here to the rescue!
What Exactly is “Describe” For?
“Describe” is a long-existing feature on MidJourney:
By uploading any image to MidJourney, the AI will ‘describe’ the image for you, providing clear guidance for what should be included in the prompt if you wish to create a similar image.
In our case, by examining the prompts provided by the “Describe” feature, you can better understand and learn the most effective ways to craft prompts that MidJourney will respond to.
Recently, the “Describe” feature received an upgrade with these enhancements:
- It is fine-tuned to align with the MidJourney V6 prompting style.
- It generates longer, more detailed, and descriptive prompts over abstract ‘vibey’ words.
- Accuracy has significantly improved. The prompts provided more closely mirror the uploaded images.
How Do You Use the “Describe” Feature to Learn Effective Prompting?
Step 1 — Find an image that’s similar to what you want to create
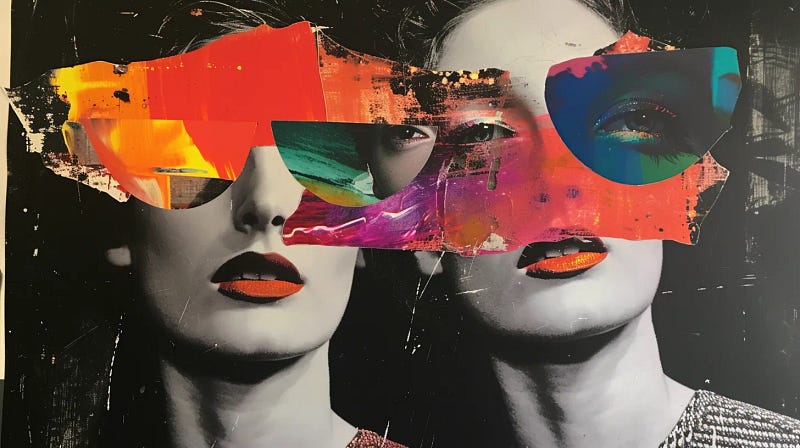
You can use any image, whether it’s one of your own or one you’ve found on the internet. In this example, I’ve chosen an image that I’ve created recently on MidJourney:
Step 2 — Upload the image to MidJourney
Now, go to the MidJourney Discord, type /describe and hit ENTER. You will see two options pop up: “image” and “link”:
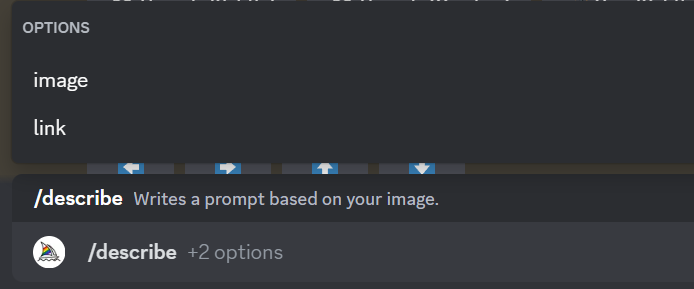
- If you select “image”: Simply upload the image directly from your computer.
- If you select “link”: Paste the image’s URL. In most browsers, right-click or long-press an image and select Copy Image Address to get the URL.
Step 3 — Let the MidJourney bot work its magic
After uploading the image or pasting the image URL, press ENTER. Within a few seconds, the MidJourney bot will provide 4 different prompt suggestions based on your image:
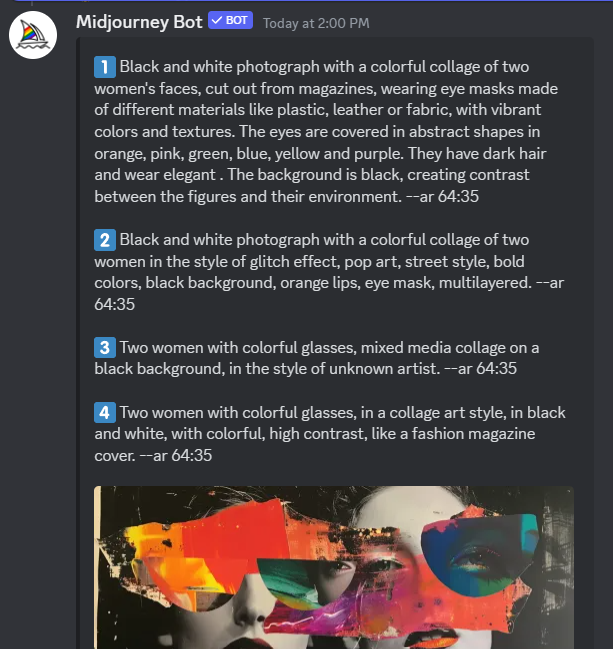
Step 4 — Study the prompts!
Now that MidJourney has provided you with four prompt suggestions, it’s time to examine them to understand which keywords are effective for creating a similar style of image.
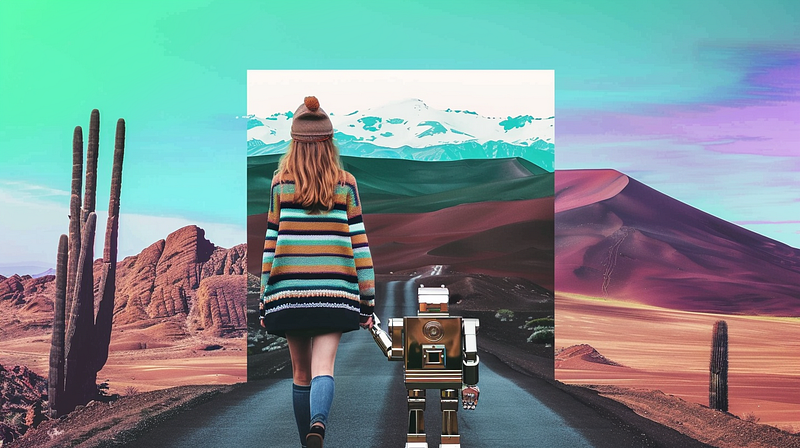
In this example, we discover that the term ‘collage,’ which appears in all four prompts, refers to this specific art style. So next time, you’ll know to include it in your prompt to get an effective response from MidJourney when you want to create a similar image! 😊
To learn more in-depth about the “Describe” feature, be sure to check out this Friendly Guide for additional personal pro-tips and attractive image examples:
💡 Trick #4: “Image Prompt” Technique — Enhance Your Prompts with Images
So now we’ve learned how to craft effective prompts for MidJourney, applied the “Style Raw” setting, and lowered the “Stylize” value — what more can you do to guide MidJourney closer to what you wish to create?
The answer is… image prompting!
What Exactly is “Image Prompt” For?
“Image Prompting” allows you to transfer the stylistic elements of a reference image you provide, such as composition, colors, and object, directly into your new creation for unique and creative results.
It is a prompting technique that can be used alone — with multiple images — or in combination with text prompts.
By using “Image Prompting,” you can guide MidJourney more precisely toward producing the visual aesthetic you’re looking for!
How Do You Do “Image Prompting”?
Step 1: Find an image that’s similar to what you want to create
You can use any image, whether it’s your own or one you’ve found on the internet.
Step 2: Get the image URL
- For images online: Right-click (or long-press on mobile) on the image and choose “Copy Image Address.”
- Upload the image to Discord: After uploading, click it to enlarge, then right-click and select “Copy Image Address.” Alternatively, you can also drag and drop the uploaded image into the prompt box.
Step 3: Start prompting with the images!
- Go to your prompt box and type
/imagineas usual. - Paste the image URL into the prompt box.
- Add any additional text and parameters to complete the prompt:

- Note: You can prompt with multiple images alone or combine them with text prompts to achieve more customized results. Remember to insert a space between each image URL and any accompanying text. 😉
Image Examples of “Image Prompting”
All the reference images featured in the examples below were previously created by me using MidJourney, enjoy!
Image + Text Prompting
Illustration of a young woman https://s.mj.run/kFT42lxHy9Q --ar 4:3 --style raw --iw 3 --v 6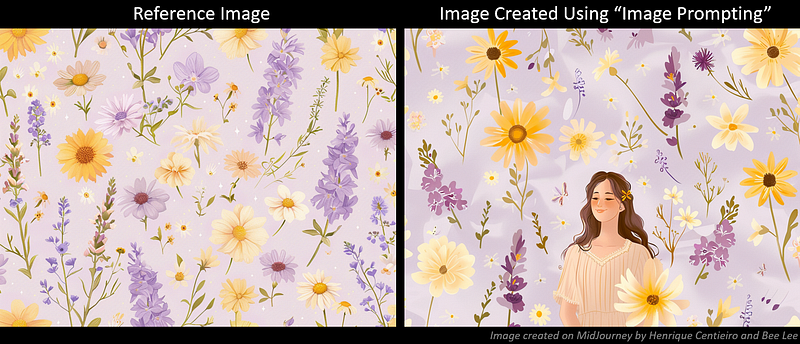
Multiple Images Prompting
https://s.mj.run/p39Zqn6-6f4 https://s.mj.run/qiHhLRkC07k --ar 16:9 --style raw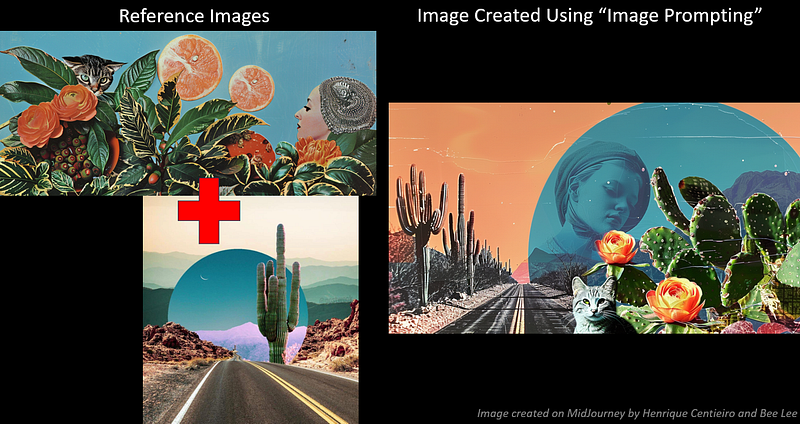
💁🏻♀️ 4 Personal Pro Tips on “Image Prompting”:
1) Experiment with Different Compositions
- Using images with interesting compositions can guide MidJourney in creating visually compelling results, like the examples showcased above.
2) Specify “Image Weight”
- You can adjust the importance of the image relative to the text in your prompt by utilizing the
--iw(image weight) parameter. - Increasing the
--iwvalue (0 to 3) gives the image prompt greater influence over the final output. If--iwis not specified, the default value (1) will be applied.
3) Aspect Ratio Tip
- For optimal results, crop your reference images to match the aspect ratio of the final output you desire. This helps maintain the intended composition and visual harmony in your final output.
- If you’re unaware of the impact aspect ratios have on your MidJourney images, make sure to read this detailed guide on using aspect ratios in MidJourney:
💡 Trick #5: “Style Reference” Feature — Effortlessly Replicate Artistic Styles
Now that you have learned to apply the “Style Raw” setting, lower the “Stylize” value, craft effective prompts with the “Describe” feature, and use “Image Prompting” to guide MidJourney more closely to your instructions, what else could be missing?
While “Image Prompting” helps direct MidJourney to your desired composition, colors, and objects of the images, what about the overall artistic style?
Let’s introduce the final trick: the “Style Reference” feature!
What Exactly is “Style Reference” For?
“Style Reference” is a new feature in MidJourney designed for style consistency — it allows you to replicate any art style and transfer it to your new creations.
You can reference any image, and the feature will use these images to transfer the overall style, color theme, vibe, and aesthetic to your new creation.
By using “Style Reference,” you can more precisely guide MidJourney to produce the specific overall aesthetic you’re aiming for!
How Do You Use “Style Reference”?
Step 1: Find an image of a style that you like
Same as “Image Prompting”.
Step 2: Get the image URL
Same as “Image Prompting”.
Step 3: Use “Style Reference” in Your Prompt
- Type
/imaginein the prompt box and press Enter. - Type your prompt (what you want to create), followed by
--sref. - Add a space after
--sref, then paste the URL of your reference image. - If using multiple images, separate their URLs with a space.
- Your prompt should look like this:
<Your Prompt> --sref urlA urlB urlC
Step 4: Adjust the “Style Weight”
- To adjust the overall style strength of your new creation, type
--swfollowed by a number. - The default is 100, and you can go up to 1,000 (0 means no style).
- Your prompt should look like this:
<Your Prompt> --sref urlA urlB --sw 800
Note: If you’re aiming for a strong style influence, I’ve found that setting the style weight to --sw 600–800 hits the sweet spot.
💡 If you want to dive deeper and discover expert tips for mastering “Style Reference”, be sure to check out this Ultimate Guide:
Image Examples of “Style Reference”
A leopard --sref https://s.mj.run/Z4rbgz8LkDI --sv 1 --sw 800 --ar 5:7 --style raw --v 6 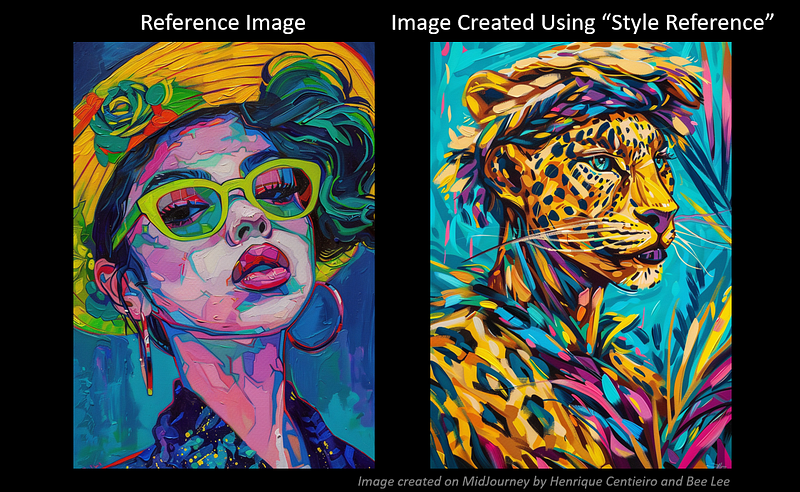
A little girl looking out the window --sref https://s.mj.run/uuQB0M7DVhk --sw 800 --ar 9:16 --v 6 --s 70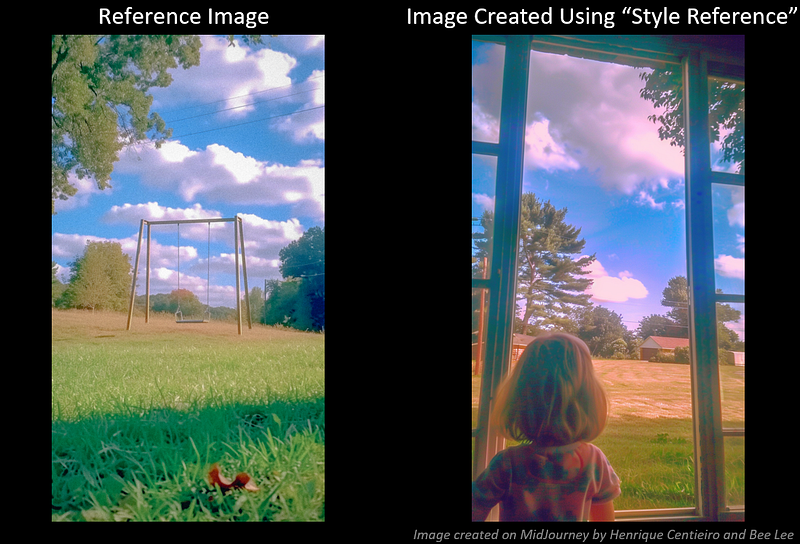
A futuristic human base on Mars --sref https://s.mj.run/2v2gDmpieF0 --sv 3 --sw 800 --ar 7:3 --style raw --v 6
💁🏻♀️ 3 Personal Pro Tips on “Style Reference”
1) Color Theme Matters
- As you can see from the examples above, “Style Reference” closely mirrors the color themes. I suggest choosing reference images with colors you’d like to see in your final creation.
2) Use High-Quality Reference Images
- High-quality reference images lead to more detailed and precise prompted results; while low-quality or blurry images may be misinterpreted by MidJourney as a deliberate style choice.
3) Use Multiple Images as Style References
- To explore the endless possibilities of “Style Reference”, I suggest you experiment with several reference images and play around with the ‘Style Weight’
--swto enhance your creative output!
4) Not to confuse it with “Image Prompting”
- It’s important not to confuse “Style Reference” with “Image Prompting,” which we have discussed in the last Trick.
- With “Image Prompting”, the final image incorporates the composition, colors, and objects from the reference image, augmented by any additional details you prompt.
- In contrast, “Style References” are used to transfer the overall aesthetics and ‘vibe’ of the reference images, integrating the prompted elements to create a cohesive blend.
To explore the differences between “Image Prompt” and “Style Reference” in-depth, check out this newly published article. I debunk the myths using ‘burger’ and ‘cocktail’ as examples for better understanding:
😊 Thank you for staying with me to the end.
I hope to have provided you with fresh insights on how to get MidJourney to ‘listens’ to you better!
Stay tuned for more insider tips and, as always, have fun in your creative journey! 🌈
— Bee Lee 💃🏻
🥰 If you found any value in this article, why not throw me some Medium love? To support my work: Clap up to 50, leave a message to share your thoughts & Be sure to follow for more future content like this one! 💌

🤗 Hiya! I’m Bee Lee — An 8X Top Writer on Medium and a (seriously) Passionate Enthusiast of Generative AI
My passion lies in creating beautiful things and exploring the boundless creative possibilities offered by Generative AI and MidJourney. Sharing the insights and knowledge I’ve accumulated on this incredible journey with you fills me with immense joy! ❤️😊 Why not join me as we dive deeper into the fascinating world of AI together? 🎨🤖⛵ Learn more about me here.

⚠️ To maximize the potential of MidJourney’s “Style Reference,” be sure to check out this secret hack that I recently discovered:
📌 Here is the folder for all the articles in my
📌 Feel free to check out all my other articles here to learn more Tips and Tricks on mastering MidJourney:
📌 To learn more about how to create ultra-photorealistic MidJourney images, this is my highly-rated series where I shared my prompting formula and 100+ cheat codes:
🌞 Stay in touch:


