Midjourney Explorations — Ultimate Cheat Sheet of Commands, Parameters, and Tools
Midjourney has so many knobs and dials to play with that it can be hard to keep up with it all. Here are all the most important bits in one place!
Joining Midjourney & Getting Organized
Just getting started? This first article below will walk you through the sign up process and your first generations.
Want to get out of the newbie rooms and get your generations organized? This article shows you how to set up your own free discord server and inviting the Midjourney bot to generate on your private server.
All the Discord image buttons
There are buttons under a Quad of images in Discord. For people with over 1000 images created, generating images on the website is possible, but since it is not available for everyone, I will focus on Discord. See the article below for website details.
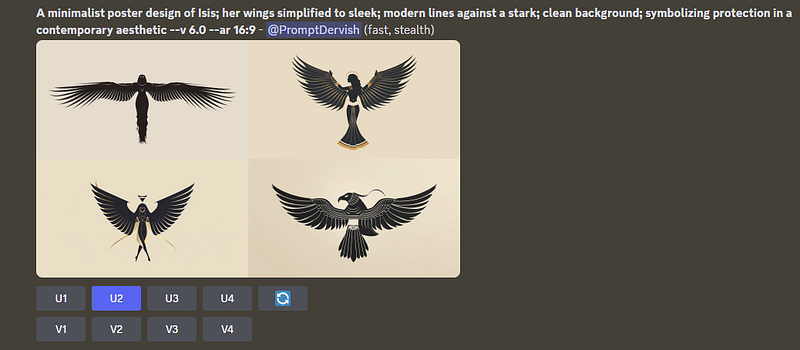
U — buttons ungrid your quads in Discord (not needed if you use the web — must be 1k club to use the image generation on the website at the date of this article. It will be open to all members eventually).
V — make a variation of the image. Whether this is subtle or strong by default is set in /settings.
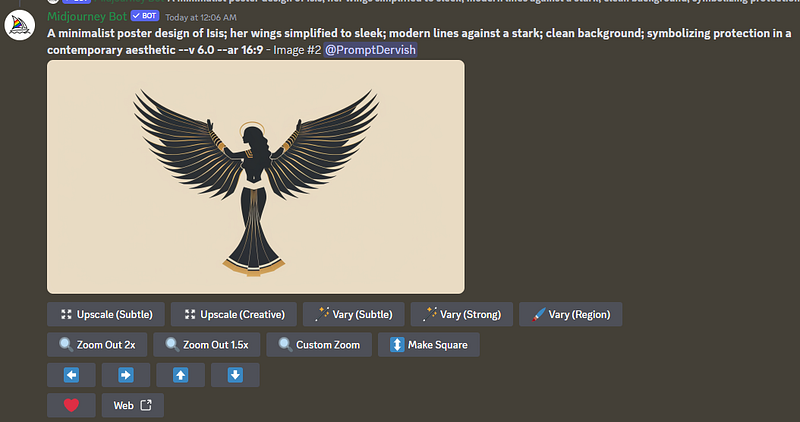
Ungrided buttons:
Upscale(Subtle) — doubles the size of your image with minimal changes to the content (1024 -> 2048)
Upscale(Creative) — doubles the size of your image with “creative” changes to the content (1024 -> 2048). This can be a good way to remove extra limbs or other problematic elements of your image.
Vary(Subtle) — gives you a variation on the image but stays closer to the original
Vary(Strong) — gives you a variation of your image but with more changes than subtle.
Vary(Region) — allows you to choose an area of your image to change; it is inpainting. This is useful for removing undesired elements or changing part of the image specifically.
Zoom Out 2x — Pulls your camera back in the scene and lets you see double the size in your image (good for removing clipping of your subject)
Zoom Out 1.5x — like 2x, just not as much.
Custom Zoom — lets you choose an aspect ratio. It hides a trick for changing an image’s version numbers, but that is strictly a promptcraft pro topic, so pretend I didn’t mention it!
Make Square — If your aspect ratio is portrait or otherwise not square, this will square it up for you. Fill in any of the empty bits based on your prompt.
Pan arrows — these arrows allow you to send the camera out in that direction in your scene. They are great for moving your subject out of the center of your image.
Heart — allows you to favorite your images.
Web — opens your image on the website. You MUST be logged in, or you will get a 404 error.
Midjourney Parameters
From Aspect Ratio to Weird, there are a lot of parameters that you can use in your prompts. It can be a lot to keep track of, so let me help you break it down.
Aspect Ratios
Change the aspect ratio of a generated image by using the --ar parameter. The numbers that must follow the ar are width:height. So, a parameter --ar 2:3 is a portrait shape that is two wide by three tall. Turn it around to --ar 3:2 , and you have a landscape. I use 16:9 a lot in my articles; that is the most common aspect ratio for cell phones and tablets. The aspect ratio can affect your image; if you are trying to create a full-length image of a person, it works best to use a portrait shape. If you do not specify a --ar it will default to a simple 1:1 square image.
Chaos <value from 0–100>
The --c command changes how varied the results in each of your quads will be compared to the others. A higher value produces the most variation in your images, and it can produce very unusual results on occasion that you might not expect. The default is zero.
Character Reference Image (cref)
This is a relatively new feature that only came out in mid-March. It allows you to use an image to set a character, which can be used in other prompts and keep a fairly similar character in other situations. It is not the answer to consistent characters but a great tool. It does take a lot of experimenting to get the hang of it, but once you do, it becomes powerful. The way you use it is --cref http://your-image-url at the end of your prompt. You can combine multiple images by putting a space after your first image URL, adding your second, and so on. You can read more about it in the introductory article below. I also have a couple of others; check my profile for more.
Character Weight <integer 0–100>
This is a parameter of --cref and cannot be used without it. When cref is used, the cw parameter has a default value of --cw 100 if no cw is added. This gives the character reference image full weight and tries to keep the face and clothing of your character. A character weight of 0 focuses just on your character's face and allows you to change the hair and clothing more easily. Read more about cref and cw here:
Image Weight <values from 0–3>
The --iw # is useful if you have used an image prompt and wish to make the image more important (weighted) than the prompt. If you do not set anything, the default is 1. You only need to use this if you want to change how much influence your image has over the prompt. Let’s say your image is overpowering your prompt; you might use --iw .05 to reduce how much influence the image has. Or if the words are overpowering your image, you might use it as --iw 2 or --iw 3 to give it two or three times the weight of the text part of the prompt. Read all about using images (and their weights) in this article:
Niji
Niji is part of Midjourney but is also its own model, which has been trained in Asian anime. It has a different aesthetic than Midjourney and can be very fun to experiment with. To have your prompt run in the current Niji model rather than the default MJ, one uses the --niji 6 parameter at the end of your prompt.
No
The --no [word,word,word] no command allows you to tell Midjourney what you do not want in the prompt. For example, if you are trying to prevent roses from appearing in your bouquet, you might prompt for your bouquet and then add --no roses to let the AI know what you do not want. I have found that with v6, this is not as effective as previous versions, so my advice is to use this sparingly. Oftentimes, if you prompt your bouquet with the flowers you want, the no parameter is unnecessary. I.e., “a bouquet of daisies and delphiniums” probably won't give you roses.
Quality <0.1, 0.25, 0.5, 0.75, or 1>
In previous versions, the quality could be set higher, but in v6, it can only be set to 1, which is the default value. There are some edge cases where a lower quality might be interesting, but overall, this parameter can be ignored in v6.
Repeat
This is a fun command to use in that you can run the same prompt multiple times. How many times you repeat depends on your account, from 4 or 10 or 40 allowed. --r 6 would repeat your prompt six times. If you have stylize, chaos, weird, etc., applied to your prompt, every generation will be different, so running the same prompt multiple times will get you lots of variations quickly and saves you from having to enter the prompt over and over. By default, your prompt runs only once.
Seed <integer between 0–4294967295>
A seed is the starting place where the AI begins your image, and it decides how the randomness in the generation will happen. Using the same seed across multiple prompts can help keep the style similar. It is important to note that seeds are not magic. They change when the servers are updated and cannot be relied on over time, which seriously limits their usefulness. For a general user, you can ignore this parameter. Want to dive deeper? I have an article for that:
Stop <integer between 10–100>
It is possible to stop a prompt from fully generating by using --stop 50 you can tell the AI to stop generating your image at 50%. Stopping the job earlier creates blurry images that are not fully formed. Most people have no need of this, this is another parameter you can safely ignore. The default for it is, of course, 100%.
Style
Style and Stylize are very different commands, so it is important to remember them. There are many different styles related to versions 4 and 5 of Midjourney, but honestly, if you started with v6, ignore them. I do not want to make this confusing. In v6, the style to know about is --style raw I am not a huge fan of Style Raw, but some folks swear by it. If you are trying to reduce the house aesthetic, you can use this parameter at the end of your prompt.
There is a Style Tuner in the older v5.2, which is quite fun. At the risk of adding complication, I suggest playing with it if you are looking to experiment. It allows you to see a single prompt with a huge variety of styles applied to it, and you can mix and match images to create style codes that work in v5.2. It is possible to make the images in v5.2 and then use them in v6. I have an assortment of articles on the tuner, as I find it quite fun. Again, this is not something you must do, but it can be a fun diversion.
Style Reference Image (sref)
This is my absolute favorite Midjourney feature! It allows you to use the style of one image and apply it to other image prompts. You can completely change the mood of an image with this one little parameter. To use it put it at the end of your prompt --sref http://your-image-url you can use multiple images together by putting a space after your first image URL and adding your second, and so on. Sref takes two additional parameters, Style Weight and Style Version, which are below. To dig deeply into this game-changing feature, check out my article on it:
Style Weight <integer 0–1000>
This is a sub-parameter of sref. The default value for style weight is 100 if no value is provided. You can use the --sw # parameter to set your own weight to your style reference image. This is useful for toning down the influence or cranking it up to max.
Style Version <integer 1–4>
This is a sub-parameter of sref. The default of Style Version is 4 if no value is provided. There are basically just four different methods of adding the style reference to your prompt. To use it add --sv # to the end of your prompt. I did extensive testing of these versions, and unless you are interested in deep dives and a lot of experimenting, I would say you can safely ignore the style version and let Midjourne use the default version 4. I have linked my article on the style versions below if you want to know more.
Stylize <integer 1–1000>
This is one of the most used parameters. If you do not set a stylize the default value is --s 100. What stylize does for you is “add pretty” as you tell Midjourney to use the house aesthetic to pretty up your image and add details to beautify it. If you are trying to get a particular artist style, or are using an image prompt, you may wish to dial the stylize back to zero --s 0 or numbers less than 100. If you are just making “a cute puppy” you can crank it up to the max if you like /imagine prompt: a cute puppy --s 1000 to get maximum beauty.
Tile
The tile command takes no numbers or anything; just put --tile At the end of your command, Midjourney will create your images to tile seamlessly. I like adding “seamless pattern” at the beginning of my prompts when using tile to emphasize it. I have found that it gives me the best results. This command is useful if you are trying to create fabric patterns or wallpapers.
Weird <interger 0–3000>
Like Stylize and Chaos, this is optional, and the default value is 0 if none is set using the parameter. What weird does can be difficult to explain; it literally adds, well, weirdness to your images. It is not for everyone, but it can be fun to crank it up and see the fun things that happen to your images. What will happen is unpredictable because it will vary greatly depending on your prompt.
The speed of your generation Relax, Fast, and Turbo
The speed at which generations are created can vary depending on a few factors. You can change which speed you are using by using the commands below or type /settings where you generate your images and choose from the buttons.
You can only use Fast or Turbo with the Basic $ 10-a-month account. I do not recommend Turbo for this account since it eats through your monthly allotment of fast time at double speed.
All three options are available if you have the Standard, Pro, or Mega accounts.
Relax
Relax time does not count against your monthly allotment of fast time. Relaxed jobs are given a lower priority and are therefore slower. The more relaxation time you use in a month, the slower your generation becomes. This protects against people abusing the system since the relax time is free for higher accounts. Use /settings to set this overall or --relax in your prompt to relax just that prompt and not all of them. You can also use the command /relax, where you prompt to switch quickly.
Fast
As with relax, you can use --fast at the end of a prompt to speed it up or use /settings to set your speed automatically for all prompts. You can also use the command /fast, where you prompt to switch quickly.
Turbo
Turbo is useful if you are presenting or want an image doubly fast for some particular reason use --turbo at the end. That said, it eats up your fast time by double that of the fast setting. Use this with care, and I recommend using the /info command occasionally to watch your time allotment and avoid any nasty surprises. You can also use the command /turbo, where you prompt to switch quickly. Also, check /settings when you finish to turn it off. I have found myself using it accidentally after not turning it back off.
Midjourney Commands
Commands are typed into the text box of Discord, either with the Midjourney bot or in a the channel where you prompt.
/blend
Easily blend up to five images together without needing a text prompt. Select your images in the file boxes that show up and then submit.
/describe
This fun command can be useful in figuring out how to describe an image. Use it as a tool to see how the AI sees your image. It will never perfectly recreate the image you give it to describe, it is good for inspiration though and may take you on new paths you might not have considered.
/feedback
Submit suggestions and ideas for Midjourney and rate ideas from users. This can help steer the development team by allowing them to see what users are asking for, so don’t be shy!
/imagine
This is the command that starts it all! Type it and click the popup so the prompt shows up on the command line, and then enter your prompt text to start generating images.
/info
I recommend that you run this critical command periodically. It shows you how much of your allotted fast time you have left, how many images you have created, and any that are queued up to generate.
/list_tuners
If you have used the Style Tuner ( /tune ), this command will show you all of the tuners you have created and their prompt so you can find them again.
/prefer auto_dm
This will toggle on or off each time you use it. It tells Midjourney to send all of your prompts to DM no matter where on Discord you create them. This can make it a bit easier to find them again.
/prefer option set
Create or manage a custom option. This is a sort of macro for Midjourney. You can set it up by typing this, then for Option give it a name that you will refer to it as. Then, for Value, enter what you want to fill in when you reference the option name. It will look like below as an example. I can add --posterz in my prompt and Midjourney will automatically expand that out for me to --ar 16:9 --style raw --s 444 save having to type that all out each time.

The Option name is case-sensitive, so beware. The options do not have to have the parameters in them, though; they can be words if there is a snippet you use a lot. If the options do have parameters, then they need to go at the end of the prompt. Others can go anywhere. It is possible to use more than one option in your prompt.
/prefer option list
This lets you see all the options you have set.
/prefer remix
Remix gives you a popup remix window anytime you vary, so you can tweak your prompt and roll it again. I recommend keeping it on as it is required for Vary(Region) to work right.
/prefer suffix
This is useful if you want to have something at the end of all of your prompts like --v 6 --ar 16:9 so that you do not have to enter it each time. To set it, you would type /prefer suffix, choose value from the popup, and then put what you want always to come at the end. To remove it, do it again and leave the value blank, that clears it all.
/settings
This command, like /info, is critical, and I recommend looking at them from time to time, especially if you have changed the speed of your generations, to ensure you know how you are generating.
/stealth
This hides your image from others so they do not appear in the community feed. This mode is only available to Pro or Mega subscribers.
/shorten
If you use this, followed by a prompt, the system will cut it down to the most important parts. This can help if you have a long prompt that does not yield the desired results. I am not a fan of it, but it can be useful to see what the AI thinks are the important parts of your prompt.
/show
This command takes a job ID and puts your image into Discord again with all of the function buttons under it. This is helpful for moving images around on Discord and working with them. The DM with the bot and the website will give you the Job ID to use.
/tune
The Style Tuner uses the /tune command and a prompt from you to create a number of styled images with the prompt. You can use those to create whole new styles. I have linked my Tuner articles near the top in the Style section. This can be a lot of fun. It works in version 5.2; there is no v6 version. But other than needing to go to /settings and change your Midjourney version to 5.2, it is still fully usable.
In Conclusion
These are all the various things needed to get the most out of Midjourney. I hope having all of this in one place is useful to you. If you got something out of this article, please leave lots of claps. You have up to 50 to give! Below are a few good starter articles to get you started with prompting. Cheers!