
Guides And Tutorials
Microsoft Outlook: Move Emails From Certain Domain To Specific Folder Automatically
Enhance Productivity and stay organized at work!

What’s Outlook
Wikipedia.org says Microsoft Outlook is a personal information manager software system from Microsoft, accessible as a piece of the Microsoft Office suite.
Outlook allows you to send and receive email messages, manage your calendar, store names and numbers of your contacts, and track your tasks. However, even if you use Outlook every day, you might not know some of the cool things it can do to help you be more productive.
What’s The Problem
When you receive a lot of emails, your inbox becomes cluttered and difficult to navigate. The mails from different domain are dumped into inbox only. And to get a specific email, you need to keep searching for an email from specific sender or email from a specific domain in the inbox.
The Solution
The problem is real and even the regular outlook users do spend lot of hours in manually moving the mails to different folders. As Time is Money, the solution I found is really time-saving one.
How about automatically storing all the emails coming from a specific domain into a separate folder ? 💡
Outlook comes with a really cool solution to deal with this problem.
Create Rules to Automatically Sort Incoming Mail in Outlook!
I am going to explain how I used these rules to automate the entire workflow which in turn improved my productivity and kept my Outlook inbox well organized.
In this article, I am putting together the steps to set up a rule in Outlook that will automatically put incoming mail from a particular domain into a specific folder.
Let’s get started! 🚀
First of all, open an Outlook account Inbox from where you want to move email coming from certain domain to another specific folder.
1️⃣ Create a New Rule
In the Home tab look for Rules Menu.
Click on the small downward triangle 🔻 and choose Manage Rules & Alerts as shown in the below picture.

This opens a Rules & Alerts list as shown below.
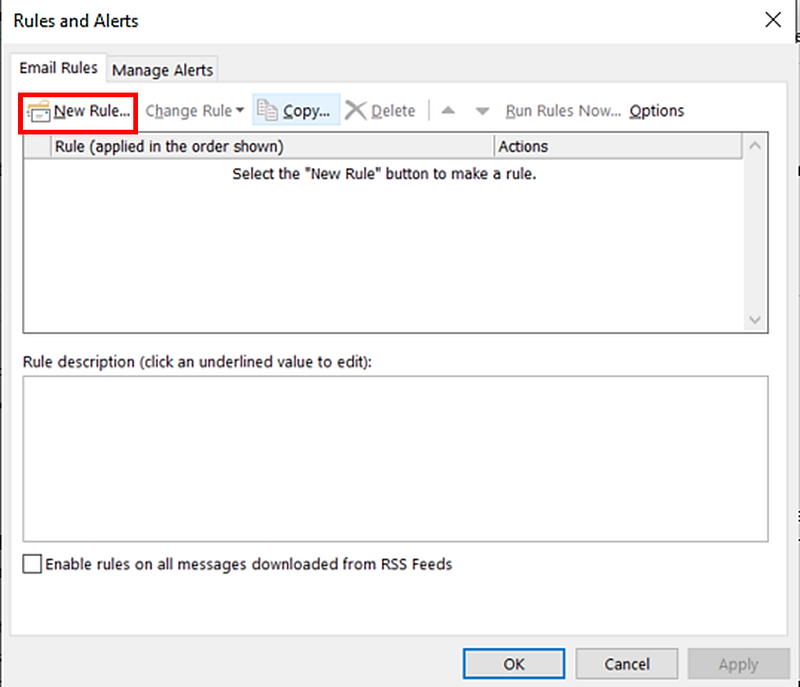
Click on New Rule to proceed.
2️⃣ Set Conditions
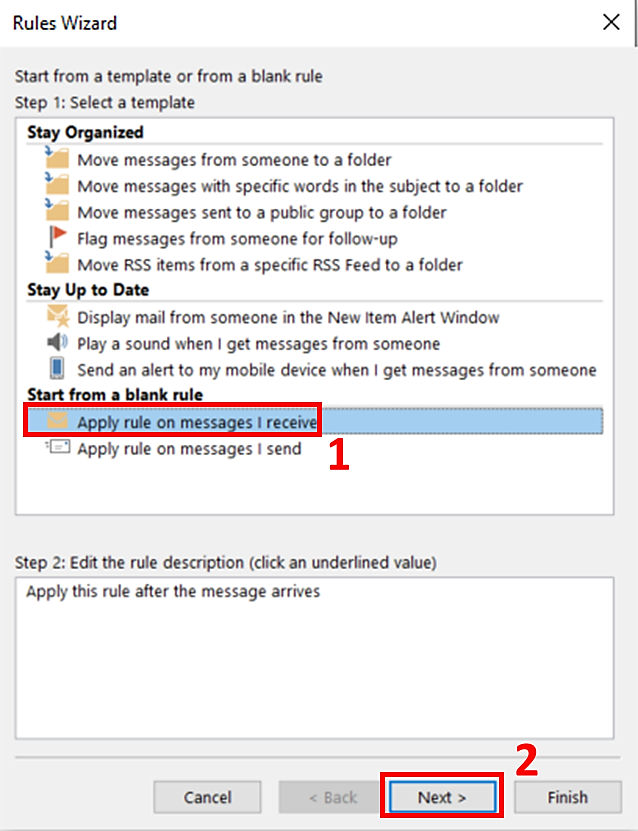
Previous step opens a new window, where the real work of setting a Rule happens.
Click on Apply rule on messages I receive and hit Next.
This opens a new window where you can choose from list of conditions to filter emails. Simply follow below 6 sub-steps process to do it.
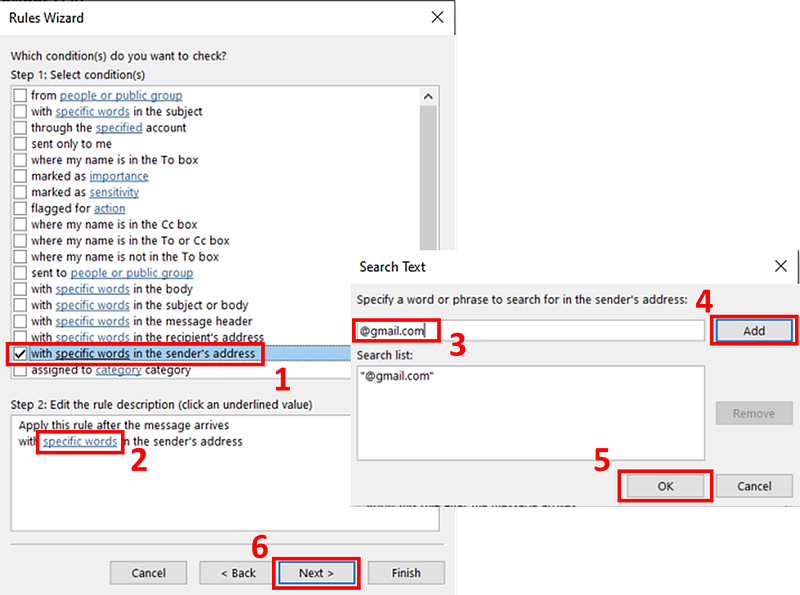
First of all select the option With specific words in sender’s address followed by a click on specific words in Edit the rule description section
This will open a Search Text window, where you can input the words you are looking for in the sender’s email address. Enter the specific word and click on Add . The words added to the list can be seen in Search list section. 📑
Once you add all the words you are looking for, click on Ok . This will close the Search Text window and take you back to the Rules Wizard.
As I wanted to move all the incoming mails from gmail.com to different folder, I entered @gmail.com in the Search Text window.
To finish setting conditions in the rule, click on Next .
3️⃣ Set Actions
Clicking on Next in previous step will open another Rule Wizard where you can set an action when the conditions mentioned in the previous step are met.
The process is well explained with the picture below.
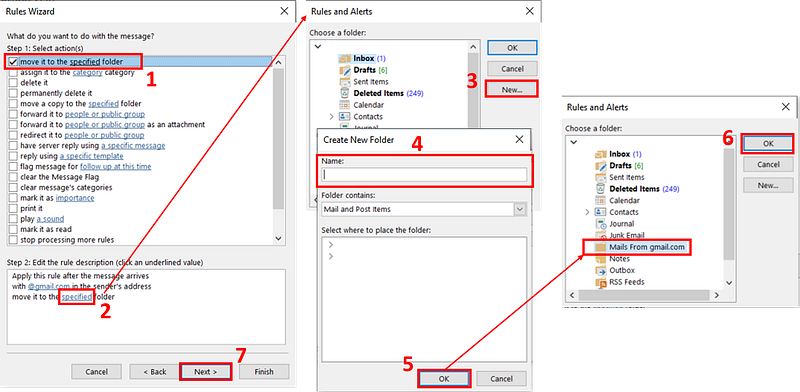
Select move it to the specified folder in the first step followed by clicking on specified in step 2.
This opens a new window to choose a destination folder. Here you can select an existing folder or alternatively can create a new folder. 📂
I chose to create a new folder and entered Mails from gmail.com as folder name in step 4. On clicking OK you can see a new folder is created in Rules & Alerts window. Select this folder and click OK in step 6 to finish setting up a destination folder.
At the end, click on Next to move to the next step.
4️⃣ Set Exceptions
The next Rule Wizard window lets you set exceptions while moving the emails from inbox to a specified folder.
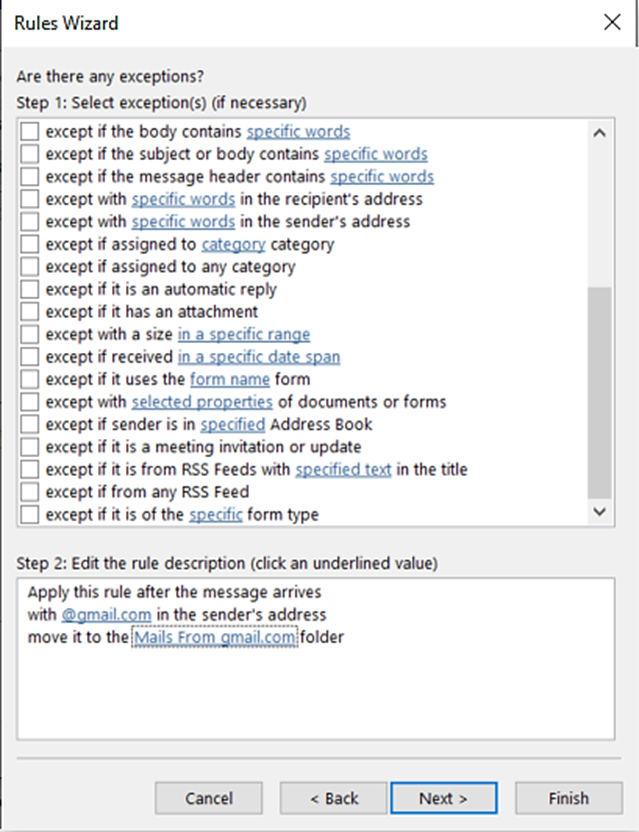
As I did not have any exceptions at the moment, I prefer not to choose any exception from the list.
You can add or remove exceptions even after creating a Rule by editing the Rule. ⚙️
Without selecting any exceptions click on Next to proceed.
5️⃣ Rule Wizard — Finish Setup
This is the last step in setting up a rule. The Rule Wizard will be self explanatory as shown in the picture below.
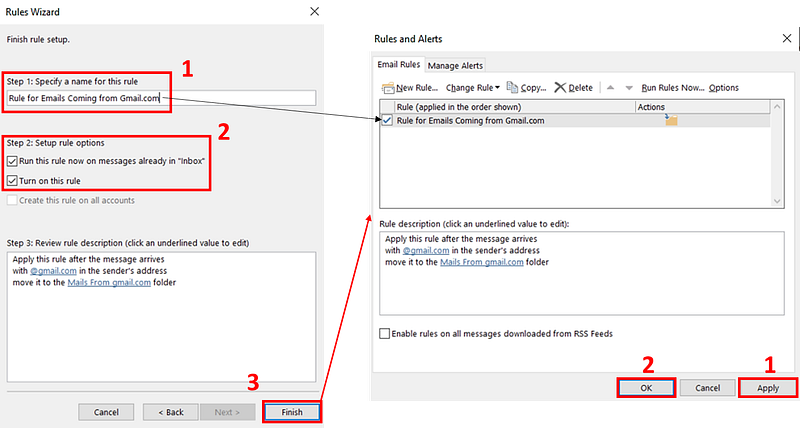
The name of the rule is used to identify the rule in Rules & Alerts window as shown in the right image.
🚩 Don’t forget to check the option Run this rule now on messages already in “inbox” to apply rule on the existing emails as shown in left image.
To finish the process, click on Finish in Rule Wizard followed by Apply and OK in Rules & Alerts window.
That’s it!!
From now on, whenever a new message arrives in your inbox from the specified domain, it will be automatically moved to the specified folder in no time!! 💯
Summing up,
Just like million other Outlook users, I wasted uncountable hours in moving the relevant emails to different folders before finding this way out.
This automation will certainly keep your inbox clean, organized and easy to navigate, which ultimately improves your productivity.
I hope you found this article interesting and it is useful for you!
Now you can become a Medium Member in just 1 minute using My Link. When you do so I’ll get a small portion of your fee and You’ll get an unlimited access 😎 to all the articles on Medium!
Also, If you like to read such an amazing content, feel free join my Email list.
Thank you for reading!


