Mastering Nmap: A Comprehensive Guide to Network Exploration and Security Auditing. Part 1
This comprehensive post will delve into the powerful network scanning tool, Nmap, exploring its capabilities from basic to advanced levels. It includes practical tutorials on using Nmap’s various commands, the Nmap Scripting Engine, and integration with other security tools. The guide aims to equip readers with the skills to conduct thorough network explorations and security audits.

About author
Hello and welcome to my article. My name is Andrey, and I am a penetration tester and cybersecurity researcher
Part 2 is here
Part 3 is here
Part 4 is here
Table of contents:
- Introduction
- Getting Started with Nmap
- Installing Nmap on Various Operating Systems
- Exploring Nmap Options with Real-Life Examples and Usage
TARGET SPECIFICATION:
- Host names
- IP addresses
- Networks
- -iL
: Input from list of hosts/networks - -iR
: Choose random targets - — exclude
- — excludefile
: Exclude list from file HOST DISCOVERY: - -sL: List Scan — simply list targets to scan
- -sn: Ping Scan — disable port scan
- -Pn: Treat all hosts as online — skip host discovery
- -PS/PA/PU/PY[portlist]: TCP SYN/ACK, UDP or SCTP discovery to given ports
- -PE/PP/PM: ICMP echo, timestamp, and netmask request discovery probes
- -PO[protocol list]: IP Protocol Ping
- -n/-R: Never do DNS resolution/Always resolve [default: sometimes]
- — dns-servers
- — system-dns: Use OS’s DNS resolve
- — traceroute: Trace hop path to each host
Introduction to Nmap: Your Gateway to Mastering Network Security
Nmap, or Network Mapper, is an indispensable tool for cybersecurity professionals, renowned for its versatility in network discovery and security auditing. This open-source marvel enables users to uncover network inventories, manage service upgrade schedules, and monitor host or service uptime, making it a critical component in the security landscape.
In this post, we will embark on a detailed exploration of Nmap, starting with the basics of its installation and fundamental commands. We’ll then advance to sophisticated scanning techniques, delve into the powerful Nmap Scripting Engine, and showcase practical scenarios where Nmap proves invaluable. Whether you’re a beginner eager to understand the core functions of Nmap or an experienced practitioner looking to deepen your expertise, this guide aims to equip you with the knowledge to leverage Nmap effectively in your security tasks.
Legal Use Disclaimer
This guide is provided for educational and informational purposes only. The use of Nmap, as described in this post, should only be performed on networks and systems where explicit permission has been granted. Unauthorized scanning and penetration testing can be considered illegal and unethical, and could result in criminal charges as well as civil liabilities. It is the responsibility of the reader to ensure compliance with all applicable local, state, national, and international laws regarding network scanning. By using the information in this guide, you agree to do so legally and ethically.
Part 1: Getting Started with Nmap
Nmap, short for Network Mapper, is a powerful network scanning tool that helps security professionals discover devices and services on a network. It is widely used for network inventory, managing service upgrade schedules, and monitoring service uptime. Nmap’s flexibility makes it invaluable for network security audits, providing detailed insights about network configurations and potential vulnerabilities.
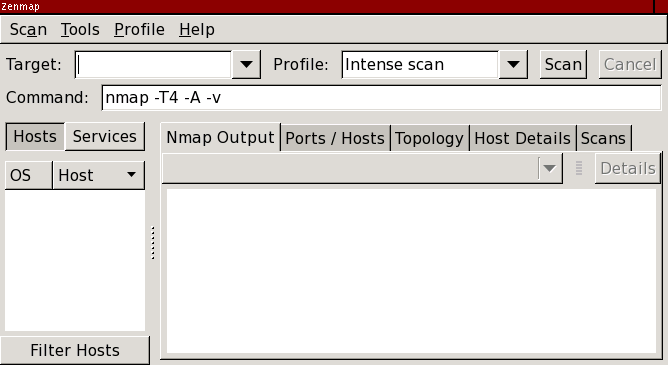
Installing Nmap on Various Operating Systems
Windows:
- Download the official Nmap installer from nmap.org.
- Run the installer and follow the on-screen instructions, ensuring you include the Nmap Zenmap GUI if graphical interface is desired.
- Once installed, you can run Nmap from the Command Prompt or through the Zenmap GUI.
Linux:
- Nmap is usually available via package management systems. For Debian-based distributions, use:
sudo apt-get install nmap
- For Red Hat-based distributions, use:
sudo yum install nmap
- After installation, you can run Nmap from the terminal.

macOS:
- The easiest way to install Nmap on macOS is through Homebrew. If Homebrew is not installed, you can install it first from brew.sh.
- Install Nmap using Homebrew by running:
brew install nmap
- Once installed, open a terminal to start using Nmap.
With Nmap installed, you’re ready to start exploring the numerous features and functionalities it offers to effectively analyze and secure your network environments.
Part 3: Exploring Nmap Options with Real-Life Examples and Usage
Nmap is equipped with a multitude of scanning options, each designed to provide specific insights and data about network environments. This section will delve into these options, offering real-life examples and practical applications to demonstrate how each can be effectively utilized in various security and network management scenarios.
First command:
nmap -- helpI will use output of this command for article of this post:
TARGET SPECIFICATION: Can pass hostnames, IP addresses, networks, etc.
Hostname/domain name scanning:
nmap scanme.nmap.org
 microsoft.com/24, ; 10.0.0–255.1–254
IP address scanning:
nmap 45.33.32.156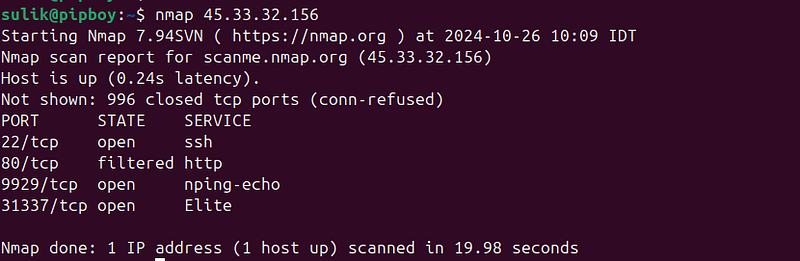
Output of basic nmap scanning:
A basic Nmap scan without any additional arguments or scripts primarily provides the following information:
- Port States: The scan lists the TCP ports on the target host and their state. Common port states reported are:
- Open: The port is actively accepting TCP connections.
- Closed: The port is accessible but not currently accepting connections.
- Filtered: The scan could not determine whether the port is open or closed because packet filtering is preventing the probes from reaching the port. (Can be Firewall or other security solution)
2. Service Detection: Basic scans can sometimes include the default service expected to run on the identified open ports based on well-known port numbers (e.g., port 80 typically hosts HTTP).
Networks scanning:
nmap 192.168.1.0/24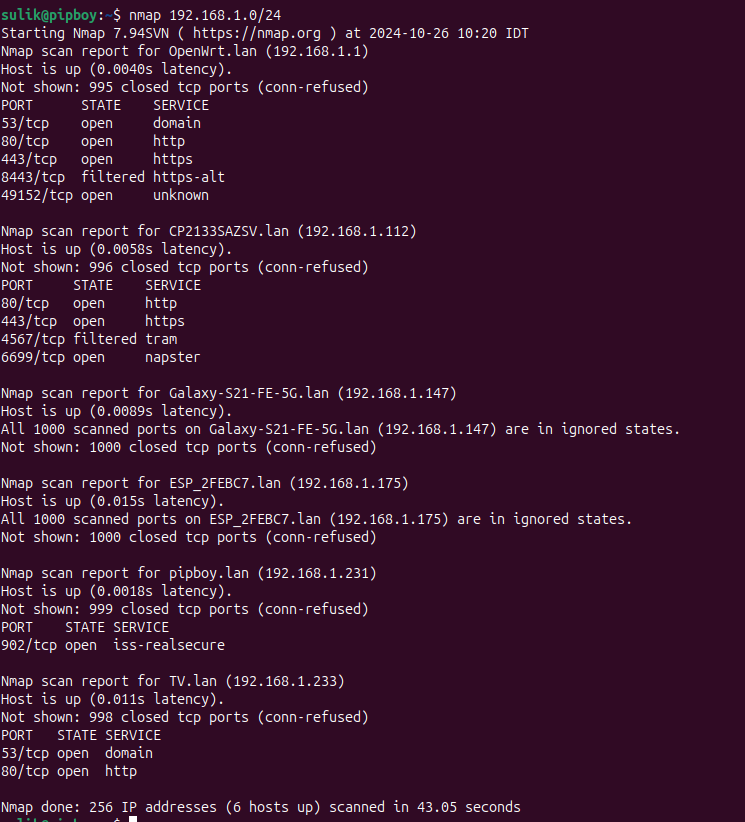
Range of IP addresses:
nmap 192.168.1.0-150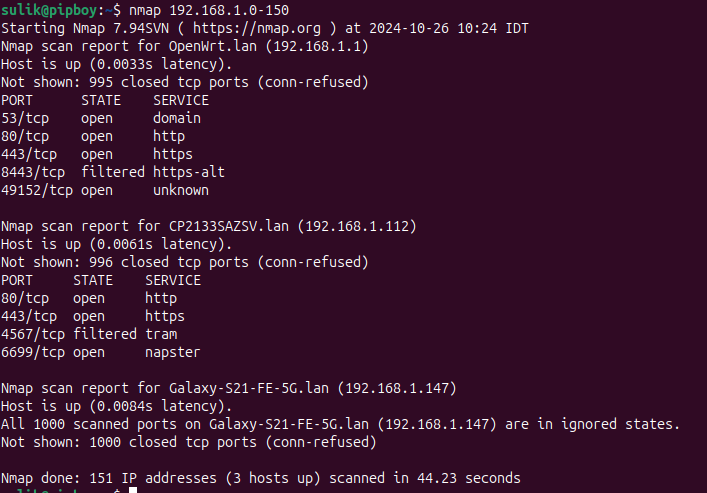
Input from list of hosts/networks
nmap -iL <path to file with list>
Choose random targets
nmap -iR <number of hosts>Exclude addresses from scanning:
nmap 192.168.1.0/24 --exclude 192.168.1.188, 192.168.1.1
nmap 192.168.1.0/24 --excludefile <path to file with list>
Output of basic network or range scanning:
- Starting Nmap: Shows the version of Nmap being used and the time the scan started.
- Nmap scan report for [Host]: Indicates the target of the scan, either by IP address or hostname.
- Host is up: Confirms that the host is online and responding.
- Ports/State/Service:
- Lists the TCP ports that are being scanned.
- STATE indicates whether each port is open, closed, or filtered.
- SERVICE provides the default service expected on the open ports.
Purposes and Uses:
- Security Assessments:
- Identifying Open Ports: Helps in determining potential points of entry for an attacker. Knowing which ports are open allows security professionals to focus their defensive measures on those services.
- Service Identification: Knowing what services are running can help in assessing vulnerabilities associated with specific versions of these services.
2. Network Inventory:
- Helps in maintaining an updated catalog of all devices and services on a network. This is crucial for managing large networks and ensuring compliance with security policies.
3. Compliance Auditing:
- Ensures that no unauthorized services are running on the network, which could be part of compliance requirements in certain industries.
4. Troubleshooting and Maintenance:
- Network administrators can use the scan results to troubleshoot issues related to network connectivity and configurations.
5. Preparing for Penetration Tests:
- Prior to a full penetration test, security teams can use Nmap to quickly gather information about the network, plan their testing strategy, and focus their efforts where there is the most potential for finding vulnerabilities.
This basic Nmap output provides a foundational overview of network status, which is instrumental for deeper analysis or routine network checks.
HOST DISCOVERY:
1. -sL
The -sL argument in Nmap stands for "List Scan." This option does not actually perform a scan on the target network; instead, it simply lists each host within the provided range or subnet. It's useful for resolving and listing hostnames to generate a map of the network without sending any packets to the target hosts. This can be particularly helpful for reconnaissance purposes where you want to gather potential target information without alerting the network’s security systems.
nmap -sL 192.168.91.0/24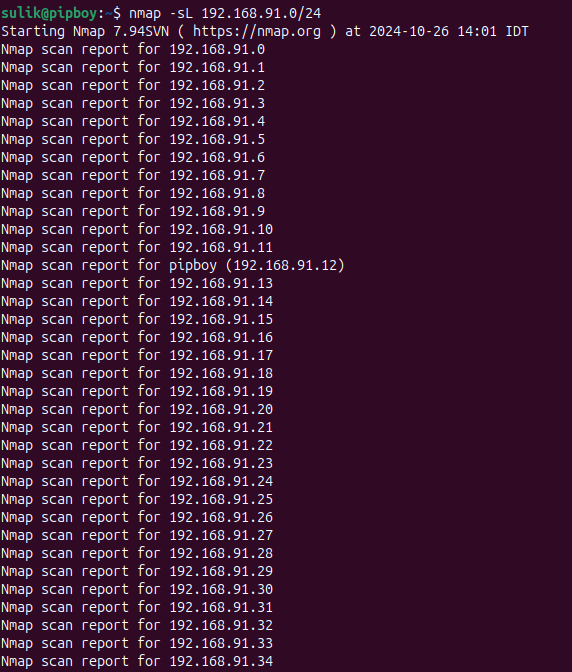
2. -sn
The -sn option in Nmap is used for a "Ping Scan," which is also commonly referred to as a host discovery or network sweep. This option tells Nmap to send network packets to the specified targets to check if they are alive (i.e., up and responding) without actually performing a port scan. It's a quick way to determine which hosts are online without engaging in the more detailed—and potentially detectable—activity of port scanning.
nmap -sn 192.168.91.0/24
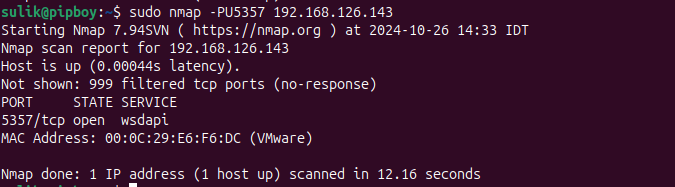
3. -Pn
The -Pn option in Nmap is used to skip the host discovery phase entirely and treats every specified host as if it were online. This means that Nmap will not attempt any kind of ping before scanning the specified targets. This option is particularly useful in situations where hosts are configured to ignore or block ICMP requests (commonly used in ping scans), or where other host discovery methods would be ineffective or undesirable.
nmap -Pn 192.168.126.143Use Cases for -Pn
- Firewalled Networks: Effective in environments where firewalls block pings or other host discovery packets, which might otherwise lead to false negatives (hosts reported as down when they are actually up but protected by firewalls).
- You can see difference here:

- Stealth Scanning: Useful for penetration testers and red teams who wish to avoid any preliminary interaction that could alert a target system’s intrusion detection systems (IDS) before more discreet scanning techniques are employed.
4. -PS/PA/PU/PY[portlist]
The -PS, -PA, -PU, and -PY options in Nmap are used for conducting more targeted host discovery scans by specifying particular types of packets to be sent to a list of ports. These options are especially useful for eliciting responses from hosts in a way that may bypass certain firewall configurations or for environments where more common discovery methods (like ICMP) are blocked. Here’s a breakdown of what each of these options does:
-PS[portlist]: TCP SYN Ping
- Function: Sends a TCP SYN packet (the initial packet in the TCP handshake) to the specified ports.
- Purpose: To check if the host is alive based on whether it responds with a SYN-ACK (indicating an open port) or a RST (indicating a closed port).
- Example Usage:
nmap -PS80,443,8080 192.168.1.1 - This sends SYN packets to ports 80, 443, and 8080 on the host 192.168.1.1.
-PA[portlist]: TCP ACK Ping
- Function: Sends a TCP ACK packet to the specified ports.
- Purpose: This is typically used to map out firewall rules. A non-responsive port could indicate that it is being filtered by a firewall, whereas an RST response typically means the port is unfiltered but closed.
- Example Usage:
nmap -PA80,443 192.168.1.1 - This sends ACK packets to ports 80 and 443.
-PU[portlist]: UDP Ping
- Function: Sends a UDP packet to the specified ports.
- Purpose: Since many services might not send a reply to a UDP packet, Nmap also sends an ICMP port unreachable packet when no response is received, indicating that the port is closed.
- Example Usage:
nmap -PU53,161 192.168.1.1 - This sends UDP packets to ports 53 (DNS) and 161 (SNMP).
-PY[portlist]: SCTP INIT Ping
- Function: Sends an SCTP (Stream Control Transmission Protocol) INIT chunk to the specified ports.
- Purpose: Used to check if a host is up by eliciting an INIT-ACK (similar to TCP’s SYN-ACK) or an ABORT chunk.
- Example Usage:
nmap -PY9901,9902 192.168.1.1 - This sends SCTP INIT chunks to ports 9901 and 9902.
Use Cases and Considerations:
- Evading Firewall Rules: These scanning techniques can sometimes evade packet filters and firewalls that do not inspect the packet contents thoroughly.
- Refined Host Discovery: Useful when traditional ICMP-based pinging is blocked, and more granular control over the scanning process is required.
- Network Mapping: Helps in detailed network mapping to identify both the status of ports and the configuration of network security devices like firewalls.
Using these options allows Nmap to adapt its scanning technique to suit different network environments and objectives, providing flexibility in how reconnaissance and preliminary scans are conducted.
5. -PE/PP/PM
The -PE, -PP, and -PM options in Nmap are used for ICMP-based host discovery, specifically leveraging different types of ICMP packets to determine if hosts are up. These options are commonly used when scanning networks where more straightforward host discovery methods are likely to succeed and less invasive techniques are preferred. Here's a breakdown of each option:
-PE: ICMP Echo Request
- Function: Sends an ICMP Echo Request (ping) to the target.
- Purpose: This is the most common and straightforward method for host discovery. A response (ICMP Echo Reply) indicates that the host is active.
- Example Usage:
nmap -PE 192.168.1.0/24- This command sends an ICMP Echo Request to all hosts in the subnet to check which ones are online.
-PP: ICMP Timestamp Request
- Function: Sends an ICMP Timestamp Request to the target.
- Purpose: This method is used to find out if hosts are up when they might be configured to not respond to standard Echo Requests. A Timestamp Reply indicates the host is active.
- Example Usage:
nmap -PP 192.168.1.0/24- This command uses ICMP Timestamp Requests to identify active hosts in the network.
-PM: ICMP Address Mask Request
- Function: Sends an ICMP Address Mask Request to the target.
- Purpose: This less commonly used method can be effective in environments where other ICMP requests are filtered. It asks the host for its subnet mask, and a response indicates activity.
- Example Usage:
nmap -PM 192.168.1.0/24- This scans the network using ICMP Address Mask Requests to determine which hosts are responsive.
Use Cases and Considerations:
- Basic Network Scanning: These methods are useful for quickly determining which hosts are online in a network, particularly in less secure or internally managed networks where ICMP traffic is not restricted.
- Initial Network Mapping: Before conducting more detailed or aggressive scans, these ICMP options can help map out the network landscape without much noise or disturbance.
- Firewall and IDS Evasion: Some networks may configure firewalls or intrusion detection systems to ignore certain types of ICMP traffic, making these options strategically valuable for stealthier scans.
6.-PO
The -PO option in Nmap is used to conduct a protocol ping, which involves sending raw IP packets without any higher-layer protocol header to the target hosts. This option allows you to specify one or more IP protocol numbers with your scans, and it's useful for probing hosts in a way that bypasses typical TCP or UDP based pinging methods.
Example Usage of -PO:
To use default IP protocols:
nmap -PO 192.168.1.0/24- This command sends packets with the default IP protocols (ICMP, IGMP, IP-in-IP) to all hosts in the subnet to determine which are online.
To specify particular IP protocols:
nmap -PO1,6,17 192.168.1.0/24- This command sends raw IP packets with the specified protocols (ICMP, TCP, and UDP represented by protocol numbers 1, 6, and 17 respectively) to the subnet.
Nmap utilizes the standard IP protocol numbers as defined by the Internet Assigned Numbers Authority (IANA). These protocol numbers are used to specify the protocol carried in the IP datagram’s protocol field.
You can find a comprehensive table of IP protocol numbers on the IANA website or in various network-related documentation. However, for quick reference, here are some of the common protocol numbers that are frequently used with tools like Nmap:
- 1: ICMP (Internet Control Message Protocol)
- 6: TCP (Transmission Control Protocol)
- 17: UDP (User Datagram Protocol)
- 2: IGMP (Internet Group Management Protocol)
- 4: IP-in-IP (a tunneling protocol)
- 41: IPv6 encapsulation
- 47: GRE (Generic Routing Encapsulation)
- 50: ESP (Encapsulating Security Payload, used in IPsec)
- 51: AH (Authentication Header, used in IPsec)
- 88: EIGRP (Enhanced Interior Gateway Routing Protocol)
- 89: OSPF (Open Shortest Path First)
Use Cases:
- Advanced Network Mapping: Useful for mapping network devices that filter or ignore common ICMP, TCP, or UDP packets but may respond to other IP protocol communications.
- Firewall Testing and Evasion: Helps in testing how firewalls handle less common IP protocols and can be used to probe networks while potentially evading detection by conventional security systems that monitor for more frequent protocol traffic.
- Research and Testing: In a research setting, using
-POcan help understand how different network devices respond to various IP protocols, aiding in the development of network models and security strategies.
7. -n/-R
The -n and -R options in Nmap are used to control how Nmap handles DNS resolution during the scanning process. Each option has a specific purpose:
-n
- Function: The
-noption tells Nmap to skip the DNS resolution of the target IP addresses. This means Nmap will not attempt to resolve IP addresses to hostnames during the scan. - Purpose: Using
-nspeeds up the scanning process because it avoids the time delay associated with DNS lookups. It's particularly useful when scanning ranges where DNS information is unnecessary or where DNS lookups might cause additional network noise or logging. - Example Usage:
nmap -n 192.168.1.0/24- This command will scan the entire subnet without attempting to resolve any IP addresses to hostnames, focusing purely on the scan results.
-R
- Function: The
-Roption forces Nmap to always perform DNS resolution for every IP address it scans. Even if Nmap's normal behavior would skip DNS resolution under certain circumstances, this option ensures that it tries to resolve every address. - Purpose: This can be helpful when detailed network documentation is required, or when you need to ensure that the scan records are as informative as possible regarding the hosts involved.
- Example Usage:
nmap -R 192.168.1.0/24- This command will scan the subnet and attempt DNS resolution for each active IP it finds, ensuring that the output includes hostnames where they are available.
Strategic Use:
-n: Opt for-nwhen conducting large scale scans where hostnames are not critical to the outcomes, or in highly secure environments where minimizing network traffic and reducing the footprint is important.-R: Use-Rwhen the clarity and detail of knowing exact hostnames are more beneficial than the additional time and network traffic incurred by DNS lookups.
Both options are about balancing the need for speed and stealth against the need for detailed information. They allow Nmap users to tailor their scans according to the specific requirements of the task at hand.
8. — dns-servers
The --dns-servers option in Nmap allows you to specify one or more DNS servers to be used for DNS resolution during the scan. This option can be very useful when you want to control which DNS servers are used for name resolution, rather than relying on the system’s default DNS settings.
Function and Use of --dns-servers:
Function: Specifies custom DNS servers for Nmap to use when it needs to resolve names during a scan. This is particularly useful when scanning networks where specific DNS servers are required to resolve internal or private network names, or when testing the impact of using different DNS servers.
Purpose: Using custom DNS servers can help in scenarios where:
- You are scanning an isolated network segment where the default system DNS doesn’t work or doesn’t have visibility.
- You want to avoid making DNS requests to a local or public DNS server to stay stealthy or avoid polluting DNS logs with scan activity.
- You need to use DNS servers that have different views (split DNS), which might resolve names differently depending on the querying source.
Example Usage:
nmap --dns-servers 192.168.1.53,192.168.1.54 192.168.1.0/24In this command, Nmap is configured to use the DNS servers at 192.168.1.53 and 192.168.1.54 for resolving any hostnames encountered during the scan of the 192.168.1.0/24 subnet.
Benefits:
- Control Over DNS Queries: You have full control over which DNS servers are used for the queries, which can help in customizing the scan according to specific network environments.
- Enhanced Stealth: By directing DNS queries to non-standard servers, you can avoid alerting network monitoring systems that might be watching for unusual queries on the default DNS.
- Accurate and Relevant Data: Ensures that the DNS data used during the scan is accurate and relevant to the environment you are scanning, especially useful in complex network configurations.
Using the --dns-servers option gives you flexibility in how DNS resolutions are handled during Nmap scans, enhancing both the effectiveness and stealthiness of your network reconnaissance efforts.
9. — system-dns
The --system-dns option in Nmap is used to explicitly instruct Nmap to use the system's default DNS resolver settings for name resolution during the scan. This option can be particularly useful in certain scenarios where you want to ensure that Nmap adheres strictly to the DNS configuration specified at the system level, such as when specific DNS forwarders or resolver settings are pre-configured for optimal network performance or security.
Function and Use of --system-dns:
Function: Forces Nmap to use the DNS resolver configuration that is set up on the system running the scan. This includes using the default DNS servers configured on the host, as well as adhering to any system-specific DNS resolution behaviors and caching mechanisms.
Purpose: Using the system DNS can be advantageous for:
- Consistency: Ensuring that the DNS resolution during the scan matches what other applications on the host would use, which can be important for accurate testing and troubleshooting.
- Integration: Leveraging system-level DNS settings that may be part of an integrated security or operational setup, such as DNS servers with security filters or internal DNS structures.
- Simplicity: Reducing the complexity of command configurations by relying on pre-established DNS settings without the need to specify DNS servers manually.
Example Usage:
nmap --system-dns 192.168.1.0/24This command tells Nmap to perform a network scan on the 192.168.1.0/24 subnet, using the DNS resolver settings that are configured on the system where Nmap is running.
Strategic Considerations:
- Default Behavior: It’s important to note that if neither
--system-dnsnor--dns-serversis specified, Nmap typically uses the system DNS settings by default. However, explicitly setting--system-dnscan be a clear declaration of intent, ensuring that there's no ambiguity about DNS resolution, especially in scripts or automated environments. - Troubleshooting and Compliance: In environments where DNS configurations are tightly controlled or subject to compliance standards, using
--system-dnsensures that scans are conducted in alignment with these requirements.
Using the --system-dns option is about ensuring conformity with the host system’s DNS settings, which can be critical for maintaining operational consistency and leveraging existing network infrastructure setups during Nmap scans.
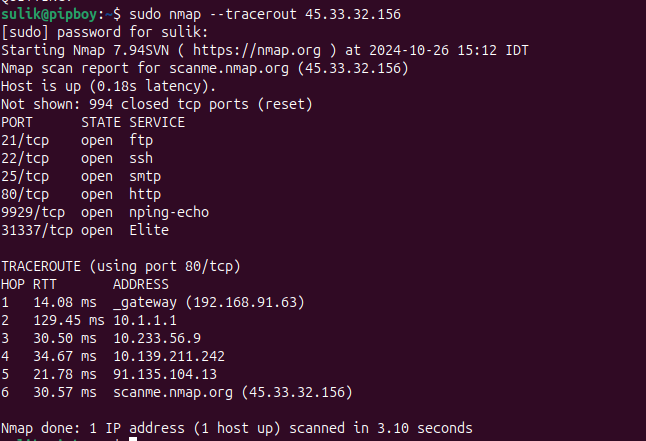
10. — traceroute
The --traceroute option in Nmap is used to perform a traceroute operation after completing a scan. This option allows you to trace the path that packets take from the scanning system to the target network, providing visibility into the network routing structure. This feature can be especially valuable for understanding how data flows through the network and identifying potential bottlenecks or misconfigurations.
Function and Use of --traceroute:
Function: Conducts a traceroute analysis from the scanning system to each scanned host to determine and display the route that packets take to reach the target. This can reveal the number of hops and the path taken through routers and switches over the internet or within local networks.
Purpose: Using the --traceroute option helps in:
- Network Troubleshooting: Identifying routing issues or delays that might affect network performance.
- Security Assessments: Mapping out network topology, which can be useful in security audits to understand the network layout and pinpoint weak points in the routing structure.
- Performance Analysis: Analyzing how traffic flows through the network, which can be essential for performance tuning and capacity planning.
Example Usage:
nmap -p 80 --traceroute 192.168.1.1This command will perform a scan on port 80 of the host at IP address 192.168.1.1, followed by a traceroute to that host. The output will include information about each hop along the path that packets take to reach the target, including the IP addresses of the intermediate routers.
Detailed Output:
- The output from the
--tracerouteoption lists each router (hop) that the packets pass through on their way to the target. For each hop, it shows the IP address, round trip time (RTT), and sometimes the DNS name if it can be resolved. - The traceroute is performed using the same protocol that was used for the scan (ICMP, UDP, or TCP), depending on the scan settings.
Strategic Considerations:
- Enhanced Insights: Combining port scanning with traceroute provides a deeper understanding of both network structure and port status across the network path, offering a comprehensive view of network security and performance.
- Scanning and Network Impact: While useful, performing traceroutes can increase the visibility of your scan and may be detected by network security systems. It’s important to consider the potential impact and visibility when using this option in sensitive environments.
The --traceroute option adds valuable context to Nmap scans by illustrating the network path taken to the scanned hosts, which is crucial for advanced network diagnostics and strategic planning in both security and network administration domains.


