
Unleashing the Power of Next-Gen NLP Models
Mastering Llama 2: A Comprehensive Guide to Fine-Tuning in Google Colab
Dive deep into Llama 2 — the cutting-edge NLP model. This guide covers everything from setup and loading to fine-tuning and deployment in Google Colab.

TL;DR
This guide explores the intricacies of fine-tuning the Llama 2–7B, a large language model by Meta, in Google Colab. Addressing initial setup requirements, we delve into overcoming memory constraints using quantization. Leveraging the patient-doctor dataset, we adapt the model’s broad capabilities to medical interactions. Key techniques like Low-Rank Adaptation (LoRA) and QLoRA are unpacked, providing an efficient approach to fine-tuning massive models. Read on for a step-by-step breakdown, from preliminary setups to training results.
Here is what we cover in this article:
- Introduction to Llama 2: The Powerhouse of Language Models
- Preliminaries
- Loading the model
- Tokenizer
- Inference
- Fine-Tunning
- Saving the Model
- Load and export the fine-tuned model
- Conclusions
Let’s dive in!
Before starting, if you want to learn more about data science, and generative AI, I suggest checking out my other posts using the below lists:
Now, let’s get started.
Introduction to Llama 2: The Powerhouse of Language Models
In the ever-evolving landscape of Natural Language Processing (NLP), models have grown in complexity, offering unparalleled capabilities and prowess in understanding and generating human-like text. Among the major models that have emerged recently is Llama 2.
Llama 2 is not just a singular model. It’s a spectrum of models, each optimized and tailored for specific applications. The collection includes models with parameter scales ranging from 7 to 70 billion. This article specifically discusses the 7B pre-trained model.
Meta’s dedication to refining Llama 2 has led to its fine-tuned versions, specifically Llama-2-Chat, standing out in dialogue-based models. Their performance has overshadowed open-source chat models in numerous benchmarks and rivalled the efficiency of renowned closed-source models like ChatGPT and PaLM.
A Glimpse into the Architecture
The underlying architecture of Llama 2 is auto-regressive, built on the foundations of an optimized transformer model. When we delve into the fine-tuned versions, we see the implementation of supervised fine-tuning (SFT) and reinforcement learning with human feedback (RLHF). These techniques ensure the model aligns seamlessly with human preferences, ensuring helpfulness and safety in its responses.
Usage and Licensing
It’s essential to note that using Llama 2 comes with its licensing governed by Meta. To harness the power of this model, you’ll need to visit the official website, accept the license agreement, and then proceed to download the model weights and tokenizer.
Having introduced Llama 2, let’s dive deeper into the practicalities. We’ll explore the preliminary steps and load the model in the following sections.
Preliminaries
Before we dive into the intricacies of fine-tuning the Llama 2 model, certain prerequisites and preliminary steps need to be addressed. These steps ensure that our environment is adequately set up and equipped with the tools necessary for the task ahead.
Installation and Setup
The first step is connecting to the drive to save the model:
from google.colab import drive
drive.mount('/content/drive')
Then we need to install some libraries:
%%capture
!pip install -q accelerate==0.21.0 peft==0.4.0 bitsandbytes==0.40.2 transformers==4.31.0 trl==0.4.7 tensorboard huggingface_hub[cli] xformers
In the code above, we are installing several libraries that will be used throughout the notebook:
accelerate: A library designed to facilitate deep learning model training on any hardware backend.peft: A library for efficient fine-tuning.bitsandbytes: Assists with memory-efficient optimization.transformers: Provides state-of-the-art machine learning architectures like BERT, GPT-2, and others.trl: Enables reinforcement learning-based training.tensorboard: A visualization tool for neural network training runs.huggingface_hub[cli]: Hugging Face's model hub allows easy model sharing and access.
Hugging Face login
We need to be authenticated to access and utilize models from the Hugging Face model hub. This line of code prompts the user to log in to their Hugging Face account. It’s essential to note that accessing the Llama model distributed by Meta requires a specific licensing step through Meta’s website, and the linked email should be consistent with the Hugging Face account.
!huggingface-cli login
    _|    _|  _|    _|    _|_|_|    _|_|_|  _|_|_|  _|      _|    _|_|_|      _|_|_|_|    _|_|      _|_|_|  _|_|_|_|
    _|    _|  _|    _|  _|        _|          _|    _|_|    _|  _|            _|        _|    _|  _|        _|
    _|_|_|_|  _|    _|  _|  _|_|  _|  _|_|    _|    _|  _|  _|  _|  _|_|      _|_|_|    _|_|_|_|  _|        _|_|_|
    _|    _|  _|    _|  _|    _|  _|    _|    _|    _|    _|_|  _|    _|      _|        _|    _|  _|        _|
    _|    _|    _|_|      _|_|_|    _|_|_|  _|_|_|  _|      _|    _|_|_|      _|        _|    _|    _|_|_|  _|_|_|_|

    To login, `huggingface_hub` requires a token generated from https://huggingface.co/settings/tokens .
Token:
Add token as git credential? (Y/n) n
Token is valid (permission: read).
Your token has been saved to /root/.cache/huggingface/token
Login successful
Importing Dependencies
Let’s import the libraries we installed:
import os
import torch
from datasets import load_dataset
from transformers import (
    AutoConfig,
    AutoModelForCausalLM,
    AutoTokenizer,
    BitsAndBytesConfig,
    HfArgumentParser,
    TrainingArguments,
    pipeline,
    logging
)
from peft import LoraConfig
from trl import SFTTrainer
import transformers
This section imports all the necessary dependencies:
os: Provides a portable way to use operating system-dependent functionality.torch: The PyTorch library, a crucial tool for deep learning tasks.datasets: Specifically, the load_dataset function to fetch our training data.- Various tools from the transformers library will assist in configuring, tokenizing, and training the model.
LoraConfigfrompeft: Configurations for the efficient fine-tuning library.SFTTrainerfromtrl: The supervised fine-tuning trainer class.
Loading the model
To get started with fine-tuning, we need to load the model to train it. This poses a few challenges based on system constraints. First, the base llama2–7b model released by Meta does not fit into our 12GB system RAM, which causes the Colab runtime to crash when we try loading the model.
Overcoming RAM Limitations: A Key Challenge in Model Loading
When leveraging platforms like Google Colab, you often encounter a fundamental challenge: Insufficient RAM. While the platform is generous in its offerings, there are undeniable limits. For instance, attempting to directly load the Llama 2–7B model into the system’s RAM can result in a complete runtime crash, necessitating a restart. This is not just an inconvenience but a roadblock for many users aiming to harness the power of such advanced models.
To overcome this, you might consider loading the model directly into GPU memory. After all, GPUs are specifically designed for heavy computational tasks and often come with their dedicated memory. On platforms like Colab, you can access up to 15 GB of GPU memory, which sounds promising.
However, even this approach has its pitfalls. Upon trying to load the Llama 2–7B model directly onto the GPU, you are met with another daunting error: OutOfMemoryError. This signifies that even the GPU's 15 GB of memory falls short of the model's demands.
So, faced with these challenges, what’s the solution? How can you leverage advanced models without being hindered by memory constraints? The answer lies in innovative techniques like quantization, which allow for a reduction in the memory footprint of models without a significant compromise in performance.
What is Quantization?
At its core, quantization is a technique that tweaks the representation of a model’s parameters, allowing them to consume less memory. Instead of using traditional floating-point numbers, which might require 64 bits (or 8 bytes) for each parameter (known as fp64 precision), quantization can drastically reduce this.
Imagine this: A colossal model with 7 billion parameters in fp64 precision would need a whopping 56 GB of memory. That’s way beyond what many platforms offer.
The Trade-Off: Precision vs. Memory
The intriguing aspect of quantization is that it lets us represent model parameters with lower precision. While models like transformers might originally be trained in mixed precision (a blend of 16-bit and 32-bit representations, termed as fp16 and fp32, respectively), quantization can further reduce this. The catch? A slight compromise in model performance in exchange for significant memory savings.
But here’s the challenge: We're still hitting walls despite the memory savings from mixed precision. With only 15 GB available, we’re restricted to roughly 2 bytes (or 16 bits) for each parameter.
A Solution from HuggingFace: BitsAndBytes
So, when faced with the puzzle of loading a model trained in mixed precision with just 2 bytes per parameter, where do we turn? HuggingFace, a stalwart in the NLP community, offers a solution: the bitsandbytes library. This innovative tool lets us dynamically adjust the precision used when loading a model into memory, irrespective of the precision utilized during training. The result? Models that once seemed too large to handle become accessible, opening doors to advanced NLP capabilities on constrained platforms.
Quantization config
The configuration below sets the model to be loaded in 4 bits per parameter. The 16 bits we computed earlier are enough to keep only the model parameters in memory. Just parameters are sufficient if we want to run inference on the model. However, to train the model, we must also compute the loss and calculate gradients in the backward pass to update the model parameters. Additionally, if we use an optimizer like Adam, we must store the optimizer state. All these parameters add up on the GPU, driving the memory needed to 3–4 times the memory required for inference. Therefore, we load the model with lower precision to make room for training.
Here, we are using official meta-llama one: meta-llama/Llama-2–7b-chat-hf.
# Set the name of the model we'll use for the rest of the notebook
model_name = "meta-llama/Llama-2-7b-chat-hf"
Now we need to define parameters for quantization:
# Load the entire model on the GPU 0
device_map = {"": 0}

# Set base model loading in 4-bits
use_4bit = True

# Compute dtype for 4-bit base models
bnb_4bit_compute_dtype = "float16"

# Quantization type (fp4 or nf4)
bnb_4bit_quant_type = "nf4"

# Activate nested quantization for 4-bit base models (double quantization)
use_nested_quant = False
The device_map variable indicates where the model will be loaded. In this case, the model is set to load on GPU 0. For quantization, several related parameters are defined:
use_4bit: A boolean flag indicating whether to use 4-bit quantization.bnb_4bit_compute_dtype: The data type used for computations after quantizing the model.bnb_4bit_quant_type: Specifies the type of 4-bit quantization (either "fp4" or "nf4").use_nested_quant: A flag will be applied to determine if nested (or double) quantization.
Now, we can load the model:
compute_dtype = getattr(torch, bnb_4bit_compute_dtype)
bnb_config = BitsAndBytesConfig(
    load_in_4bit=use_4bit,
    bnb_4bit_quant_type=bnb_4bit_quant_type,
    bnb_4bit_compute_dtype=compute_dtype,
    bnb_4bit_use_double_quant=use_nested_quant
)
# Load the base model
model = AutoModelForCausalLM.from_pretrained(
    model_name,
    device_map=device_map,
    quantization_config=bnb_config,
)
model.config.use_cache = False
model.config.pretraining_tp = 1
In this section, the model is loaded using the defined quantization settings:
compute_dtypeis determined using thegetattrfunction to fetch the appropriate data type from the torch library.bnb_configis an instance of theBitsAndBytesConfigclass, which holds the quantization configurations.AutoModelForCausalLM.from_pretrainedis a method from the HuggingFace library used to load a pre-trained model. It's being given the model name(model_name), device mapping (device_map), and quantization configuration (bnb_config).- Two additional configurations are set for the loaded model:
use_cacheis disabled, andpretraining_tpis set to 1.
Tokenizer
For language models, like the ones from HuggingFace, the raw text isn’t directly fed into the model. Instead, the text must be converted into a format the model understands. This conversion process is known as tokenization. Tokenization is the bridge between the textual data and the model. It converts the text into a sequence of integers, each representing a specific word, subword, or character.
When using a pre-trained model, tokenizing the input data in the exact way the model was trained is crucial. Otherwise, the model might not understand the input correctly. That’s why it’s standard practice to use the tokenizer that comes with the model. This ensures that the tokenization during inference or fine-tuning matches the original training.
# Load the model tokenizer
tokenizer = AutoTokenizer.from_pretrained(model_name, trust_remote_code=True)
Here, the AutoTokenizer.from_pretrained method loads the tokenizer associated with the specified model from the HuggingFace hub.
Padding
The input text might sometimes be shorter than the model’s expected input length. The input must be padded (i.e., filled) to match the model’s input length. This is where the concept of padding comes into play.
Why is padding necessary?
Neural models, especially transformer-based ones, expect input data in fixed-sized batches. If the data is shorter, we pad it; if it’s longer, we truncate it. The padding ensures consistent tensor dimensions across different inputs.
There are various tokens used in NLP tasks, like start-of-sequence (sos), end-of-sequence (eos), and padding tokens. One common approach is to use the eos token as the padding token. However, this approach can be problematic.
Consider this: If the eos token is used for padding, during training, the model learns that the eos token is just filler and shouldn’t generate it as part of its output. This means that given a prompt, the model might generate never-ending text, and we would need to truncate the output manually.
To avoid this, a custom padding token (
# Define a custom padding token
tokenizer.pad_token = "<PAD>"
Here, the pad token for the tokenizer is explicitly set to
Note on Errors: While there are various ways to set padding tokens in HuggingFace, some methods can introduce errors, especially at the GPU level. For instance, using the
add_special_tokensmethod might cause CUDA-related errors. This could be due to changes in embedding dimensions. But without diving deep, it's hard to pinpoint the exact cause. As a result, directly setting the pad_token attribute is a safer bet.
Padding Direction
Once the padding token is set, the direction of padding needs to be specified. Padding can be added either to the left (before the text) or to the right (after the text). In this case, the padding is added to the right.
Why does this matter? Well, for certain training configurations, especially with mixed precision (fp16), left-side padding can cause crashes. Hence, specifying the padding direction is crucial.
# Set the padding direction to the right
tokenizer.padding_side = "right"
Inference
Once a model is loaded, the next logical step is to use it for predictions or inference in deep learning. In the case of the given model, it’s designed for chat-based tasks, making it perfect for generating textual responses.
Deep learning models, especially large ones, can consume significant GPU memory during inference. You might encounter out-of-memory issues if you plan to run training after inference. It’s a good practice to restart the runtime to free up memory and then load the model again before training.
# Create a text generation pipeline which use the model and the tokenizer loaded
generator = pipeline(task="text-generation", model=model, tokenizer=tokenizer)
Here, the pipeline function from the HuggingFace library is used to create a text generation pipeline. This pipeline combines the model and the tokenizer, making generating text based on input prompts easy.
Generating a Response
To get a textual response from the model, you provide it with a prompt. In this case, the prompt is seeking advice on skiing vacation destinations.
import textwrap

def display_response(prompt, generated_response, max_width=120):
    # Function to print a bordered text box
    def print_boxed(text):
        lines = textwrap.wrap(text, max_width)  # Wrap text to desired width
        border = '+' + '-' * (max_width + 2) + '+'
        print(border)
        for line in lines:
            print('| ' + line.ljust(max_width) + ' |')
        print(border)

    # Extract the instruction and the patient's query from the prompt
    instruction_start = prompt.find("[INST]") + len("[INST]")
    instruction_end = prompt.find("[/INST]")
    instruction = prompt[instruction_start:instruction_end].strip()

    prefix = "As a medical doctor, respond to this patient query: Patient: "
    if instruction.startswith(prefix):
        instruction = instruction[len(prefix):].strip()

    # Extract the generated text from the response dictionary
    response_text = generated_response[0]['generated_text']

    # Extract the medical doctor's response from the generated text
    doctor_response_start = response_text.find("[/INST]") + len("[/INST]")
    doctor_response = response_text[doctor_response_start:].strip()

    # Display the information with a wrapper
    print("Human:")
    print_boxed(instruction)
    print("\nAssistance:")
    print_boxed(doctor_response)


prompt = """<s>[INST] Hi, Are you there? How are you?  [/INST] """


display_response(prompt, generator(prompt, max_new_tokens=100))
Human:
+--------------------------------------------------------------------------------------------------------------------------+
| Hi, Are you there? How are you? |
+--------------------------------------------------------------------------------------------------------------------------+
Assistance:
+--------------------------------------------------------------------------------------------------------------------------+
| Hello! I'm just an AI, I don't have feelings or emotions, so I can't experience emotions like humans do. everybody! I'm |
| here to help answer your questions and provide information to the best of my ability. How can I assist you today? |
+--------------------------------------------------------------------------------------------------------------------------+The special tokens , [INST], and [/INST] are used to format the prompt for the model. While their exact function isn't detailed here, they typically serve as markers or commands for the model. For instance, [INST] might indicate the start of an instruction.
The generator pipeline is then used to produce a response based on the prompt. The max_new_tokens=100 parameter limits the response to 100 tokens, ensuring the output isn't overly verbose.
The display_response takes a textual prompt and a generated_response (expected from some text generation model) to display them in a neatly formatted manner on the console. Within this main function, there's a nested helper function, print_boxed, which uses the textwrap module to wrap and print any provided text inside a bordered box. The main function first extracts the instruction from the prompt by looking for specific markers ([INST] and [/INST]). It then checks and removes any predefined prefix from this instruction to ensure clarity. Afterward, the function extracts the model's generated response, which is assumed to follow the [/INST] marker in the generated_response. Finally, the user's instruction and the model's response are displayed in boxed format. The sample usage at the end showcases how to use this function with a mock generator and a sample prompt.
Loading Data
After loading the model and running inference, the next step is fine-tuning the model on a specific dataset. Fine-tuning allows the model to adapt its pre-trained knowledge to a more specific task or domain.
Dataset Formatting:
To train a model, we must provide it with data in a format it understands. In the context of chat models, this means structuring our dataset with prompts and expected responses. The model is then trained to generate appropriate responses based on the prompts.
The Llama-chat model expects prompts of the form:
[INST] {user_message} [/INST]
To train the model, we construct our training data like this:
[INST] {user_message} [/INST] {response}
Let’s look at the functions that help in formatting the dataset:
Next, a dataset formatter function is chosen. This function will be used to format each sample in the dataset according to the model’s expected prompt structure.
Loading and Preprocessing the Dataset:
The dataset is loaded, and a portion is selected if a subset size is specified. For this post, we are using sid6i7/patient-doctor dataset, which is for a patient-doctor interaction task. To start, we create a prompt for each sample so it guides a model to respond to the role of a medical doctor.
def template_dataset(sample):
    """
    Template a dataset sample to add a prompt to each sample for a patient-doctor interaction.

    Args:
        sample (dict): A dictionary containing 'Patient' and 'Doctor' fields which need to be templated.

    Returns:
        dict: The same dictionary but with an added 'text' field that contains the templated string.
    """

    cleaned_response = sample['Doctor'].replace('<start>', '').replace('<end>', '').strip()

    instruction = f"<s>[INST] As a medical doctor, respond to this patient query: Patient: {sample['Patient']} [/INST]"
    response = f"Doctor: {cleaned_response}"
    sample["text"] = instruction + response + tokenizer.eos_token
    return sample

dataset_name = 'sid6i7/patient-doctor'
dataset = load_dataset(dataset_name, split="train")
dataset_sample = 3000


if dataset_sample > 0:
  dataset_shuffled = dataset.shuffle(seed=1234)
  dataset = dataset_shuffled.select(range(dataset_sample))


dataset = dataset.map(template_dataset, remove_columns=[f for f in dataset.features if not f == 'text'])
Function template_dataset plays a pivotal role in the templating process:
- Input: A dictionary named
sample, expected to contain the 'Patient' and 'Doctor' fields. cleaned_response: Removes placeholder tokens (instruction: Constructs a prompt, directing a hypothetical medical doctor model to respond to a patient's query.response: Structures the actual response from the doctor.- The function merges the instruction and response, appends a token signifying the end of the string (this token comes from an external tokenizer not explicitly defined in the provided code), and places the result in the
textfield of thesampledictionary. - Output: The modified
sampledictionary.
Then the above code do dataset initialization and sampling:
dataset_name: Identifies the name or path of the desired dataset.load_dataset: Loads the dataset (presumably from thedatasetslibrary, though the import isn't depicted in the provided code).- If the dataset needs to be sub-sampled (as defined by
dataset_sample), the code randomizes the dataset order (using a consistent seed for reproducibility) and chooses the firstdataset_samplenumber of examples. - The function
dataset.map()applies thetemplate_datasetfunction to each dataset sample. - Through the
remove_columnsargument, the code ensures that only the templated 'text' column remains, while all auxiliary columns get removed.
A new name is generated for the fine-tuned model based on the dataset and the number of samples with inference.
new_model = 'Llama-7b-medical-assistance'Let’s select some samples to check the datasets:
import random
idx_1 = random.randint(0, len(dataset))
idx_2 = random.randint(0, len(dataset))
idx_3 = random.randint(0, len(dataset))
idx_4 = random.randint(0, len(dataset))
idx_5 = random.randint(0, len(dataset))
print(f'Selected Samples for test: {idx_1}, {idx_2}, {idx_3}, {idx_4}, and {idx_5}')
Selected Samples for test: 1907, 424, 778, 1395, and 996print("="*50)
print("DATASET INFORMATION")
print("="*50)
print(f"Dataset Name: {dataset_name}\n")
print(f"Number of Samples: {len(dataset)}\n")
print("="*50)
print("RUNNING INFERENCE ON A SAMPLES")
print("="*50)
print(f"Sample Example (Index {idx_1}):")
prompt = f"{dataset[idx_1]['text'].split('[/INST]')[0]}[/INST] "
display_response(prompt, generator(prompt, max_new_tokens=200))
print("="*50)
print(f"Sample Example (Index {idx_2}):")
prompt = f"{dataset[idx_2]['text'].split('[/INST]')[0]}[/INST] "
display_response(prompt, generator(prompt, max_new_tokens=200))
print("="*50)
print(f"Sample Example (Index {idx_3}):")
prompt = f"{dataset[idx_3]['text'].split('[/INST]')[0]}[/INST] "
display_response(prompt, generator(prompt, max_new_tokens=200))
print("="*50)
print(f"Sample Example (Index {idx_4}):")
prompt = f"{dataset[idx_4]['text'].split('[/INST]')[0]}[/INST] "
display_response(prompt, generator(prompt, max_new_tokens=200))
print("="*50)
print(f"Sample Example (Index {idx_5}):")
prompt = f"{dataset[idx_5]['text'].split('[/INST]')[0]}[/INST] "
display_response(prompt, generator(prompt, max_new_tokens=200))
print("="*50)
print("MODEL INFORMATION")
print("="*50)
print(f"Fine-Tuned Model Name: {new_model}")
print("="*50)and here are the results based on prompt of dataset:
==================================================
DATASET INFORMATION
==================================================
Dataset Name: sid6i7/patient-doctor

Number of Samples: 3000

==================================================
RUNNING INFERENCE ON A SAMPLES
==================================================
Sample Example (Index 1907):
Human:
+--------------------------------------------------------------------------------------------------------------------------+
| My daughter is 16 months old and for about a month now, atleast once a day but sometimes more, she will vomit the        |
| majority of her meal back up after eating just a few bites to eating the entire meal. We feed her about 6 tablespoons of |
| oatmeal in the morning and she typically cannot finish this (although she was always finishing this up to about a month  |
| ago) and/or she will vomit sometime during the meal. We feed her a 6 oz jar of a squash or sweet potato for lunch and    |
| same thing occurs that she may sometimes finish but other times will vomit halfway thru. After nap, she gets a 4 oz jar  |
| of fruit and a 4 oz can of yogurt and today she vomited after the fruit. For dinner we use to feed her a green bean and  |
| rice mix but gave up since she nearly vomited everyime we fed her this and sometimes it was after 2-3 bites in. She will |
| not feed herself any feed that we are eating other than spaghetti and even then it is maybe 10 macoroni noodles. We are  |
| giving her about 18 oz of whole milk throughout the day and 6 oz of pediasure. She is also taking 1 mil of a vitamin     |
| each day, not sure the vitamin name but is smells really bad. Where do we go from here? Thanks.                          |
+--------------------------------------------------------------------------------------------------------------------------+

Assistance:
+--------------------------------------------------------------------------------------------------------------------------+
| Thank you for sharing this information about your daughter's recent vomiting episodes. As a medical doctor, I understand |
| your concern and would like to provide some insights and suggestions based on the information you provided. Firstly, it  |
| is important to acknowledge that vomiting in infants and toddlers is a common phenomenon, especially during the first    |
| year of life. However, persistent and recurrent vomiting can be a sign of an underlying issue, and it is essential to    |
| investigate and address the cause. Based on the information you provided, there are a few potential reasons why your     |
| daughter is vomiting after eating: 1. Food allergy or intolerance: It is possible that your daughter has developed an    |
| allergy or intolerance to one or more of the foods she is consuming. Common allergens in infants include dairy, soy,     |
| wheat, and eggs. Intolerance to lactose or gl                                                                            |
+--------------------------------------------------------------------------------------------------------------------------+
==================================================
Sample Example (Index 424):
Human:
+--------------------------------------------------------------------------------------------------------------------------+
| hi, I am having dust allergy for a while now. Earlier i was used to get the allergic reactions like sneezing, running    |
| nose and eyes sporadically but nowadays after returning UK, I am finding it a daily occurrence. I dont know what could   |
| be the cure for this. I have taken cetrizine some time, then Levocet tablet and now Montek LC. Pls advice how to proceed |
| and which medicine will be most effective. Thanks Aftab                                                                  |
+--------------------------------------------------------------------------------------------------------------------------+

Assistance:
+--------------------------------------------------------------------------------------------------------------------------+
| Hello Aftab, Thank you for reaching out to me regarding your dust allergy symptoms. It's understandable that you're      |
| experiencing frequent allergic reactions, especially after returning from the UK. Firstly, it's important to understand  |
| that dust allergy is an overreaction of the immune system to harmless particles in the air, such as dust mites, pollen,  |
| and pet dander. The symptoms you're experiencing, such as sneezing, running nose, and itchy eyes, are caused by the      |
| release of histamine and other chemicals from the immune system. Cetrizine, Levocet, and Montek LC are all               |
| antihistamines, which work by blocking the action of histamine on histamine receptors. While these medications can       |
| provide relief from symptoms, they don't address the underlying cause of the allergy                                     |
+--------------------------------------------------------------------------------------------------------------------------+
==================================================
Sample Example (Index 778):
Human:
+--------------------------------------------------------------------------------------------------------------------------+
| My 5 year old daughter is 5 days post tonsillectomy. After the surgery she seemed to have a lot of nasal mucus and       |
| developed a cough that is very wet. I can hear the mucus in her chest. She keeps wanting to cough but says she can t. Is |
| this normal after a tonsillectomy?                                                                                       |
+--------------------------------------------------------------------------------------------------------------------------+

Assistance:
+--------------------------------------------------------------------------------------------------------------------------+
| Hello there! As a medical doctor, I understand your concern about your 5-year-old daughter's post-tonsillectomy          |
| symptoms. It's common for children to experience nasal mucus and coughing after a tonsillectomy, and in most cases,      |
| these symptoms are a normal part of the recovery process. After a tonsillectomy, the body needs time to heal and remove  |
| any remaining tissue or debris from the tonsils. This can cause swelling and inflammation in the nasal passages, leading |
| to increased mucus production and coughing. The mucus in the chest is likely a result of the nasal mucus draining down   |
| the back of the throat and into the lungs. It's important to note that some children may experience more severe symptoms |
| than others after a tonsillectomy, and in some cases, these symptoms can last                                            |
+--------------------------------------------------------------------------------------------------------------------------+
==================================================
Sample Example (Index 1395):
Human:
+--------------------------------------------------------------------------------------------------------------------------+
| A few weeks ago I got a new crown. Last molar in bottom back left side. I cannot afford to loose the tooth. He used the  |
| new technology. Two hours and all done. But it sits too low. He has tried to adjust my bite by taking a little off my    |
| front bottom teeth but it still is too low. Can the crown be built up with porcelain while in my mouth. I am afraid of   |
| taking it off and redoing it because the tooth has a crack in it.                                                        |
+--------------------------------------------------------------------------------------------------------------------------+

Assistance:
+--------------------------------------------------------------------------------------------------------------------------+
| Dear Patient, Thank you for reaching out to me regarding your concerns about your new crown. I understand your           |
| apprehension about the crown sitting too low and the crack in the tooth. As a medical doctor and a dentist, I will do my |
| best to provide you with a helpful response. It is possible to build up the crown with porcelain while you are still     |
| wearing it in your mouth. This process is called "in-office tooth bleaching" or "in-office bonding." During this         |
| procedure, a dentist will apply a tooth-colored resin to the surface of the crown to build it up and make it sit higher. |
| The resin is bonded to the tooth using a special light, and the process is usually completed in a single appointment.    |
| However, there are a few things to consider before undergoing this procedure: 1. The crack in the tooth: If the crack in |
| the tooth                                                                                                                |
+--------------------------------------------------------------------------------------------------------------------------+
==================================================
Sample Example (Index 996):
Human:
+--------------------------------------------------------------------------------------------------------------------------+
| My child is 3 years old. He is having cold from past one month and doctor prescribed antibiotics twice in this period.   |
| Now last night he had terrible wheezing due to which he was nebulised this morning and also been treated with levolin    |
| syrup. My query is whether levolin syrup is steroidal? If yes, is it better to nebulise him rather than giving levolin   |
| syrup?                                                                                                                   |
+--------------------------------------------------------------------------------------------------------------------------+

Assistance:
+--------------------------------------------------------------------------------------------------------------------------+
| As a medical doctor, I understand your concern about your child's persistent cold and the treatment he has been          |
| receiving. Levolin syrup is indeed a steroidal medication, specifically a corticosteroid, which is commonly used to      |
| treat respiratory conditions such as wheezing and coughing in children. While both nebulization and oral administration  |
| of steroidal medications like Levolin syrup can be effective in managing respiratory symptoms, there are some factors to |
| consider when deciding which route of administration is best for your child. Advantages of Nebulization: 1. Rapid onset  |
| of action: Nebulization can provide rapid relief of symptoms as the medication is directly delivered to the lungs        |
| through the nebulizer. 2. Targeted delivery: Nebulization allows for precise delivery of medication to the affected      |
| area, which can be especially helpful in cases of severe whe                                                             |
+--------------------------------------------------------------------------------------------------------------------------+
==================================================
MODEL INFORMATION
==================================================
Fine-Tuned Model Name: Llama-7b-medical-assistance
==================================================
Fine-Tunning
First, lets see what is LoRA and QLoRA:
LoRA stands for Low-Rank Adaptation. It’s an innovative method to trim down memory requirements while fine-tuning Large Language Models (LLMs). Specifically, LoRA falls under the umbrella of Parameter Efficient Fine-tuning (PeFT) techniques.
The principal idea behind LoRA is not to directly adjust a large weight matrix. Instead, it’s approximated using two smaller matrices. When these matrices undergo multiplication, they should mimic the original, larger matrix. Let’s dive to an example to see how it works:
A matrix ( W ) of size 1000x1000 encompasses approximately 1 million values. With 32-bit precision (4 bytes per value), this matrix would need around 4MB of memory. But, by representing ( W ) through the multiplication of two matrices, ( W_a ) (1000x64) and ( W_b ) (64x1000), the memory footprint drops significantly. Together, ( W_a ) and ( W_b ) only house 128K values, translating to about 512KB of memory — an 8x reduction.
So, we learn about LoRA, so what’s QLoRA? In summary, think of this as an advanced iteration of LoRA.
QLoRA pushes the envelope further by encoding the weights of ( W_a ) and ( W_b ) using a mere 16 bits per parameter. This move halves the memory requirement when set against a 32-bit representation. An essential detail to note: this snippet doesn't define the configuration to employ 16 bits during the training phase.
It was, however, determined in the BitsAndBytes configuration at the time of model loading. The parameter bnb_4bit_compute_dtype delineates the datatype for computations on 4-bit loaded parameters.
During the refinement process, the model understands the tweaks required for ( W ) via the low-rank matrices ( W_a ) and ( W_b ). Post-training, the resultant ( W_a ) and ( W_b ) matrices are multiplied and amalgamated with ( W ) to yield the new weight matrix.
Configuration for QLoRA
After understanding the essence of QLoRA, we set parameters specifically designed for this method:
# LoRA attention dimension
lora_r = 64
# Alpha for LoRA scaling
lora_alpha = 64
# Dropout probability for LoRA
lora_dropout = 0.1
Here, lora_r is initialized to a value of 64. This denotes the LoRA (Low-Rank Adaptation) attention dimension. In LoRA, this value represents the rank of the low-rank matrix, which modifies the attention scores in the self-attention mechanism. In other words, it controls the size of the low-rank approximation. lora_alpha represents the scaling factor for LoRA. When you scale the attention scores, this value can help determine how much you amplify or diminish these scores. lora_dropout indicates the dropout probability for the LoRA mechanism. Dropout is a regularization technique used in neural networks where random subsets of units (in this case, within the LoRA mechanism) are dropped during training to prevent overfitting.
# Create the LoRA configuration
peft_config = LoraConfig(
    r=lora_r,
    lora_alpha=lora_alpha,
    lora_dropout=lora_dropout,
    inference_mode=False,
    bias="none",
    task_type="CAUSAL_LM",
)
The LoraConfig appears to be a configuration object for the LoRA setup. Here’s the breakdown of the parameters:
r: This is the LoRA attention dimension which we initialized earlier withlora_r.lora_alpha: This is the scaling factor for LoRA, which we initialized earlier.lora_dropout: Represents the dropout probability for the LoRA mechanism.inference_mode: This boolean value (TrueorFalse) indicates if the model is in inference mode. In the given code, it is set toFalse, meaning it's not in inference mode and might be in training mode.bias: It seems to determine the type of bias used in the mechanism. In this code, it is set to "none", which suggests that no additional bias is being used.task_type: This indicates the type of task for which the configuration is set. "CAUSAL_LM" suggests that the task is a causal language modeling task.
Training Loop
Building on our prior discussion of the LoRA configuration, which dealt with setting up the foundational parameters for attention mechanisms in neural networks, we now delve into the broader training architecture. This encompasses computation precision, optimization techniques, batching strategies, and more. Such intricate details play a pivotal role in ensuring the efficient training of deep learning models. Each parameter is a building block that can greatly influence training outcomes, from deciding the model’s learning rate to choosing how often to log progress. By meticulously configuring these aspects, we’re better poised to harness the capabilities of the underlying LoRA mechanism.
let’s first output_dir and final_checkpoint_dir in order to save training results (like model weights, logs, etc.), and the final model checkpoint will be saved after training.
output_dir = "./results"
final_checkpoint_dir = os.path.join(output_dir, "final_checkpoint")
Now, let’s add some of the training parameters:
num_train_epochs = 1
max_steps = -1
bf16 = False
fp16 = True
per_device_train_batch_size = 4
per_device_eval_batch_size = 4
gradient_accumulation_steps = 1
max_grad_norm = 0.3
optim = "paged_adamw_32bit"
learning_rate = 4e-5
lr_scheduler_type = "constant"
warmup_ratio = 0.03
weight_decay = 0.001
group_by_length = True
gradient_checkpointing = True
save_steps = 50
logging_steps = 10
Here is the summary of the above variables:
num_train_epochs: This variable specifies the number of times the model will iterate over the entire dataset during training. e.g.,num_train_epochs = 1means the model will go through the entire dataset once.max_steps: This determines the number of training steps the model should undergo. A value of-1means it's unset, and the training will be determined bynum_train_epochs. If set to a positive value, it will overridenum_train_epochs.bf16: This is a boolean variable that indicates whether bfloat16 (BF16) precision should be used during training. BF16 is a numerical format primarily used in TPUs.fp16: A boolean variable determining if float16 (FP16) precision should be used. Usingfp16reduces memory consumption and can speed up the training process.per_device_train_batch_size: This represents the number of samples in a training batch for a single device.per_device_eval_batch_size: It indicates the number of samples in an evaluation batch for a single device.gradient_accumulation_steps: Represents the number of steps during which gradients are accumulated before they're updated. This is particularly useful when a large batch size doesn’t fit into memory.max_grad_norm: This acts as a threshold for gradient clipping. Gradient clipping can prevent the undesirable effect of exploding gradients.optim: This variable specifies the type of optimizer used during training.learning_rate: Represents the initial learning rate set for the optimizer.lr_scheduler_type: This determines the kind of learning rate scheduler to use. The scheduler dictates how the learning rate should change or adjust over time.warmup_ratio: It's the fraction of the total training steps used for a learning rate warm-up phase.weight_decay: This regularization technique penalizes large weights, preventing the model from overfitting.group_by_length: If set toTrue, sequences in a batch that have similar lengths are grouped together. This can enhance efficiency because there’s less padding needed.gradient_checkpointing: When enabled, this can save memory by trading off computation time during training.save_steps: Determines how many training steps a model checkpoint should be saved.logging_steps: Sets the frequency of logging information during the training process.
Now we can define TrainingArguments object that aggregates all the configurations for training.
training_arguments = TrainingArguments(
    output_dir=output_dir,
    per_device_train_batch_size=per_device_train_batch_size,
    gradient_accumulation_steps=gradient_accumulation_steps,
    optim=optim,
    save_steps=save_steps,
    logging_steps=logging_steps,
    learning_rate=learning_rate,
    num_train_epochs=num_train_epochs,
    weight_decay=weight_decay,
    fp16=fp16,
    bf16=bf16,
    max_grad_norm=max_grad_norm,
    max_steps=max_steps,
    warmup_ratio=warmup_ratio,
    group_by_length=group_by_length,
    lr_scheduler_type=lr_scheduler_type,
    report_to="tensorboard",
)
The parameters passed to it correspond to the settings defined above. reports_to = “tensorboard”ensures that training metrics are logged and can be visualized using TensorBoard. We also need to define max_seq_length and packing:
max_seq_length = None
packing = Falsemax_seq_length: Defines the maximum number of tokens the model can handle in a sequence. When set to None, it implies that there's no preset limit, and it might use the default limit of the model or process sequences of any length present in the dataset.packing: A boolean flag that indicates whether shorter sequences should be packed together to form an input of maximum sequence length. This is done to efficiently utilize memory and speed up the training process.
Training
Having established the importance of training configurations in our preceding discussion, the next step is to see how data handling and the actual training process are managed. As we advance deeper into the neural network’s structure and interactions with data, parameters like sequence length and data packing play pivotal roles.
Now, we can define SFTTrainer using above defined parameters:
# Set the supervised fine-tuning parameters
trainer = SFTTrainer(
    model=model,
    train_dataset=dataset,
    peft_config=peft_config,
    dataset_text_field="text",
    max_seq_length=max_seq_length,
    tokenizer=tokenizer,
    args=training_arguments,
    packing=packing,
)
The SFTTrainer seems to be a specific trainer for supervised fine-tuning.
Parameters passed to the SFTTrainer:
model: The actual neural network model to be trained.train_dataset: The dataset used for training the model.peft_config: The LoRA configuration that we defined earlier.dataset_text_field: Specifies which field in the dataset contains the text data.max_seq_length: Maximum number of tokens in a sequence for processing.tokenizer: Used to tokenize the input text data.args: The training configurations are defined in training_arguments.packing: Whether or not to pack shorter sequences together.
If training was previously interrupted, this can be set to the path of a saved checkpoint. The training will then resume from that checkpoint. We set it to
None
resume_checkpoint = NoneNow we set the logging level to “info” to see important messages during training.
transformers.logging.set_verbosity_info()
Now we can use .train to train the model. The training method starts the training process using the given checkpoint if provided by passing resume_checkpoint.
trainer.train(resume_checkpoint)
**** Running training *****
  Num examples = 3,000
  Num Epochs = 1
  Instantaneous batch size per device = 4
  Total train batch size (w. parallel, distributed & accumulation) = 4
  Gradient Accumulation steps = 1
  Total optimization steps = 750
  Number of trainable parameters = 33,554,432
You're using a LlamaTokenizerFast tokenizer. Please note that with a fast tokenizer, using the `__call__` method is faster than using a method to encode the text followed by a call to the `pad` method to get a padded encoding.
 [750/750 49:59, Epoch 1/1]
Saving the Model
After training, the model is saved to the specified directory final_checkpoint_dir, which we defined in the earlier section.
trainer.save_model(final_checkpoint_dir)
Saving model checkpoint to ./results/final_checkpoint
tokenizer config file saved in ./results/final_checkpoint/tokenizer_config.json
Special tokens file saved in ./results/final_checkpoint/special_tokens_map.json
after meticulously setting up and executing the training process, we now focus on safeguarding our results and maintaining the health of our environment. The above operations highlight the importance of data backup, visualization for better understanding, and system hygiene in the machine learning workflow.
Let’s create a directory in the Google Drive:
import os

path = "drive/MyDrive/Colab Notebooks/llama-2-fine-tunning/results-aug29"
os.makedirs(path, exist_ok=True)
After training, it’s crucial to back up the model, especially if you’re using temporary environments like Google Colab. This command copies the trained model (stored in the final_checkpoint folder) to the newly created directory in Google Drive.
import shutil
import os

source_path = "./results/final_checkpoint"
destination_path = "drive/MyDrive/Colab Notebooks/llama-2-fine-tunning/results-aug29/final_checkpoint"

# Ensure the destination directory exists
os.makedirs(os.path.dirname(destination_path), exist_ok=True)

# Copy the directory
shutil.copytree(source_path, destination_path)
Now let’s load TensorBoard Extensions:
%load_ext tensorboard
%reload_ext tensorboard
%tensorboard --logdir results/runs
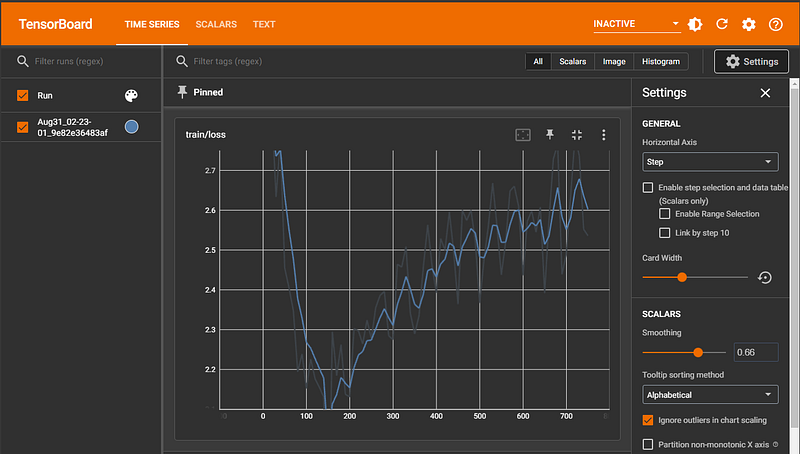
These commands visualize training metrics using TensorBoard within the Colab notebook.
%load_ext tensorboard: Loads the TensorBoard extension for Jupyter/Colab.%reload_ext tensorboard: Reloads the TensorBoard extension, useful if there were updates or if it was previously unloaded.%tensorboard --logdir results/runs: Launches TensorBoard and specifies the directory where the logs are stored (results/runs).
Load and export the fine-tuned model
To check the model, we could restart the run-time and run the below cells. After restarting, we might need to do some of these steps again:
- Connect to the drive to save the model:
from google.colab import drive
drive.mount('/content/drive')- Then we need to install some libraries:
%%capture
!pip install -q accelerate==0.21.0 peft==0.4.0 bitsandbytes==0.40.2 transformers==4.31.0 trl==0.4.7 tensorboard huggingface_hub[cli] xformers- Hugging Face login
!huggingface-cli login
_|    _|  _|    _|    _|_|_|    _|_|_|  _|_|_|  _|      _|    _|_|_|      _|_|_|_|    _|_|      _|_|_|  _|_|_|_|
    _|    _|  _|    _|  _|        _|          _|    _|_|    _|  _|            _|        _|    _|  _|        _|
    _|_|_|_|  _|    _|  _|  _|_|  _|  _|_|    _|    _|  _|  _|  _|  _|_|      _|_|_|    _|_|_|_|  _|        _|_|_|
    _|    _|  _|    _|  _|    _|  _|    _|    _|    _|    _|_|  _|    _|      _|        _|    _|  _|        _|
    _|    _|    _|_|      _|_|_|    _|_|_|  _|_|_|  _|      _|    _|_|_|      _|        _|    _|    _|_|_|  _|_|_|_|

    To login, `huggingface_hub` requires a token generated from https://huggingface.co/settings/tokens .
Token:
Add token as git credential? (Y/n) n
Token is valid (permission: read).
Your token has been saved to /root/.cache/huggingface/token
Login successful- Importing Dependencies:
import os
import torch
from datasets import load_dataset
from transformers import (
    AutoConfig,
    AutoModelForCausalLM,
    AutoTokenizer,
    BitsAndBytesConfig,
    HfArgumentParser,
    TrainingArguments,
    pipeline,
    logging
)
from peft import LoraConfig
from trl import SFTTrainer
import transformers
Now let’s copy the saved model to temporary on our runtime:
import shutil

source_path = 'drive/MyDrive/Colab Notebooks/llama-2-fine-tunning/results-aug29'
destination_path = './results/results-aug29'

shutil.copytree(source_path, destination_path)
Now, let’s load the model and merge it with the based model:
import os
from peft import AutoPeftModelForCausalLM
import torch
from transformers import AutoTokenizer

output_dir = "./results/results-aug29"

# Where to load model results
final_checkpoint_dir = os.path.join(output_dir, "final_checkpoint")

# Load the entire model on the GPU 0
device_map = {"": 0}
reloaded_model = AutoPeftModelForCausalLM.from_pretrained(
    final_checkpoint_dir,
    low_cpu_mem_usage=True,
    return_dict=True,
    torch_dtype=torch.float16,
    device_map=device_map,
)
reloaded_tokenizer = AutoTokenizer.from_pretrained(final_checkpoint_dir)

# Merge the LoRA and the base model
merged_model = reloaded_model.merge_and_unload()
The trained model is loaded from the checkpoint directory using the AutoPeftModelForCausalLM class. The dlow_cpu_mem_usage flag indicates that the model should use minimal CPU memory, and cache_dir specifies where the cache should be located. Just like the model, the tokenizer used for the model is also loaded. The tokenizer is essential for converting text data into a format the model can understand.
Post-training, the LoRA (localized random attention) and the base model might exist as separate entities. This step merges them into a unified model often required for deployment or further use. For inference, we can use this code:
# Create a text generation pipelinewhich use the merged_model and the tokenizer loaded
reloaded_generator = pipeline(task="text-generation", model=merged_model, tokenizer=reloaded_tokenizer)
Now, we can save the final model and copy it to our Google Drive:
# Save the merged model
merged_dir = os.path.join(output_dir, "final_merged_checkpoint")
merged_model.save_pretrained(merged_dir)
reloaded_tokenizer.save_pretrained(merged_dir)

source_path = final_checkpoint_dir
destination_path = 'drive/MyDrive/Colab Notebooks/llama-2-fine-tunning/results-guanaco-2k-aug29/final_merged_checkpoint'

shutil.copytree(source_path, destination_path)
We could push the model to Hugging Face Hub if you want:
hf_repo = "llama-2-7b-chat-hf-instruct-medical-assistance"
merged_model.push_to_hub(hf_repo, max_shard_size="4GB")
Conclusions
Fine-tuning large language models presents a unique set of challenges, particularly when system constraints come into play. However, we can circumvent these challenges with innovative techniques like quantization, LoRA, and QLoRA. Adapting the Llama 2–7B model to a patient-doctor interaction scenario underscores the versatility and potential of these models. By employing tailored training configurations and leveraging specific datasets, we can harness the power of large models in niche domains.
Thank you for reading my post, and I hope it was useful for you. If you enjoyed the article and would like to show your support, please consider taking the following actions:
- 📚 If you found value in my articles and would like to support my work, consider buying me a book: Buy me a book
- 👏 Show your support by giving the article a clap, enhancing its visibility.
- 📖 Stay updated with my latest pieces by Follow Now.
- 🔔 Don’t miss out on my new posts. Subscribe to the newsletter.
- 🛎 For more regular updates, connect with me on LinkedIn.


