
Mapbox with React Native

Building a MapBox Integration in React Native: Step-by-Step Guide
What is MapBox:
Mapbox is a mapping platform that provides developers with tools and services to integrate interactive maps into their applications. It offers a wide range of features, including map rendering, geocoding, routing, and custom styling.
Why to use:
- Mapbox provides powerful map rendering capabilities, allowing you to display maps with various layers, markers, and overlays. Users can interact with the maps by zooming, panning, and tapping on markers.
- Mapbox allows you to create visually stunning and personalized maps by customizing the map styles, colors, and themes. Also you can define your own map layers.
- Mapbox provides geocoding services that enable you to convert addresses or place names into geographics coordinates and vice versa.
- You can calculate routes and provide turn-by-turn directions to help users navigate from one location to another.
In this tutorial, we will explore how to integrate Mapbox into a React Native application. Mapboc is a powerful mapping platform that provides a wide range of features and customization options. By the end of this tutorial, you will be able to display maps, and markers, and customize the appearance of your maps using Mapbox in your React Native app.
Follow Step:
To follow along with this tutorial, you should have a basic understanding of React Native and have a development environment setup.
Step 1: Setup Mambox Account and obtain Access Token:
Before we begin, you need to create a Mapbox account and obtain an access token. Visit the Mapbox website https://www.mapbox.com/ and sign up for a free account. Once you have an account, navigate to your account settings and locate your access token.
Step 2: Install Dependencies:
Install the required dependencies by running the following command:
npm install @react-native-mapbox-gl/maps
Step 3: Setup Mapbox Configuration:
Create a file named ‘MapboxConfig.ts’ in the root of your project. Add the following code to the file:

Replace ‘YOUR_MAPBOX_ACCESS_TOKEN’ with the access token you obtained from the Mapbox website.
Step 4: Initialize Mapbox in your App:
Open ‘App.tsx’ and import the necessary Components:

In the ‘App’ component, add the following code:

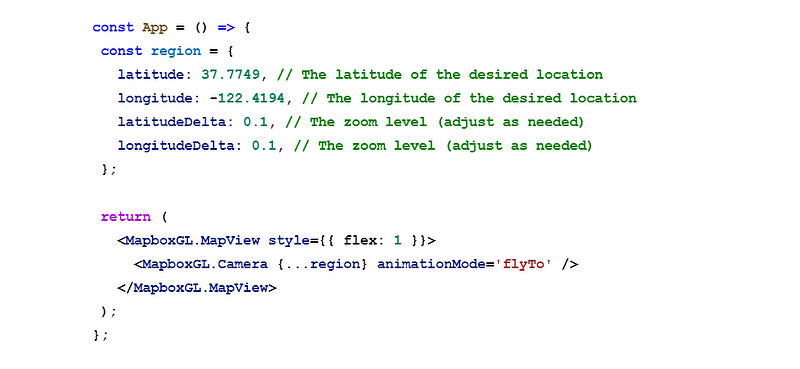
Step 5: Display a Map:
To display a map, you need to define a region and provide a style URL. Modify the ‘App’ component as follows:
Step 6: Add Markers:
To add markers to the map, modify the ‘App’ component as follows:

Step 9: Customize Map Styling:
To customize the appearance of your map, you can specify a style URL. Mapbox provides various predefined styles, or you can use a custom style. Modify the ‘App’ component as follows:

Let’s start some advance level
Custom Map Layers:
Mapbox allows you to create and display custom map layers on top of the base map. Here’s an example of how to add a custom layer using GeoJSON data:


Now, You have learned how to implement custom map layers, enhance user interactions, visualize dynamic data, and enable offline maps. These examples provide a solid foundation to explore the advanced capabilities of Mapbox in your React Native applications.
If you have any queries regarding React Native App, Hire React Native App Developers India from us.


